

Openharmony - 基于ArkUI(TS)开发颜色选择器
source link: https://blog.51cto.com/harmonyos/5535940
Go to the source link to view the article. You can view the picture content, updated content and better typesetting reading experience. If the link is broken, please click the button below to view the snapshot at that time.

作者:梁青松
本项目基于 OpenHarmony的ArkUI框架:TS扩展的声明式开发范式,关于语法和概念直接看官网官方文档地址: 基于TS扩展的声明式开发范式,因为OpenHarmony的API相对于HarmonyOS的API,功能上比较完善和成熟的,有些新的技术也早早接触到,所以本项目直接使用OpenHarmony SDK开发。
工具版本: DevEco Studio 3.0 Beta4
SDK版本: 3.1.6.6(API Version 8 Release)
项目功能: 常见的颜色选择器,使用颜色条滑动选择主色调,更改颜色面板的颜色,并触摸选择颜色。

主要API
画布组件canvas:画布组件,用于自定义绘制图形。
| 方法/属性 | 解释 |
|---|---|
| createLinearGradient() | 创建一个线性渐变色 |
| addColorStop() | 设置渐变颜色和比例 |
| getImageData() | 获取坐标点像素的颜色值 |
| fillRect() | 填充一个矩形 |
| clearRect() | 清空画布 |
| fillStyle | 属性:指定绘制的填充色 |
1. 绘制颜色条
使用createLinearGradient()方法创建一个从上至下的线性渐变色。
代码片段
  /**
   * 颜色条
   */
  @Builder ColorBar() {
    Canvas(this.crcBar)
      .onAreaChange((oldValue: Area, newValue: Area) => {
        // 获取组件的宽高
        this.barWidth = parseInt(newValue.width.toString())
        this.barHeight = parseInt(newValue.height.toString())
        this.barIndicatorSize = this.barWidth / 3
        // 创建渐变色的范围
        const grad = this.crcBar.createLinearGradient(0, 0, 0, this.barHeight)
        // 设置渐变颜色和比例。
        grad.addColorStop(0, 'rgb(255, 0, 0)')
        grad.addColorStop(1 * 1 / 6, 'rgb(255, 255, 0)')
        grad.addColorStop(2 * 1 / 6, 'rgb(0, 255, 0)')
        grad.addColorStop(3 * 1 / 6, 'rgb(0, 255, 255)')
        grad.addColorStop(4 * 1 / 6, 'rgb(0, 0, 255)')
        grad.addColorStop(5 * 1 / 6, 'rgb(255, 0, 255)')
        grad.addColorStop(1, 'rgb(255, 0, 0)')
        // 设置渐变色
        this.crcBar.fillStyle = grad
        // 绘制矩形
        this.crcBar.fillRect(0, 0, this.barWidth, this.barHeight)
      }).width('100%')
      .borderWidth(0.5)
  }
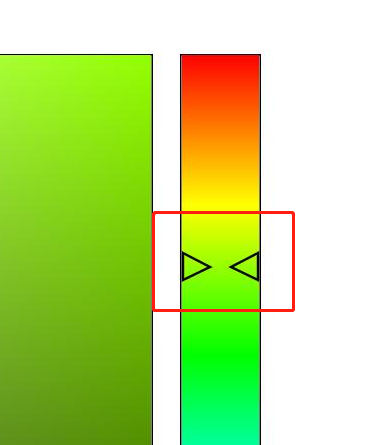
2. 绘制颜色条指示器
使用 Path绘制组件 :绘制两个相对的三角形,作为颜色条指示器。
代码片段
  /**
   * 颜色条指示器
   */
  @Builder ColorBarIndicator() {
    Row() {
      if (this.barIndicatorSize != 0) {
        Path()
          .width(this.barIndicatorSize)
          .height(this.barIndicatorSize)
          .commands(`M0 0 L${vp2px(this.barIndicatorSize)} ${vp2px(this.barIndicatorSize / 2)} L0 ${vp2px(this.barIndicatorSize)} Z`)
          .fill('#00000000')
          .stroke(Color.Black)
          .strokeWidth(0.8)

        Blank()

        Path()
          .width(this.barIndicatorSize)
          .height(this.barIndicatorSize)
          .commands(`M0 ${vp2px(this.barIndicatorSize / 2)} L${vp2px(this.barIndicatorSize)} 0 L${vp2px(this.barIndicatorSize)} ${vp2px(this.barIndicatorSize)} Z`)
          .fill('#00000000')
          .stroke(Color.Black)
          .strokeWidth(0.8)
      }
    }.width('100%')
    .padding(1)
    .offset({ y: this.barIndicatorOffsetY })
    .markAnchor({ y: '50%' })
  }
3. 颜色条滑动选择颜色
设置颜色条的触摸事件,根据坐标点,调用getImageData()方法获取触摸坐标点像素的颜色值。并更新颜色条指示器的Y轴位置。
代码片段
  /**
   * 颜色条触摸事件
   */
  onTouchEventBar(event: TouchEvent) {
    // x坐标
    let x = event.touches[0].x
    // y坐标
    let y = event.touches[0].y
    // 触摸区域限制
    if (x < 0)x = 0
    if (x > this.barWidth - 1.2) x = this.barWidth - 1.2
    if (y < 1)y = 1
    if (y > this.barHeight - 1.2) y = this.barHeight - 1.2
    console.log(`颜色条-当前坐标:x = ${x}, y = ${y}`)
    // 触摸y坐标赋值给指示器偏移量
    this.barIndicatorOffsetY = y
    // 获取颜色条坐标点一个像素的颜色值
    let imageData = this.crcBar.getImageData(x, y, px2vp(1), px2vp(1))
    console.log(`颜色条-当前颜色:` + JSON.stringify(imageData))
    // 绘制颜色面板
        		   this.drawColorBoard(`rgb(${imageData.data[0]},${imageData.data[1]},${imageData.data[2]})`)
    // 获取颜色面板选中的颜色
    this.getBoardSelectColor()
  }
4. 绘制颜色面板
使用fillRect()绘制背景矩形,在其之上绘制:从左至右,白色–>透明渐变色,最后绘制:从下至上,黑色–>透明渐变色。
  /**
   * 绘制颜色面板
   * @param bgColor 背景颜色 默认颜色:红色
   */
  drawColorBoard(bgColor = 'rgb(255, 0, 0)') {
    // 清空画布
    this.crcBoard.clearRect(0, 0, this.boardWidth, this.boardHeight)

    // 绘制背景色
    this.crcBoard.fillStyle = bgColor
    this.crcBoard.fillRect(0, 0, this.boardWidth, this.boardHeight)

    // 绘制渐变色:白色->透明色
    const gradWhite = this.crcBoard.createLinearGradient(0, 0, this.boardWidth, 0)
    gradWhite.addColorStop(0, 'rgb(255,255,255)')
    gradWhite.addColorStop(1, 'rgba(255,255,255,0)')
    this.crcBoard.fillStyle = gradWhite
    this.crcBoard.fillRect(0, 0, this.boardWidth, this.boardHeight)

    // 绘制渐变色:黑色->透明色
    const gradBlack = this.crcBoard.createLinearGradient(0, this.boardHeight, 0, 0)
    gradBlack.addColorStop(0, 'rgb(0,0,0)')
    gradBlack.addColorStop(1, 'rgba(0,0,0,0)')
    this.crcBoard.fillStyle = gradBlack
    this.crcBoard.fillRect(0, 0, this.boardWidth, this.boardHeight)
  }
5. 绘制颜色面板指示器
这个很简单,就是组件设置边框和圆角,圆角半径为宽高一半为圆形,大圆套小圆
  /**
   * 颜色面板指示器
   */
  @Builder ColorBoardIndicator() {
    if (this.boardIndicatorSize != 0) {
      Stack() {
        Stack() {
        }
        .width(this.boardIndicatorSize - 1)
        .height(this.boardIndicatorSize - 1)
        .border({ color: Color.White, width: 1, radius: this.boardIndicatorSize / 2 })

        Stack() {
        }
        .width(this.boardIndicatorSize)
        .height(this.boardIndicatorSize)
        .border({ color: Color.Black, width: 1, radius: this.boardIndicatorSize / 2 })
      }.offset({ x: this.boardIndicatorOffsetX, y: this.boardIndicatorOffsetY })
      .markAnchor({ x: '50%', y: '50%' })
    }
  }
6. 颜色面板触摸选择颜色
设置颜色条的触摸事件,根据坐标点,调用getImageData()方法获取触摸坐标点像素的颜色值。并更新颜色面板指示器的的XY位置。(代码片段)
  /**
   * 颜色面板触摸事件
   */
  onTouchEventBoard(event: TouchEvent) {
    // x坐标
    let x = event.touches[0].x
    // y坐标
    let y = event.touches[0].y
    // 触摸区域限制
    if (x < 0)x = 0
    if (x > this.boardWidth - 1) x = this.boardWidth - 1
    if (y < 0)y = 0
    if (y > this.boardHeight - 1) y = this.boardHeight - 1
    // 触摸xy坐标赋值给指示器偏移量
    this.boardIndicatorOffsetX = x
    this.boardIndicatorOffsetY = y
    // 获取颜色面板选中的颜色
    this.getBoardSelectColor()
  }
  /**
   * 获取颜色面板选中的颜色
   */
  getBoardSelectColor() {
    console.log(`颜色面板-当前坐标:x = ${this.boardIndicatorOffsetX}, y = ${this.boardIndicatorOffsetY}`)
    // 获取坐标点一个像素的颜色值
    let imageData = this.crcBoard.getImageData(this.boardIndicatorOffsetX, this.boardIndicatorOffsetY, px2vp(1), px2vp(1))
    console.log(`颜色面板-当前颜色:` + JSON.stringify(imageData))
    this.colorChange(`rgb(${imageData.data[0]},${imageData.data[1]},${imageData.data[2]})`)
  }
7. 外部调用
界面加载成功后,ColorPickerView组件提供一个方法回调。直接在回调中获取颜色变化。来更新数据。
import { ColorPickerView } from '../component/ColorPicker'

@Entry
@Component
struct Index {
  @State color: string = 'rgb(255, 0, 0)'

  build() {
    Column() {
      Text('Hello World')
        .fontSize(40)
        .fontWeight(FontWeight.Bold)
        .fontColor(this.color)

      Stack() {
        ColorPickerView({
          colorChange: (color) => {
            this.color = color
          }
        })
      }.width(300)
      .height(300)
      .margin({ top: 30 })

    }.width('100%')
    .height('100%')
    .justifyContent(FlexAlign.Center)
  }
}
本项目没有什么特别难的点,主要还是熟悉API,多看官方文档,多看一些优秀的项目,只有把原理掌握到自己手上才是王道。
每天进步一点点、需要付出努力亿点点。
项目地址: ArkUI(TS)声明式开发:颜色选择器
更多原创内容请关注: 中软国际 HarmonyOS 技术团队
入门到精通、技巧到案例,系统化分享HarmonyOS开发技术,欢迎投稿和订阅,让我们一起携手前行共建鸿蒙生态。
Recommend
-
5
【甜甜酱OH实践】OpenHarmony ArkUI实现Web API Drag拖拽效果-51CTO.COM 【甜甜酱OH实践】OpenHarmony ArkUI实现Web API Drag拖拽效果 原创 作者:拓维信息...
-
7
OpenHarmony - ArkUI基于JSAPI实现的360°全景展示-51CTO.COM OpenHarmony - ArkUI基于JSAPI实现的360°全景展示 作者:中软HOS小鸿 2022-05-27 14:55:34 基于canvas画布,通过绘制一个3...
-
10
ArkUI(ETS) 自定义图片查看组件-51CTO.COM OpenHarmony - ArkUI(ETS) 自定义图片查看组件 作者:王国菊 2022-05-26 14:50:15 今日分享的组件由subsampling-scale-image-view+swipe...
-
6
OpenHarmony - ArkUI(TS)开发翻页时钟 作者:梁青松 2022-07-20 15:32:25 时钟翻页效果,用到四个Text组件,使用堆叠容器Stack,底层:用到两个裁剪过后的Text上下显示;顶层:也是用两个裁剪后的Text做动画...
-
3
作者:梁青松 本文正在参加星光计划3.0–夏日挑战赛 本项目基于
-
4
想了解更多关于开源的内容,请访问:...
-
4
OpenHarmony- 基于ArkUI (JS)实现数字排序小游戏-51CTO.COM OpenHarmony- 基于ArkUI (JS)实现数字排序小游戏 作者:82王先生 2022-08-04 13:55:08 拼数字小游戏其实是借鉴了很多...
-
2
想了解更多关于开源的内容,请访问:...
-
6
作者:张呈 WIFI是大家日常必不可少需求,在OpenHarmony的开发中,系统提供了一系列完整的API,在万物互联的这个概念下,相信涉及到wifi功能操作的需求会越来越多,今日分享的是用ets来实现简单的wifi连接操作,可以实现扫描设备附近的wifi并进行连接,结合...
-
2
OpenHarmony - 基于 ArkUI(JS)实现图案解锁组件(一) 推荐 原创 作者:杨尚晓 Ope...
About Joyk
Aggregate valuable and interesting links.
Joyk means Joy of geeK