

OpenHarmony - 基于 ArkUI(JS)实现图案解锁组件(一)
source link: https://blog.51cto.com/harmonyos/5680036
Go to the source link to view the article. You can view the picture content, updated content and better typesetting reading experience. If the link is broken, please click the button below to view the snapshot at that time.

OpenHarmony - 基于 ArkUI(JS)实现图案解锁组件(一)
推荐 原创作者:杨尚晓
Openharmony作为我们国内开源系统,并且以js/ets最为开发语言,完全抛弃了java。作为一名前端开发人员,也需要为咱们国产系统壮大起来,所以贡献一份微薄之力。😄😄
ohos-pattern是一个解锁功能的组件,是基于openharmony AkrUI(JS)实现的。在手机指纹解锁还没来临之前,图案解锁是一个很热门的功能,包括数字解锁。不过现在也还很多应用场景中有使用到图案解锁和数字解锁的功能。本文图案解锁仅仅只是实现UI层面,并不涉及到加密解密的的方式。这个可以二次开发使用。
本文为第一篇,后续会更新加入数字解锁功能,如果后续能涉及到生物识别API,还会加入指纹解锁等三种解锁方式。
- 开发工具:DevEco Studio 3.0 Beta4
- SDK版本:3.1.6.6(API Version 8)
- 主要组件:canvas
| 属性名 | 类型 | 默认值 | 作用 |
|---|---|---|---|
| radius | Number | 5 | 密码点半径[5-20] |
| scope | Number | 20 | 热区范围[20-40] |
| point-color | String | #383838 | 密码点内颜色 |
| point-stroke-color | String | #ff9800 | 密码点边框颜色 |
| active-color | String | #ff9800 | 激活密码点颜色 |
| line-color | String | #1a73e8 | 密码线颜色 |
| active-line-color | String | #04be02 | 激活密码线颜色 |
| is-show-line | Boolean | true | 是否显示密码线 |
| 属性名 | 类型 | 返回值 | 备注 |
|---|---|---|---|
| result-cb | Function | Array | 返回密码结果 |
<element name="ohos-pattern" src="../../common/component/ohosPattern/ohosPattern"></element>
<div class="container">
  <ohos-pattern
      radius="{{radius}}"
      scope="{{scope}}"
      point-color="{{pointColor}}"
      point-stroke-color="{{pointStrokeColor}}"
      active-color="{{activeColor}}"
      line-color="{{lineColor}}"
      active-line-color="{{activeLineColor}}"
      is-show-line="{{isShowLine}}"
  ></ohos-pattern>
</div>
实现思路比较简单,使用canvas绘制九个密码点,然后通过监听手势触摸和9个密码点的碰撞产生密码数据
- 创建canvas
- 绘制9个密码点
- 绘制可控区域(就是密码点跟随手指一动区域)
1. 创建canvas
创建canvas元素,并且绑定touchstart,touchmove,touchend手势事件
<div class="container">
  <canvas
      id="canvas"
      ref="canvas"
      @touchstart="onTouchStart"
      @touchmove="onTouchMove"
      @touchend="onTouchEnd"
      style="width: {{w}}px;height: {{h}}px"
  ></canvas>
</div>
在js中初始化canvas对象
onShow(){
    this.initCanvas();
},
// 初始化画布
initCanvas(){
    const c = this.$refs.canvas;
    this.ctx = c.getContext('2d', { antialias: true });
},
2. 绘制九个密码点
下面看个草图
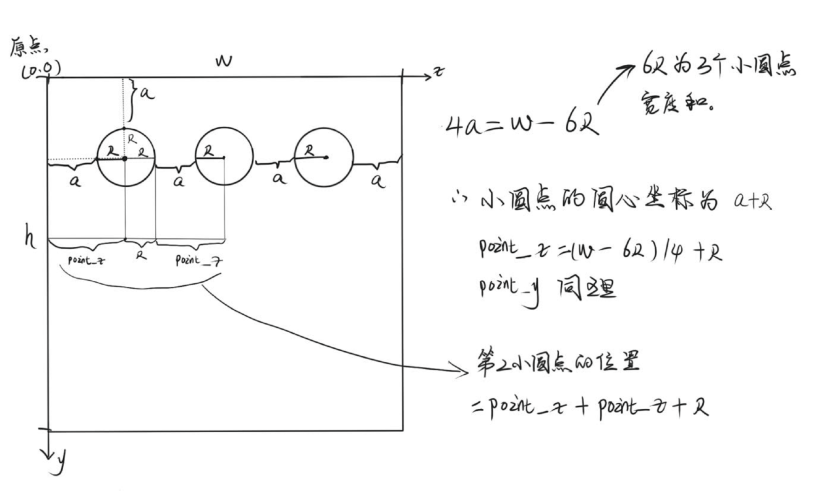
从草图上可以看出我们的密码点位置了,这里使用for循环方法实现,创建3行,每行3个点。
这里有个注意点,因为我们密码点有一个需要跟随手势移动的需求,需要修改point_list的数据,所以使用point_list_copy复制了一份出来,这里使用es6的展开运算符…来实现深拷贝。
// 创建9个密码点
createPoint(){
    let point_x = Math.ceil((this.w - this.R * 6) / 4 + this.R);
    let point_y = Math.ceil((this.h - this.R * 6) / 4 + this.R);
    for (var j = 0; j < 3; j++) {
        for (var i = 0; i < 3; i++) {
            let d = {
                x: point_x * (i + 1) + this.R * i,
                y: point_y * (j + 1) + this.R * j
            }
            this.point_list.push(d);
            this.point_list_copy = [...this.point_list];
            this.drawPoint(d);
        }
    }
},
下面实现将9个密码点到画布上
  // 绘制9个密码点到画布上
  drawPoint(obj) {
    let {x, y} = obj;
    // 绘制外圆环
    this.ctx.beginPath();
    this.ctx.lineCap = "round"; //向线条的每个末端添加圆形线帽
    this.ctx.lineWidth = (this.R / 2);  //绘制圆的边框
    this.ctx.strokeStyle = '#ff9800'; //绘制边框的颜色
    this.ctx.arc(x, y, this.R, 0, 2 * Math.PI);
    this.ctx.stroke();
    this.ctx.closePath();

    // 绘制内圆
    this.ctx.beginPath();
    this.ctx.arc(x, y, this.R, 0, 2 * Math.PI);
    this.ctx.fillStyle = "#383838";
    this.ctx.fill();
    this.ctx.closePath();
  },
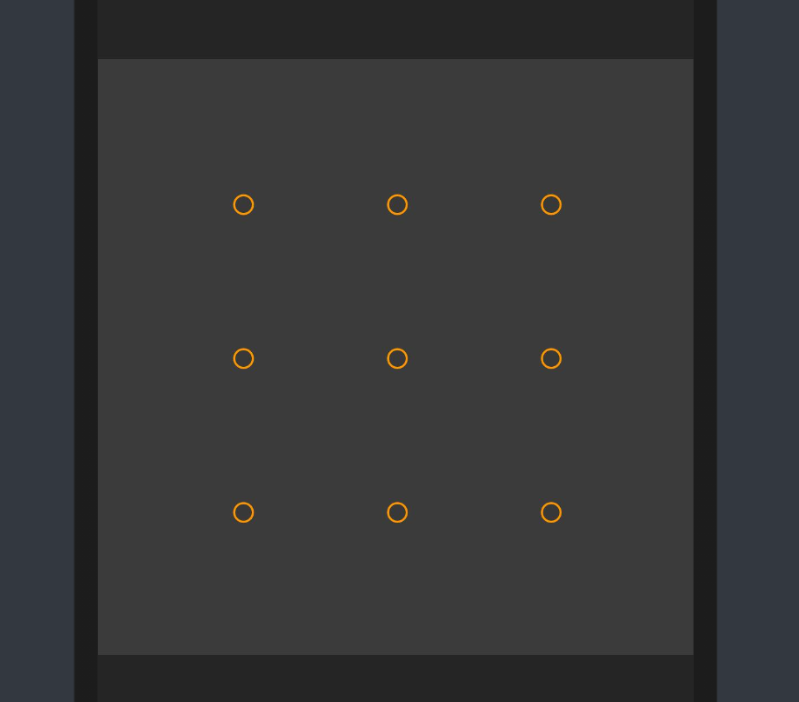
下面来看看绘制后的效果
3. 监听手势和密码点的碰撞
我们写了三个手势事件
- 触摸开始 onTouchStart
- 触摸变化 onTouchMove
- 触摸结束 onTouchEnd
  onTouchStart(e){
    let x = e.touches[0].localX;
    let y = e.touches[0].localY;
    this.isCollision(x, y)
  },
  onTouchMove(e){
    let x = e.touches[0].localX;
    let y = e.touches[0].localY;
    this.isCollision(x, y);
    // 每次触摸后都需要清除画布重新绘制
    this.ctx.clearRect(0, 0, this.w, this.h);
    this.reDraw(x, y, true);
  },
  onTouchEnd(e){
    this.ctx.clearRect(0, 0, this.w, this.h);
    this.reDraw(e.touches[0].clientX, e.touches[0].clientY, false);
    // 松开手后,记录所有触摸的点
    lg.log('图案结果:',this.result)
    this.result = [];
  },
  // 重绘
  reDraw(x, y, bol) {
    for (let i in this.point_list) {
      // 重新绘制9个密码点
      this.drawPoint(this.point_list[i]);
    }
    for (let i in this.result) {
      // 重新绘制密码状态
      this.drawStatus(this.result[i]);
    }

  },
监听手势触摸是否和密码点发生碰撞
this.scope表示热区范围,当触摸点进入这个热区范围,说明已经跟该密码点发生接触碰撞了
  // 是否跟9个密码点发生接触。
  isCollision(x, y) {
    let c_x, c_y;
    for (let i in this.point_list) {
      c_x = Math.abs(x - this.point_list[i].x);
      c_y = Math.abs(y - this.point_list[i].y);
      // 如果发生碰撞,记录状态
      if (c_x < this.scope && c_y < this.scope) {
        lg.warn('发生了碰撞,碰撞点是:', i)
        this.drawStatus(i)
        return
      }
    }
  },
当触摸点和密码点发生碰撞之后,需要给该密码点绘制触摸状态
//  绘制触摸到密码点的状态
drawStatus(index) {
  // 绘制状态内圆
  this.ctx.beginPath();
  this.ctx.arc(this.point_list[index].x, this.point_list[index].y, (this.R / 2), 0, 2 * Math.PI);
  this.ctx.fillStyle = "#ac2dfb";
  this.ctx.fill();
  this.ctx.closePath();

  //记录缓存碰撞的结果
  if(this.result.indexOf(index) === -1){
    this.result.push(index)
  }
},
下面看看效果
但是这样还不够,我们能还需要绘制连接的密码线
4. 绘制密码线
在重绘方法里最顶端加入绘制密码线方法
this.drawLine(this.result, x, y, bol);
绘制密码线方法
这里需要绘制两条线:
- 一条是跟随触摸移动的线
- 一条是已经存在两点之间的线
drawLine(arr, x, y, bol) {
  if(arr.length === 0){
    return;
  }
  // 当存在已经两个点的时候,两点直线形成连线
  this.ctx.beginPath();
  for (let i in arr) {
    if (i == 0) {
      this.ctx.moveTo(this.point_list[arr[i]].x, this.point_list[arr[i]].y);
    } else {
      this.ctx.lineTo(this.point_list[arr[i]].x, this.point_list[arr[i]].y);
    }
  }
  this.ctx.strokeStyle = '#1a73e8';
  this.ctx.lineWidth = (this.R / 2);
  this.ctx.stroke();

  // 跟着手机滑动的线条
  if (bol) {
    this.ctx.beginPath();
    this.ctx.moveTo(this.point_list[arr[arr.length - 1]].x, this.point_list[arr[arr.length - 1]].y);
    this.ctx.lineTo(x, y);
    this.ctx.strokeStyle = '#04be02';
    this.ctx.lineWidth = (this.R / 2);
    this.ctx.stroke();
  }
},
好了,下面我们看看加上密码线的效果
5. 实现可移动的密码点
优化体验,增加了密码点跟随手势一起移动的效果。
在重绘的顶部添加绘制可移动的密码点方法
  // 绘制跟随手势移动的密码点
  this.pointAn(x,y,bol);
r_x,r_y表示密码点热区范围,在热区范围内可以将该密码点变为触摸点跟随触摸点一起移动,当触摸点离开了热区之后,密码点回到原来的中心位置。
  // 绘制状态point范围内活动
  pointAn(x, y, bol){
    if(bol){
      if(this.result.length === 0){
        return;
      }
      let t = this.result[this.result.length - 1];
      let r_x = Math.abs(x - this.point_list_copy[t].x);
      let r_y = Math.abs(y - this.point_list_copy[t].y);
      if(r_x < this.scope && r_y < this.scope){
        this.point_list[t] = {x,y}
      } else {
        this.point_list = [...this.point_list_copy];
      }
    } else {
      this.point_list = [...this.point_list_copy];
    }
  },
最后来看看加上热区的效果
到这里,整个基本功能已经实现了。
最后再来看一下最终效果
ohos-pattern 基于OpenHarmony JSAPI实现图案解锁组件
该组件整体实现逻辑都比较简单,主要是通过手势去绘制canvas画布实现的,这里需要注意的是,api version需要7以上,因为在api version 6 之前,存在canvas重绘闪屏的情况,在api 7之后修复了这个问题。相比api 6之前的版本,api8真的优化和修复了很多功能。很期待harmongOS 3.0更新,可以在真机下去体验ets开发的应用。
更多原创内容请关注: 中软国际 HarmonyOS 技术团队
入门到精通、技巧到案例,系统化分享HarmonyOS开发技术,欢迎投稿和订阅,让我们一起携手前行共建鸿蒙生态。
- 打赏
- 赞
- 收藏
- 评论
- 分享
- 举报
Recommend
About Joyk
Aggregate valuable and interesting links.
Joyk means Joy of geeK