

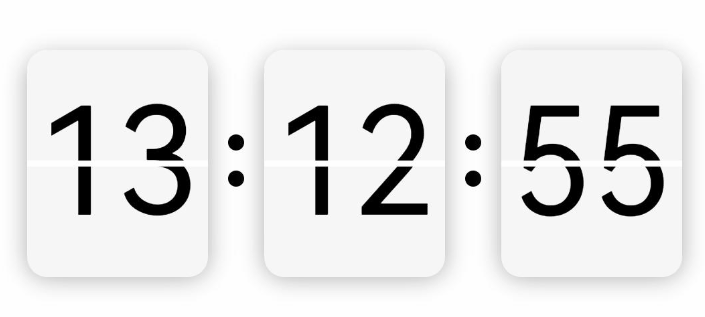
#夏日挑战赛# OpenHarmony - ArkUI(TS)开发翻页时钟
source link: https://blog.51cto.com/harmonyos/5504401
Go to the source link to view the article. You can view the picture content, updated content and better typesetting reading experience. If the link is broken, please click the button below to view the snapshot at that time.

作者:梁青松
本项目基于 OpenHarmony的ArkUI框架:TS扩展的声明式开发范式,关于语法和概念直接看官网官方文档地址: 基于TS扩展的声明式开发范式
工具版本: DevEco Studio 3.0 Beta4
SDK版本: 3.1.6.6(API Version 8 Release)
主要知识点
时钟翻页效果,用到四个Text组件,使用堆叠容器Stack,底层:用到两个裁剪过后的Text上下显示;顶层:也是用两个裁剪后的Text做动画效果,进行X轴角度旋转。
1. 裁剪Text
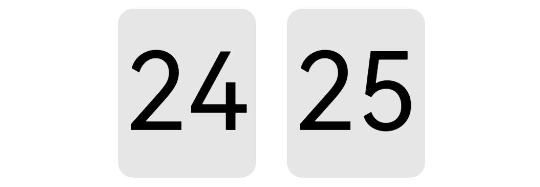

使用形状裁剪属性clip
- 裁剪Text上半部:从坐标(0,0)往下裁剪,clip(new Rect({ width: this.width, height: this.height / 2 }))
- 裁剪Text下半部:从坐标(0,height / 2)往下裁剪,clip(new Path().commands(this.bottomPath))
@Entry
@Component
struct Test {
  private width = 90
  private height = 110
  private fontSize = 70
  private defaultBgColor = '#ffe6e6e6'
  private borderRadius = 10

  // 下半部裁剪路径
  private bottomPath = `M0 ${vp2px(this.height / 2)}
  L${vp2px(this.width)} ${vp2px(this.height / 2)}
  L${vp2px(this.width)} ${vp2px(this.height)}
  L0 ${vp2px(this.height)} Z`

  build() {
    Row() {

      Text('24')
        .width(this.width)
        .height(this.height)
        .fontColor(Color.Black)
        .fontSize(this.fontSize)
        .textAlign(TextAlign.Center)
        .borderRadius(this.borderRadius)
        .backgroundColor(this.defaultBgColor)
        .clip(new Rect({ width: this.width, height: this.height / 2 }))

      Text('25')
        .margin({left:20})
        .width(this.width)
        .height(this.height)
        .fontColor(Color.Black)
        .fontSize(this.fontSize)
        .textAlign(TextAlign.Center)
        .borderRadius(this.borderRadius)
        .backgroundColor(this.defaultBgColor)
        .clip(new Path().commands(this.bottomPath))

    }.width('100%')
    .height('100%')
    .justifyContent(FlexAlign.Center)
  }
}
2. 放入堆叠容器
四个裁剪后的Text放入到堆叠容器中(代码片段)
    Stack() {
      // 底层文字上部
      Text(this.newValue)
        ......
        .clip(new Rect({ width: this.width, height: this.height / 2 }))

      // 底层文字下部
      Text(this.oldValue)
        ......
        .clip(new Path().commands(this.bottomPath))

      // 顶层文字上部动画
      Text(this.oldValue)
        ......
        .clip(new Rect({ width: this.width, height: this.height / 2 }))
        .rotate({ x: 1, centerY: '50%', angle: this.angleTop })

      // 顶层文字下部动画
      Text(this.newValue)
        ......
        .margin({ top: 3 })
        .clip(new Path().commands(this.bottomPath))
        .rotate({ x: 1, centerY: '50%', angle: this.angleBottom })
    }
3. 使用显式动画
先顶层上部的动画,上部旋转角度从0到90停止,接下来执行顶层下部的动画,下部旋转角度从-90到0停止,停止完后重置初始状态,上部旋转角度 = 0、下部旋转角度 = -90(代码片段)
  /**
   * 启动顶层文字上部动画
   */
  startTopAnimate() {
    animateTo({
      duration: 400,
      onFinish: () => {
        this.startBottomAnimate()
        this.animateBgColor = '#ffededed'
      }
    }, () => {
      this.angleTop = 90
      this.animateBgColor = '#ffc5c5c5'
    })
  }

  /**
   * 启动顶层文字下部动画
   */
  startBottomAnimate() {
    animateTo({
      duration: 400,
      onFinish: () => {
        this.angleTop = 0
        this.angleBottom = -90
        this.animateBgColor = this.defaultBgColor
        this.oldValue = this.newValue
      }
    }, () => {
      this.angleBottom = 0
      this.animateBgColor = this.defaultBgColor
    })
  }
4. 组件封装
翻页逻辑封装成组件,提供给外部调用,根据外部传入的双向数据绑定:newValue,监听数据变化,有变化则启动翻页动画(代码片段)
@Component
export struct FlipPage {
  // 顶层上部动画角度
  @State angleTop: number = 0
  // 顶层下部动画角度
  @State angleBottom: number = -90
  // 旧值
  @Prop oldValue: string
  // 新值,加入监听
  @Link @Watch('valueChange') newValue: string

  /**
   * 监听新值变化
   */
  valueChange() {
    if (this.oldValue === this.newValue) return
    this.startTopAnimate()
  }

  build() {
    Stack() {
      // 底层文字上部
      Text(this.newValue)
        ......
        .clip(new Rect({ width: this.width, height: this.height / 2 }))

      // 底层文字下部
      Text(this.oldValue)
        ......
        .clip(new Path().commands(this.bottomPath))

      // 顶层文字上部动画
      Text(this.oldValue)
        ......
        .clip(new Rect({ width: this.width, height: this.height / 2 }))
        .rotate({ x: 1, centerY: '50%', angle: this.angleTop })

      // 顶层文字下部动画
      Text(this.newValue)
        ......
        .margin({ top: 3 })
        .clip(new Path().commands(this.bottomPath))
        .rotate({ x: 1, centerY: '50%', angle: this.angleBottom })
    }
  }
  /**
  * 启动顶层文字上部动画
  */
  startTopAnimate() {
    ......
  }
5. 外部调用
界面加载成功后,开启循环定时器setInterval、间隔1秒更新时间。更改newValue的值,翻页组件内部进行动画翻页。
import { FlipPage } from '../componet/FlipPage'

@Entry
@Component
struct Index {
  // 小时-旧值
  @State oldHours: string = ''
  // 小时-新值
  @State newHours: string = ''
  // 分钟-旧值
  @State oldMinutes: string = ''
  // 分钟-新值
  @State newMinutes: string = ''
  // 秒数-旧值
  @State oldSeconds: string = ''
  // 秒数-新值
  @State newSeconds: string = ''

  @Builder Colon() {
    Column() {
      Circle().width(8).height(8).fill(Color.Black)
      Circle().width(8).height(8).fill(Color.Black).margin({ top: 10 })
    }.padding(10)
  }

  build() {
    Row() {
      // 翻页组件-显示小时
      FlipPage({ oldValue: this.oldHours, newValue: $newHours })
      // 冒号
      this.Colon()
      // 翻页组件-显示分钟
      FlipPage({ oldValue: this.oldMinutes, newValue: $newMinutes })
      // 冒号
      this.Colon()
      // 翻页组件-显示秒数
      FlipPage({ oldValue: this.oldSeconds, newValue: $newSeconds })
    }
    .justifyContent(FlexAlign.Center)
    .width('100%')
    .height('100%')
    .onAppear(() => {
      // 开启定时器
      this.initDate()
      setInterval(() => {
        this.updateDate()
      }, 1000)
    })
  }

  /**
   * 初始化时间
   */
  initDate() {
    let date = new Date()
    // 设置小时
    this.oldHours = this.format(date.getHours())
    // 设置分钟
    this.oldMinutes = this.format(date.getMinutes())
    // 设置秒数
    this.oldSeconds = this.format(date.getSeconds())
    // 设置新的秒数
    this.newSeconds = date.getSeconds() + 1 === 60 ? '00' : this.format(date.getSeconds() + 1)
  }

  /**
   * 更新时间
   */
  updateDate() {
    let date = new Date()
    console.log(`${date.getHours()}时${date.getMinutes()}分${date.getSeconds()}秒`)
    // 当新值改变,才有动画
    if (date.getSeconds() === 59) {
      this.newSeconds = '00'
      this.newMinutes = date.getMinutes() + 1 === 60 ? '00' : this.format(date.getMinutes() + 1)
      if (date.getMinutes() === 59) {
        this.newHours = date.getHours() + 1 === 24 ? '00' : this.format(date.getHours() + 1)
      }
    } else {
      this.newSeconds = this.format(date.getSeconds() + 1)
    }
  }

  /**
   * 不足十位前面补零
   */
  format(param) {
    let value = '' + param
    if (param < 10) {
      value = '0' + param
    }
    return value
  }
}
根据上面的实现思路和5个步骤流程,相信你也掌握了翻页时钟原理,拆分成一步一步还是很简单的,最主要还是对API的熟悉和声明式语法的掌握。HarmonyOS的API是根据OpenHarmony去更新的,两者区别语法都一样,只是OpenHarmony的API比较新,功能比较完善和成熟的,所以本项目直接使用OpenHarmony SDK开发。
项目地址: OpenHarmony - ArkUI(TS)开发翻页时钟
更多原创内容请关注: 中软国际 HarmonyOS 技术团队
入门到精通、技巧到案例,系统化分享HarmonyOS开发技术,欢迎投稿和订阅,让我们一起携手前行共建鸿蒙生态。
Recommend
About Joyk
Aggregate valuable and interesting links.
Joyk means Joy of geeK