

[spring]spring详细总结 - 路漫漫qixiuyuanxi
source link: https://www.cnblogs.com/lumanmanqixiuyuanxi/p/16544483.html
Go to the source link to view the article. You can view the picture content, updated content and better typesetting reading experience. If the link is broken, please click the button below to view the snapshot at that time.

spring
1.spring简介
-
Spring框架是一个开源的应用程序框架,是针对bean的生命周期进行管理的轻量级容器。
-
Spring解决了开发者在J2EE开发中遇到的许多常见的问题,提供了功能强大IOC、AOP及Web MVC等功能。
-
Spring可以单独应用于构筑应用程序,也可以和Struts、Webwork、Tapestry等众多Web框架组合使用,并且可以与 Swing等桌面应用程序AP组合。
-
Spring不仅仅能应用于J2EE应用程序之中,也可以应用于桌面应用程序以及小应用程序之中。
-
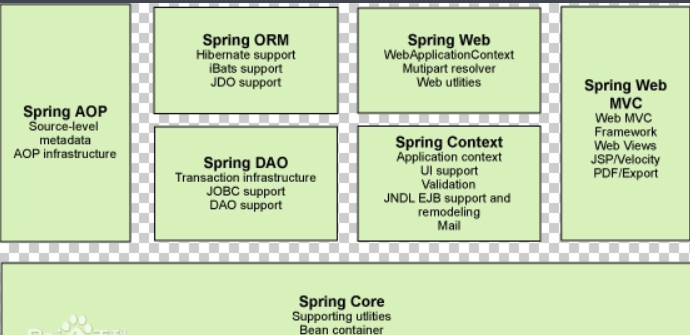
Spring框架主要由七部分组成,分别是 Spring Core、 Spring AOP、 Spring ORM、 Spring DAO、Spring Context、 Spring Web和 Spring Web MVC。
官方文档地址:
https://docs.spring.io/spring-framework/docs/4.3.9.RELEASE/spring-framework-reference/
https://www.docs4dev.com/docs/zh/spring-framework/5.1.3.RELEASE/reference/
优点:
- 轻量级的非入侵式的
- 控制反转(IOC),面向切面编程(aop)
- 支持事务处理
使用spring的jar包支持:
<!-- https://mvnrepository.com/artifact/org.springframework/spring-web -->
<dependency>
    <groupId>org.springframework</groupId>
    <artifactId>spring-web</artifactId>
    <version>5.3.22</version>
</dependency>
七大模块:
弊端:发展了太久后,配置越来越多,人称“配置地狱”
2.IOC理论推导
在我们之前的业务中,用户的需求可能会影响程序的代码,可能需要修改代码,如果程序的代码量十分大,修改一次的成本十分的昂贵!
原来的方式:
private UserMapper usermapper=new UserMapperImpl();
现在将对象的传递由new变成set动态注入
private UserMapper userMapper;
public void setUserMapper(UserMapper userMapper){
    this.userMapper=userMapper;
}
原来是程序控制的,现在变成用户控制了。
3.一个spring项目的快速搭建
(1)写一个实体类
package com.pojo;

/**
 * @author panglili
 * @create 2022-07-23-21:40
 */
public class HelloSpring {
    private String name;

    public void setName(String name) {
        this.name = name;
    }

    public String getName() {
        return name;
    }

    @Override
    public String toString() {
        return name;
    }
}
(2)将实体类配置在spring容器
<?xml version="1.0" encoding="UTF-8"?>
<beans  xmlns = "http://www.springframework.org/schema/beans"
        xmlns:xsi = "http://www.w3.org/2001/XMLSchema-instance"
        xsi:schemaLocation = "http://www.springframework.org/schema/beans
        http://www.springframework.org/schema/beans/spring-beans.xsd" >

    <!--使用spring来创建对象,在spring中被称为bean -->
    <!-- class="com.pojo.HelloSpring"  相当于在newHelloSpring
         id="helloSpring"              相当于对象变量名字
         name="name"                   属性
         value="spring"                属性值
     -->
<bean id="helloSpring" class="com.pojo.HelloSpring">
<property name="name"  value="spring"></property>
</bean>
</beans>
(3)测试
import com.pojo.HelloSpring;
import org.springframework.context.ApplicationContext;
import org.springframework.context.support.ClassPathXmlApplicationContext;

/**
 * @author panglili
 * @create 2022-07-23-21:43
 */
public class MyTest {
    public static void main(String[] args) {
        ApplicationContext context = new ClassPathXmlApplicationContext( "application.xml");
        HelloSpring hello =(HelloSpring) context.getBean("helloSpring");
        System.out.println(hello.toString());

    }
}
4.IOC创建对象的过程
- 使用无参构造创造
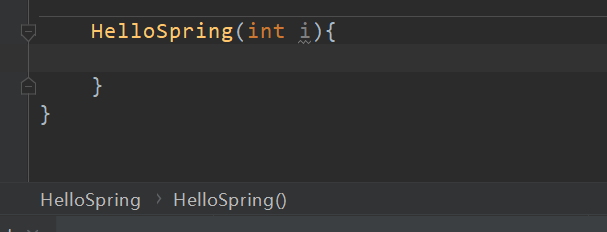
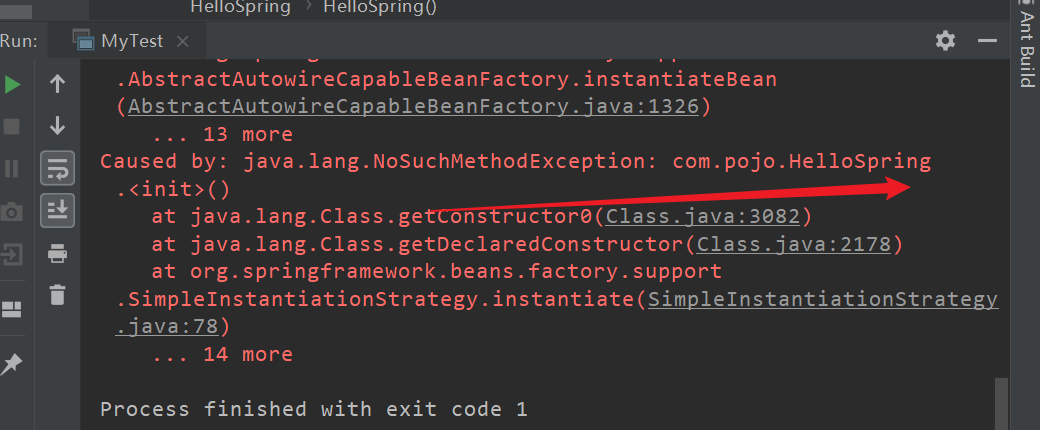
设定为有参后,就会报错!
对象在被注册进去的时候,就被实例化了,直接使用就好。
5.IO注入
(1)前面的构造器注入
(2)set注入
<?xml version="1.0" encoding="UTF-8"?>
<beans xmlns="http://www.springframework.org/schema/beans"
      xmlns:xsi="http://www.w3.org/2001/XMLSchema-instance"
      xsi:schemaLocation="http://www.springframework.org/schema/beans
       https://www.springframework.org/schema/beans/spring-beans.xsd">

   <bean id="user" class="cn.itnanls.User">
       <!--构造注入——参数类型注入-->
       <!--<constructor-arg type="java.lang.Integer" value="12"/>-->
       <!--<constructor-arg type="java.lang.String" value="Tom"/>-->

       <!--构造注入——下标注入-->
       <!--<constructor-arg index="0" value="tom"/>-->
       <!--<constructor-arg index="1" value="12"/>-->

       <!--构造注入——名字注入,最常用-->
       <!--<constructor-arg name="name" value="lucy"/>-->
       <!--<constructor-arg name="age" value="12"/>-->

       <!--setter注入-->
       <!--<property name="name" value="tom"/>-->

   </bean>
</beans>
构造注入对象之间的关系为组合
set注入的对象之间的关系为聚合
(3)p命名空间注入
- 使用set方式注入
<beans  xmlns = "http://www.springframework.org/schema/beans"
    xmlns:xsi = "http://www.w3.org/2001/XMLSchema-instance"
    xmlns:p = "http://www.springframework.org/schema/p"
    xsi:schemaLocation = "http://www.springframework.org/schema/beans
        http://www.springframework.org/schema/beans/spring-beans.xsd" >

     <bean id="helloSpring" class="com.pojo.HelloSpring">
<property name="name"  value="spring"></property>
</bean>

     <bean id="p-name" class="com.pojo.HelloSpring" p:name="ss">

</beans>
(4)c命名空间注入
- 使用构造器方式注入,开启构造器才能用
HelloSpring(String name){
    this.name=name;
}
HelloSpring(){

}
<bean id="c-name" class="com.pojo.HelloSpring" c:name="cName"/>
注意导入头文件
xmlns:p = "http://www.springframework.org/schema/p"
xmlns:c="http://www.springframework.org/schema/c"
6.作用域
ScopeDescription
(Default) Scopes a single bean definition to a single object instance for each Spring IoC container.
Scopes a single bean definition to any number of object instances.
Scopes a single bean definition to the lifecycle of a single HTTP request. That is, each HTTP request has its own instance of a bean created off the back of a single bean definition. Only valid in the context of a web-aware Spring ApplicationContext.
Scopes a single bean definition to the lifecycle of an HTTP Session. Only valid in the context of a web-aware Spring ApplicationContext.
Scopes a single bean definition to the lifecycle of a ServletContext. Only valid in the context of a web-aware Spring ApplicationContext.
Scopes a single bean definition to the lifecycle of a WebSocket. Only valid in the context of a web-aware Spring ApplicationContext.
<bean id="accountService" class="com.DefaultAccountService"/>
*<!-- the following is equivalent, though redundant (singleton scope is the default) -->*
<bean id="accountService" class="com.DefaultAccountService" scope="singleton"/>
<bean id="accountService" class="com.something.DefaultAccountService" scope="prototype"/>
7.bean的自动装配
- 是spring满足bean依赖的一种方式
- spring会在上下文中自动寻找,并自动给bean装配属性
spring的装配方式:
(1)手动装配
- 在people类中依赖了cat和dog对象,所以属性中手动装配他们的属性
<?xml version="1.0" encoding="UTF-8"?>
<beans xmlns = "http://www.springframework.org/schema/beans"
     xmlns:xsi = "http://www.w3.org/2001/XMLSchema-instance"
       xsi:schemaLocation = "http://www.springframework.org/schema/beans
        http://www.springframework.org/schema/beans/spring-beans.xsd" >

    <bean id="cat" class="pojo.Cat">
        <property name="voice" value="mom~"/>
    </bean>
    <bean id="dog" class="pojo.Dog">
        <property name="voice" value="wow~"/>
    </bean>

 <bean id="people" class="pojo.People">
     <property name="name" value="tata"/>
     <property name="dog" ref="dog"/>
     <property name="cat" ref="cat"/>
 </bean>
</beans>
(2)自动装配
通过byName自动装配
- spring会自动去找people中的set后面相对应的cat和dog与bean中id对应
<bean id="people" class="pojo.People" autowire="byName">
    <property name="name" value="tata"/>

</bean>
通过byType自动装配
- spring会自动去找people中的对象依赖和bean中class类相同的对应
<bean id="people" class="pojo.People" autowire="byType">
    <property name="name" value="tata"/>

</bean>
(3)使用注解实现自动装配
使用之前导入注解依赖的配置和支持
<?xml version="1.0" encoding="UTF-8"?>
<beans xmlns="http://www.springframework.org/schema/beans"
    xmlns:xsi="http://www.w3.org/2001/XMLSchema-instance"
    xmlns:context="http://www.springframework.org/schema/context"
    xsi:schemaLocation="http://www.springframework.org/schema/beans
        https://www.springframework.org/schema/beans/spring-beans.xsd
        http://www.springframework.org/schema/context
        https://www.springframework.org/schema/context/spring-context.xsd">

    <context:annotation-config/>

</beans>
不再使用显示引用对象依赖的其他属性
<bean id="cat" class="pojo.Cat"/>
<bean id="dog" class="pojo.Dog"/>
<bean id="people" class="pojo.People"/>
@Autowired
直接在对象上面使用@Autowired注解
private String name;
@Autowired
private Dog dog;
@Autowired
private Cat cat;
如果装配环境复杂的话,可以通过@Qualifier(value = "cat")指定bean注入
例如多个cat对象bean,属性值不同的时候
<bean id="cat" class="pojo.Cat">
    <property name="eat" value="fish"/>
</bean>
<bean id="cat11" class="pojo.Cat">
    <property name="eat" value="cookie"/>
</bean>
@Qualifier
否则,只会spring会走第一个bean
@Autowired
@Qualifier(value = "cat11")
private Cat cat;
Resource
- 这个注解跟上面的@Autowired功能相似,但是它可以通过名字再通过类型装配,都没有才会报错,要比@Autowired智能一点,但使用较少。
@Resource(name="cat")
private Cat cat;
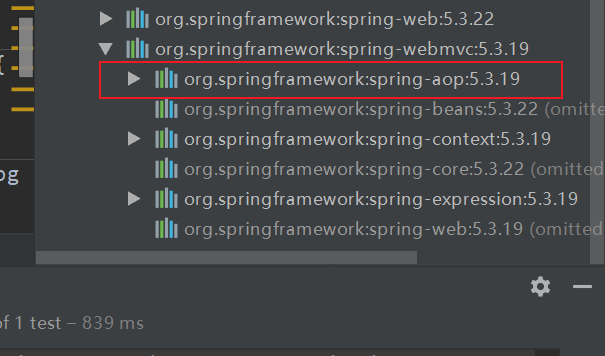
8.使用注解开发
1.bean
spring4以后,注解依赖于aop包,确保你的lib中有它
确保开启了使用注解
<context:annotation-config/>
2.组件代替bean实现自动注入
在配置文件中自动扫描包下的所有类为bean
<context:component-scan base-package="pojo"/>
在类对象上加上注解@Component可以被扫描
- @component (把普通pojo实例化到spring容器中,相当于配置文件中的 )
@Component
使用注解给属性注入值
package pojo;

import org.springframework.beans.factory.annotation.Autowired;
import org.springframework.beans.factory.annotation.Qualifier;
import org.springframework.beans.factory.annotation.Value;
import org.springframework.stereotype.Component;

import javax.annotation.Resource;

/**
 * @author panglili
 * @create 2022-07-24-9:52
 */
@Component
public class People {
    private String name;
    @Value("123")
   public int age;
    private Dog dog;
    private Cat cat;
 }
}
- 但是复杂的属性配置还是建议使用xml统一管理注入
3.component衍生的注解
dao:@repository
service:@service
controller:@controller
跟component功能相同只是能够使得分工更加的明确
xml与注解:
- xml更加万能,适用于各种场合!维护简单方便
- 注解 不是自己类使用不了,维护相对复杂
最佳实践:
- xml用来管理bean
- 注解只负责属性的注入
9.使用javaconfig实现代替xml配置
The central artifacts in Spring’s new Java-configuration support are @Configuration-annotated classes and @Bean-annotated methods.
根据官方文档的说明,创建一个java—configuration的配置类,使用@configuration注解,再使用@Bean在方法上面就可以实现xml中的功能。
(1)创建一个java—configuration
package config;

import org.springframework.context.annotation.Bean;
import org.springframework.context.annotation.Configuration;
import pojo.User;

/**
 * @author panglili
 * @create 2022-07-24-11:24
 */
@Configuration
public class Java_config {

    @Bean
    public User getUser(){
        return new User();
    }
}
(2)实体类
package pojo;

import org.springframework.beans.factory.annotation.Autowired;
import org.springframework.beans.factory.annotation.Value;
import org.springframework.context.annotation.Bean;
import org.springframework.stereotype.Component;

/**
 * @author panglili
 * @create 2022-07-24-11:24
 */
@Component
public class User {
    @Value("tata")
    private String name;

    public String getName() {
        return name;
    }

    public void setName(String name) {
        this.name = name;
    }
}
(3)测试
现在也可以拿到值
import config.Java_config;
import org.springframework.context.annotation.AnnotationConfigApplicationContext;
import pojo.User;

/**
 * @author panglili
 * @create 2022-07-24-11:28
 */
public class MyTest {
    public static void main(String[] args) {
        AnnotationConfigApplicationContext context = new AnnotationConfigApplicationContext(Java_config.class);
        User user =(User) context.getBean("getUser");

        System.out.println(user.getName());
    }
}
这种java代替xml的实现方式,在springboot中大量使用。
10.代理模式
代理模式的分类:
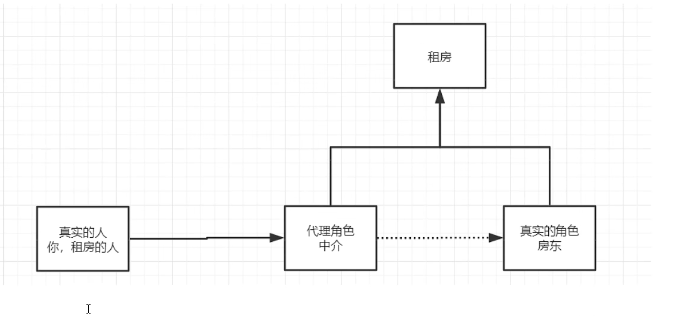
抽象角色:一般会使用接口或者抽象类
真实角色:被代理的角色
代理角色:代理真实的角色,做一些附属的操作
客户:访问代理对象的人
静态代理
抽象角色:
/**
 * @author panglili
 * @create 2022-07-24-15:00
 */
public interface Rent {
    public void rent();
}
真实角色:
/**
 * @author panglili
 * @create 2022-07-24-15:01
 */
public class Host implements Rent {
    public void rent() {
        System.out.println("host would rent house");

    }
}
代理角色:
/**
 * @author panglili
 * @create 2022-07-24-15:02
 */
public class Proxy implements Rent {

    private Host host;
    public Proxy(){

    }

    public Proxy(Host host){
        this.host=host;
    }

    public void rent() {
        host.rent();
        seeHouse();
    }

    //look house
    public void seeHouse(){
        System.out.println("look House");
    }
}
/**
 * @author panglili
 * @create 2022-07-24-15:02
 */
public class Client  {
    public static void main(String[] args) {
        Host host = new Host();
        Proxy proxy = new Proxy(host);
        proxy .rent();
    }
}
动态代理
- 和静态代理的角色一样
- 动态生成,不是我们直接写好了的
- 动态代理分为两大类:基于接口的动态代理和基于类的动态代理
- 基于接口——jdbc
- 基于类——cglib
- 基于字节码
11.AOP切面编程
使用aop植入,需要导入一个依赖包
<dependency>
    <groupId>org.aspectj</groupId>
    <artifactId>aspectjweaver</artifactId>
    <version>1.9.7</version>
</dependency>
- 横切关注点
在执行的方法前动态的添加一个日志输出
方法一使用spring类实现
(1)接口
package service;

/**
 * @author panglili
 * @create 2022-07-24-16:09
 */
public interface Service {
    public void add();
    public void delete();
    public void update();
    public void select();
}
(2)要代理的实现类
package service;

/**
 * @author panglili
 * @create 2022-07-24-16:09
 */
public class ServiceImpl implements Service {
    public void add() {
        System.out.println("add");
    }

    public void delete() {
        System.out.println("delete");
    }

    public void update() {
        System.out.println("update");
    }

    public void select() {
        System.out.println("select");
    }
}
(3)代理商
package log;

import org.springframework.aop.MethodBeforeAdvice;

import java.lang.reflect.Method;

/**
 * @author panglili
 * @create 2022-07-24-16:11
 */
public class Log implements MethodBeforeAdvice {
    public void before(Method method, Object[] args, Object target) throws Throwable {
        System.out.println("excutor"+method.getName()+target);
    }
}
<!--注册bean -->
<bean id="userSer" class="service.ServiceImpl"/>
  <bean id="log" class="log.Log"/>

  <!--方式一:使用原生的spring api接口 -->
  <aop:config>
      <!-- 切入点expression要切入的位置-->
      <aop:pointcut id="pointcut" expression="execution(* service.ServiceImpl.*(..))"/>

       <!--执行环绕增加 -->
      <aop:advisor advice-ref="log" pointcut-ref="pointcut"/>

  </aop:config>
(4)客户调用
import org.springframework.context.ApplicationContext;
import org.springframework.context.support.ClassPathXmlApplicationContext;
import service.Service;

/**
 * @author panglili
 * @create 2022-07-24-16:28
 */
public class MyTest  {
    public static void main(String[] args) {
      ApplicationContext context = new ClassPathXmlApplicationContext("application.xml");
        //注意,代理的是接口类型
        Service ser = (Service) context.getBean("userSer");
        ser.add();

    }
}
方法二 使用自定义类实现
(1)自定义一个类,是被横切进去的内容
package dir;

/**
 * @author panglili
 * @create 2022-07-24-17:00
 */
public class PointMethod {
    public void after(){
        System.out.println("执行方法之后切入……");
    }
    public void before(){
        System.out.println("执行方法之前切入……");
    }
}
(2)在配置文件中使用aop切入
<!--方式二 自定义类切入 -->
<bean id="in" class="dir.PointMethod"/>
<aop:config>
    <!--自定义切面 -->
    <aop:aspect ref="in">
        <aop:pointcut id="point" expression="execution(* service.ServiceImpl.*(..))"/>
        <aop:after method="after" pointcut-ref="point"/>
        <aop:before method="before" pointcut-ref="point"/>
    </aop:aspect>
</aop:config>
(3)测试
import org.springframework.context.ApplicationContext;
import org.springframework.context.support.ClassPathXmlApplicationContext;
import service.Service;

/**
 * @author panglili
 * @create 2022-07-24-16:28
 */
public class MyTest  {
    public static void main(String[] args) {
      ApplicationContext context = new ClassPathXmlApplicationContext("application.xml");
        //注意,代理的是接口类型
        Service ser = (Service) context.getBean("userSer");
        ser.add();

    }
}

方式三 使用注解实现aop
(1)在要被切入的地方使用@Aspect和@After等注解标识切面和切点等
package dir;

import org.aspectj.lang.annotation.After;
import org.aspectj.lang.annotation.Aspect;
import org.aspectj.lang.annotation.Before;

/**
 * @author panglili
 * @create 2022-07-24-17:00
 */
@Aspect
public class PointMethod {
    @After("execution(* service.ServiceImpl.*(..))")
    public void after(){
        System.out.println("执行方法之后切入……");
    }
    @Before("execution(* service.ServiceImpl.*(..))")
    public void before(){
        System.out.println("执行方法之前切入……");
    }
}
(2)将此类配置到spring中,别忘了开启注解支持
<!--方式三 注解 -->
<bean id="in1" class="dir.PointMethod"/>
<!--一定要开启 否则注解不生效 -->
<aop:aspectj-autoproxy/>
(3)测试
同上面一样的测试,不再赘述
12.spring和mybatis整合
1.导包
<dependencies>
    <dependency>
        <groupId>junit</groupId>
        <artifactId>junit</artifactId>
        <version>4.13.1</version>
    </dependency>
    <!-- https://mvnrepository.com/artifact/mysql/mysql-connector-java -->
    <dependency>
        <groupId>mysql</groupId>
        <artifactId>mysql-connector-java</artifactId>
        <version>8.0.29</version>
    </dependency>

    <dependency>
        <groupId>org.mybatis</groupId>
        <artifactId>mybatis</artifactId>
        <version>3.5.3</version>
    </dependency>
    <dependency>
        <groupId>org.springframework</groupId>
        <artifactId>spring-webmvc</artifactId>
        <version>5.3.19</version>
    </dependency>
    <dependency>
        <groupId>org.springframework</groupId>
        <artifactId>spring-jdbc</artifactId>
        <version>5.3.18</version>
    </dependency>
    <dependency>
        <groupId>org.aspectj</groupId>
        <artifactId>aspectjweaver</artifactId>
        <version>1.9.7</version>
    </dependency>
    <dependency>
        <groupId>org.mybatis</groupId>
        <artifactId>mybatis-spring</artifactId>
        <version>2.0.2</version>
    </dependency>
</dependencies>
2.将mybatis中的配置到spring中
mybatis被spring接管后,他自己的配置文件只需要写别名和日志,事务和数据库连接交给spring
<?xml version="1.0" encoding="UTF-8" ?>
<!DOCTYPE configuration
        PUBLIC "-//mybatis.org//DTD Config 3.0//EN"
        "http://mybatis.org/dtd/mybatis-3-config.dtd">
<configuration>

    <settings>
        <setting name="logImpl" value="STDOUT_LOGGING"/>
    </settings>
    <typeAliases>
        <package name="com.pang.pojo"/>
    </typeAliases>
</configuration>
<?xml version="1.0" encoding="UTF-8"?>
<beans xmlns="http://www.springframework.org/schema/beans"
       xmlns:xsi="http://www.w3.org/2001/XMLSchema-instance"
       xmlns:context="http://www.springframework.org/schema/context"
       xmlns:aop="http://www.springframework.org/schema/aop"
       xsi:schemaLocation="http://www.springframework.org/schema/beans
        https://www.springframework.org/schema/beans/spring-beans.xsd
        http://www.springframework.org/schema/context
        https://www.springframework.org/schema/context/spring-context.xsd http://www.springframework.org/schema/aop https://www.springframework.org/schema/aop/spring-aop.xsd">

    <!--整合mybatis的数据库 -->
    <bean id="dataSource" class="org.springframework.jdbc.datasource.DriverManagerDataSource">
        <property name="driverClassName" value="com.mysql.cj.jdbc.Driver"/>
        <property name="url" value="jdbc:mysql://localhost:3306/jdbc?useSSL=false&useUnicode=true&characterEncoding=utf-8"/>
        <property name="username" value="root"/>
        <property name="password" value="123123"/>
    </bean>

    <!--整合mybatis的SQLSessionFactory -->
    <bean id="sqlSessionFactory" class="org.mybatis.spring.SqlSessionFactoryBean">
        <property name="dataSource" ref="dataSource"/>
        <!--绑定mybatis配置文件 -->
        <property name="configLocation" value="classpath:mybatis_config.xml"/>
        <property name="mapperLocations" value="classpath:mapper/*.xml"/>
    </bean>

    <bean id="sqlSession" class="org.mybatis.spring.SqlSessionTemplate">
        <!--只能用构造器注入 没有set方法 -->
        <constructor-arg index="0" ref="sqlSessionFactory"/>
    </bean>

    <bean id="user" class="mapper.UserMapperImpl">
        <property name="session" ref="sqlSession"/>
    </bean>
</beans>
3.接口实现类
package mapper;

import org.mybatis.spring.SqlSessionTemplate;
import pojo.User;

import java.util.List;

/**
 * @author panglili
 * @create 2022-07-24-18:42
 */
public class UserMapperImpl implements UserMapper {
    private SqlSessionTemplate sqlSession;

    public void setSession(SqlSessionTemplate session) {
        this.sqlSession = session;
    }

    public List<User> user() {
        UserMapper mapper = sqlSession.getMapper(UserMapper.class);

        return mapper.user();
    }
}
测试
import mapper.UserMapper;
import org.junit.Test;
import org.springframework.context.ApplicationContext;
import org.springframework.context.support.ClassPathXmlApplicationContext;
import pojo.User;
import java.util.List;

/**
 * @author panglili
 * @create 2022-07-24-18:01
 */
public class MyTest {
  @Test
    public void Test(){

       ApplicationContext context = new ClassPathXmlApplicationContext("application.xml");
        UserMapper user1 = context.getBean("user", UserMapper.class);
        List<User> list = user1.user();
        for(User u :list){
            System.out.println(u);
        }

    }
}
13.事务支持
只需要在spring中简单的配置两点就可以实现
<tx:advice id="txAdvice">
        <tx:attributes>
            <tx:method name="get*" read-only="true"/>
            <tx:method name="*"/>
        </tx:attributes>
    </tx:advice>
注意代理的是接口不是类!!!
 <aop:config>

        <aop:pointcut id="serviceOperation"
                expression="execution(* service..*Service.*(..))"/>

        <aop:advisor pointcut-ref="serviceOperation" advice-ref="txAdvice"/>

    </aop:config>
Recommend
About Joyk
Aggregate valuable and interesting links.
Joyk means Joy of geeK