

SwiftUI Testing With ViewInspector for iOS [FREE]
source link: https://www.raywenderlich.com/30227776-swiftui-testing-with-viewinspector-for-ios
Go to the source link to view the article. You can view the picture content, updated content and better typesetting reading experience. If the link is broken, please click the button below to view the snapshot at that time.
SwiftUI Testing With ViewInspector for iOS
Learn how to use the ViewInspector framework to write UI tests for SwiftUI apps.
Version
When you build an app, you want it to look great for your customers, and you want it to keep looking great as time passes and you add new features. One of your tools for this is testing the UI for consistency.
Apple doesn’t provide any testing framework for SwiftUI, but fortunately Alexey Naumov — a very talented Swift developer — has created a SwiftUI testing framework called ViewInspector, which allows you to both inspect the runtime state of your views and perform actions like pressing buttons.
In this tutorial, you’ll:
- Install ViewInspector as a Swift Package.
- Use ViewInspector to write your first UI tests.
- Learn to write asynchronous UI tests.
- Test a custom
ButtonStyle. - Learn to control the search direction when finding UI elements.
To get the most out of the tutorial, you should be familiar with SwiftUI. If you’re not, get started here.
Time to get going!
Getting Started
Download the project using the Download Materials link at the top or bottom of the tutorial.
You’ll work with an app called StepByStep — it’s an app that lets you collect recipes for your favorite meals and snacks.
Open the Xcode project in StepByStep-starter and look around. The architecture is model-view-controller (MVC) with a main-detail-based view stack, and the model and persistence layer use CoreData.
If you’d like to learn more about CoreData, fortunately we have a lot of tutorials available for you on this site. :]
First Run
Select the Simulator iPhone 12 Pro:
Build and run to see the starting state of the project:

You can see the view is plain with no decoration. During this tutorial, you’ll add styles and transform the app into something you’d be proud to present to a customer. You’ll test these changes using ViewInspector and XCTest.
Your first step is to install ViewInspector in the project so you can start testing.
Installing ViewInspector
Before adding ViewInspector, you need to add a test target to your project.
Adding a Test Target to Your Project
To add a test target:
- Select the project in the Project navigator.
- Click the Add a target control at the bottom of the target list.
Next, choose Unit Testing Bundle for iOS and click Next. You can filter the view to make it easier to find the right template:
Finally, set the Team to None and the Organization Identifier to com.raywenderlich, then click Finish:

Your target list will have a StepByStepTests target in the list:
Next, you’ll add the ViewInspector framework to the new StepByStepTests target using Swift Package Manager (SPM).
Adding the ViewInspector Framework to Your Test Target
To add the ViewInspector framework, you:
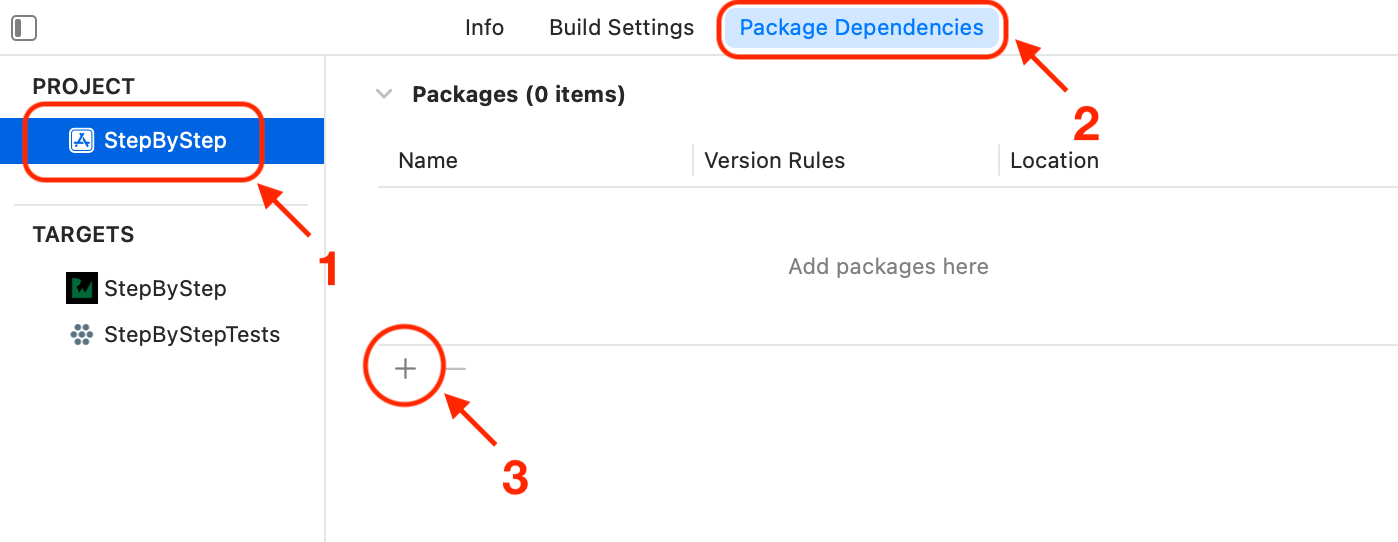
- Select the StepByStep project in the project view.
- Select the Package Dependencies tab.
- Click the Add Package Dependency control to reveal a window.
Enter the URL https://github.com/nalexn/ViewInspector into the search bar, and you’ll see the package description appear:

Use Exact Version for the Dependency Rule and select version 0.9.1.
Click Add Package to load the package from the remote repository. When the Choose Package Products window appears, select StepByStepTests as the destination target:
Click Add Package to complete the process. The project view will now show ViewInspector in your package list.

Well done! You’ve now done everything you need to start testing with ViewInspector. Next, you’ll write your first test.
Writing ViewInspector Tests
The first test you write will be a baseline test to ensure that everything is working with ViewInspector.
Writing a Baseline Test
In the project navigator, you’ll find a folder called StepByStepTests that Xcode creates when you add a test target. In that folder, open StepByStepTests.swift:
You’ll see the declaration for StepByStepTests. Delete everything that Xcode supplied inside the class, so you’re left with an empty body. Here’s how the file should look:
import XCTest

class StepByStepTests: XCTestCase {

}
Next, add these imports to the top of the file, just below import XCTest:
import SwiftUI
import ViewInspector
@testable import StepByStep
The last line is very important, as using the @testable modifier allows you to test your module. Your app is a Swift module.
Inside the body of StepByStepTests, add the following function:
func testViewInspectorBaseline() throws {
  let expected = "it lives!"
  let sut = Text(expected)
  let value = try sut.inspect().text().string()
  XCTAssertEqual(value, expected)
}
In this test, you create a Text view. Then, using syntax provided by ViewInspector, you verify that the inspected text matches what you initialized it with.
Build and test from the menu Product ▸ Test or use the key shortcut Command-U. Soon, you’ll see the test navigator light up green:
All those green checks tell you that your tests are succeeding.
Having a test that verifies that a framework is working will save you time in the future when your tests break. This test answers the question of whether a break is in the framework or your code.
From here, you’ll start to test your code.
Making Changes to the View
In this section, you’ll apply styles to the recipe list and then test those styles.
In the project navigator, open the folder StepByStep ▸ Views ▸ Recipes. Open RecipeListView.swift. This file contains RecipeListView and an associated preview, RecipeListView_Previews.
Show the canvas using the control at the right side of the editor or the key combination Command-Option-Return:
Refresh the canvas preview with Resume or the key combination Command-Option-P to show the preview for RecipeList:
RecipeListView_Previews populates a RecipeController with two recipes, one of them with no title or description. RecipeListView displays those two recipes.
Your first act is to style the cells of the table view. In the project navigator, in the Recipes folder, open RecipeLineView.swift.
Within the body of RecipeLineView, you can see two Text blocks. Add these modifiers to the top Text that displays the recipe name:
.fontWeight(.medium)
.font(.title2)
.foregroundColor(.primary)
That code changes the font of the recipe name. Next, add these modifiers to the bottom Text that displays the recipe description:
.font(.caption)
.foregroundColor(.primary)
.lineLimit(3)
That’s made the description less prominent than the name.
Open RecipeListView.swift again and refresh the preview. Your list now looks a lot better with those small style changes:
Adding Tests for Changes
To ensure consistency in your app, you want to make sure those cells always look like that — time to add some tests to do this.
In the project navigator, return to the folder StepByStepTests and open StepByStepTests.swift. You’ll add test code for the test cases:
- The cell should show a default name when the recipe name is empty.
- The cell should show a default description when the recipe description is empty.
Add this test function to StepByStepTests:
func testRecipeDefaultText() throws {
  // 1
  let controller = RecipeController.previewController()
  let recipe = controller.createRecipe()
  let view = RecipeLineView(recipe: recipe)

  // 2
  let inspectedName = try view
    .inspect()
    .find(text: AppStrings.defaultTitle)
    .string()
  XCTAssertEqual(AppStrings.defaultTitle, inspectedName)
  let inspectedDescription = try view
    .inspect()
    .find(text: AppStrings.defaultDescription)
    .string()
  XCTAssertEqual(AppStrings.defaultDescription, inspectedDescription)
}
In this test, you:
- Create an empty recipe.
- Verify the placeholder text matches the expected values in the UI.
Click the test result icon in the source file to run all the tests in StepByStepTests:
Oh no! Your test fails with the error “Search did not find a match. Possible blockers: RecipeLineView”:
The expression “There’s no such thing as thing as a free lunch” applies when using ViewInspector. You’ll encounter two requirements when using this framework. The first is that your views and all their children conform to the Inspectable protocol — this is very easy to fix and is only needed in your test target. The other requirement, you’ll meet later in this tutorial.
Conform Your View to Inspectable
To add conformance to Inspectable, select the folder StepByStepTests in the project navigator and create a new Swift file called Inspectable+Model.swift.
Check that Inspectable+Model.swift was added to the target StepByStepTests in the file inspector:
Add the following code to the file:
import ViewInspector
@testable import StepByStep

extension RecipeLineView: Inspectable {}
Here, you conform RecipeLineView to Inspectable. As Inspectable requires nothing from its conforming object, you’re ready to go. Build and test. Open the test navigator, and you’ll be all green again.
You’ve tested that the placeholder text in the cell is correct. As an exercise, you could test that when you set name and longDescription on a Recipe, you can see those values in the UI.
Next, you’ll test the style of the name field. In the project navigator, open StepByStepTests.swift, and add this next test to StepByStepTests:
func testRecipeNameStyle() throws {
  let controller = RecipeController.previewController()
  let recipe = controller.createRecipe()
  let view = RecipeLineView(recipe: recipe)
  let inspectedName = try view.inspect().find(text: AppStrings.defaultTitle)
  // 1
  let fontStyle = try inspectedName.attributes().font().style()
  XCTAssertEqual(fontStyle, .title2)
  // 2
  let fontWeight = try inspectedName.attributes().fontWeight()
  XCTAssertEqual(fontWeight, .medium)
}
This test checks these two cases:
- The name field should use
title2font. - The name field should use
mediumfont weight.
find is the function you’ll use most often in ViewInspector. It has many variants that you can use. This version locates the first instance of the string AppStrings.defaultTitle.
Build and test, and you’ll see you now have three successful tests. Well done! You’ve learned how to test the string value and attributes of a view.
These tests may seem redundant, but consider a larger app with many views. You could create these test cases from a design document to prevent the inevitable cosmetic mistakes that happen during refactors.
In the next section, you’ll learn how to test with environment objects.
Working With Runtime Properties
Previously, you learned that using this framework has two requirements. The first requirement was to conform your views to Inspectable to work with ViewInspector. In this section, you’ll find out about the second requirement.
To test views that use @State, @EnvironmentObject and @Environment, you first need to add a small piece of code to the app target.
In the project navigator, select the folder StepByStep ▸ Help. Add a new Swift file named Inspection.swift.
Add this code to the file:
import Combine
import SwiftUI

internal final class Inspection<V> {
  let notice = PassthroughSubject<UInt, Never>()
  var callbacks: [UInt: (V) -> Void] = [:]

  func visit(_ view: V, _ line: UInt) {
    if let callback = callbacks.removeValue(forKey: line) {
      callback(view)
    }
  }
}
Here, you create an object that allows ViewInspector to trigger changes in your view at any point — such as on didAppear or one second after the view appears when an animation has finished.
How this works will become clearer when you write a test. Next, you need to add an Inspection instance to the view you want to test.
In the project navigator, open RecipeListView.swift, and below the line:
@EnvironmentObject var recipeController: RecipeController
Add this line:
internal let inspection = Inspection<Self>()
Finally, add this closure at the top level of body at the comment // add onReceive here:
.onReceive(inspection.notice) { self.inspection.visit(self, $0) }
Here, you tell onReceive to run the visit function of your Inspection property whenever someone publishes data to the notice publisher. When you’re running your UI tests, ViewInspector will use this publisher to trigger the lifecycle of the view.
You’re almost done!
In the project navigator, open Inspectable+Model.swift. Then, add this protocol conformance for Inspection:
extension Inspection: InspectionEmissary {}
This conformance connects the InspectionEmissary available in the test target to the Inspection. Your views can expect a visit from the friendly emissary of ViewInspectorVille soon! :]
Writing an Asynchronous Test
You’re now ready to write a test for RecipeListView. Your first test will check that when you tap Add Recipe, a Recipe is added to the database.
Still inside Inspectable+Model.swift, add this declaration for RecipeListView:
extension RecipeListView: Inspectable {}
Next, in the project navigator, open StepByStepTests.swift and add this test function:
func testAddRecipeAddsRecipe() throws {
  let controller = RecipeController.previewController()
  let view = RecipeListView()
  // 1
  let expectation = view.inspection.inspect { view in
    XCTAssertEqual(controller.recipes.count, 0)
    try view.find(button: "Add Recipe").tap()
    XCTAssertEqual(controller.recipes.count, 1)
  }
  // 2
  ViewHosting.host(view: view.environmentObject(controller))
  // 3
  self.wait(for: [expectation], timeout: 1.0)
}
In this test, you:
- Make an
XCTestExpectationthat you’ll be able to touch “Add Recipe”, after whichRecipeControllershould have oneRecipe. - ViewInspector supplies
ViewHosting.ViewHostingprovides aUIWindowand aUIHostingControllerfor your view to live in while testing. - Wait for all the asynchronous flow to complete and the
XCTestExpectationto be fulfilled. ViewInspector callsfulfill()on the expectation as part of the inspection process, so you don’t need to do that.
Build and test to see another green check in your test navigator:
Part of the pleasure of writing tests is seeing the list of working tests grow and knowing that your app features will work in the future. Your effort now will save you a lot of time in the future.
You’ve learned enough to make simple tests of attributes and press a button, but there’s a lot more you can do. First, it’s time for some theory, though. :]
Understanding how ViewInspector Works
Now that you’ve used ViewInspector, you may be curious about the inner workings of the framework.
ViewInspector is the product of some smart generic coding and a lot of hard work by its developer to create a proxy for each supported SwiftUI type. The framework uses the reflection API Mirror to inspect a view while it’s being rendered in a window.
For every supported SwiftUI type, ViewInspector creates a corresponding proxy object by parsing the description tree generated by Mirror.
For example, take a simplified look at the test testAddRecipeAddsRecipe:
In this diagram:
-
RecipeListViewconforms toInspectableand has anInspection. Remember thatInspectionconforms toInspectionEmissaryin the test target. Therefore, you can callview.inspection.inspect, and in the callback sent to that function, you can now callinspect.find(button: "Add Recipe")onRecipeListView. - ViewInspector uses
Mirrorto describe the content tree inRecipeListView. - ViewInspector returns to you an
InspectableViewproxy object of typeViewType.Button. - You call
tap()on the proxy object to simulate a touch on the button. - ViewInspector uses
Mirrorto get a reference to the action closure attached to theButtoninRecipeListView. ViewInspector then calls that closure.
The source code for ViewInspector is available in the project navigator in the Package Dependencies section. You can add breakpoints and step through them in the debugger if you want to get a deeper view of how the framework works.
Testing With Style
When you build your app, you’ll want to keep common styles in a ViewModifier or a specialist type like ButtonStyle, which allows you to encapsulate many modifiers and make changes to the style when you touch a button. In this section, you’ll explore testing a ButtonStyle.
In the project navigator, open RecipeListView.swift. Display and refresh the preview canvas. You can see the Add Recipe button you tested in the previous section. You’ll add a ButtonStyle to that button to make it look nice, and then you’ll test that style.
Your design specifies a button with a capsule-style green background that expands by 10% when pressed.
In the project navigator, in the folder StepByStep ▸ Views, open the file StyleBook.swift. At the bottom of the file, add this modifier:
struct AdditiveButtonStyle: ButtonStyle {
  func makeBody(configuration: Configuration) -> some View {
    configuration.label
      .padding(8)
      .background(Color.green)
      .foregroundColor(.white)
      .clipShape(Capsule())
      .scaleEffect(configuration.isPressed ? 1.0 : 1.1)
      .animation(.easeOut(duration: 0.2), value: configuration.isPressed)
  }
}
Open RecipeListView.swift again and locate Button("Add Recipe"). Add this line at the comment // Add button style here:
.buttonStyle(AdditiveButtonStyle())
Refresh the preview, and make it interactive:
You’ll see your button has a capsule style that changes when you touch it. Next, you’ll add a test to check that this style conforms to the requested design and doesn’t change.
In the project navigator, open StepByStepTests.swift. Add these two tests to StepByStepTests:
func testAddRecipeButtonHasCorrectStyle() throws {
  let controller = RecipeController.previewController()
  let view = RecipeListView()
  let expectation = view.inspection.inspect { view in
    let button = try view.find(button: "Add Recipe")
    XCTAssertTrue(try button.buttonStyle() is AdditiveButtonStyle)
  }
  ViewHosting.host(view: view.environmentObject(controller))
  self.wait(for: [expectation], timeout: 1.0)
}

func testAdditiveButtonStylePressedState() throws {
  let style = AdditiveButtonStyle()
  XCTAssertEqual(try style.inspect(isPressed: true).scaleEffect().width, 1.1)
  XCTAssertEqual(try style.inspect(isPressed: false).scaleEffect().width, 1.0)
}
The first test checks that the button has AdditiveButtonStyle applied to it.
The second test verifies that AdditiveButtonStyle makes a button larger when pressed. ViewInspector provides a convenience initializer inspect(isPressed: Bool) to allow you to select the pressed state for testing.
Build and test to see the results:
testAdditiveButtonStylePressedState failed. It appears the ternary expression for the scaleFactor value is back to front. This sort of bug is why you write tests. You challenge your own assumptions about a piece of code when you write a test for the code.
In the project navigator, open StyleBook.swift, and in AdditiveButtonStyle, find the line:
.scaleEffect(configuration.isPressed ? 1.0 : 1.1)
And change it to:
.scaleEffect(configuration.isPressed ? 1.1 : 1.0)
Build and test. Your test navigator is all green again:
Next, you’ll learn how test collection views where you have many identical elements.
Testing Collections
When you create a List, you usually have a collection of objects that you present in a vertical table. Each object uses an identical cell view. In this section, you’ll learn how to search List or any other collection view that SwiftUI provides.
In the project navigator, in the folder StepByStep ▸ Views ▸ Steps, open StepListView.swift. Refresh the preview:
Configuring StepListView for Test
You have a button and a list. In StepListView, add this line to the top of the struct body to enable inspection:
internal let inspection = Inspection<Self>()
Next, you’ll dress up your button. Add the button style you created to Button("Add Step") at the comment // add style here:
.buttonStyle(AdditiveButtonStyle())
And lastly, add an observer to the VStack at the comment // add onReceive here:
.onReceive(inspection.notice) { self.inspection.visit(self, $0) }
In the project navigator, open Inspectable+Model.swift and add the conformance to Inspectable for all the views that make up the step list:
extension StepListView: Inspectable {}
extension StepLineView: Inspectable {}
extension StepEditorView: Inspectable {}
Testing StepListView
You’re now ready to write some tests. Open StepByStepTests.swift. Your first test confirms that the list has a cell for every step item. Add this code to the end of StepByStepTests:
func testStepName(_ index: Int) -> String {
  "Step -\(index)"
}

func makeStepController(_ count: Int) -> StepController {
  let recipeController = RecipeController.previewController()
  let recipe = recipeController.createRecipe()
  for idx in 1...count {
    let step = recipeController.createStep(for: recipe)
    step.name = testStepName(idx)
    step.orderingIndex = Int16(idx)
  }

  let stepController = StepController(
    recipe: recipe,
    dataStack: recipeController.dataStack
  )
  return stepController
}
This code creates a database that you can test against and a recipe with count steps. One of the secrets to a highly testable app is the ability to create a data model in your test environment:
Now, add this test function to StepByStepTests:
func testStepListCellCountSmall() throws {
  let expectedCount = 20
  let stepController = makeStepController(expectedCount)
  let view = StepListView(stepController: stepController)

  let expectation = view.inspection.inspect { view in
    let cells = view.findAll(StepLineView.self)
    XCTAssertEqual(cells.count, expectedCount)
  }
  ViewHosting.host(view: view)
  self.wait(for: [expectation], timeout: 1.0)
}
In this test, you check that StepListView has the same number of cells as steps in the recipe. You use the alternative search of findAll to locate all instances of StepLineView. findAll returns an empty array if there are no matches, unlike find, which throws when there’s no match.
Build and test to check whether your test assumption is true:
Next, add this test to prove that the cells are displaying the name of the Step:
func testStepListCellContent() throws {
  let expectedCount = 10
  let stepController = makeStepController(expectedCount)
  let view = StepListView(stepController: stepController)

  let expectation = view.inspection.inspect { view in
    for idx in 1...expectedCount {
      _ = try view.find(StepLineView.self, containing: self.testStepName(idx))
    }
  }
  ViewHosting.host(view: view)
  self.wait(for: [expectation], timeout: 1.0)
}
This test uses find(_:containing:) to locate a StepLineView with the specified name. Build and test to check that all tests pass:
When you make unit tests, try to test one thing per test. Don’t try to squish multiple tests into one test just because the setup process is long.
Your test code should be as readable and maintainable as your production code.
Your next test checks that a cell has a NavigationLink to StepEditorView. Add this test to StepByStepTests:
func testStepCellNavigationLink() throws {
  let expectedCount = 1
  let stepController = makeStepController(expectedCount)
  let view = StepListView(stepController: stepController)

  let expectation = view.inspection.inspect { view in
    let navLink = try view.find(ViewType.NavigationLink.self)
    _ = try navLink.view(StepEditorView.self)
  }
  ViewHosting.host(view: view)
  self.wait(for: [expectation], timeout: 1.0)
}
You verify the test case that a cell has a NavigationLink that takes you to StepEditorView. You don’t need a call to XCTAssert, as the call to view will throw if StepEditorView can’t be found.
Build and test to check this works:
Very nice! You now have a comprehensive test suite to help you as you proceed with your recipe app.
Traversing the View Tree
In this section, you’ll learn how to control search direction as you write your tests.
Trees are a structure you’ll come across frequently in your programming life. A SwiftUI view is a tree of views and modifiers.
Consider the structure of RecipeListView:
You used variations on find to locate views in RecipeListView. All those versions of find call into a base function:
func find<T>(
  _ viewType: T.Type,
  relation: ViewSearch.Relation = .child,
  traversal: ViewSearch.Traversal = .breadthFirst,
  skipFound: Int = 0,
  where condition: (InspectableView<T>) throws -> Bool = { _ in true }
) throws -> InspectableView<T> where T: KnownViewType
The third argument, traversal, controls the direction of search, so by default find always uses a .breadthFirst search:

The search pattern looks for a match by moving across the node’s children before descending farther down the tree.
The other option available to you is .depthFirst, where the search moves all the way to the end of a branch before progressing to the next child:

Now, you’ll make a demo to show why you might need to use this in your own code. In the project navigator, select the folder StepByStepTests and create a new Unit Test Case Class file called TraversalTests.swift.

Delete everything in TraversalTests.swift and replace with this code:
import XCTest
import SwiftUI
import ViewInspector

struct AmbiguousView: View, Inspectable {
  var body: some View {
    VStack {
      HStack {
        Button("Ray") {}
          .id(1)
      }
      Button("Ray") {}
        .id(2)
    }
  }
}

class TraversalTests: XCTestCase {
  func testBreadthFirst() throws {
    let view = AmbiguousView()
    let button = try view.inspect().find(button: "Ray")
    XCTAssertEqual(try button.id(), 2)
  }
}
AmbiguousView has two buttons called “Ray”. The id value allows you to check which one you found:
Build and test, and you’ll see your test passes:
The Button with an id of 2 is the first match because find, as a default, does a .breadthFirst search, or in other words: It walks across the tree before descending.
Now, you’ll learn how to use find to locate the button inside the HStack. Add this test to TraversalTests:
func testDepthFirst() throws {
  let view = AmbiguousView()
  let button = try view.inspect().find(
    ViewType.Button.self,
    traversal: .depthFirst
  ) { button in
    // 1
    let text = try button.find(text: "Ray")
    // 2
    return (try? text.find(ViewType.Button.self, relation: .parent)) != nil
  }
  XCTAssertEqual(try button.id(), 1)
}
Here, you use the base find method to specify a .depthFirst traversal. You locate a Button that has Text that matches “Ray” and also that Text has a parent that’s a Button. Without the second clause, you could match on a “Ray” that isn’t the label for the button.
Build and test one last time to prove your test works:
How fortunate! :]
Where to Go From Here?
You can download the finished project using the Download Materials link at the top or bottom of the tutorial.
You’ve seen how to test the attributes of a view and interact with a view during its test lifetime, but this tutorial only dips into the potential for testing with ViewInspector. ViewInspector also has support for gestures and view modifiers. The documentation includes examples for many different test scenarios.
What you decide to test in your project can be a fuzzy decision based on how your app works. In this tutorial, you’ve tested styles, labels and navigation destinations. You want to avoid making your tests too easy to break, so try to base the tests on specific use cases rather than layout choices, such as:
- The test “Add Step” button should be inside a
VStack, which is inside anHStackis a test that won’t have much value because you’re testing a specific layout that might change during normal development. - The test “Add Step” button action should add one step to the data model is a user-focused test that will help you ensure your UX doesn’t get broken.
Remember: A developer like you made and supports ViewInspector. If you need support, be nice and treat them as you’d like to be treated. If you’d like to contribute, then submit a PR to the repository or even buy them a cup of coffee.
We hope you enjoyed this tutorial, and if you have any questions or comments, please join the forum discussion below!
raywenderlich.com Weekly
The raywenderlich.com newsletter is the easiest way to stay up-to-date on everything you need to know as a mobile developer.
Get a weekly digest of our tutorials and courses, and receive a free in-depth email course as a bonus!
Recommend
About Joyk
Aggregate valuable and interesting links.
Joyk means Joy of geeK