
idrac远程登录服务器
source link: https://bajie.dev/posts/20240115-idrac_monitor/
Go to the source link to view the article. You can view the picture content, updated content and better typesetting reading experience. If the link is broken, please click the button below to view the snapshot at that time.

Idrac远程登录服务器
Linux的环境了,windows的不行。
Dell的idrac其实提供了远程的ssh界面,我们通常用idrac来设置bios什么的,当然如果能通过idrac直接登录服务器那就更好了。
首先普及以下几个概念:
- tty: Video console terminal (abbreviation for “Teletype”)
- ttyS: Serial console terminal
- pts: Virtual console terminal (pseudo-tty or pty but stands for Pseudo-Terminal Slave (PTS))
简单说,tty是带显示器的终端,ttyS是串口终端,pts是虚拟终端。tty接显示器、键盘,ttyS接串口,pst就是远程ssh/telnet过来的虚拟终端。
第一步:修改Dell Bios
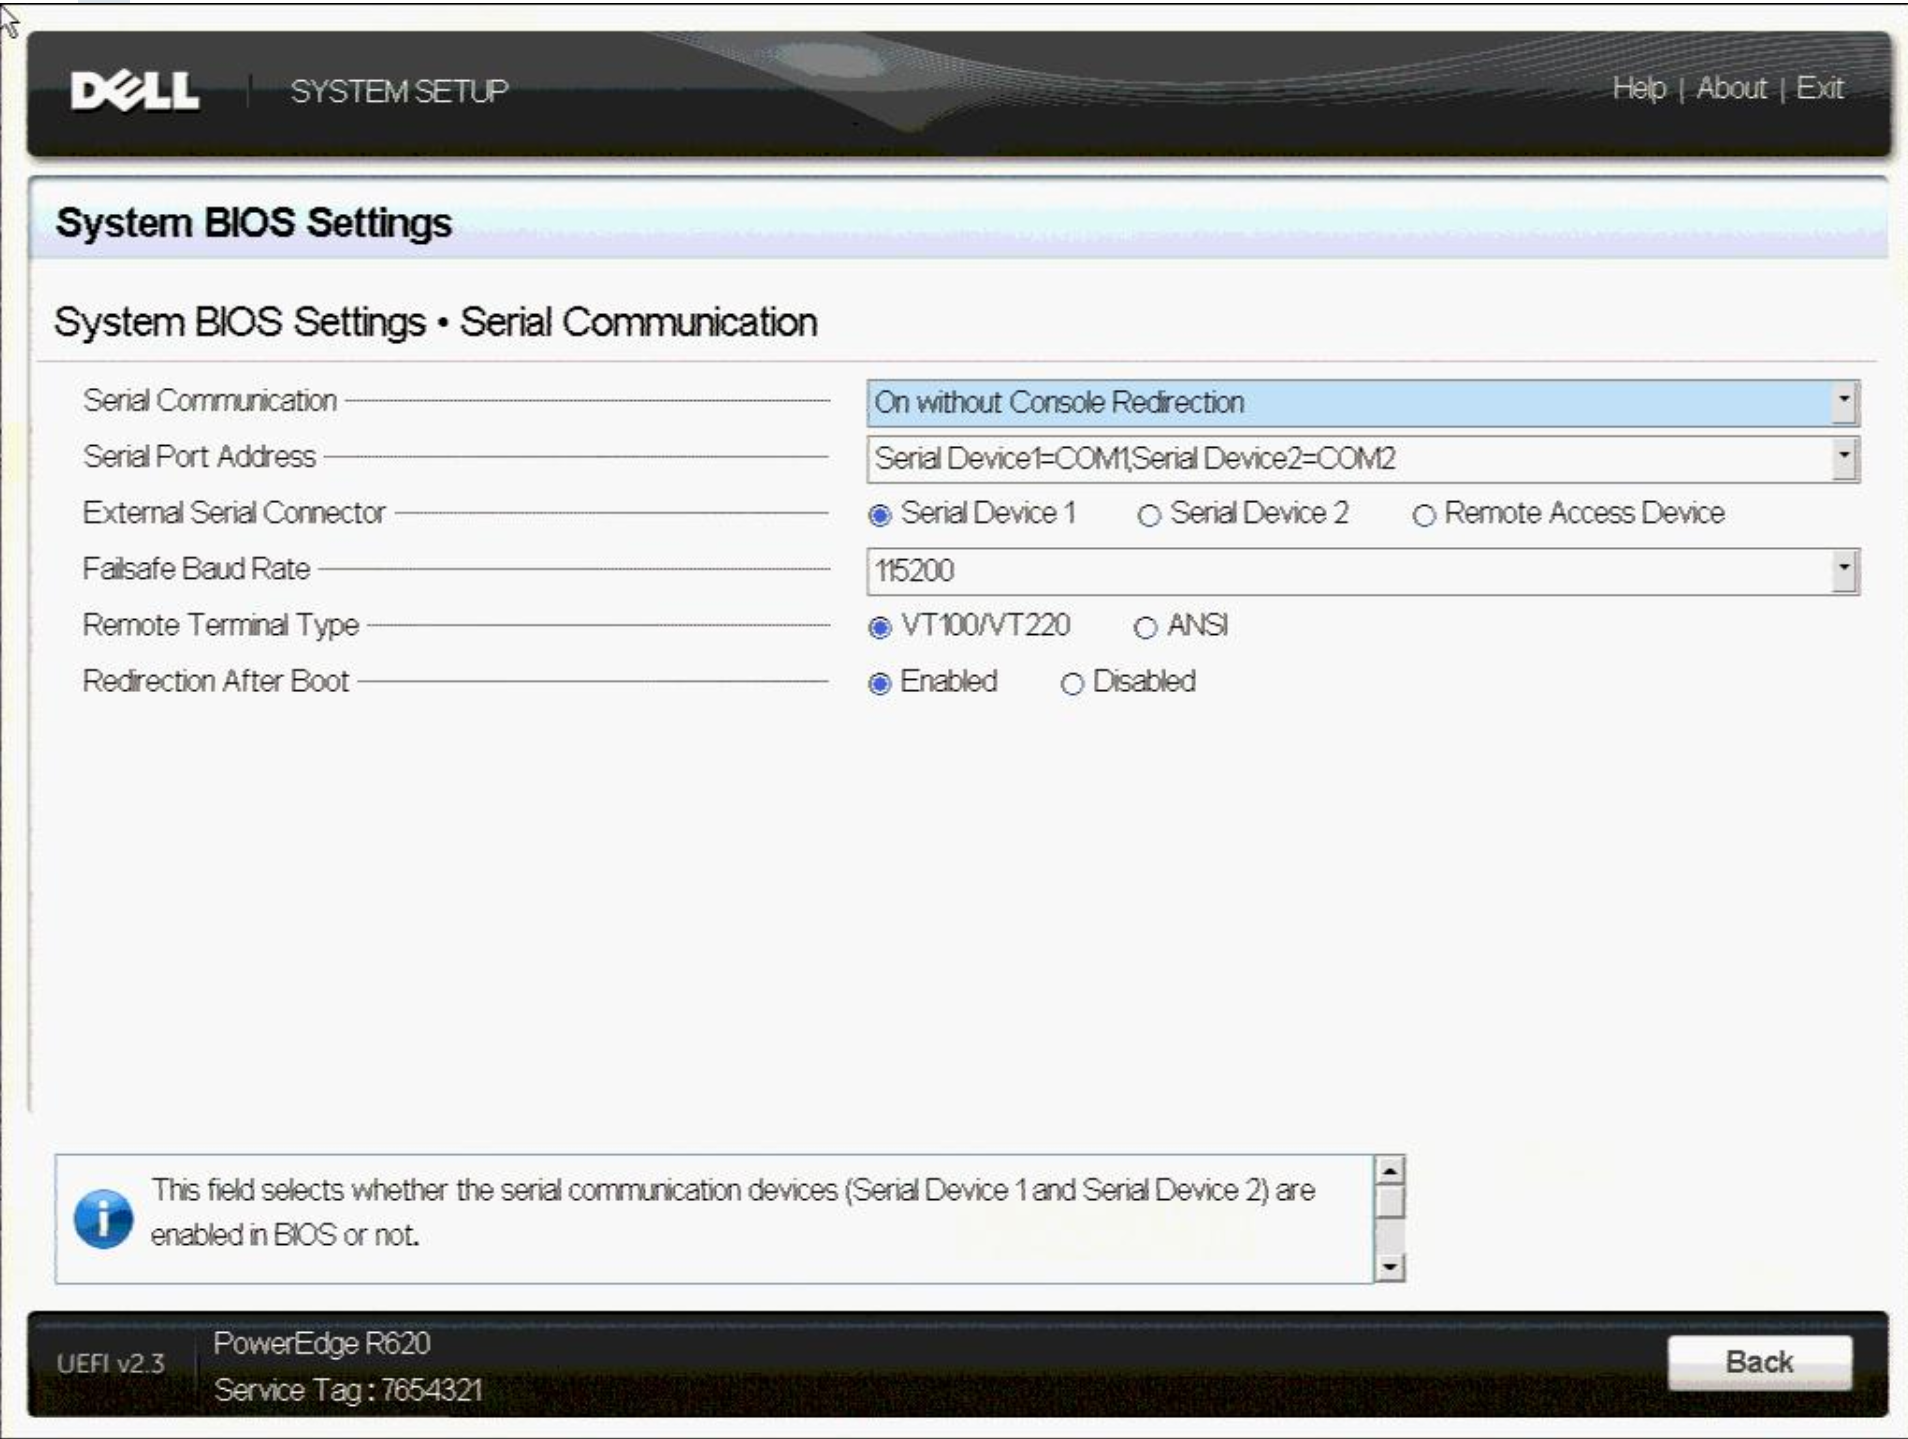
dell的bios中关于serial的配置如下图:

我们只改前两个就可以了:
- Serial Communication: “On with serial redirection via com2”
- Serial Port Address: “Serial Device1 = COM1, Serial Device2=COM2
- External Serial Connector: “Serial Device1”
- Failsafe Baud Rate: “115200”
- Remote Terminal Type: “VT100/VT220”
- Redirection After Boot: “Enabled”
解释一下:
- Serial Communication 缺省是 On without Console Redirection,我们需要把所有console的显示都转发到com2上,所以需要改。
- Serial Port Address 缺省是 Serial Device 1=COM2, Serial Device 2=COM1,如果不改,那么接上物理机上的串口就可以看到登录画面了,这样等于串口1废掉了,万一我们要把物理机上的com1口给留出来备用,插个串口的wavecom modem做报警用,那就傻眼了,所以必须改掉留出com1备用。
- External Serial Connector 缺省是 Serial Device1,不用改,那么物理机上的com口就是com1了,对应ttyS0。
- Failsafe Baud Rate: “115200”,不用改,就用这个高的好了。
- Remote Terminal Type: “VT100/VT220”,不用改,黑白的vt100就很好
- Redirection After Boot: “Enabled”,也不用改,需要重定向。
当然,用脚本一次搞定更好:
#!/bin/sh
sshpass -p "xxxxxx" ssh -oStrictHostKeyChecking=no [email protected].$1 racadm set BIOS.SerialCommSettings.SerialPortAddress "Serial1Com1Serial2Com2"
sshpass -p "xxxxxx" ssh -oStrictHostKeyChecking=no [email protected].$1 racadm set BIOS.SerialCommSettings.SerialComm "OnConRedirCom2"
sshpass -p "xxxxxx" ssh -oStrictHostKeyChecking=no [email protected].$1 racadm jobqueue create BIOS.Setup.1-1 -r pwrcycle -s TIME_NOW -e TIME_NA
第二步:编辑linux
编辑/etc/grub.conf 加上以下两行,并且注释掉splashimage,注意speed是57600,不是115200
serial –unit=1 –speed=57600
terminal –timeout=10 serial
#splashimage=(hd0,0)/grub/splash.xpm.gz
在kenel一行最后加上
console=tty1 console=ttyS1,115200n8r
给个完成版本:
default=0
timeout=5
#splashimage=(hd0,0)/grub/splash.xpm.gz
serial -unit=1 -speed=57600
terminal -timeout=10 serial
hiddenmenu
title CentOS 6 (2.6.32-504.el6.x86_64)
    root (hd0,0)
    kernel /vmlinuz-2.6.32-504.el6.x86_64 ro root=UUID=16154774-dbaf-4fcb-aedb-0513cb65a0eb rd_NO_LUKS rd_NO_LVM LANG=en_US.UTF-8 rd_NO_MD SYSFONT=latarcyrheb-sun16 crashkernel=auto  KEYBOARDTYPE=pc KEYTABLE=us rd_NO_DM rhgb quiet intel_iommu=on  console=tty1 console=ttyS1,115200n8r
    initrd /initramfs-2.6.32-504.el6.x86_64.img
修改/etc/securetty,加上ttyS1
cat /etc/securetty

console
vc/1
vc/2
vc/3
vc/4
vc/5
vc/6
vc/7
vc/8
vc/9
vc/10
vc/11
tty1
tty2
tty3
tty4
tty5
tty6
tty7
tty8
tty9
tty10
tty11
ttyS1
编辑 vi /etc/inittab,加一行
co:2345:respawn:/sbin/agetty ttyS1 115200 vt100-nav
cat /etc/inittab
id:3:initdefault:
co:2345:respawn:/sbin/agetty ttyS1 115200 vt100-nav
然后重启服务器,登录idrac , console com2就可以直接登录服务器了:
ssh 10.8.1.2
[email protected]'s password:
/admin1-> console com2

Connected to Serial Device 2. To end type: ^\
Recommend
About Joyk
Aggregate valuable and interesting links.
Joyk means Joy of geeK