

【木棉花】#星计划#在HarmonyOS中调用百度翻译API-鸿蒙开发者社区-51CTO.COM
source link: https://ost.51cto.com/posts/27842
Go to the source link to view the article. You can view the picture content, updated content and better typesetting reading experience. If the link is broken, please click the button below to view the snapshot at that time.
通过http请求和HarmonyOS自带的加密框架,可以为移动应用实现调用百度翻译API的功能。

完整示例链接
开发环境要求
● DevEco Studio版本:DevEco Studio 3.1 Release
● HarmonyOS SDK版本:API version 9
● API9
● Stage模型

main
├─ module.json5
├─ resources
│  ├─ zh_CN
│  ├─ rawfile        //图片资源目录
│  │  ├─ image1.png
│  │  └─ image2.png
│  └─ base
└─ ets
   ├─ XL_Modules
   │  └─ XL_Translation_Tool.ts    //翻译工具模块
   ├─ pages
   │  └─ Index.ets          //主页面
   └─ entryability
      └─ EntryAbility.ts
在本案例中,我们是通过http数据请求的方式调用百度翻译API的,这意味着应用必须拥有联网权限。所以我们需要在module.json5中申请“name”为"ohos.permission.INTERNET"的权限
{
  "module": {
    "name": "entry",
    "type": "entry",
    "description": "$string:module_desc",
    "mainElement": "EntryAbility",
    "deviceTypes": [
      "phone"
    ],
    "deliveryWithInstall": true,
    "installationFree": false,
    "pages": "$profile:main_pages",
    "requestPermissions": [
      {
        "name": "ohos.permission.INTERNET",
        "usedScene": {
          "abilities": [
            "EntryAbility"
          ],
          "when": "inuse"
        }
      }
    ],
    "abilities": [
      {
        "name": "EntryAbility",
        "srcEntry": "./ets/entryability/EntryAbility.ts",
        "description": "$string:EntryAbility_desc",
        "icon": "$media:icon",
        "label": "$string:EntryAbility_label",
        "startWindowIcon": "$media:icon",
        "startWindowBackground": "$color:start_window_background",
        "exported": true,
        "skills": [
          {
            "entities": [
              "entity.system.home"
            ],
            "actions": [
              "action.system.home"
            ]
          }
        ]
      }
    ]
  }
}
获取百度翻译开放平台的App Id和密钥
开发者能通过http数据请求调用百度翻译API的前提是提供一些必要的认证信息,即开发者在百度翻译开放平台的App Id与密钥。
首先,进入百度翻译开放平台的网址,网页链接为http://api.fanyi.baidu.com。随后,注册个人用户,并在注册完成之后打开开发者信息的选项,即可查看自己的App Id与密钥。

最后,我们还需要在平台中开通通用文本翻译API(这个是免费申请的),成功开通后可以进入下一步

翻译工具模块
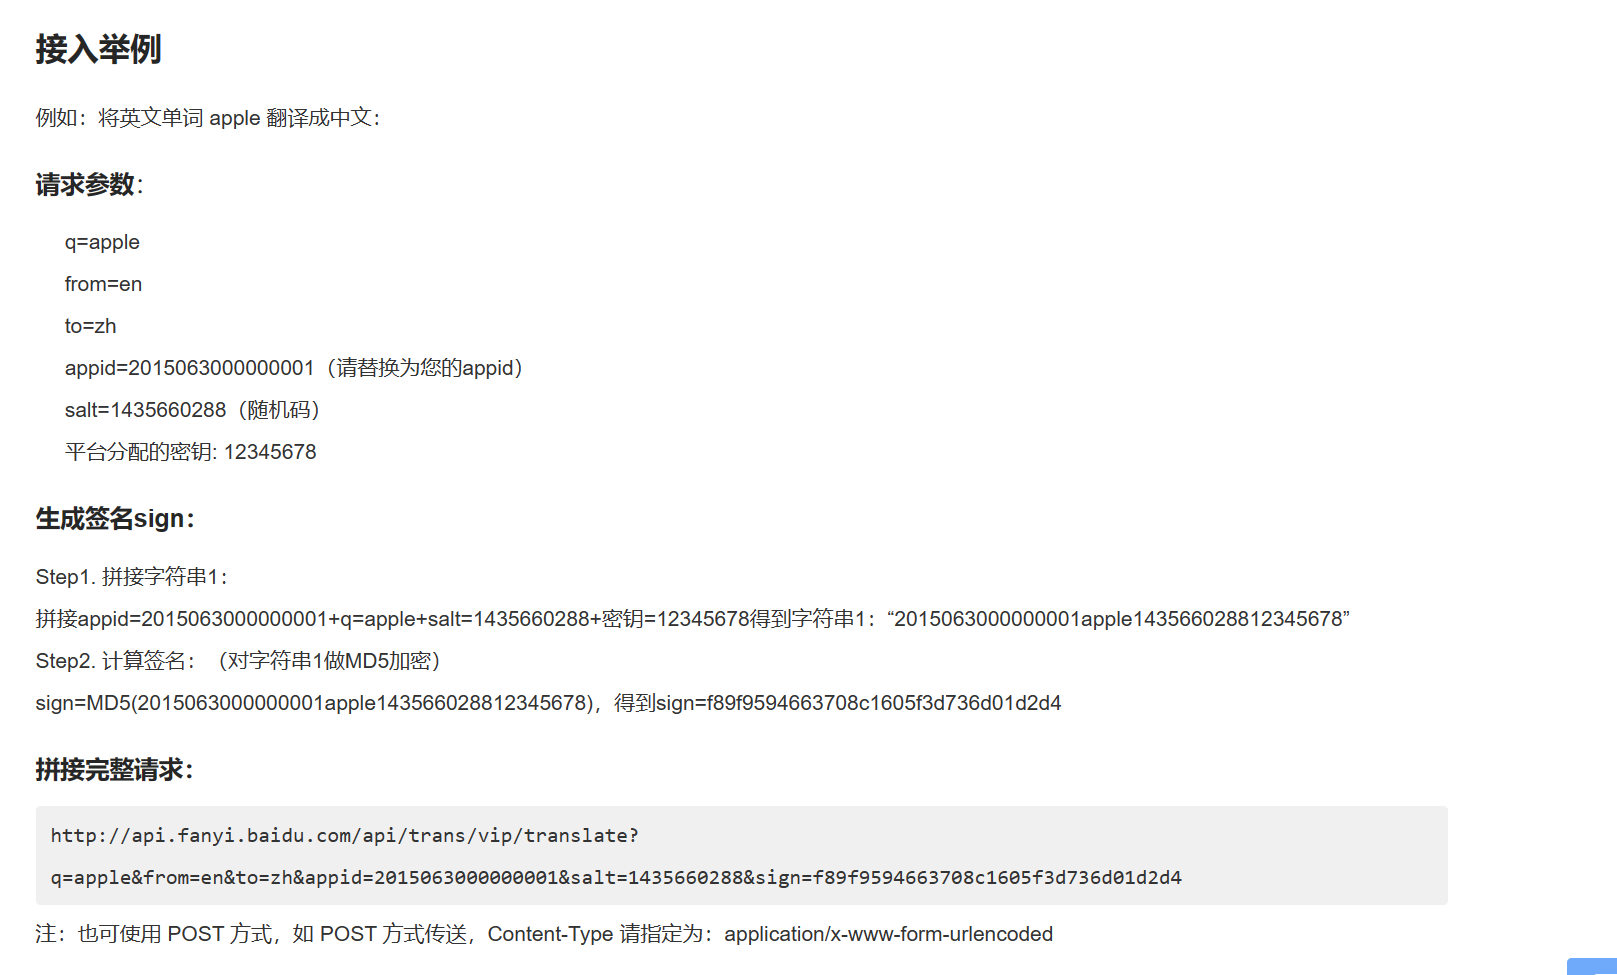
在本案例中,调用百度翻译API的关键代码被封装在翻译工具类中,而翻译工具类( XL_Translation_Tool)则被集成在文件 XL_Translation_Tool.ts中。在XL_Translation_Tool.ts中,首先需要导入cryptoFramework与http,前者用于MD5数据加密,后者用于http数据请求。接着编写两个辅助函数,分别为Generate_number_Sequence_10与Transform_10_To_16,前者用于生成十位随机数,后者则用于将10进制整数序列转换为16进制整数序列。随后,将MD5加密的代码封装在异步函数Generate_Sign内,并创建类XL_Translation_Tool。在类XL_Translation_Tool中,provideDeveloperInfo方法用于获取开发者在百度翻译开放平台的App Id与密钥,translate方法则是基于上述App Id与密钥,以及待翻译文本,来调用百度翻译API。调用API需要的URL格式如下
最后,导出一个XL_Translation_Tool实例
//导入加密框架
import cryptoFramework from '@ohos.security.cryptoFramework';

//导入http模块
import http from '@ohos.net.http';

/*
 * 函数名: Generate_number_Sequence_10
 * 描述: 随机生成携带十个元素的数字序列(此序列的数据类型为字符串)
 */
function Generate_number_Sequence_10():string{

  var ret:string = ''

  for(var i = 0; i < 10; ++i){
    ret += Math.floor(Math.random()*9.999)
  }

  console.info('------[Random] '+ret)
  return ret

}

/*
 * 函数名: Transform_10_To_16
 * 描述: 用于将10进制整数序列(参数的数据类型为Uint8Array)转换为16进制整数序列(输出的数据类型为字符串)的辅助函数
 */
function Transform_10_To_16(Sign_10:Uint8Array):string{
  let Array_16 = ['0','1','2','3','4','5','6','7','8','9','a','b','c','d','e','f']
  let Sign_16:string = ''
  for(var item of Sign_10) Sign_16 += Array_16[(item-item%16)/16]+Array_16[item%16]
  console.info('------[MD5 16]: '+Sign_16.toString())
  return Sign_16
}

/*
 * 函数名: Generate_Sign
 * 描述: 通过MD5模块进行信息加密, 以生成签名
 */
async function Generate_Sign(query:string,appId:string, key:string, sequence_10:string){

  //预定义输出
  let output = {
    'ifComplete':false,
    'Sign_16':null,
  }

  //创建md模块
  let MD5 = cryptoFramework.createMd('MD5')

  //MD5加密的输入值
  let sign = appId + query + sequence_10 + key

  //数据转换
  var arr = []
  for(var i = 0 ; i < sign.length ; i++)arr.push(sign.charCodeAt(i))
  var dataBlog = {
    data:new Uint8Array(arr)
  }
  console.info('------[MD5 10] dataBlog: '+dataBlog.data.toString())

  //开始MD5加密
  await MD5.update(dataBlog)
  var SecretSign
  await MD5.digest().then((mdOutput) => {
    SecretSign = mdOutput.data
    console.info("------[MD5 10] MD result: " + SecretSign.toString());
    output.ifComplete = true
    output.Sign_16 = SecretSign
  }).catch((err) => console.error("------[MD5 10] err: " + err.code))

  output.Sign_16 = Transform_10_To_16(SecretSign)

  //输出加密结果
  return output

}

/*
 * 枚举名: TranslationForm
 * 描述: 用于确定翻译流程的始末
 */
export enum TranslationForm{

  From_En_To_Zh = 0,

  From_Zh_To_En = 1

}

/*
 * 数据类型名: TranslationResult
 * 描述: 类XL_Translation_Tool的translate方法返回的数据类型
 */
declare type TranslationResult = {

  ifComplete:boolean

  result:string

  description:string

}

class XL_Translation_Tool{

  private TAG:string = '------[XL_Translation_Tool] '

  private Baidu_Translation_API_URL_Prefix:string = 'https://fanyi-api.baidu.com/api/trans/vip/translate'

  private Baidu_APPID:string = ''

  private Baidu_Key:string = ''

  private If_Provide_Developer_Info:boolean = false

  /*
   * 方法名: provideDeveloperInfo
   * 描述: 为XL_Translation_Tool提供百度翻译平台的开发者信息, 这是百度翻译API得以被调用的前提
   */
  public provideDeveloperInfo(appId:string, key:string){
    this.Baidu_APPID = appId
    this.Baidu_Key = key
    this.If_Provide_Developer_Info = true
  }

  /*
   * 方法名: translate
   * 描述: 将输入的字符串信息, 通过百调用度翻译API进行翻译并返回
   */
  public async translate(message:string, form:TranslationForm):Promise<TranslationResult>{

    //预定义返回值
    var ret:TranslationResult = {
      ifComplete:false,
      result:null,
      description:''
    }

    //判断appId和key是否被提供
    if(!this.If_Provide_Developer_Info){
      ret.description = '请为翻译工具提供百度智能翻译平台的开发者信息'
      console.info(this.TAG+'Please provide the appId and key')
      return ret
    }

    //通过http模块实例化HttpRequest
    var httpRequest = http.createHttp()

    let from:string
    let to:string
    let query:string = message+''

    if(form == TranslationForm.From_En_To_Zh){
      from = 'en'
      to = 'zh'
    }else if(form == TranslationForm.From_Zh_To_En){
      from = 'zh'
      to = 'en'
    }

    //生成10位随机整数序列
    const RANDOM_SEQUENCE:string = Generate_number_Sequence_10()

    var sign:string

    //生成签名
    let msg = await Generate_Sign(query,this.Baidu_APPID,this.Baidu_Key,RANDOM_SEQUENCE)
    if(msg.ifComplete){
      sign = msg.Sign_16
    }else {
      ret.description = '加密过程出错, 请检查相关项'
      return ret
    }

    //拼接URL
    let url = this.Baidu_Translation_API_URL_Prefix
    +'?q=' + encodeURI(query)
    +'&from=' +from
    +'&to='+to
    +'&appid='+this.Baidu_APPID
    +'&salt='+RANDOM_SEQUENCE
    +'&sign='+sign

    console.info(this.TAG+'url: '+url)

    //调用request方法
    await httpRequest.request(url,{
      method:http.RequestMethod.POST,
      header:{
        'Content-Type': 'application/x-www-form-urlencoded'
      }
    }).then((data)=>{
      console.info(this.TAG+'Succeed in connecting to Internet')
      // @ts-ignore
      let trans_result = JSON.parse(data.result).trans_result
      console.info(this.TAG+'Result:' + data.result);
      console.info(this.TAG+'code:' + JSON.stringify(data.responseCode));
      console.info(this.TAG+'Translate output:'+trans_result[0].dst)
      ret.ifComplete = true
      ret.description = '翻译成功'
      ret.result = trans_result[0].dst
    }).catch(err => console.error(this.TAG+'err:'+JSON.stringify(err)))

    //销毁HttpRequest实例
    httpRequest.destroy()

    //返回翻译结果
    return ret
  }

}

//导出本模块
export default new XL_Translation_Tool()
在页面Index.ets中,我们需要设计一个自定义弹窗(名为dialog1)。该弹窗有一个用@Link装饰器修饰的变量If_Provide_Developer_Info,表示此自定义弹窗组件与其父组件支持双向数据传递。弹窗中有两个文本输入组件,分别用于输入开发者的App Id与密钥,而内容为"确定"的文本组件则用于调用XL_Translation_Tool实例的provideDeveloperInfo方法,将开发者认证信息载入XL_Translation_Tool实例中。
//导入自定义的翻译工具
import XL_Translation_Tool, { TranslationForm } from 'ets/XL_Modules/XL_Translation_Tool'

//主页面UI
@Entry
@Component
struct Index{
		......
}

//自定义弹窗
@CustomDialog
struct dialog1{

  dialogController:CustomDialogController
  @Link If_Provide_Developer_Info:boolean
  @State private Baidu_AppId:string = ''
  @State private Baidu_Key:string = ''

  build(){
    Column(){

      Text('APP Id: ')
        .fontSize(20)
        .fontWeight(600)
        .fontColor(Color.Gray)
        .margin({
          top:20,
          bottom:4
        })
        .width('86%')

      TextInput()
        .type(InputType.Number)
        .width('95%')
        .height(40)
        .backgroundColor('#eeeeee')
        .onChange((value:string) => this.Baidu_AppId = value)

      Text('密钥: ')
        .fontSize(20)
        .fontWeight(600)
        .fontColor(Color.Gray)
        .margin({
          top:20,
          bottom:4
        })
        .width('86%')

      TextInput({
        text:this.Baidu_Key
      })
        .type(InputType.Password)
        .width('95%')
        .height(40)
        .backgroundColor('#eeeeee')
        .onChange((value:string) => this.Baidu_Key = value)

      Row(){
        Text('确认')
          .fontSize(24)
          .fontWeight(700)
          .fontColor(Color.Blue)
          .onClick(() => {
            this.dialogController.close()
            this.If_Provide_Developer_Info = true
            XL_Translation_Tool.provideDeveloperInfo(this.Baidu_AppId, this.Baidu_Key)
          })

        Text('取消')
          .fontSize(24)
          .fontWeight(700)
          .fontColor(Color.Red)
          .onClick(() => {
            this.dialogController.close()
          })
      }
      .width('100%')
      .margin({
        top:30
      })
      .justifyContent(FlexAlign.SpaceEvenly)


    }
    .height(260)
    .width('92%')
  }

}
最后,编写页面入口Index。dialogController表示自定义弹窗组件dialog1的控制器。
//导入自定义的翻译工具
import XL_Translation_Tool, { TranslationForm } from 'ets/XL_Modules/XL_Translation_Tool'

//主页面UI
@Entry
@Component
struct Index {

  @State private If_Provide_Developer_Info:boolean = false
  @State private translation_mode:number = TranslationForm.From_En_To_Zh

  @State private translation_content:string = ''
  @State private translation_result:string = ''

  private dialogController = new CustomDialogController({
    builder:dialog1({
      If_Provide_Developer_Info:$If_Provide_Developer_Info
    })
  })


  private async Begin_Translate(){
    let result = await XL_Translation_Tool.translate(this.translation_content, this.translation_mode)
    this.translation_result = result.result
  }

  build() {
      Column() {

        Text('百度翻译API')
          .fontSize(36)
          .fontColor(Color.Pink)
          .fontWeight(800)
          .margin({
            top:20
          })


        Row(){

          Row() {
            Text('英译中')
              .fontSize(20)
              .fontColor('#8099ff')
              .fontWeight(800)

            Image($rawfile('image2.png'))
              .height(30)
              .width(30)
          }

          Text('提供密钥')
            .fontSize(20)
            .fontColor('#ff6666')
            .fontWeight(800)
            .onClick(() => this.dialogController.open())

        }
        .margin({
          top:20
        })
        .width('100%')
        .justifyContent(FlexAlign.SpaceEvenly)

        Text('输入')
          .fontSize(20)
          .fontWeight(600)
          .fontColor(Color.Gray)
          .margin({
            top:30,
            bottom:10
          })
          .width('86%')


        TextArea()
          .width('90%')
          .height(120)
          .border({
            width:3,
          })
          .onChange((value:string) => this.translation_content = value)
          .fontSize(21)

        Text() {
          Span('结果')
        }
        .fontSize(20)
        .fontWeight(600)
        .fontColor(Color.Gray)
        .margin({
          top: 30,
          bottom: 10
        })
        .width('86%')


        TextArea({
          text:this.translation_result
        })
          .width('90%')
          .height(150)
          .border({
            width:3,
          })
        .fontSize(21)


        Row(){

          Image($rawfile('image1.png'))
            .height(40)
            .width(40)

          Text('翻译')
            .fontWeight(700)
            .fontSize(24)
            .fontColor(Color.White)
            .margin({
              left:20
            })

        }
        .width('93%')
        .height(50)
        .backgroundColor('#8099ff')
        .borderRadius(30)
        .justifyContent(FlexAlign.Center)
        .margin({
          top:50
        })
        .onClick(() =>{
          if(!this.If_Provide_Developer_Info){
            this.dialogController.open()
            return
          }
          console.info('------[ArkUI] '+'--'+this.translation_content+'--')
          this.Begin_Translate()
        })


      }
      .width('100%')
  }
}

//自定义弹窗
@CustomDialog
......
这样之后,调用百度API的案例便编写完成了,使用模拟器或真机可以查看运行效果。受一些奇怪的bug的影响,本案例中的翻译功能只支持英译中。
通过本次案例,相信你已经学会如何在HarmonyOS中调用百度翻译API。文章所述仅代表个人理解,如有不足恳请读者不吝赐教。

Recommend
About Joyk
Aggregate valuable and interesting links.
Joyk means Joy of geeK