

Quick Start Demo
source link: https://devs.polygonid.com/docs/quick-start-demo/
Go to the source link to view the article. You can view the picture content, updated content and better typesetting reading experience. If the link is broken, please click the button below to view the snapshot at that time.

Quick Start Demo
This tutorial is a quick demonstration of some of Polygon ID's main functionalities. To illustrate how Polygon ID works, we will walk you through some of its products and tools by following along a simple POAP use case. POAP stands for Proof of Attendance Protocol, which is used to prove that someone has taken part in a given event.
This guide will briefly touch on the 3 roles of the Triangle of Trust, namely the Identity Holder, the Issuer and the Verifier. For that, we will take the case of an individual who needs to prove that they were able to participate in a particular event.
These are the steps we will cover in this article:
Set up a Polygon ID wallet
As an Identity Holder, the individual who wants to have a credential to prove his age, for example, will need an application that can hold their credentials. In our case, we will be using the Polygon ID Wallet.
You can also use any Polygon ID compatible wallet. Please, check our Ecosystem page for other options.
To get started with the Polygon ID Wallet, download the Polygon ID Wallet App and create an Identity:
Polygon ID wallet is an implementation of the Wallet SDK, as a way of showcasing its possibilities. Head to the Polygon ID SDK documentation to know more about how it works.
The process from downloading to creating an identity on the Polygon ID Wallet is just as it is shown below. You need to download the app, create a wallet, set up a PIN number and the wallet is ready to be used.
"Mumbai" is selected instead of "Polygon Main".
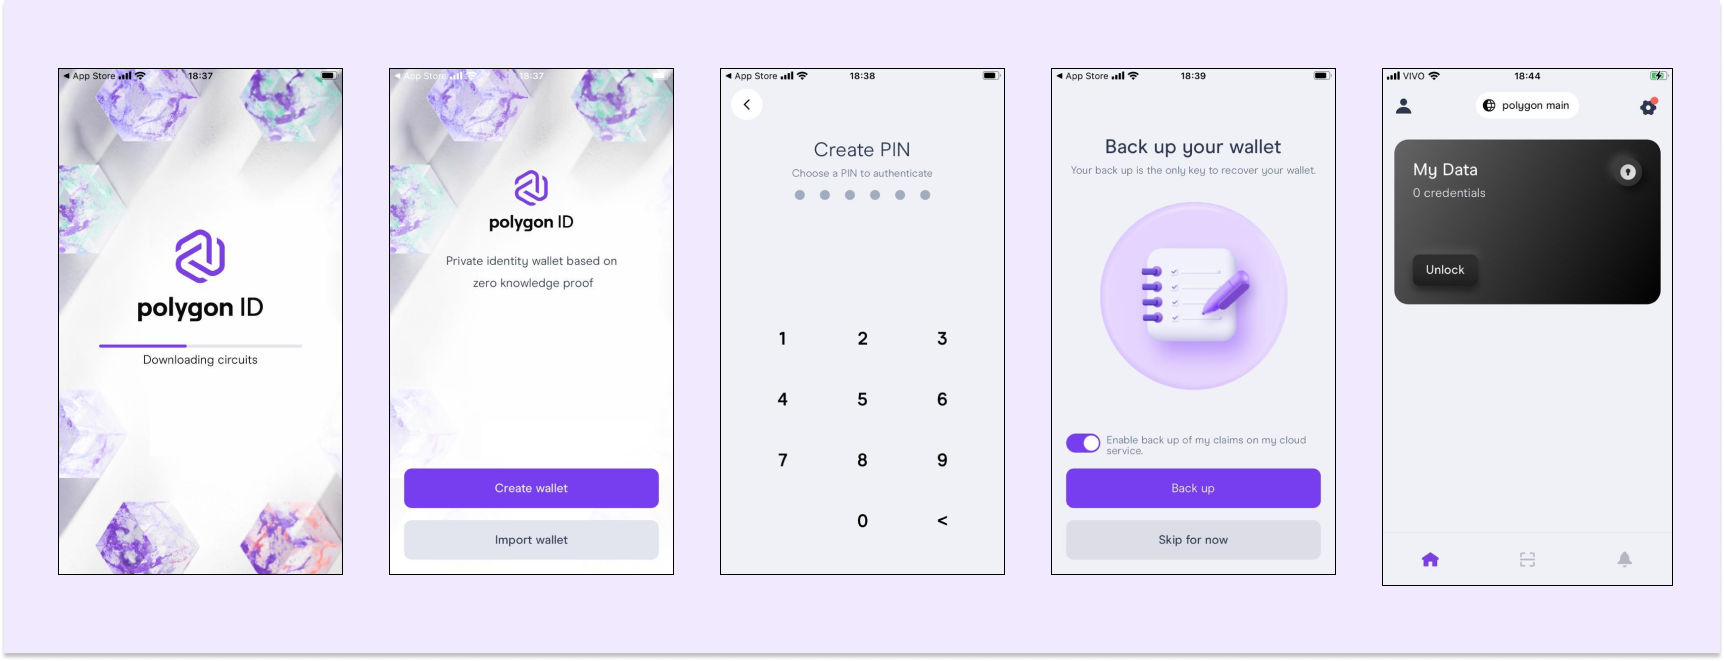
This demo is using Polygon's Mumbai testnet. Go to the gear icon at the top right and ensure "Polygon Mumbai" is selected instead of "Polygon Main".

Issue a new credential to attest to the ID Holder's event attendance
A trusted entity, for instance, a private institution will now play the role of an issuer. It will be responsible for creating the credential and sending it to the ID Holder.
We are using the Issuer Node UI testing environment to manage credentials. This is the place where the trusted entity can create credentials, manage schemas and generate connections.
However, if you are using a new credential type, you actually need to create a schema for that credential, which basically is the set of JSON files that gather all the attributes of that specific credential.
To facilitate this issuance process, we have already created the credential schema whose URLs are the following:
- JSON schema URL
ipfs://QmTSwnuCB9grYMB2z5EKXDagfChurK5MiMCS6efrRbsyVX - JSON-LD Context
ipfs://QmdH1Vu79p2NcZLFbHxzJnLuUHJiMZnBeT7SNpLaqK7k9X
To learn how to set up your own issuer environment by deploying an issuer node, visit the Issuer section in the documentation.
The schema used in this demo was built using the Polygon ID Schema Builder and is available on the Polygon ID Schema Explorer. Learn more about creating new schemas on the Schema Builder UI guide.
Issue the credential
With the new schema in hand, the issuer should now be able to generate a credential.
First, go to the the Issuer Node UI testing environment.
dangerThis Issuer Node is publicly available and used only for testing purposes. Do not use personal or sensitive data. All data is deleted every 48 hours.
Now you need to import the schema. Click on Import Schema and paste our previously generated schema IPFS address
ipfs://QmTSwnuCB9grYMB2z5EKXDagfChurK5MiMCS6efrRbsyVX: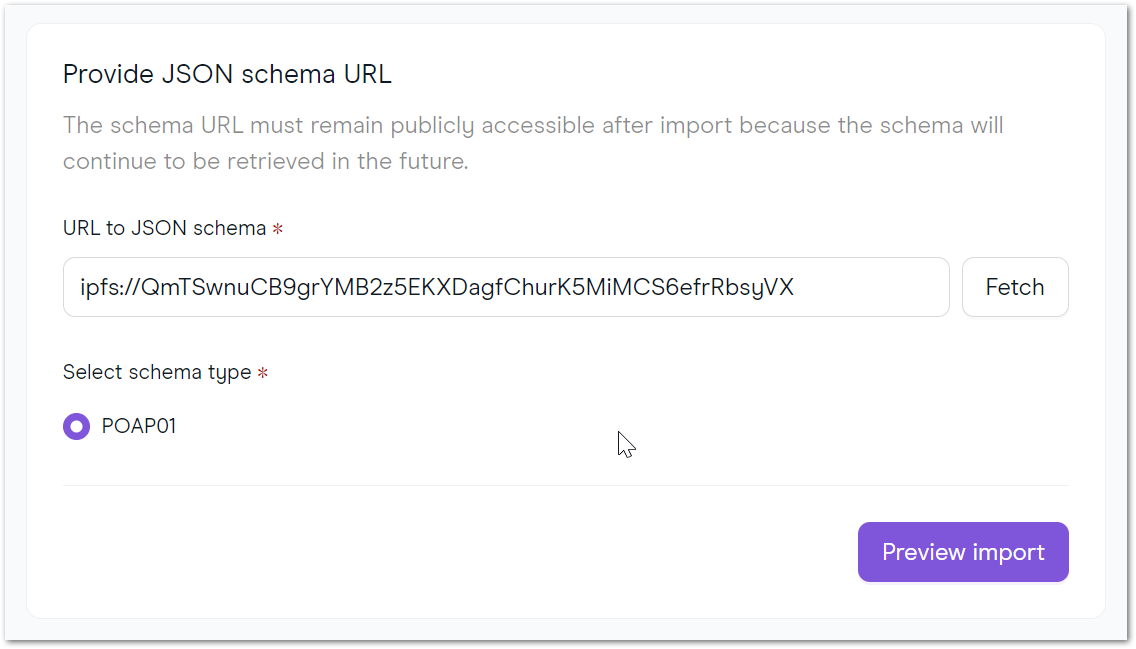
You may preview the schema and then Import it.
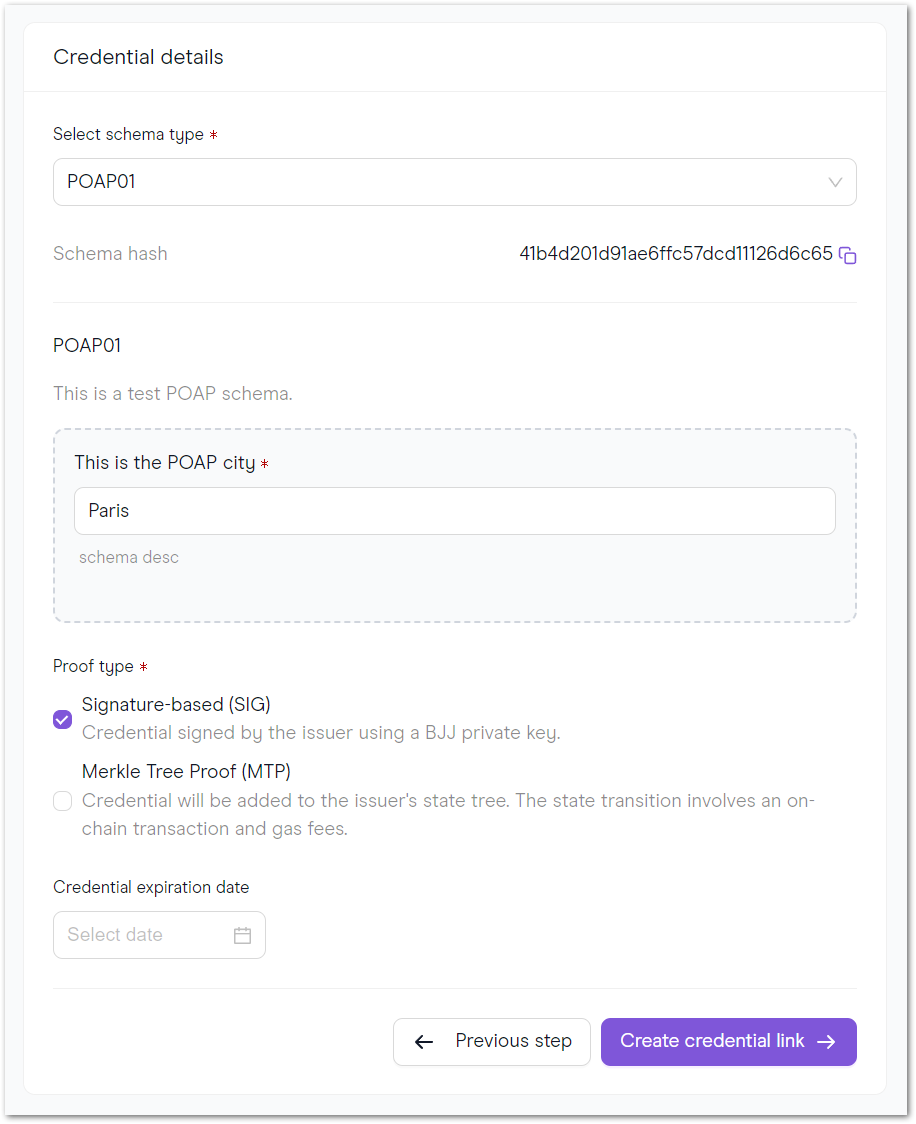
You can go ahead and click on Issue Credential in the top righ-hand corner. Choose Credential Link on the next page and your schema on the dropdown menu ("POAP01", in our case). For this credential, we are providing a proof of attendance to an event in Paris:
After you click on Create Credential Link, you can also click on View Link on the next screen to check the generated QR code.

Fetch the newly created credential
Now we are back to the ID Holder role. They will use their mobile application to authenticate themselves by scanning the QR code generated by the issuer in the last step.

Connect to the issuer:

This will instantly trigger a notification on the mobile which will look like this:

Accept the credential:

The ID Holder successfully retrieved the credential and it is visible on the app:

Verify the ID holder credential
Here comes the third role in this tutorial: the verifier. This could be represented by an organization that needs to check the accuracy of someone's credentials. In our use case, this organization wants to verify whether the ID holder actually attended our made-up Paris event.
Here are the steps to verify the credential:
Visit the Verifier website. As we are using a newly-created credential type, you need to choose Custom on the dropdown menu. Click on Sign In.

Now you will again make use of the JSON-LD URL we have also provided:
ipfs://QmdH1Vu79p2NcZLFbHxzJnLuUHJiMZnBeT7SNpLaqK7k9X. Here is how the query should look like:
After clicking on Submit, you should scan the resulting QR code and follow the instructions on the mobile app.

The process of generating the proof is then started:

And finally, the proof will be validated by the Verifier.
This was a quick demonstration of Polygon ID's basic functionalities. However, Polygon ID is far more complex than this. It offers a range of SSI-focused tools that allow for decentralized identity and verifiable credentials management.
Recommend
About Joyk
Aggregate valuable and interesting links.
Joyk means Joy of geeK