

Configure Single Sign On for CockroachDB CLI With Okta IdP
source link: https://dzone.com/articles/configure-single-sign-on-for-cockroachdb-cli-with
Go to the source link to view the article. You can view the picture content, updated content and better typesetting reading experience. If the link is broken, please click the button below to view the snapshot at that time.

Configure Single Sign On for CockroachDB CLI With Okta IdP
Today we're going to cover how to set up Single Sign On for CockroachDB CLI with Okta SSO using short-lived JWT tokens.
CockroachDB supported Single Sign On for DB Console and CC Console for a while. Today, we're going to introduce Single Sign On for CockroachDB CLI. It is an industry-first method to authenticate to a database via JWT tokens. This capability allows you to authenticate with a cluster via an IdP of your choice and issue SQL commands.
I've written articles covering SSO for DB Console previously. You may find articles covering Google OAuth, Microsoft Identity Platform and Okta.
High-Level Steps
- Provision a CockroachDB cluster
- Configure Okta
- Configure CockroachDB with the Okta details
- Verify
- Conclusion
Step-by-Step Instructions
Provision a CockroachDB Cluster
SSO for SQL can be set up for CockroachDB Self-Hosted and our hosted offerings. Follow this tutorial to set up a Dedicated cluster. I'm using a Docker environment with the latest 22.2 beta image where this capability is available.
Configure Okta
I am using an Okta developer account, you can get one by signing up here.
Follow this tutorial to set up an application integration.
In your Okta console, Create an app integration / Add App / Create New App
Check the box for OIDC - OpenID connect
Check the box for the Native application
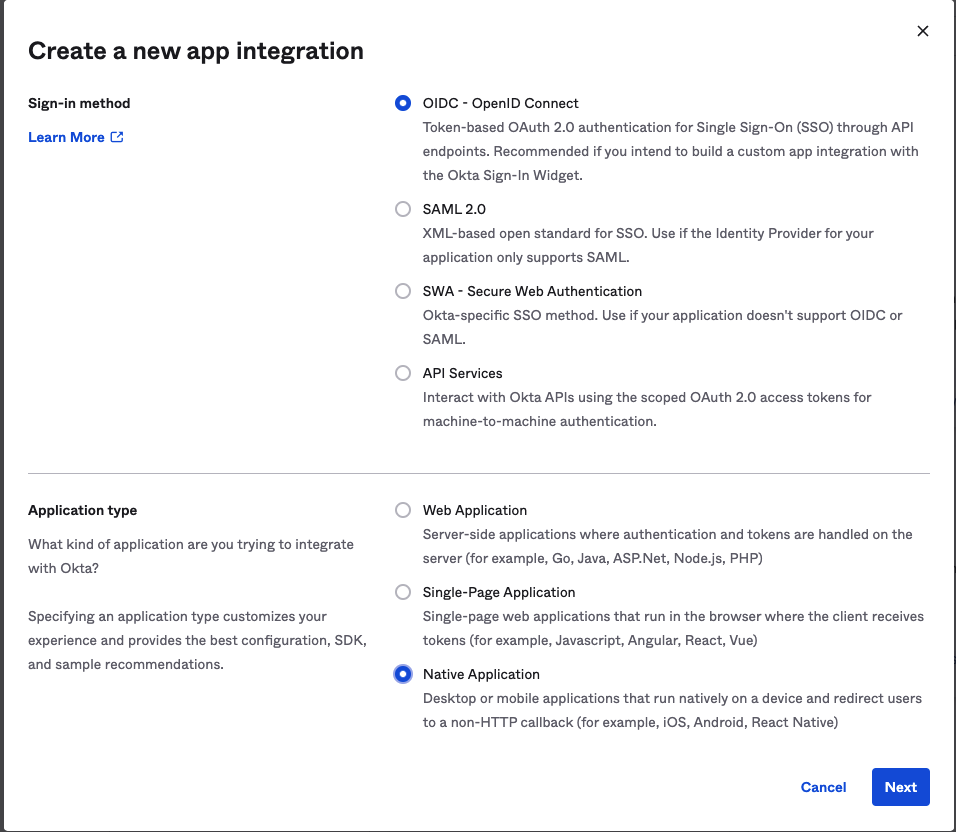
Click Next
Name the application, optionally upload a logo, and then check the box for Resource Owner Password.
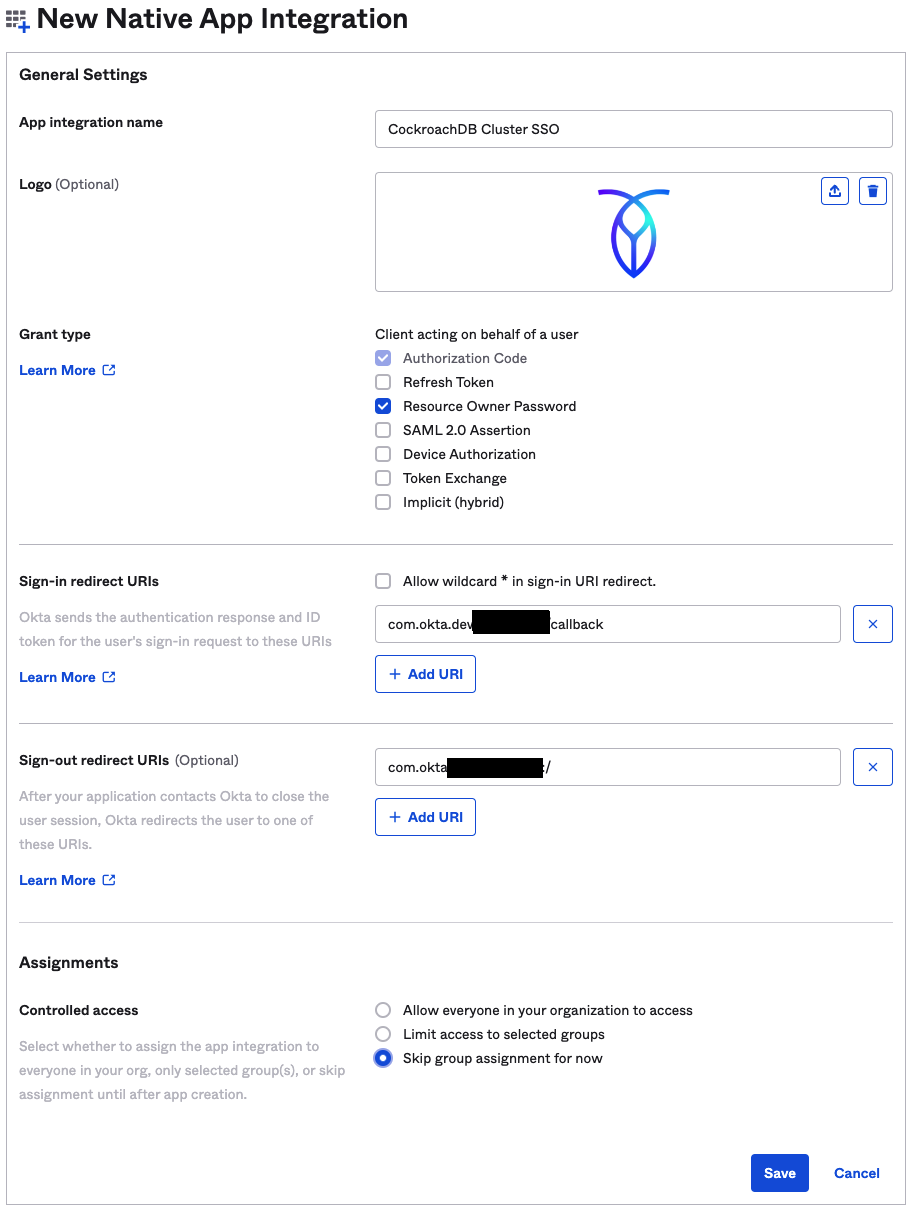
Assign access or click "Skip group assignments" and click save.
Go to Assignments and click Assign / Assign to People
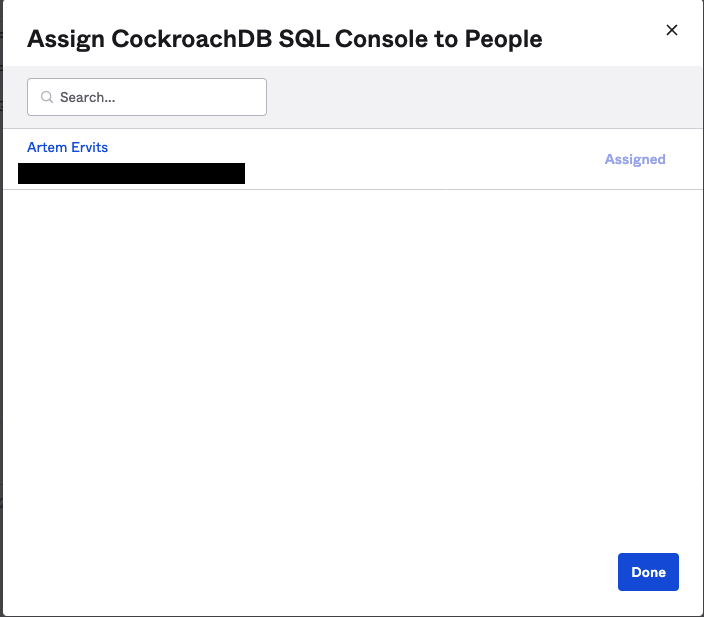
Click the Assignments tab and add your existing users, in my case artem.
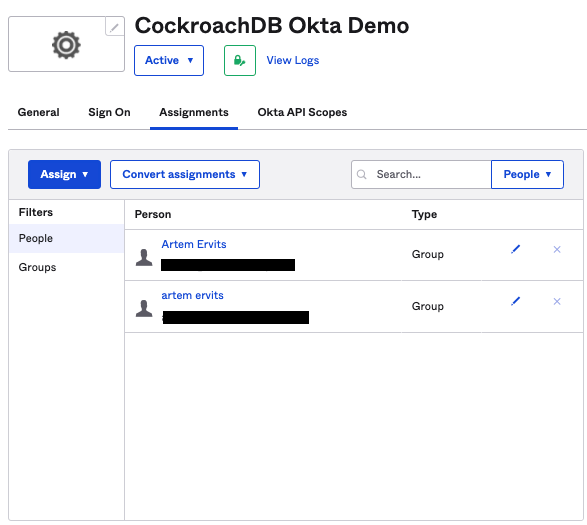
This almost completes our work in the Okta console.
We need to fill out the required properties in SQL below with the details of our Okta integration.
Configure CockroachDB With the Okta Details
You do need an enterprise license for this feature to work. In Dedicated, this is already taken care of but in self-hosted, you need to provide your organization and license if not yet set.
SET CLUSTER SETTING cluster.organization = '';
SET CLUSTER SETTING enterprise.license = '';
The following five properties will be pre-filled with the information from Okta. In Dedicated, some of this information will be pre-populated using our automation, in self-hosted, you have to capture this info yourself.
SET CLUSTER SETTING server.jwt_authentication.enabled=on;
SET CLUSTER SETTING server.jwt_authentication.issuers='';
SET CLUSTER SETTING server.jwt_authentication.audience='';
SET CLUSTER SETTING server.jwt_authentication.jwks='';
SET CLUSTER SETTING server.identity_map.configuration='';
The server.jwt_authentication.issuers property is the Okta URL, i.e.
SET CLUSTER SETTING server.jwt_authentication.issuers='https://dev-number.okta.com';Please note to specify the standard URL and not the admin URL, i.e. https://dev-number-admin.okta.com/.
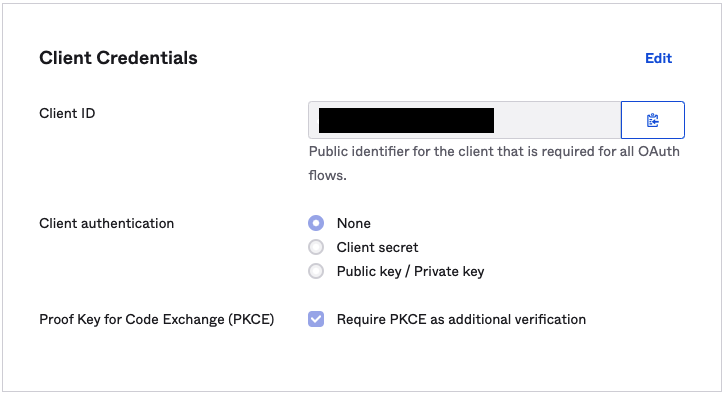
The server.jwt_authentication.audience property is the Okta Client ID, you may find it in your Okta Console
The server.jwt_authentication.jwks can be captured by navigating to /oauth2/v1/keys endpoint of your Okta organization, i.e. https://dev-number.okta.com/oauth2/v1/keys. Copy the entire output string.

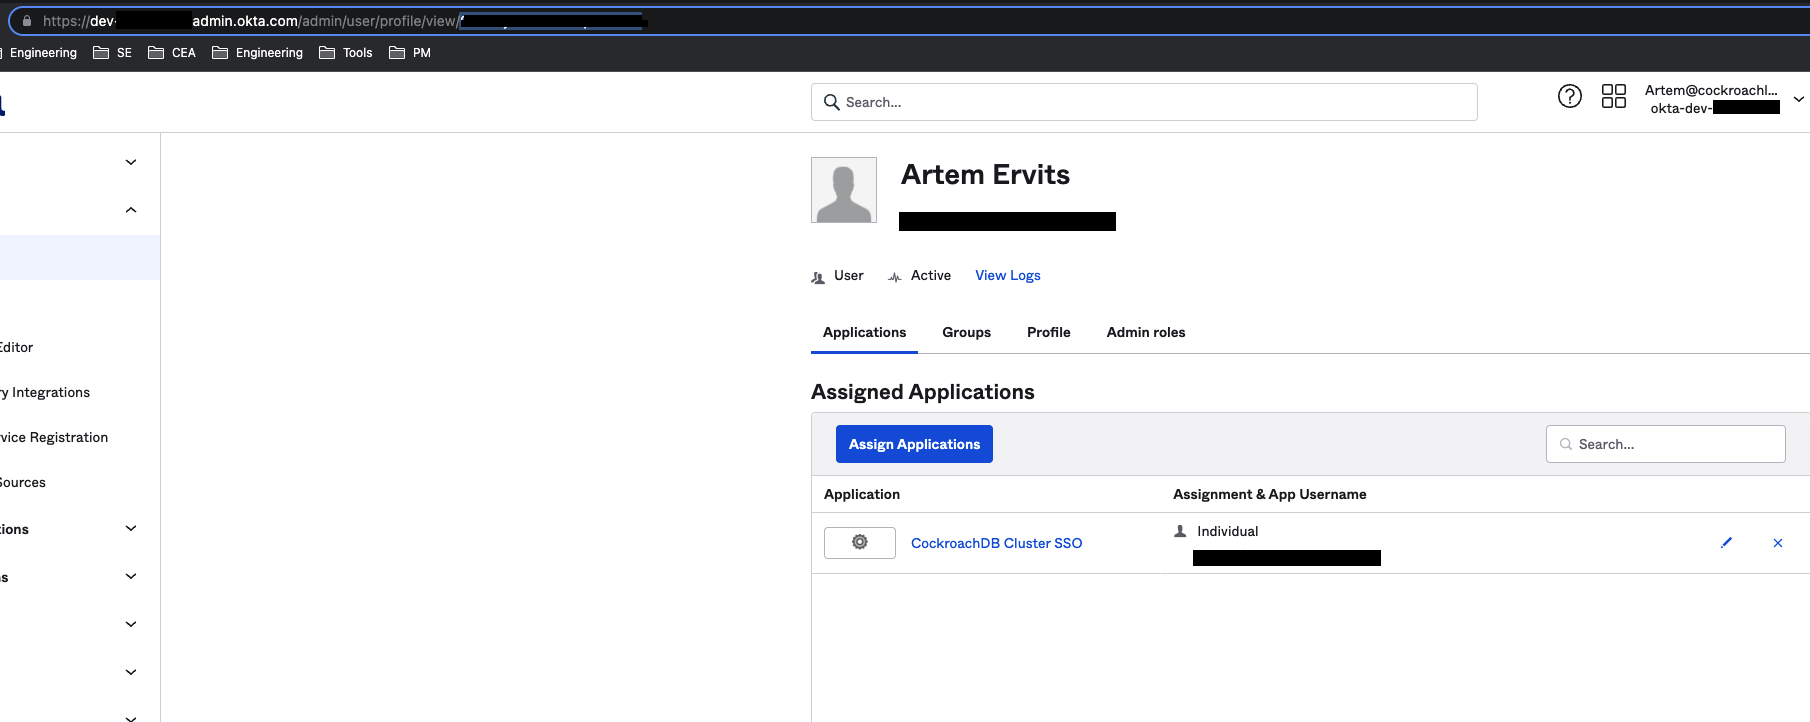
The server.identity_map.configuration property is your Okta URL, Client ID secret and SQL user as per the PostgreSQL documentation.
SET CLUSTER SETTING server.identity_map.configuration='https://dev-number.okta.com okta-userid-from-admin-url roach';The okta-userid-from-admin-url can be found by navigating to the specific user in the Okta admin console and copying the ID from the URL
Finally, execute the queries in the CockroachDB CLI and make sure they complete successfully.
At this point, we have to request a JWT token from Okta. Set up the following curl command:
export CLIENT_ID=<Okta Client ID>
export CLIENT_SECRET=<Okta Client Secret>
export USERNAME=<Okta user>
export PASSWORD=<Okta password>
curl --request POST \
--url https://dev-number.okta.com/oauth2/v1/token \
--header 'accept: application/json' \
-u "$CLIENT_ID:$CLIENT_SECRET" \
--header 'content-type: application/x-www-form-urlencoded' \
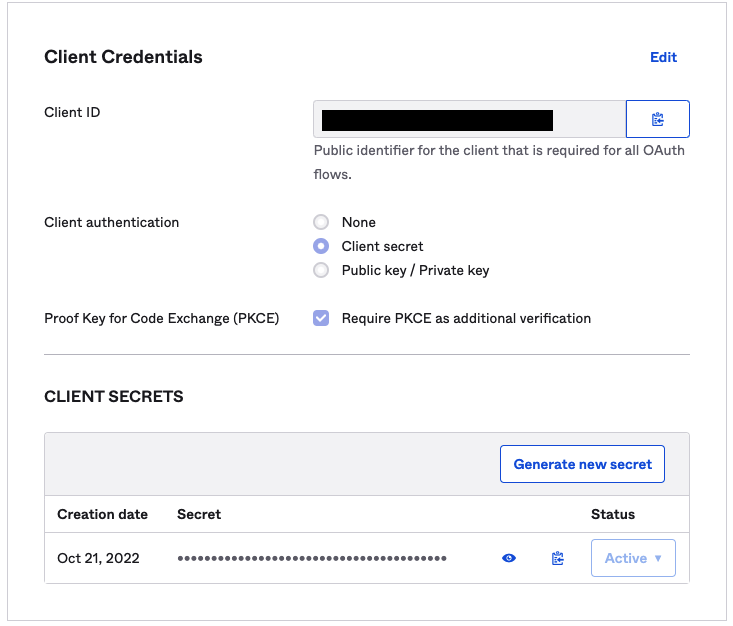
--data "grant_type=password&username=$USERNAME&password=$PASSWORD&scope=openid"You can find the secret
Under General / Client Credentials
Click Edit / Client secret / Save
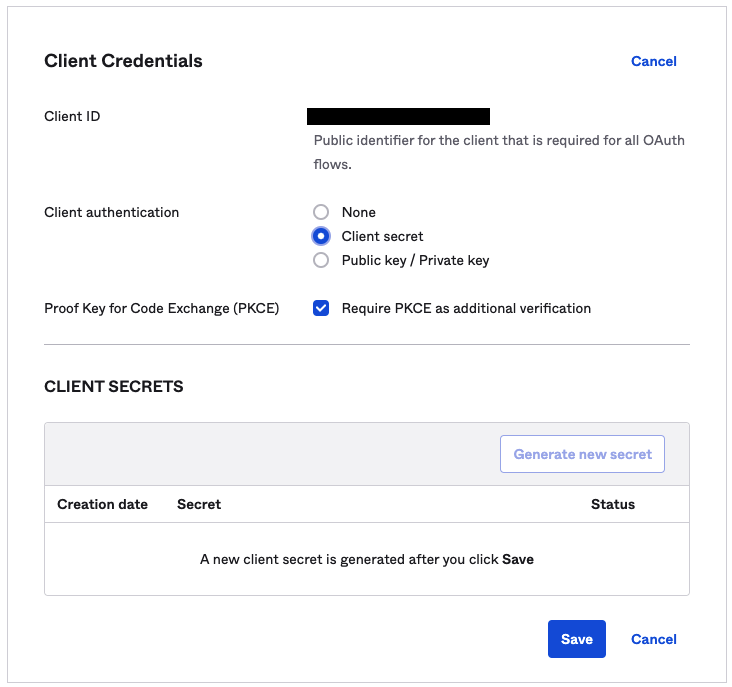
Then save it to the clipboard
Execute the curl command from above and capture the output, specifically the part where it says id_token.
"id_token":"eyJraWQiOiI2ZTNIbl8tVHQ4TDF2V0FaT1IzcUk4aTVNMjlNWkRtZ1o0bktaSDJPYVRzIiwiYWxnIjoiUlMyNTYifQ.eyJzdWIiOiIwMHUzdXk3bTR3RU12cUdDNDVkNyIsInZlciI6MSwiaXNzIjoiaHR0cHM6Ly9kZXYtNTMyMDE4NDEub2t0YS5jb20iLCJhdWQiOiIwb2E2eWwzOWs0NVlnQnVQWjVkNyIsImlhdCI6MTY2NjM4NTczOCwiZXhwIjoxNjY2Mzg5MzM4LCJqdGkiOiJJRC5kd3JscWtReUtxUG9yME5vbzR4VzRVX2lOb3o3eU5vSDE4TGVFUGhndHFNIiwiYW1yIjpbInB3ZCJdLCJpZHAiOiIwMG8zdXk2cnViOEFlWGpvUDVkNyIsImF1dGhfdGltZSI6MTY2NjM4NTczNywiYXRfaGFzaCI6IkRIalhmNWp2N2FsZVhGXzVtazJHVEEifQ.ZoDhQvU5DkUalsQehw9vUFbWNN_Rzs44Ui_zKJ_oowNW3VejeUE_s-ks_dGtcBwmDuvzkFqDY3bio8OgMmZMcZwQdvzD2-GBsIZgshaFnqSrQQ-vE87BDmVepnYu_bWsydB1FQcyvFqZ7fxojTqV609IDlSGI761iEM9AQjgpaPbdJeQMYf6cf3bWR8q7vzquEDBAimX_Pztgoz332QoGcR2ha-nEOwbxe67tPicAAKP8fZWkF1AluUbkRyCWatW1oSxKeNbANGZvvYmebanDb12L-fU6lOP6epvWaRrTlYtx7r2YHG-gsqawLmSpa5V4y5_bkDRmXltStSw1I-9Eg"}The JWT token is the value surrounded by double quotes.
At this point, we can connect to Cockroach using the JWT tokens.
Verify
The connection command will look similar to the following:
cockroach sql --url \
"postgresql://user:<token>@host:26257?options=--crdb:jwt_auth_enabled=true" --certs-dir=/certscockroach sql --url \
"postgresql://roach:eyJraWQiOiI2ZTNIbl8tVHQ4TDF2V0FaT1IzcUk4aTVNMjlNWkRtZ1o0bktaSDJPYVRzIiwiYWxnIjoiUlMyNTYifQ.eyJzdWIiOiIwMHUzdXk3bTR3RU12cUdDNDVkNyIsInZlciI6MSwiaXNzIjoiaHR0cHM6Ly9kZXYtNTMyMDE4NDEub2t0YS5jb20iLCJhdWQiOiIwb2E2eWwzOWs0NVlnQnVQWjVkNyIsImlhdCI6MTY2NjM4NjI4MCwiZXhwIjoxNjY2Mzg5ODgwLCJqdGkiOiJJRC5sTF9XWV9jdmhjOVUzSXl2U3lVWERrRWNfZXFNV1Z4aUJvOUd2TGVlRjh3IiwiYW1yIjpbInB3ZCJdLCJpZHAiOiIwMG8zdXk2cnViOEFlWGpvUDVkNyIsImF1dGhfdGltZSI6MTY2NjM4NjI4MCwiYXRfaGFzaCI6Im9qVXBIeG8xd01CX2VKWGF2NmR3ZVEifQ.gwQUUD4KJGS0llKg0fR_PFNK8NQmu30vqdHJ12XPlL9sSgXNUjuxEdTAw76N5mZdJOfWU1_GRjevndufVCDxc2k-2Z5FU2-y93h7ct2fgfyvBVXUX7NJYZzzygmWECEAw8-LsdiYB3WVpi-43CVIV8CWWEv8WJIk3d83p8K_0q7ODG5xEwgU-YLDXpX9Mb03ps-jFryLEBpcGefnJil9wXBqDz3YFW816pq39wT6efRQDYjgxJK_P6UxK3ANSuWcEXsZuPfPBleYEKG4HCzASYAhH04oQPJ3wR6r4ER5c01c24-eZZ2e5KMGSUxI8dWeYITlb7qxum2yJsVumB7Fyg@lb:26257?options=--crdb:jwt_auth_enabled=true" --certs-dir=/certsAt this point, you should be authenticated
#
# Welcome to the CockroachDB SQL shell.
# All statements must be terminated by a semicolon.
# To exit, type: \q.
#
# Server version: CockroachDB CCL v22.2.0-beta.4 (x86_64-pc-linux-gnu, built 2022/10/17 14:34:07, go1.19.1) (same version as client)
#
# Enter \? for a brief introduction.
#
roach@lb:26257/defaultdb>
We can inspect the current connection:
roach@lb:26257/defaultdb> \c
Connection string: postgresql://roach:~~~~~~@lb:26257/?application_name=%24+cockroach+sql&connect_timeout=15&options=--crdb%3Ajwt_auth_enabled%3Dtrue&sslcert=%2Fcerts%2Fclient.roach.crt&sslkey=%2Fcerts%2Fclient.roach.key&sslmode=verify-full&sslrootcert=%2Fcerts%2Fca.crt
You are connected to database "defaultdb" as user "roach".
roach@lb:26257/defaultdb>
To my surprise, using JWT tokens is not limited to cockroach binary alone. We can use the psql client to authenticate with CockroachDB via JWT tokens as well.
I will install the client into my cockroach image:
rpm -ivh https://download.postgresql.org/pub/repos/yum/reporpms/EL-8-x86_64/pgdg-redhat-repo-latest.noarch.rpm

microdnf install postgresql15
The command to authenticate requires an option to pass a flag telling CockroachDB to treat the assumed password as a JWT token.
export PGOPTIONS=--crdb:jwt_auth_enabled=true

psql "postgresql://roach:eyJraWQiOiI2ZTNIbl8tVHQ4TDF2V0FaT1IzcUk4aTVNMjlNWkRtZ1o0bktaSDJPYVRzIiwiYWxnIjoiUlMyNTYifQ.eyJzdWIiOiIwMHUzdXk3bTR3RU12cUdDNDVkNyIsInZlciI6MSwiaXNzIjoiaHR0cHM6Ly9kZXYtNTMyMDE4NDEub2t0YS5jb20iLCJhdWQiOiIwb2E2eWEwaW1yMVdFMlVOZDVkNyIsImlhdCI6MTY2NjY0MTU4OSwiZXhwIjoxNjY2NjQ1MTg5LCJqdGkiOiJJRC5KeWwtcXJia3M5MWpzbFl4c0ZhTUV5ZExmTEplRnlacVlralBXV0V5aU1rIiwiYW1yIjpbInB3ZCJdLCJpZHAiOiIwMG8zdXk2cnViOEFlWGpvUDVkNyIsImF1dGhfdGltZSI6MTY2NjY0MTU4OSwiYXRfaGFzaCI6IkEzSjNtd2U2emJVdDZlcGUzdEs4T3cifQ.OsRVU9PZZtYZojevb0fHDXc9H7p98R53H2EF2B_Yd7zfTQV08FRyPGJokCNEO-d1PaDujytW1fMJPB_EAvinto5mDW3heb2kxUf1wpz2jT6egBJkEH6WJKzTMuPBpsWh0OUB3Zb7rcuuNYPjv8lk-mHE7iWXvhgZNe-b-oUxxfjbi7cXXK8ew0h-nqj-zSFnGdmONsfwgJWmEX3ikHy7CcooHiTsJN3ipJ_3szf-brTNIXq7FYTfoxMIrWA78QZyVsqKJOBRFTNGZwJiK7s6cScNVSPDXwPTRddWBdvUErUTPOs_7Dmt8L7JB1uUdqnb_mrVkoNx23aU9ATLEwGSUg@lb:26257?sslcert=%2Fcerts%2Fclient.roach.crt&sslkey=%2Fcerts%2Fclient.roach.key&sslmode=verify-full&sslrootcert=%2Fcerts%2Fca.crt"
Instead of the password field, you paste the value for id_token. Once you authenticate, you should see a standard PostgreSQL prompt.
psql (15.0, server 13.0.0)
SSL connection (protocol: TLSv1.3, cipher: TLS_AES_128_GCM_SHA256, compression: off)
Type "help" for help.

roach=>
Let's inspect the current connection
roach=> \c
psql (15.0, server 13.0.0)
SSL connection (protocol: TLSv1.3, cipher: TLS_AES_128_GCM_SHA256, compression: off)
You are now connected to database "roach" as user "roach".
We can also use psql with parameters to authenticate to CockroachDB, we have to pass the options flag as a parameter.
psql "port=26257 host=lb user=roach options=--crdb:jwt_auth_enabled=true sslmode=verify-full sslkey=%2Fcerts%2Fclient.roach.key sslcert=%2Fcerts%2Fclient.roach.crt sslrootcert=/certs/ca.crt password=eyJraWQiOiI2ZTNIbl8tVHQ4TDF2V0FaT1IzcUk4aTVNMjlNWkRtZ1o0bktaSDJPYVRzIiwiYWxnIjoiUlMyNTYifQ.eyJzdWIiOiIwMHUzdXk3bTR3RU12cUdDNDVkNyIsInZlciI6MSwiaXNzIjoiaHR0cHM6Ly9kZXYtNTMyMDE4NDEub2t0YS5jb20iLCJhdWQiOiIwb2E2eWEwaW1yMVdFMlVOZDVkNyIsImlhdCI6MTY2NjY0MTU4OSwiZXhwIjoxNjY2NjQ1MTg5LCJqdGkiOiJJRC5KeWwtcXJia3M5MWpzbFl4c0ZhTUV5ZExmTEplRnlacVlralBXV0V5aU1rIiwiYW1yIjpbInB3ZCJdLCJpZHAiOiIwMG8zdXk2cnViOEFlWGpvUDVkNyIsImF1dGhfdGltZSI6MTY2NjY0MTU4OSwiYXRfaGFzaCI6IkEzSjNtd2U2emJVdDZlcGUzdEs4T3cifQ.OsRVU9PZZtYZojevb0fHDXc9H7p98R53H2EF2B_Yd7zfTQV08FRyPGJokCNEO-d1PaDujytW1fMJPB_EAvinto5mDW3heb2kxUf1wpz2jT6egBJkEH6WJKzTMuPBpsWh0OUB3Zb7rcuuNYPjv8lk-mHE7iWXvhgZNe-b-oUxxfjbi7cXXK8ew0h-nqj-zSFnGdmONsfwgJWmEX3ikHy7CcooHiTsJN3ipJ_3szf-brTNIXq7FYTfoxMIrWA78QZyVsqKJOBRFTNGZwJiK7s6cScNVSPDXwPTRddWBdvUErUTPOs_7Dmt8L7JB1uUdqnb_mrVkoNx23aU9ATLEwGSUg"Finally, if you're like me and prefer to use a pgurl with psql client, the only way I was able to authenticate was to add an options flag at the end of the command.
psql "postgresql://roach:eyJraWQiOiI2ZTNIbl8tVHQ4TDF2V0FaT1IzcUk4aTVNMjlNWkRtZ1o0bktaSDJPYVRzIiwiYWxnIjoiUlMyNTYifQ.eyJzdWIiOiIwMHUzdXk3bTR3RU12cUdDNDVkNyIsInZlciI6MSwiaXNzIjoiaHR0cHM6Ly9kZXYtNTMyMDE4NDEub2t0YS5jb20iLCJhdWQiOiIwb2E2eWEwaW1yMVdFMlVOZDVkNyIsImlhdCI6MTY2NjY0MTU4OSwiZXhwIjoxNjY2NjQ1MTg5LCJqdGkiOiJJRC5KeWwtcXJia3M5MWpzbFl4c0ZhTUV5ZExmTEplRnlacVlralBXV0V5aU1rIiwiYW1yIjpbInB3ZCJdLCJpZHAiOiIwMG8zdXk2cnViOEFlWGpvUDVkNyIsImF1dGhfdGltZSI6MTY2NjY0MTU4OSwiYXRfaGFzaCI6IkEzSjNtd2U2emJVdDZlcGUzdEs4T3cifQ.OsRVU9PZZtYZojevb0fHDXc9H7p98R53H2EF2B_Yd7zfTQV08FRyPGJokCNEO-d1PaDujytW1fMJPB_EAvinto5mDW3heb2kxUf1wpz2jT6egBJkEH6WJKzTMuPBpsWh0OUB3Zb7rcuuNYPjv8lk-mHE7iWXvhgZNe-b-oUxxfjbi7cXXK8ew0h-nqj-zSFnGdmONsfwgJWmEX3ikHy7CcooHiTsJN3ipJ_3szf-brTNIXq7FYTfoxMIrWA78QZyVsqKJOBRFTNGZwJiK7s6cScNVSPDXwPTRddWBdvUErUTPOs_7Dmt8L7JB1uUdqnb_mrVkoNx23aU9ATLEwGSUg@lb:26257?sslcert=%2Fcerts%2Fclient.roach.crt&sslkey=%2Fcerts%2Fclient.roach.key&sslmode=verify-full&sslrootcert=%2Fcerts%2Fca.crt" options=--crdb:jwt_auth_enabled=trueConclusion
This completes our overview of this cutting-edge capability. We've only scratched the surface of what JWT tokens can provide for Database Ops. In the follow-up articles, we're going to demonstrate how we can leverage token expiry to improve our security posture and demonstrate how we can grant, revoke and renew tokens.
Recommend
About Joyk
Aggregate valuable and interesting links.
Joyk means Joy of geeK