

How to Create a Chatbot Using Azure Bot Service: Step-by-Step Instructions
source link: https://dzone.com/articles/how-to-create-a-chatbot-using-azure-bot-service-st
Go to the source link to view the article. You can view the picture content, updated content and better typesetting reading experience. If the link is broken, please click the button below to view the snapshot at that time.

Messengers, network services, and other software cannot go without bots. In software, a bot is an application designed to automate (or execute, according to a preset script) an action created at a user’s request. In this article, Daniil Mikhov, .NET Developer at NIX United, will look at an example of creating a chatbot using Microsoft's Azure Bot Service. The article will be helpful for anyone who wants to develop bots using the service.
Why Azure Bot Service?
The advantage of developing bots on Azure Bot Services is the high level of Microsoft support for its products. The company's experts actively communicate with the community and promptly identify and fix bugs in their services. In addition, Microsoft provides the ability to create custom JSON files to work with some messengers’ API, allowing you many possibilities when creating bots.
It is also important to remember the other advantages:
- The Azure Bot Service allows you to use open-source SDK tools (Software Development Kit) to create, test, and deploy the bot.
- Integration with Cognitive Services is services that use machine learning tools in their work to solve typical tasks. CS ensures a better process of interaction between the bot and the user.
- Multi-platform is the ability to connect the bot to multiple channels without having to change the original code.
- A large number of open source examples to facilitate the development process and quick start (a lot of examples of ready-made code on GitHub).
You can expand your bot infrastructure on Azure by adding new functionality. For example, you can add more channels and test with each of them. You can use the Cosmos DB service to store dialog states and information entered by the user. To train the bot, you can add LUIS (Language Understanding). This uses machine learning algorithms for better communication with the user. However, LUIS is not free, and not every one of your customers will want to allocate additional funding.
Anatomy of a Bot in Azure Bot Services
The structure of the functioning of the bot created on Azure can be represented as follows:
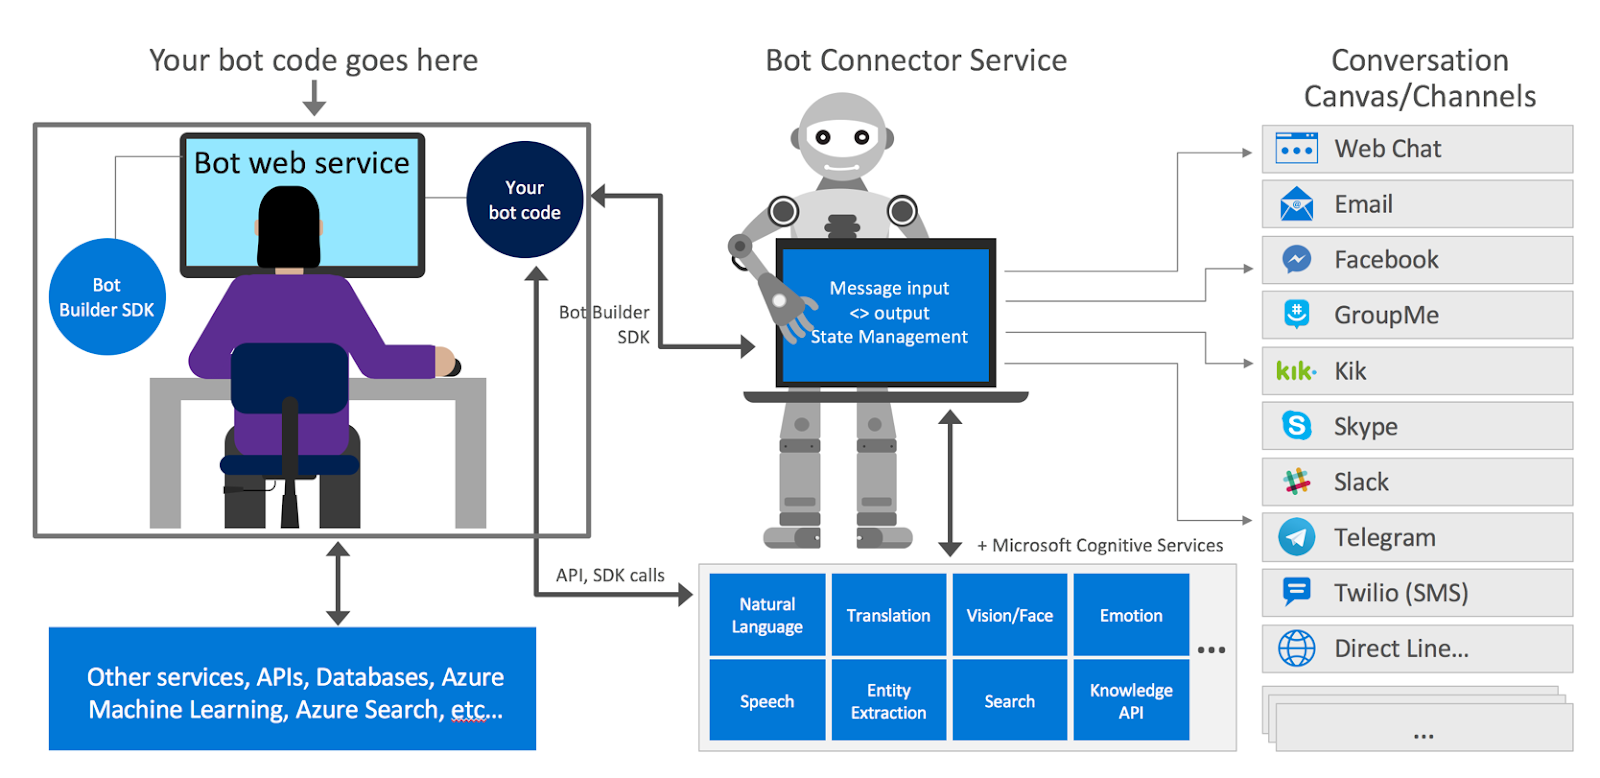
You can see a list of possible channels to connect to the bot on the right. This list is constantly updated with new platforms. At the bottom are the available Microsoft Cognitive Services that the Azure platform can work with. These services allow you to communicate with the bot through voice requests, facial expressions, gestures, and more.
The Bot Builder SDK is used to develop a bot on Azure. The product is in the public domain, and its main advantage is the constant support of developers. In a separate branch on GitHub, you can always get the latest information about the service or ask questions to its developers.
Moving on to the Сreation of the Bot
Before writing the code, let's analyze the nuances you should consider before creating a bot on Azure Bot Service:
- Updates that disrupt functionality. Microsoft is constantly updating its products. New updates often break parts of the code that used to work. So always read the patch lists of new Bot Builder SDK builds. Someone else’s manuals you will use to develop your bot may become irrelevant.
- Unobvious solutions. When using the Bot Builder SDK, you should always be open to experimentation and be willing to do things differently than you are used to.
- Versatility. The same bot can be uploaded to different channels (Telegram, Skype, Slack, and so on) without changing its source code. However, when developing a bot, you should keep in mind that each of these platforms has nuances which will require different approaches from you as a developer when creating the working logic of the application.
Does the Bot Understand You Correctly?
Communication with the bot is through the user interface. The user interface allows you to communicate with the bot in a language it understands. For this purpose, Azure uses a system of dialogs that follow a specific hierarchy:
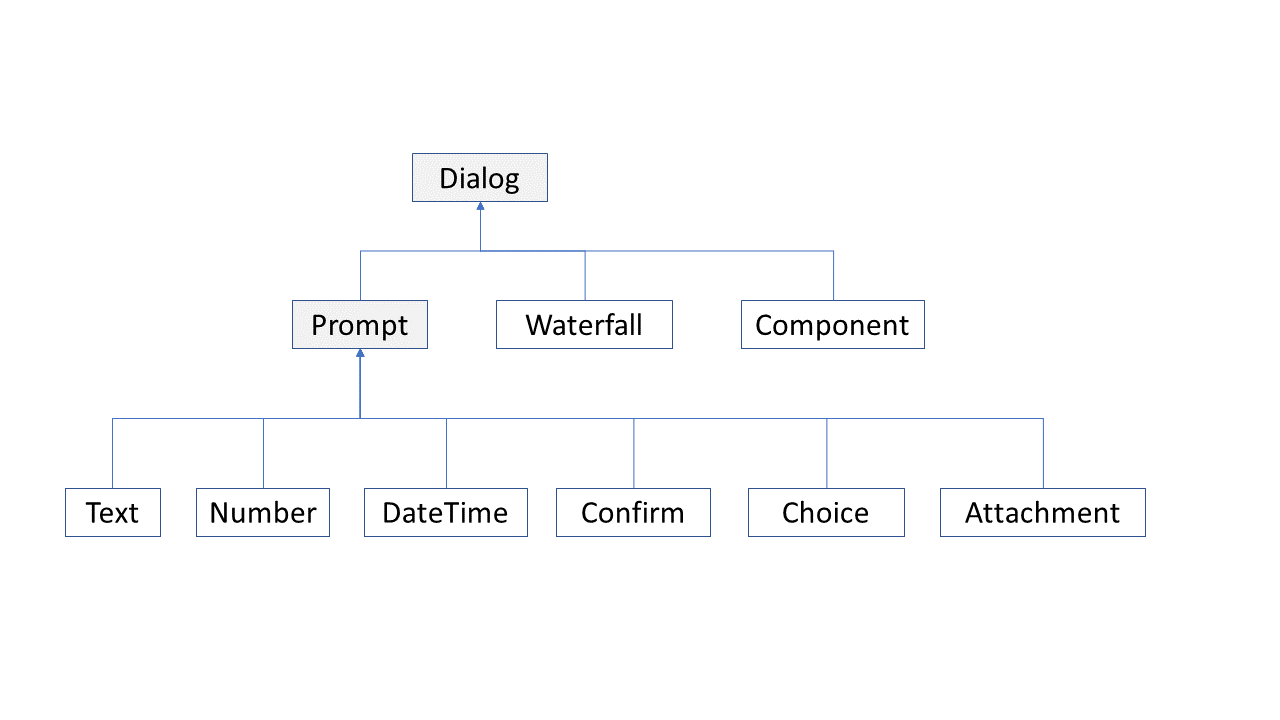
Here you can see three basic ways to build a dialog with the bot:
- Prompt—the bot interacts with the user through hints and answers. For example, you give the bot information as a numerical hint. Prompt checks whether the user correctly answered the cue. If it is successful, the dialog with the bot continues. If an incorrect answer was received from the user, he would be prompted to enter valid data.
- Waterfall is a way of collecting information from the user by going through a series of sequential tasks/questions. Each step of the waterfall dialog is implemented as an asynchronous function. At each stage, the bot asks the user for input data, waits for a response, and then passes the results to the next step. The result of the first function is passed to the following function as an argument, and so on until the whole cycle of questions has been passed.
- Component is a method that uses the breakdown of a large and voluminous dialog into smaller, easily manageable parts. Component allows you to create a reusable dialog and use it later for various independent scenarios. For example, you can use it to make a dialog that will sequentially ask the user for the street name/address/postal code.
In the bottom row, you can see the allowed ways to create a custom request to the bot:
- Text query (Text)
- Number query (Number)
- Date/time request (DateTime)
- Confirm request (Confirm)
- Choice request (Choice)
- Attachment request (Attachment)
In essence, queries are phased dialogs: in the first phase, the bot asks for input data, and in the second phase, it returns valid values to the user or starts the data query cycle anew if invalid values are received.
Controllers and Templates
Let's look at the code on the example of the Remind me Later chatbot I created—its main task was to remind me of any actions I need to take in the future.
To create the bot, I used the Empty Template provided by Visual Studio, which includes several types of controllers: BotController and NotifyController.
The BotController accepts messages for the bot and passes them to the bot framework. The bot also consists of several Deployment Templates, which are used to more easily deploy the application to the Azure platform.
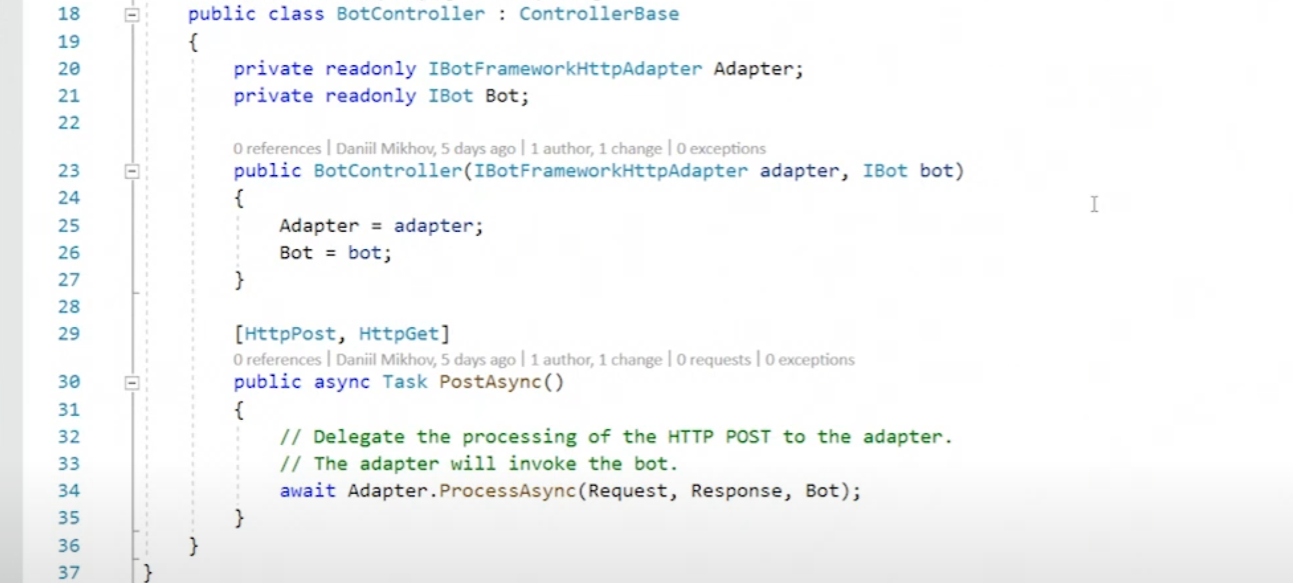
The NotifyController determines when to send a message to the user. I will talk about this in more detail later on.
Startup Features and Filling the ToDoDialog Tab
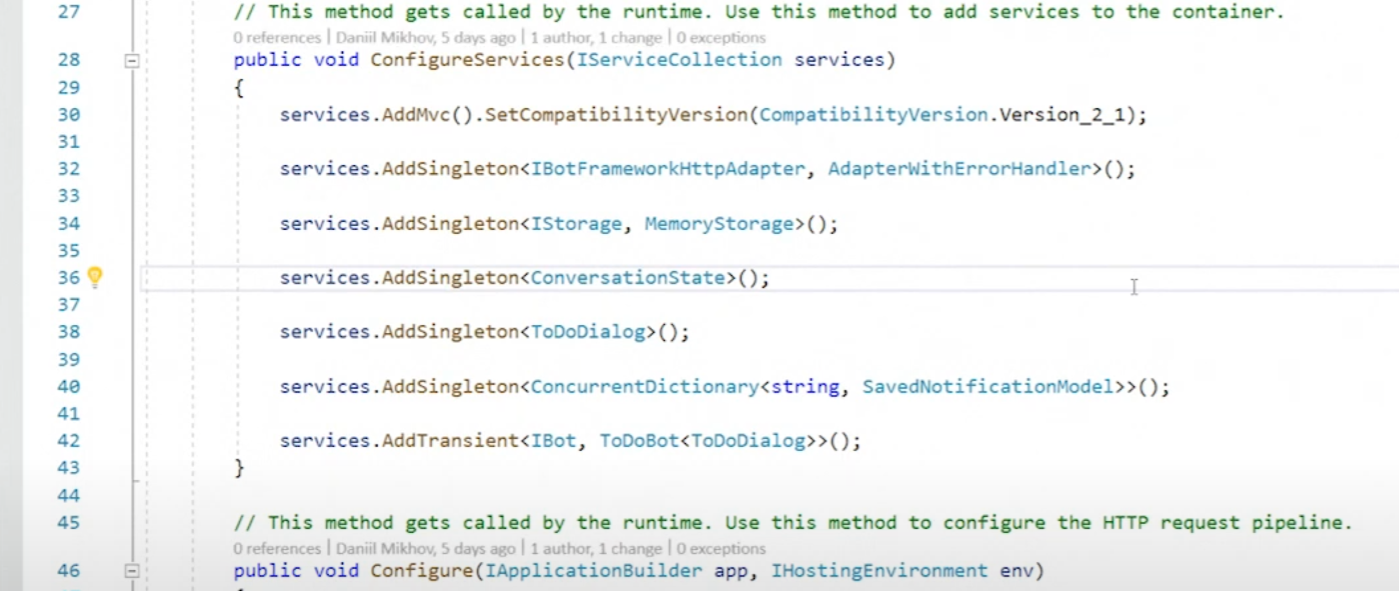
Let's go to the Startup.cs tab and look at its content. Here you can see the registered error handler, AdapterWithErrorHandler. It is necessary for the reaction of the application to errors in case they occur in the program. Pay attention to the registration ConversationState—we use it to make the bot understand with which user he is communicating and at what stage of the dialog.
Let's look at the contents of the ToDoDialog.cs tab. I've declared waterfallSteps, a set of steps for the waterfall-dialog, which we've already mentioned above. In waterfallSteps we specify which asynchronous functions will be used to build a dialog between the user and the bot in each step.

Below you can see what types of input Prompts our bot will use. The content here is pretty standard: the bot will ask us a few questions about the event and then offer to schedule a reminder.

Now let's run the chatbot and test its operation using the Bot Framework Emulator interface.
First Launch and Testing in the Bot Framework Emulator
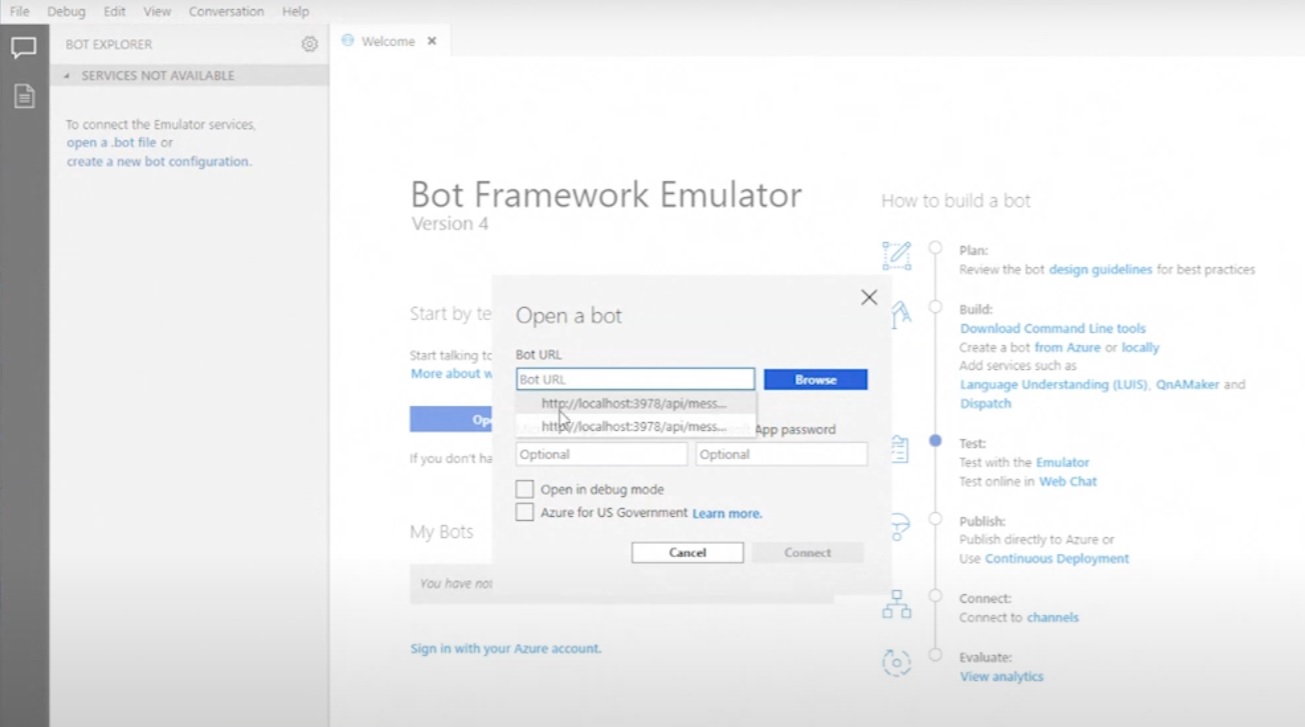
When you run the app, a link to the URL where the bot will wait for a message from the user appears.

Before we start testing, let's specify this link in the Bot Framework Emulator:
In the first communication step, the bot asks the user to enter the event name for which you want a reminder. To do this, call the following code:

Now, when you call the bot, it will return the following text: Please enter event description. After declaring the event for which you want to make a reminder (for example: Buy Milk), call the code of the second step—here the bot will offer to choose one of the three options of the reminder time:
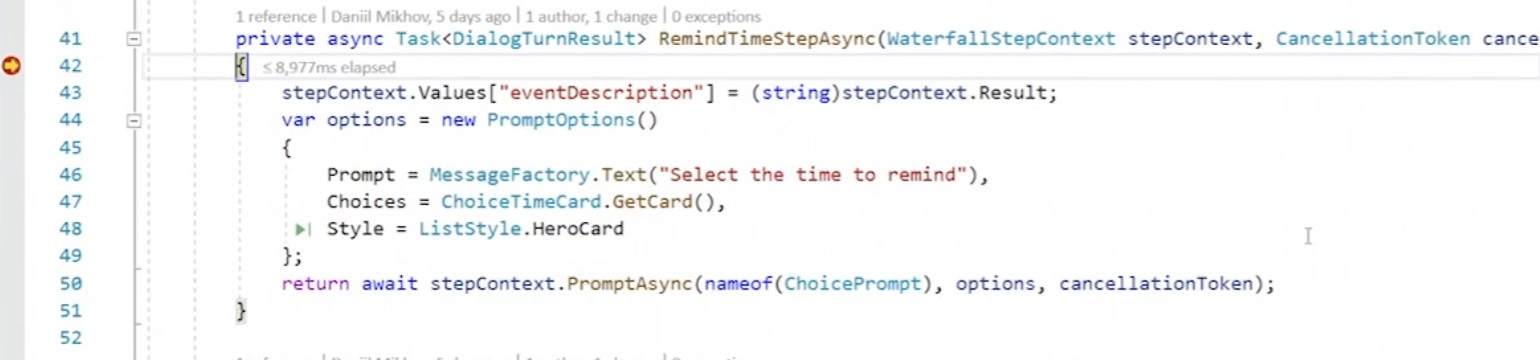
Note the use of stepContext. It saves all the information about the dialog, recording intermediate values. To implement the list of possible reminder times, I used ChoicePrompt. This method will offer the user to choose 3 options with a possible reminder time (in 2 minutes, in 5 minutes, or the next day at the same time). There could be more choices, but I settled on three.
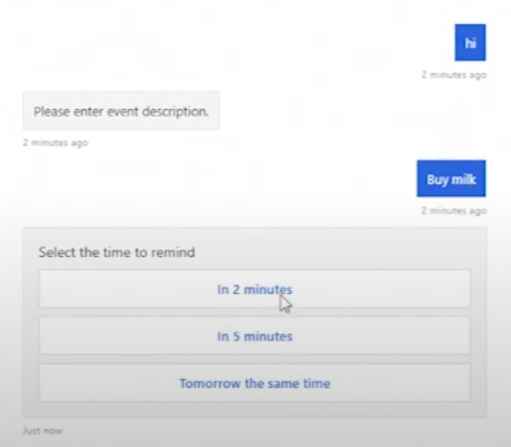
We denote each new selection time by Choice and obtain:

In the Bot Framework Emulator, this code will be rendered like this:
The result can be parsed using Parse. Let me remind you that parsing is the process of automatically collecting data and then structuring it. The bot will then ask the user if they are sure about the selected reminder time, using ConfirmPrompt to confirm the agreement:
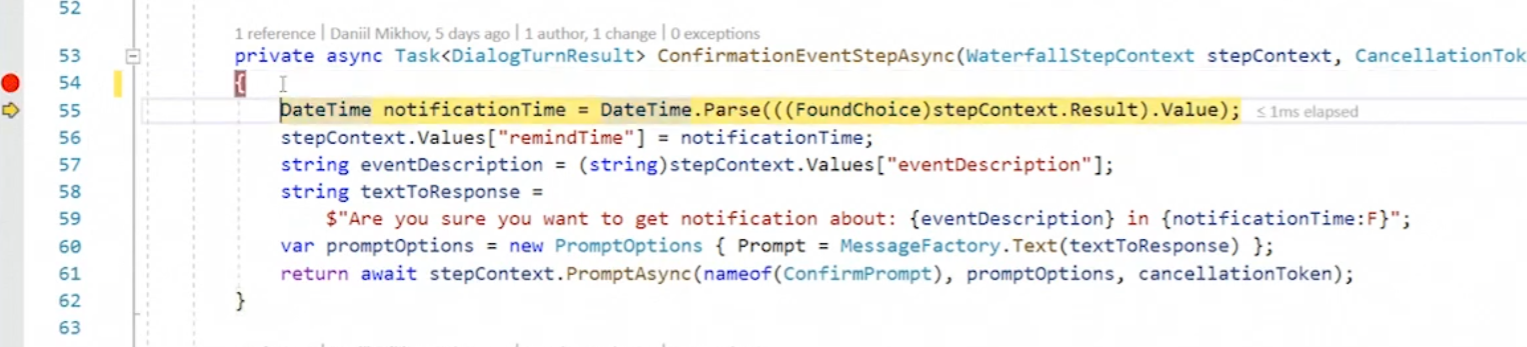
Visually, this method will look as follows:
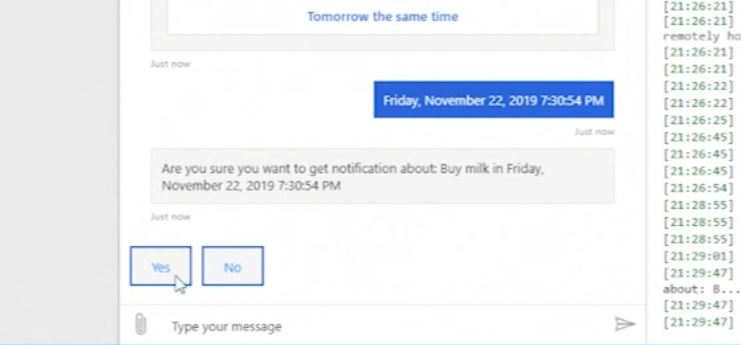
The last step is to take the previously filled information out of stepContext and generate a SavedNotificationModel, to which we must add a conversationReference. Without it, the bot won't be able to restore the dialog with the user and won't figure out which user specifically addressed it.

I used the dictionary method as a temporary repository for these events, thanks to which the bot assigns its unique instanceId to each specific dialog:
This will end the dialog with the bot. You can display text to the user, indicating the end of the dialog and creating a corresponding reminder request: Thanks. Notification has been successfully saved.

How the Bot Navigates Through Time
To orient the bot in time, I created the NotifiedController method NotifyTimeCheck(). This method allows us to poll our application systematically, and if the time of an event is about to occur, the bot will retrieve this event from the dictionary and send a notification to the user.

To get the notification, I will call the ContinueConversationAsync() method of the BotAdapter and pass the ConversationReference to it. The first parameter of ContinueConversationAsync() must always be the appId (Application ID) of our bot service, otherwise, it won't work.
In addition, the bot needs to be reminded that when a certain time arrives, the event must be reminded to a particular user. You can use Azure Function (BotTimerFunction), which will be triggered by a time trigger (TimerTrigger).
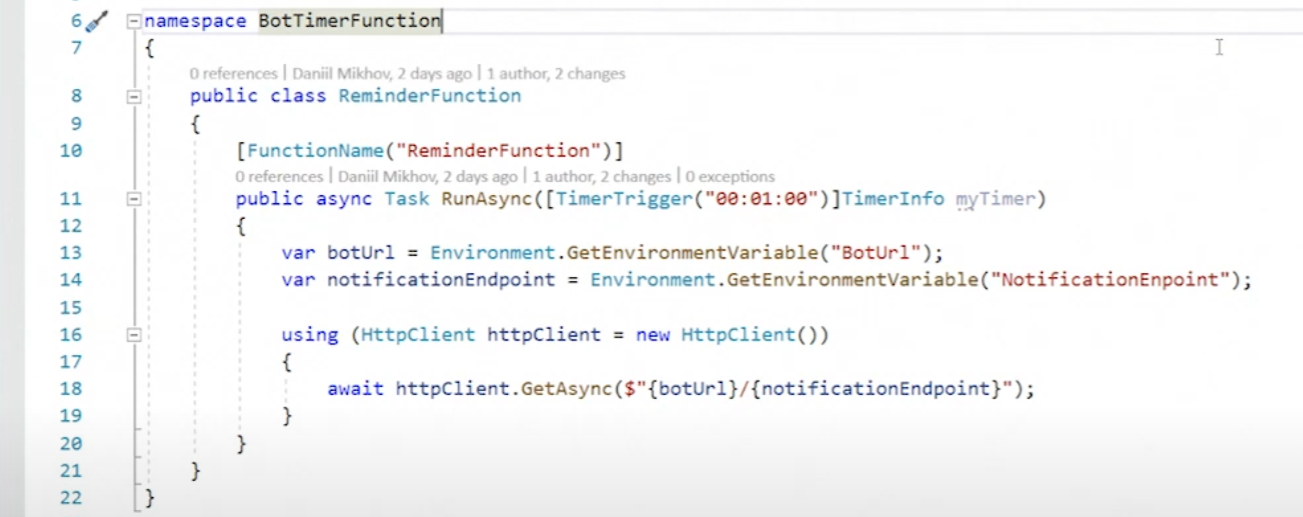
Every minute, the function will send a request to this Endpoint and start checking for the prescribed events. If it hits the correct time frame, the bot will notify the user that the scheduled event is imminent.
Today WhatsApp, Facebook Messenger, Telegram, and other messengers are not only platforms for communication but also for doing business. Chatbots help companies effectively sell and promote goods and services online. Automating routine processes, promptly providing customers with necessary product information, and receiving and processing requests — all these features of an appropriately configured chatbot will help convert a regular user into a regular customer. So you, as developers, should remember how popular this tool is nowadays and how cool it is to be able to create such things and thus be a sought-after specialist.
Recommend
About Joyk
Aggregate valuable and interesting links.
Joyk means Joy of geeK