

Cinchoo - ChoEazyCopy, Yet Another RoboCopy GUI
source link: https://www.codeproject.com/Articles/988605/Cinchoo-ChoEazyCopy-Yet-Another-RoboCopy-GUI
Go to the source link to view the article. You can view the picture content, updated content and better typesetting reading experience. If the link is broken, please click the button below to view the snapshot at that time.

Contents
1. Introduction
RoboCopy is a powerful tool included in the Microsoft Windows Server that is used to perform more advanced file replication tasks. The biggest benefit you'll find is the ability to create full mirror duplicates of two file structures (including all subdirectories and files, if you choose). RoboCopy also allows you to preserve all of the associated file information, including date and time stamps, security access control lists (ACLs) and more which is missing from normal file copy operations.
For people who like to work with command line, RoboCopy.exe tool as it is comes with package is great enough for them. However, for those who are comfortable to work with GUI, here it is EazyCopy, a simple and intuitive GUI tool to RoboCopy command.
This tool is developed using Cinchoo - An application framework for .NET. It is another working example of using some of the key features of Cinchoo framework.
2. Features
- Simple and Intuitive GUI
- Compose and Save the options as profile for later use
- Run multiple instances
- Run and launch from Windows System Tray
- Provides text box with
RoboCopycommands associated with the changes to the properties - Display immediate hints to an option highlighted in the property grid or in the text editor
- Able to run the
RoboCopywithin the GUI - 'Eazy Copy...' Windows Explorer extension
- 32-bit or 64-bit support
3. How to Run
This tool can be started and run as:
- Console Application
- Windows Application
- Tray Application
- Shell File Type (.ezy) Association
- Explorer Shortcut Menu ('Eazy Copy...')
3.1 Window Mode
By default, if you run the executable (ChoEazyCopy.exe), it will start as a Windows application. In the main window, you can compose RoboCopy command with your options, run them immediately. Additionally, you can save the RoboCopy command with options as profile (.ezy file) file and later you can open it using this tool to execute them as and when needed.
The main window looks like below:
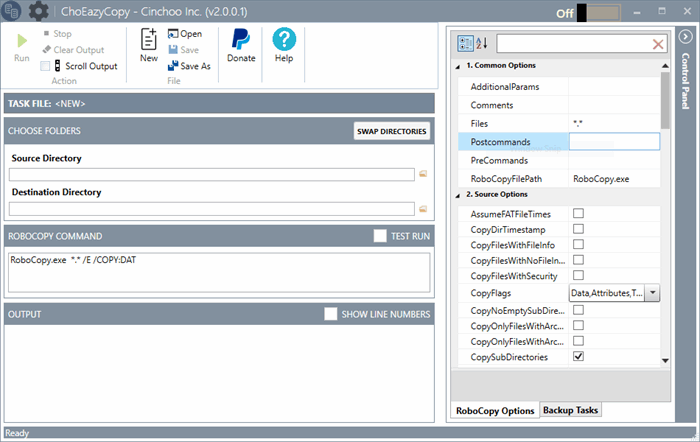 Image 3.1.1 Main Window (With RoboCopy Options Tab)
 Image 3.1.2 Main Window (With Backup Tasks Tab)
3.1.1 Main Toolbar
Main application toolbar contains a set of application command buttons that gives users quick access to do compose, open, save profiles and control the execution of file operations.

Image 3.1.1.1 Main Toolbar
 - Create new profile settings file.
 - Open a existing profile settings file.
 - Save the profile settings to file.
 - Save the profile settings to new file.
 - Start the RoboCopy processing.
 - Stop the RoboCopy processing.
 - Erase the status messages.
- Scroll Output - Turn on / off the output scrolling
- Highlighted in Blue area shows the name of the profile settings file.
3.1.2 Folders Selection
This section of controls allows to choose the folders needed for RoboCopy operations.

- Source Directory - Source path where the files and sub folders are copied from
- Destination Directory - Target path where the files and sub folders are copied to
3.1.3 Output

This output window shows the output messages of the RoboCopy operation.
3.1.4 RoboCopy Options Tab Window

It is a property grid window to visually edit and manage RoboCopy command line options group together by category.
It has the below 4 categories:
- Copy Options
- Logging Options
- Retry Options
- Common Options
Each category contains a list of RoboCopy options. You can follow the below link for more help about RoboHelp:
Common Options
AdditionalParams- Any additional parameters not listed in the property grid you may want to pass toRoboCopy, you can specify here.Files- The files to be copied from source to target location. Wildcard accepted.RoboCopyFilePath- If theRoboCopyis not in the PATH, you can specify the exact location of theRoboCopyexecutable here.Precommands- Specify any MS-DOS commands to be executed before theRoboCopyoperation. Each command can be separated by ;Postcommands- Specify any MS-DOS commands to be executed after theRoboCopyoperations. Each command can be separated by ;Comments- Short description of RoboCopy task.
For Precommands & Postcommands, you can use {{SRC_DIR}} / {{DEST_DIR}} tokens to replace them with source directory / destination directory respectively.
3.1.5 Backup Tasks Tab Window
In this window, you can load and manage the collection of Backup Tasks (aka. RoboCopy tasks) within this tool. Select the location of folder where the files reside. This tool automatically discover and load all the files with .ezy extension. From here you can perform the below operations
- Clone existing task.
- Delete a task.
- Modify the comments of a task.

3.2 Tray Application Mode
Sometimes, you may want to keep this tool running all the time and quickly go back to get access to this tool to carry out bulk file operations. In such cases, you can let them run in tray mode. By pressing 'minimize' button, the tool will be made to run in tray mode.
After minimizing the main window, the tool will run in system tray. The below image shows the tool in system tray.

In this mode, when you right click on this tool application icon, you will be given the below menu options:
- Open - To restore the window
- Launch New Instance - Open a new instance of
EazyCopyapplication - Run as Administrator - Launch the application in administrator mode
- Always on Top - To keep the window as topmost of all other Windows applications
- Run at System Startup - This option lets the application start up automatically when the system starts
The below image shows the system tray context menu of this tool.


- Register Shell Extensions - Register .ezy files to windows shell, so it is easy to open by double clicking the file.
- Unregister Shell Extensions - Unregister .ezy files from windows shell.
3.3 Console Mode
This tool can be started as Console Application by passing /#AM:Console command line parameter to the executable.
>ChoEazyCopy.exe /#AM:Console test.ezy /s:"C:\Test1" /d:"C:\Test2"
Where:
- /#AM:Console - Instruct the tool to start in console mode
- test.ezy - Profile Settings file path, either absolute or relative file path.
- /s - Source directory. Optional. If not specified, it will be picked up from settings file.
- /d - Destination directory. Optional. If not specified, it will be picked up from settings file.
3.3.1 Help
To get help of the application, pass /? in command line.
Listing 3.3.1.1 Getting help
>ChoEazyCopy.exe /#AM:Console /?
ChoEazyCopy [Version 1.0.0.0]
Copyright c  2015

CHOEAZYCOPY SettingsFilePath [/s:<string>] [/d:<string>]

        SettingsFilePath        Settings file path.
        /s                      Source directory.
        /d                      Destination directory.
Below is the screenshot of help.

3.4 Shell File Type (.ezy) Association
This tool registers and associates .blk (profile settings file extension) files when you run this tool in elevated rights. Once registration is successful, you can open .blk files from explorer directly by double-clicking the file. The below screenshot shows the .blk file associations.

3.5 Explorer Shortcut Menu
This tool registers and associates to all folders when you run this tool in elevated rights. Once registration is successful, you can right-click on any folder in explorer and launch this tool by clicking 'Eazy copy...' menu. The below screenshot shows the shortcut menu associations on folders.

History
- 6th May, 2015: Initial version
Recommend
About Joyk
Aggregate valuable and interesting links.
Joyk means Joy of geeK