Android热补丁之Robust原理解析(一)
早在16年9月份,美团技术团队就写过一篇文章描述 Android 热补丁框架Robust的简单实现原理,但是并没有开源;然后在17年3月份,美团团队宣布正式开源 Robust并且配套了自动打补丁包工具。本系列文章主要解析Robust实现原理,分为几个方面
本文为第一篇,主要讲解补丁加载过程和基础包插桩过程,分析版本 0.3.2。
系列文章:
从 InstantRun 说起
不得不说 InstantRun 真是个好东西。目前主流的热修复框架都有或多或少的参考 InstantRun 的某些技术点,比如 Tinker 的官方文章中明确考虑过 InstantRun 中的 Application 替换,虽然最后没有采用,但是身为其兄弟库的 TinkerPatch 中一键接入方案就采用的该技术点。关于该技术点,可以参考我之前写的一篇文章 一键接入Tinker 。
我们知道,InstantRun 对应三种更新机制:
- 冷插拔,我们称之为重启更新机制
- 温插拔,我们称之为重启Activity更新机制
- 热插拔,我们称之为热更新机制
如果你还不熟悉 InstantRun,请参考我的这篇文章从Instant run谈Android替换Application和动态加载机制
而这篇文章的主角 Robust ,其热修复的关键技术点就是采用了 InstantRun 中的热更新机制,对应于多 ClassLoader 的动态加载方案,即一个 dex 文件对应一个新建 ClassLoader 。
Robust 原理解析
Robust 的原理可以简单描述为:
- 打基础包时插桩,在每个方法前插入一段类型为
ChangeQuickRedirect 静态变量的逻辑
- 加载补丁时,从补丁包中读取要替换的类及具体替换的方法实现,新建 ClassLoader 加载补丁dex。
我们来分别分析。
打基础包时,Robust 为每个类新增了一个类型为 ChangeQuickRedirect 的静态变量,并且在每个方法前,增加判断该变量是否为空的逻辑,如果不为空,走打基础包时插桩的逻辑,否则走正常逻辑。我们反编译出基础包中的代码如下:
//SecondActivity
public static ChangeQuickRedirect u;
protected void onCreate(Bundle bundle) {
if (u != null) {
if (PatchProxy.isSupport(new Object[]{bundle}, this, u, false, 78)) {
PatchProxy.accessDispatchVoid(new Object[]{bundle}, this, u, false, 78);
return;
super.onCreate(bundle);
对应于补丁文件,需要有三个文件
PatchesInfoImpl 用于记录修改的类,及其对应的 ChangeQuickRedirect 接口的实现,我们反编译补丁包得出以下结果,其中的类名是混淆后的。
public class PatchesInfoImpl implements PatchesInfo {
public List getPatchedClassesInfo() {
List arrayList = new ArrayList();
arrayList.add(new PatchedClassInfo("com.meituan.sample.robusttest.l", "com.meituan.robust.patch.SampleClassPatchControl"));
arrayList.add(new PatchedClassInfo("com.meituan.sample.robusttest.p", "com.meituan.robust.patch.SuperPatchControl"));
arrayList.add(new PatchedClassInfo("com.meituan.sample.SecondActivity", "com.meituan.robust.patch.SecondActivityPatchControl"));
EnhancedRobustUtils.isThrowable = false;
return arrayList;
xxxPatchControl 是 ChangeQuickRedirect 接口的具体实现,是一个代理,具体的替换方法是在 xxxPatch 类中
public class SecondActivityPatchControl implements ChangeQuickRedirect {
public boolean isSupport(String methodName, Object[] paramArrayOfObject) {
return "78:79:90:".contains(methodName.split(":")[3]);
public Object accessDispatch(String methodName, Object[] paramArrayOfObject) {
SecondActivityPatch secondActivityPatch;
Object obj = methodName.split(":")[3];
if ("78".equals(obj)) {
secondActivityPatch.onCreate((Bundle) paramArrayOfObject[0]);
if ("79".equals(obj)) {
return secondActivityPatch.getTextInfo((String) paramArrayOfObject[0]);
if ("90".equals(obj)) {
secondActivityPatch.RobustPubliclambda$onCreate$0((View) paramArrayOfObject[0]);
return null;
} catch (Throwable th) {
th.printStackTrace();
最终调用 accessDispatch 方法,该方法会根据传递过来的方法签名,调用xxxPatch的修改过的方法。
xxxPatch 具体的替换实现类,代码就不贴了。
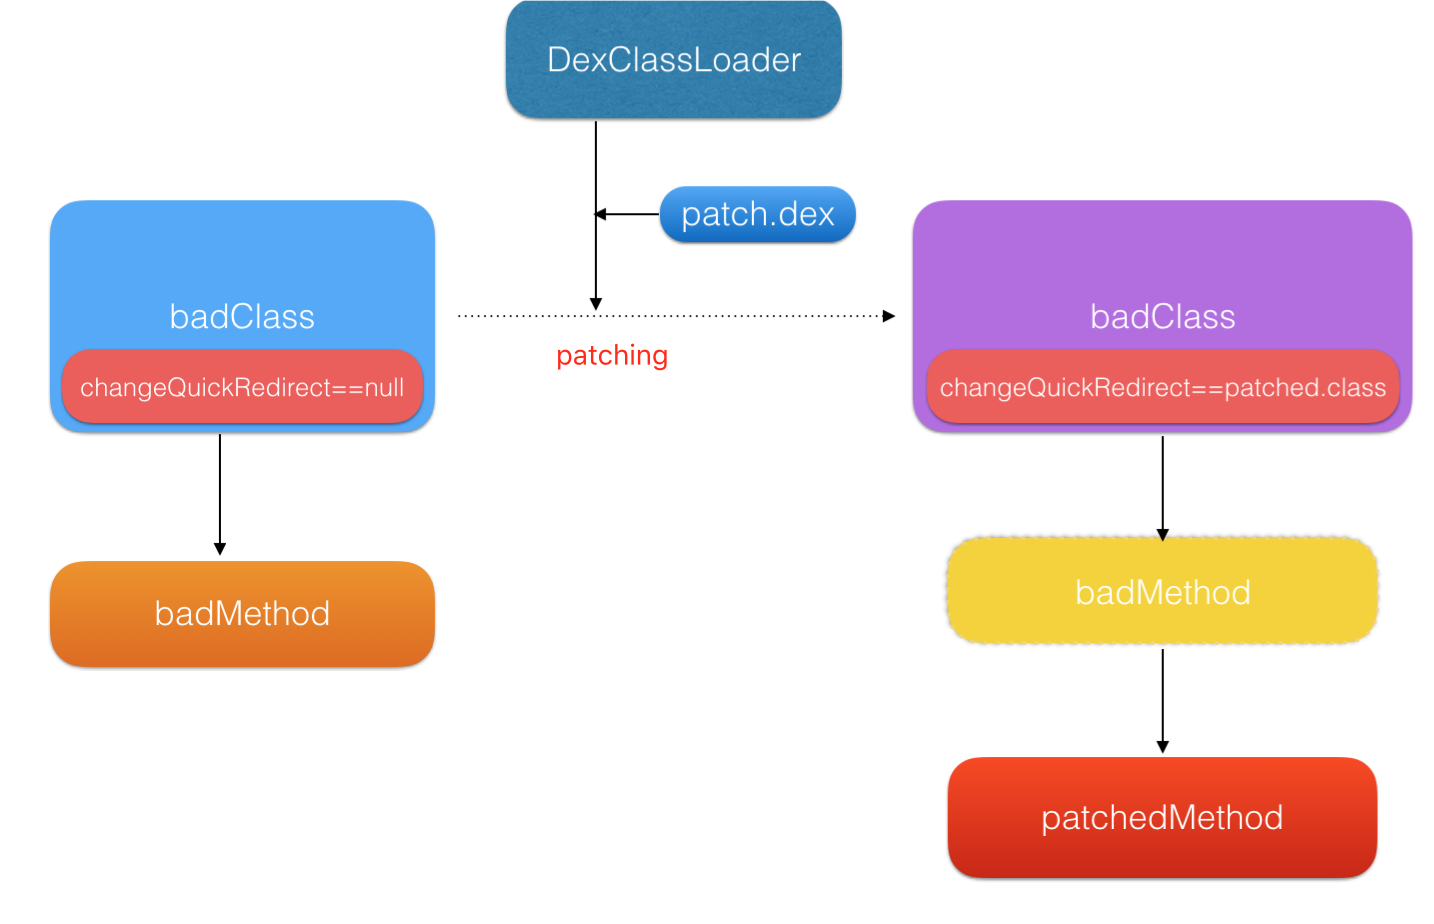
其过程可以简单描述为,下发补丁包后,新建 DexClassLoader 加载补丁 dex 文件,反射得到 PatchesInfoImpl class,并创建其对象,调用 getPatchedClassesInfo() 方法得到哪些修改的类(比如 SecondActivity),然后再通过反射循环拿到每个修改类在当前环境中的的class,将其中类型为 ChangeQuickRedirect 的静态变量反射修改为 xxxPatchControl.java 这个class new 出来的对象。
用官方的一种图很好的表达了替换原理。
补丁加载过程分析
demo中的补丁加载就一句
new PatchExecutor(getApplicationContext(), new PatchManipulateImp(), new Callback()).start();
PatchExecutor 是个 Thread
public class PatchExecutor extends Thread {
@Override
public void run() {
applyPatchList(patches);
* 应用补丁列表
protected void applyPatchList(List<Patch> patches) {
for (Patch p : patches) {
currentPatchResult = patch(context, p);
protected boolean patch(Context context, Patch patch) {
DexClassLoader classLoader = new DexClassLoader(patch.getTempPath(), context.getCacheDir().getAbsolutePath(),
null, PatchExecutor.class.getClassLoader());
patch.delete(patch.getTempPath());
patchsInfoClass = classLoader.loadClass(patch.getPatchesInfoImplClassFullName());
patchesInfo = (PatchesInfo) patchsInfoClass.newInstance();
} catch (Throwable t) {
for (PatchedClassInfo patchedClassInfo : patchedClasses) {
oldClass = classLoader.loadClass(patchedClassName.trim());
Field[] fields = oldClass.getDeclaredFields();
for (Field field : fields) {
if (TextUtils.equals(field.getType().getCanonicalName(), ChangeQuickRedirect.class.getCanonicalName()) && TextUtils.equals(field.getDeclaringClass().getCanonicalName(), oldClass.getCanonicalName())) {
changeQuickRedirectField = field;
break;
patchClass = classLoader.loadClass(patchClassName);
Object patchObject = patchClass.newInstance();
changeQuickRedirectField.setAccessible(true);
changeQuickRedirectField.set(null, patchObject);
} catch (Throwable t) {
} catch (Throwable t) {
return true;
开启一个子线程,通过指定的路径去读patch文件的jar包,patch文件可以为多个,每个patch文件对应一个 DexClassLoader 去加载,每个patch文件中存在PatchInfoImp,通过遍历其中的类信息进而反射修改其中 ChangeQuickRedirect 对象的值。
基础包插桩过程分析
类似 InstantRun , Robust 也是使用 Transform API 修改字节码文件,该 API 允许第三方插件在 .class 文件打包为 dex 文件之前操作编译好的 .class 字节码文件。
Robust 中的 Gradle-Plugin 就是操作字节码的名为 robust 的 gradle 插件项目。我们来简单看下实现。
class RobustTransform extends Transform implements Plugin<Project> {
@Override
void apply(Project target) {
//解析项目下robust.xml配置文件
robust = new XmlSlurper().parse(new File("${project.projectDir}/${Constants.ROBUST_XML}"))
project.android.registerTransform(this)
project.afterEvaluate(new RobustApkHashAction())
@Override
void transform(Context context, Collection<TransformInput> inputs, Collection<TransformInput> referencedInputs, TransformOutputProvider outputProvider, boolean isIncremental) throws IOException, TransformException, InterruptedException {
ClassPool classPool = new ClassPool()
project.android.bootClasspath.each {
logger.debug "android.bootClasspath " + (String) it.absolutePath
classPool.appendClassPath((String) it.absolutePath)
def box = ConvertUtils.toCtClasses(inputs, classPool)
insertRobustCode(box, jarFile)
writeMap2File(methodMap, Constants.METHOD_MAP_OUT_PATH)
首先读取 robust.xml 配置文件并初始化,可配置选项包括:
- 一些开关选项
- 需要热补丁的包名或者类名,这些包名下的所有类都被会插入代码
- 不需要热补的包名或者类名,可以在需要热补的包中剔除指定的类或者包
然后通过 Transform API 调用 transform() 方法,扫描所有类加入到 classPool 中,调用 insertRobustCode() 方法。
def insertRobustCode(List<CtClass> box, File jarFile) {
ZipOutputStream outStream=new JarOutputStream(new FileOutputStream(jarFile));
new ForkJoinPool().submit {
box.each { ctClass ->
if (isNeedInsertClass(ctClass.getName())) {
//将class设置为public ctClass.setModifiers(AccessFlag.setPublic(ctClass.getModifiers()))
boolean addIncrementalChange = false;
ctClass.declaredBehaviors.findAll {
//规避接口和无方法类
if (ctClass.isInterface() || ctClass.declaredMethods.length < 1) {
return false;
if (!addIncrementalChange) {
//插入 public static ChangeQuickRedirect changeQuickRedirect;
addIncrementalChange = true;
ClassPool classPool = it.declaringClass.classPool
CtClass type = classPool.getOrNull(Constants.INTERFACE_NAME);
CtField ctField = new CtField(type, Constants.INSERT_FIELD_NAME, ctClass);
ctField.setModifiers(AccessFlag.PUBLIC | AccessFlag.STATIC)
ctClass.addField(ctField)
logger.debug "ctClass: " + ctClass.getName();
if (it.getMethodInfo().isStaticInitializer()) {
return false
// synthetic 方法暂时不aop 比如AsyncTask 会生成一些同名 synthetic方法,对synthetic 以及private的方法也插入的代码,主要是针对lambda表达式
if ((it.getModifiers() & AccessFlag.SYNTHETIC) != 0 && !AccessFlag.isPrivate(it.getModifiers())) {
return false
//不支持构造方法
if (it.getMethodInfo().isConstructor()) {
return false
//规避抽象方法
if ((it.getModifiers() & AccessFlag.ABSTRACT) != 0) {
return false
//规避NATIVE方法
if ((it.getModifiers() & AccessFlag.NATIVE) != 0) {
return false
//规避接口
if ((it.getModifiers() & AccessFlag.INTERFACE) != 0) {
return false
if (it.getMethodInfo().isMethod()) {
if (AccessFlag.isPackage(it.modifiers)) {
it.setModifiers(AccessFlag.setPublic(it.modifiers))
//判断是否有方法调用,返回是否插庄
boolean flag = modifyMethodCodeFilter(it)
if (!flag) {
return false
//方法过滤
if (isExceptMethodLevel && exceptMethodList != null) {
for (String exceptMethod : exceptMethodList) {
if (it.name.matches(exceptMethod)) {
return false
if (isHotfixMethodLevel && hotfixMethodList != null) {
for (String name : hotfixMethodList) {
if (it.name.matches(name)) {
return true
return !isHotfixMethodLevel
}.each { ctBehavior ->
// methodMap must be put here
methodMap.put(ctBehavior.longName, insertMethodCount.incrementAndGet());
if (ctBehavior.getMethodInfo().isMethod()) {
boolean isStatic = ctBehavior.getModifiers() & AccessFlag.STATIC;
CtClass returnType = ctBehavior.getReturnType0();
String returnTypeString = returnType.getName();
def body = "if (${Constants.INSERT_FIELD_NAME} != null) {"
body += "Object argThis = null;"
if (!isStatic) {
body += "argThis = \$0;"
body += " if (com.meituan.robust.PatchProxy.isSupport(\$args, argThis, ${Constants.INSERT_FIELD_NAME}, $isStatic, " + methodMap.get(ctBehavior.longName) + ")) {"
body += getReturnStatement(returnTypeString, isStatic, methodMap.get(ctBehavior.longName));
body += " }"
body += "}"
ctBehavior.insertBefore(body);
} catch (Throwable t ) {
logger.error "ctClass: " + ctClass.getName() + " error: " + t.toString();
zipFile(ctClass.toBytecode(),outStream,ctClass.name.replaceAll("\\.","/")+".class");
}.get()
outStream.close();
logger.debug "robust insertMethodCount: " + insertMethodCount.get()
该方法做了以下几件事:
- 将class设置为public
- 规避 无方法类
- 规避 构造方法
- 规避 抽象方法
- 规避 native方法
- 规避 synthetic方法
- 过滤配置文件中不需要修复的类
- 通过 javassist 在类中插入
public static ChangeQuickRedirect changeQuickRedirect;
- 通过 javassist 在方法中插入逻辑代码段
- 通过 zipFile() 方法写回class文件
最后调用 writeMap2File() 将插桩的方法信息写入 robust/methodsMap.robust 文件中,此文件和混淆的mapping文件需要备份。
到这里本篇文章结束,主要讲了下基础原理、补丁加载流程和插桩过程。我们也可以简单的对 Robust 做下总结。
- 由于使用多ClassLoader方案(补丁中无新增Activity,所以不算激进类型的动态加载,无需hook system),兼容性和稳定性更好,不存在preverify的问题
- 由于采用 InstantRun 的热更新机制,所以可以即时生效,不需要重启
- 支持Android2.3-7.X版本
- 对性能影响较小,不需要合成patch
- 支持方法级别的修复,支持静态方法
- 支持新增方法和类
- 支持ProGuard的混淆、内联、编译器优化后引起的问题(桥方法、lambda、内部类等)等操作
当然,有优点就会有缺点:
- 暂时不支持新增字段,但可以通过新增类解决
- 暂时不支持修复构造方法,已经在内测
- 暂时不支持资源和 so 修复,不过这个问题不大,因为独立于 dex 补丁,已经有很成熟的方案了,就看怎么打到补丁包中以及 diff 方案。
- 对于返回值是 this 的方法支持不太好
- 没有安全校验,需要开发者在加载补丁之前自己做验证
- 可能会出现深度方法内联导致的不可预知的错误(几率很小可以忽略)
总的来说,Robust是可用的、高稳定性的、成功率很高(官方说99.9%)的、无侵入的一款优秀的热修复框架。
本文链接: http://w4lle.com/2017/03/31/robust-0/
版权声明:本文为 w4lle 原创文章,可以随意转载,但必须在明确位置注明出处!
本文链接: http://w4lle.com/2017/03/31/robust-0/


