

I made a custom ceiling mount for my camera
source link: https://www.jeffgeerling.com/blog/2021/i-made-custom-ceiling-mount-my-camera
Go to the source link to view the article. You can view the picture content, updated content and better typesetting reading experience. If the link is broken, please click the button below to view the snapshot at that time.

I made a custom ceiling mount for my camera
August 18, 2021
I shoot the 'A-roll' for my YouTube videos with a Sony a6000 and a small Glide Gear TMP 75 smartphone teleprompter:
Until recently, I had these mounted on a tripod just off the back corner of my desk:
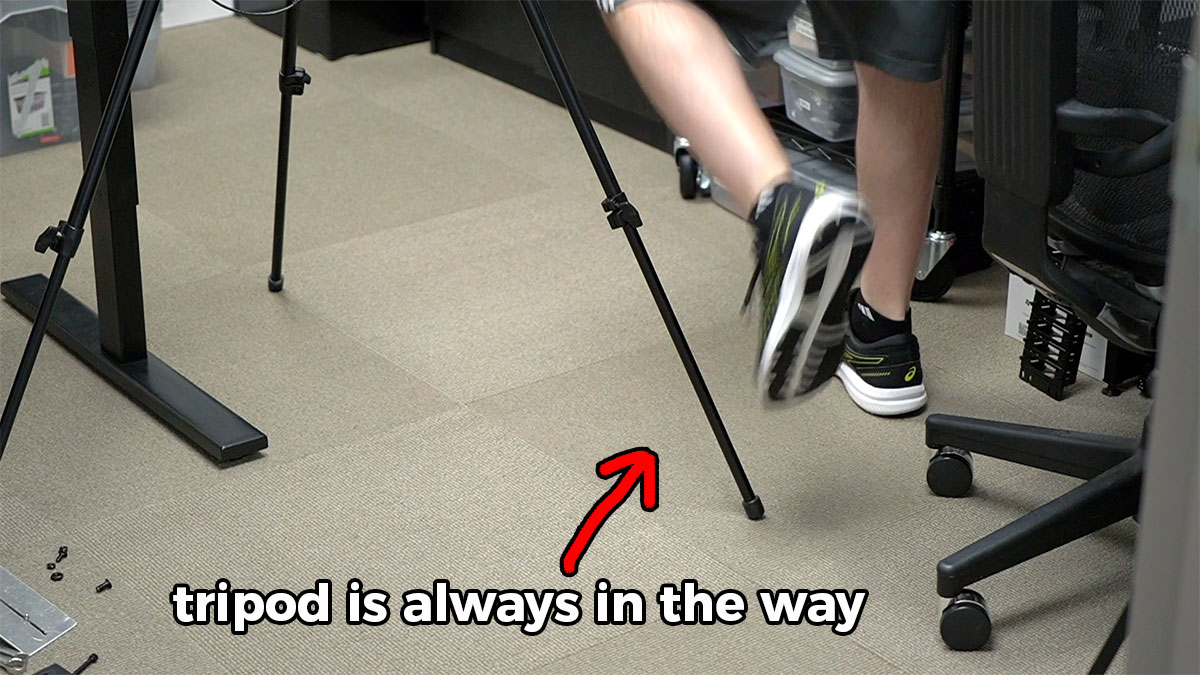
Some people mount semi-permanent camera rigs on a pole on their desks (example), but my adjustable-height desk (by UPLIFT) is not rock solid, so sometimes when I'm typing or accidentally bump the desk, anything mounted to the desktop wobbles.
For lights, monitors, etc., a little wobble isn't a problem. But even with image stabilization in my camera, the wobble becomes noticeable if I have the camera physically attached to my desk.
So I've been using a tripod. Only problem is my little 12' x 12' office is not set up to be a YouTube studio. I built it in 2014, and at the time video production was not even on my radar.
Idea: TV Ceiling Mount
I stopped looking at dedicated camera mounting arms and truss systems once I realized they'd cost at least a couple hundred dollars—and the low end of the price range includes the weaker systems that I wouldn't trust with my $1000 camera rig!
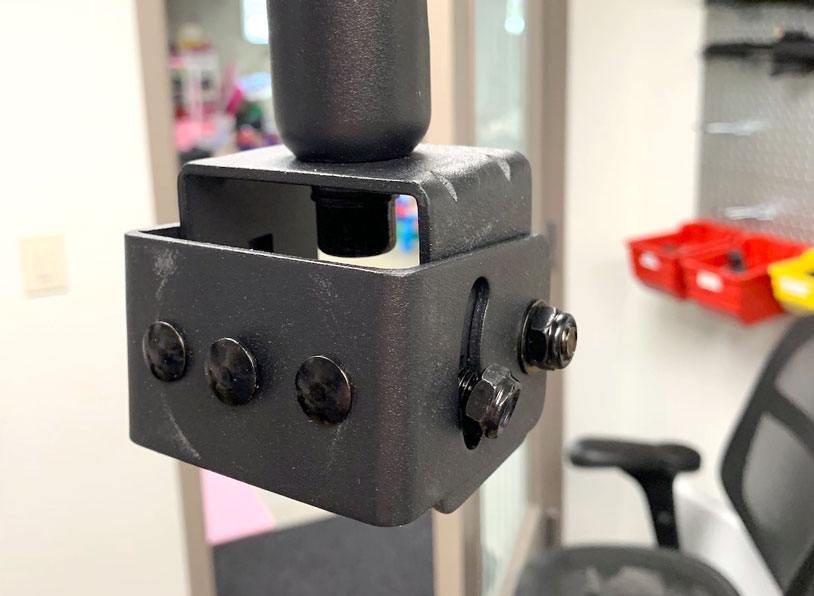
Having mounted many TVs before, I realized TV ceiling mounts are cheap, sturdy, and available darn near everywhere. I bought this VideoSecu ceiling TV mount for $37, and decided there must be a way I could hack together some sort of rigid mounting plate for it, with a platform for the camera and a tripod screw underneath.
Here's what the base of the mount looks like without the VESA mounting adapter plate attached:
Can I 3D Print it?
I initially considered a fully-3D-printed mount, with a lot of support material and a large amount of infill. I've dialed in my 3D printing setup now, and am confident I could get a good print. But I just won't trust a 5 pound camera rig on a plastic printed part.
I knew metal was the best option, but I didn't know how I'd make a bracket thick enough with the tools I had.
I have a small sheet metal folding tool and some aviation snips, but I can only use that on relatively thin metal—16 gauge, or about 1.5mm. I would need at least 3mm if I wanted to be confident in the strength of my bracket.
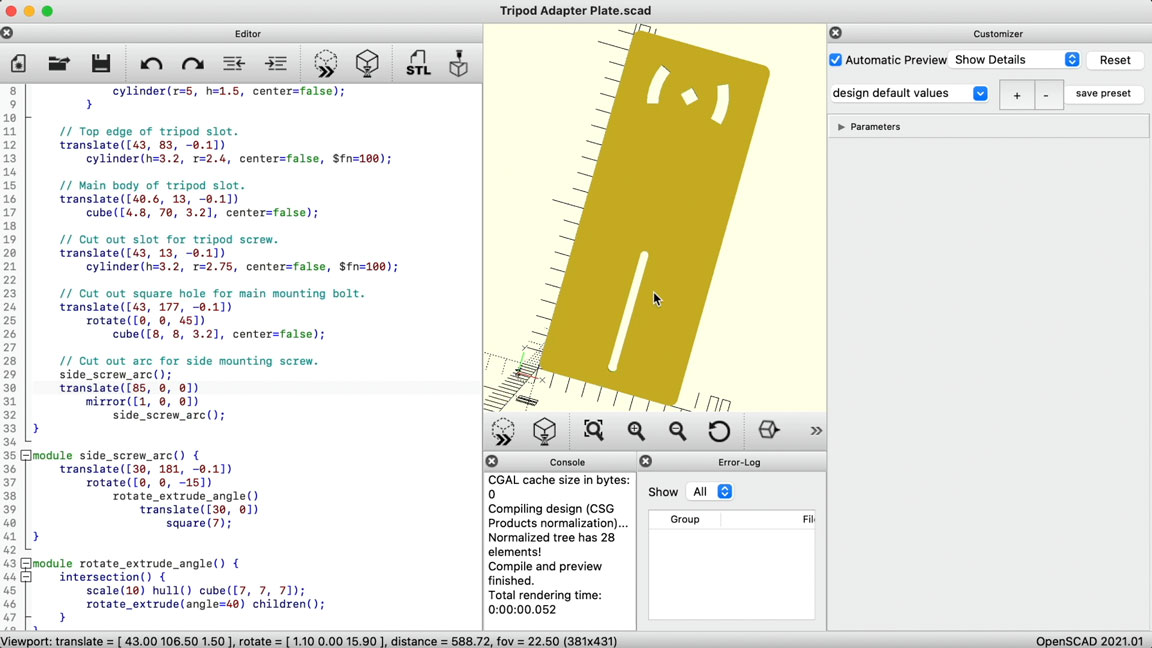
Designing the part in OpenSCAD
I used a sheet of paper and made up a template for what I wanted the final plate to look like:
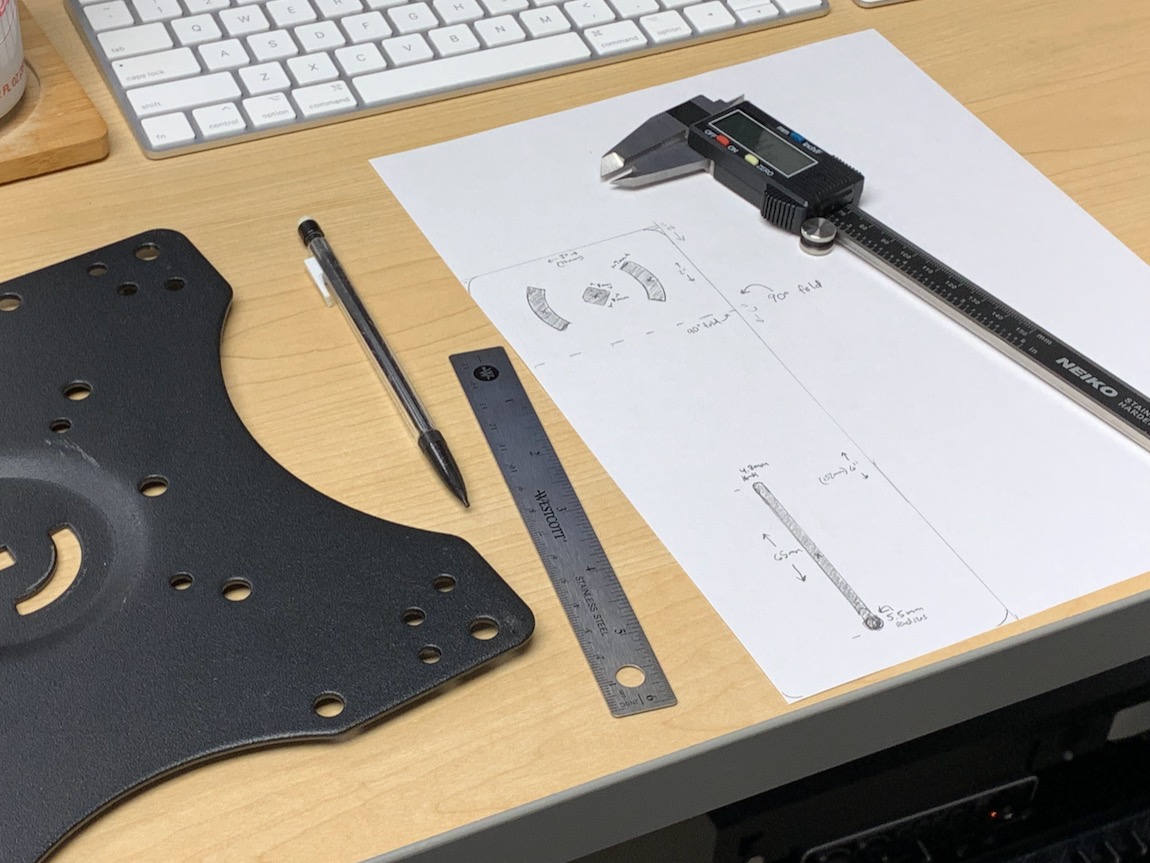
I wanted a lot of adjustability, so I decided:
- The tripod screw would be in a long channel, so the camera could be mounted closer or further from the ceiling mount pole—essential for potential upgrades to a larger teleprompter or camera in the future.
- The mounting screws would have an arc so the whole mount could be tilted forward or backward, allowing many axes of adjustability once everything's mounted up.
I decided to use OpenSCAD to do the modeling, since it's open source and it lends itself to quick designs for simple parts like this.
After a couple hours, I was satisfied I had captured the dimensions for the plate:
I also opened it up in Meshmixer to quickly plane cut the part and 'bend' it virtually so I could see what the final part would look like—assuming I found a way to bend 3mm steel!
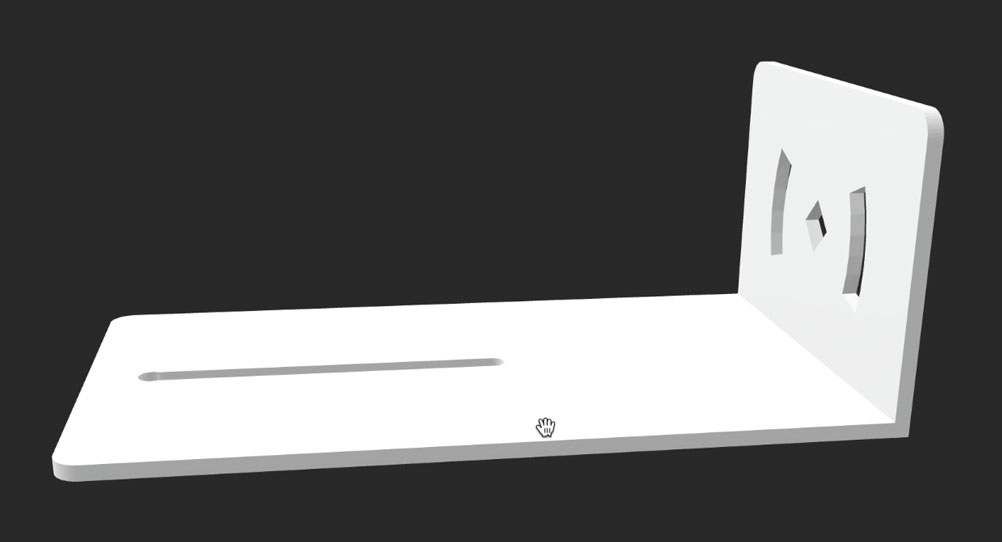
Since I have a 3D printer, I decided to print the final result for a dry-fit, and it fit great:
But it was definitely not sturdy enough for a camera rig!
Getting it MADE
At this point, I was exploring the possibility of buying a brake rated for 3mm steel, but found the options (at least for quality equipment I'd be able to use for years) too expensive to justify. I also didn't have a solution for cutting the steel that didn't involve a lot of painful abuse of my power tools meant more for woodworking.
So I asked on Twitter, and Sam Wronski pointed me to MADE, a local makerspace in St. Louis—I had no clue we had anything like it, besides Arch Reactor!

When I looked at their equipment list, I spotted the two machines I needed:
- A waterjet capable of cutting any flat shape out of darn near any material.
- Industrial-sized brakes capable of bending any of the sheet steel I could imagine using.
To use the machines, I'd need to take a training and become a member, but I wanted to get this done quickly so I could get the tripod off my office floor, so I opted for a special service they offer called Custom MADE.
My project was so simple it's almost a joke compared to the elaborate projects they often take on, but it is really nice to be able to take an idea and project description, pay someone a little money, and have a working part within a short time.
And so that's what I did, and I have a whole video about the process on my YouTube channel:
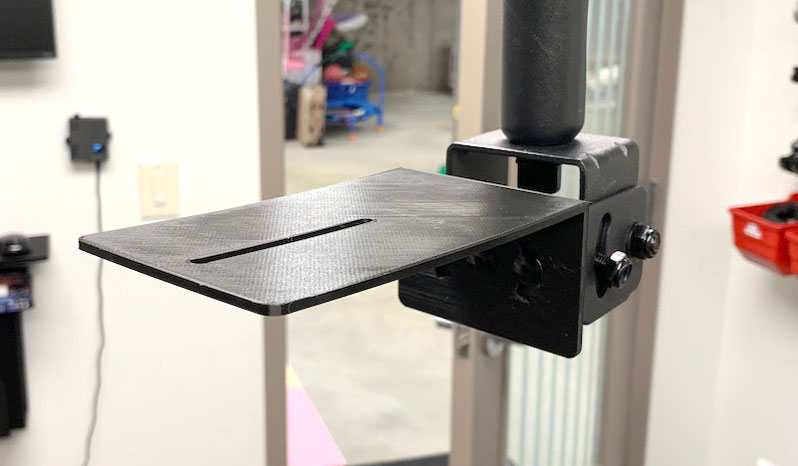
After the part was made, I tapped a 1/4"-20 hole in it with my humble little Irwin set, and put in a tripod screw from my SmallRig tripod screw kit.
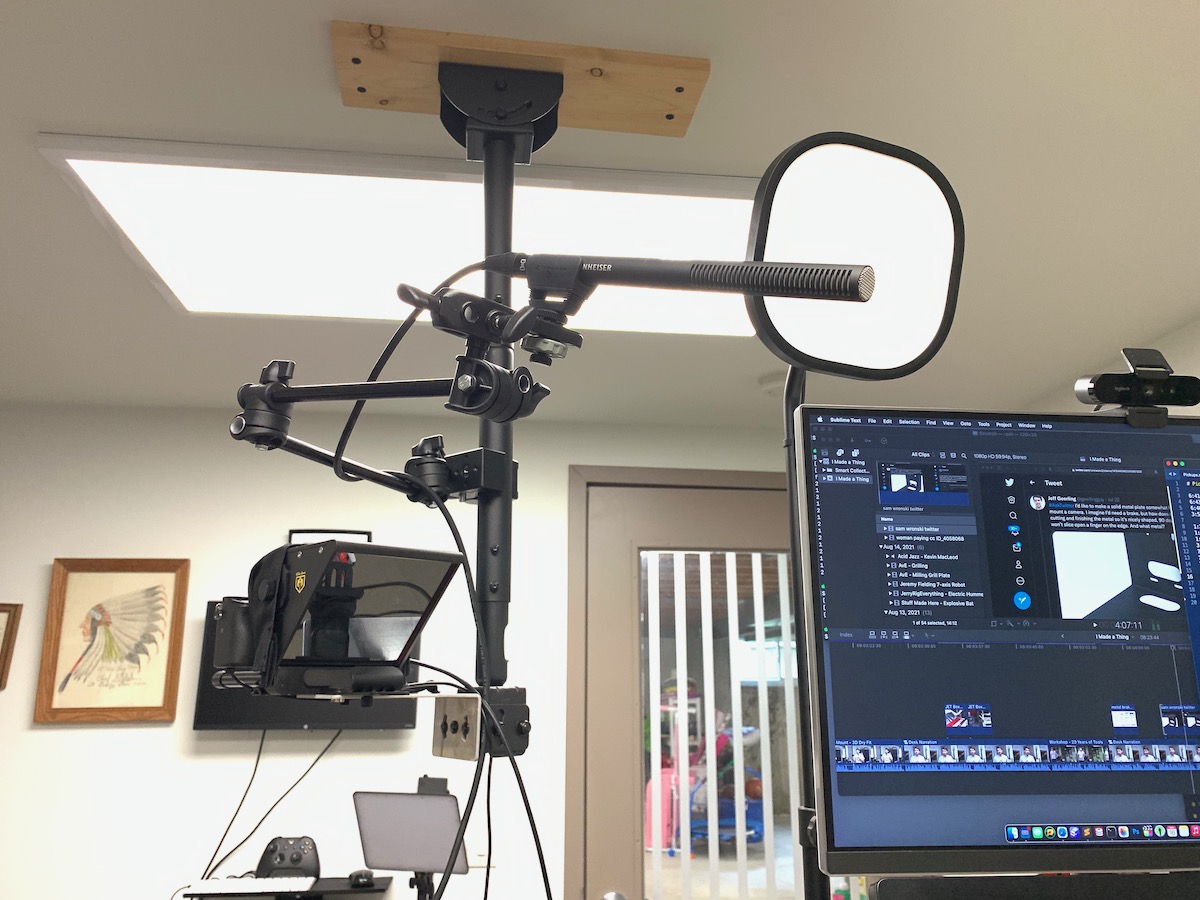
I mounted the bracket on the arm, and mounted the camera and teleprompter to it. At the same time, I also mounted my microphone (a Sennheiser MKE 600 shotgun) to the pole using a Manfrotto Super Clamp and Articulated Arm, and now my entire recording setup is up in the air, out of the way, ready at a moment's notice:
The 3D bracket file and OpenSCAD source are on Thingiverse, so anyone else who might want to build a similar ceiling-mounted camera rig could do so... though you'd need to access a waterjet and metal brake if you want to make it out of sturdy metal!
Recommend
About Joyk
Aggregate valuable and interesting links.
Joyk means Joy of geeK