

How do I restore my database in the panel?
source link: https://help.dreamhost.com/hc/en-us/articles/215100557-How-do-I-restore-my-database-in-the-panel-
Go to the source link to view the article. You can view the picture content, updated content and better typesetting reading experience. If the link is broken, please click the button below to view the snapshot at that time.

How do I restore my database in the panel?
DreamHost's daily backups
DreamHost cannot guarantee that any data will be retained on inactive (suspended/closed/disabled) accounts for longer than two weeks following the account's status change. See the following knowledge base articles for more information on how you can back up your account or make a payment:
All DreamHost MySQL databases backup daily. The backups start at midnight and complete after every single database has been backed up. It is HIGHLY RECOMMENDED that you create your own offsite backups of all of your databases to supplement the short term backups DreamHost creates. DreamHost makes no guarantee that backups are available.
Backing up your account
To backup your entire account (FTP users, Mail users, and Databases) check out the account backup feature. This is available in the Backup Your Account section of the DreamHost panel. The backups created can be downloaded to another offsite location for safe keeping.
Restoring a database
There are generally 5 days of backups available. Please note that this is not guaranteed, so you should always make your own personal backups just in case there are none available to restore in your panel.
- Navigate to the MySQL Databases page.

- Click the Restore DB button to the right of your database.
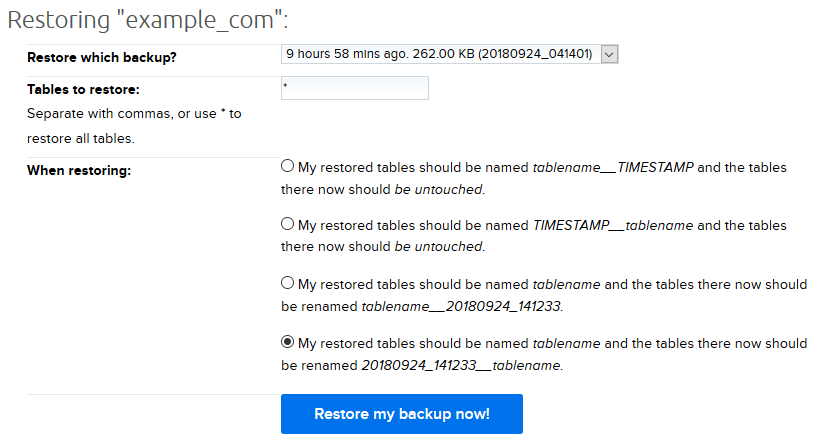
- Choose what you would like restored:
- Restore which backup? — Choose any available backup from the dropdown menu
- Tables to restore — If you want the entire database restored, leave this as *
- When restoring — You have 4 options of how your tables are restored.
— The first two options restore your tables but the names are changed. This way, the restored files do NOT take the place of the current files. You'll either need to manually change the table names or adjust your site's config file to view the restored database Options 3 and 4 — The last two options immediately replace your database tables. The current tables are renamed. You most often want one of the two last options
WordPress sites
When restoring a WordPress site database, it's strongly recommended that you select Option 4. This allows you to easily revert the site to the previous version of your database if there are any issues with the restored data.
You can quickly revert to the old version by updating the prefix value in your wp-config.php file. Log into your site via FTP or SSH and open the wp-config.php file (this is in your site's directory). You’ll see the following line:
$table_prefix = 'wp_';
Replace the value with the new timestamp of the backup you created. For example:
$table_prefix = '20180924_141233_wp_';
- Click the Restore my backup now! button.
You'll see a success messages notifying you that your database will be restored within 10 minutes.
MySQL database disk usage
MySQL servers have very fast, high RPM and smaller disks deployed in them, to provide the speed boost required to make MySQL fast. Due to this, there is limited space available on the MySQL servers and DreamHost encourages its customers to develop as small and efficient databases as possible. For specifics on what size databases are allowed on a specific DreamHost MySQL server, please review the Unlimited Policy and contact support if you have further questions.
See also
Did this article answer your questions?
Recommend
About Joyk
Aggregate valuable and interesting links.
Joyk means Joy of geeK