

Making A Mac App Scriptable Tutorial
source link: https://www.raywenderlich.com/133007/making-mac-app-scriptable-tutorial
Go to the source link to view the article. You can view the picture content, updated content and better typesetting reading experience. If the link is broken, please click the button below to view the snapshot at that time.

This article has been archived and is no longer being updated. It may not work with the most recent OS versions.
Making A Mac App Scriptable Tutorial
Allow users to write scripts to control your OS X app – giving it unprecedented usability. Discover how in this “Making a Mac App Scriptable Tutorial”.
By Sarah Reichelt.
Update 9/21/16: This tutorial has been updated for Xcode 8 and Swift 3.
As an app developer, it’s near impossible to think of all the ways people will want to use your app. Wouldn’t it be cool to let your users create scripts to customize your app to their own personal needs?
With Applescript and Javascript for Automation (JXA), you can! In this making a Mac app scriptable tutorial you will discover how to add scripting capabilities to a sample application. You’ll start by learning how to control existing apps with scripting, and then extend a sample app to allow custom script actions.
Getting Started
Download the sample project, open it in Xcode and build and run to see how it looks:
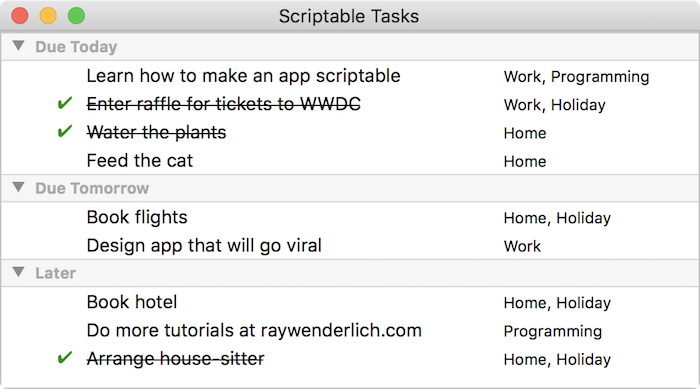
The app shows a list of tasks with due dates in the next few days and the tags associated with each task. It uses an outline view to group the tasks by due date.
You might have noticed that you can’t add, edit, or delete any tasks. That’s by design – these actions will be handled by your user automation scripts.
Take a a look at the files in the project:
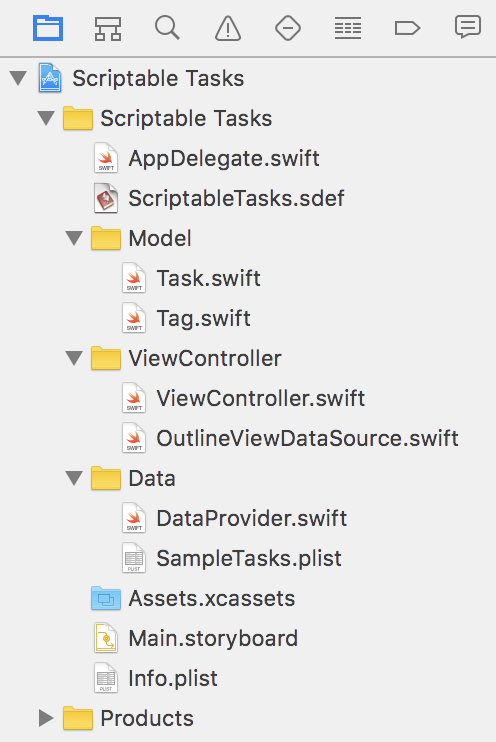
- There are 2 model class files: Task.swift and Tag.swift. These are the classes that you will be scripting.
- The ViewController group handles the display and watches for changes in the data.
- The Data group has a file with the sample tasks and a DataProvider that reads those tasks and handles any edits that arrive.
- The AppDelegate uses a
DataProviderobject to keep a record of the app’s tasks. - The ScriptableTasks.sdef file is a crucial file…which you will explore in detail later.
There are sample scripts for this tutorial as well; download them here. There are two folders in this package: one for AppleScript and one for JavaScript. Since this tutorial isn’t focused on how to write scripts, you’ll be using each of the downloaded scripts to test the functionality that you’ll add to Scriptable Tasks.
Enough with the talk – time to move on to the scripting! :]
Using the Script Editor
Open up the Script Editor app, found in Applications/Utilities, and open a new document:

You’ll see a set of four buttons in the top toolbar: Record, Stop, Run, and Compile. Compile checks that your scripting is syntactically correct, and Run does pretty much what what you’d expect.
At the bottom of the window, you’ll see three icons which switch between views. Description lets you add some information about your script, while Result shows the final result of running a script. The most useful option is the third button: Log.
The Log offers a further four options: Result, Messages, Events and Replies. Replies is the most informative, as it shows a log of every command and the return value of that command. When testing any scripts, I highly recommend the Log in Replies mode.
Note: If you ever open an AppleScript file and find it contains code like this: «class TaSk» whose «class TrFa» is false and «class CrDa», click Compile and it will be translated to readable AppleScript, provided you have the target app installed.
There are two scripting languages you’ll cover in this tutorial. The first is AppleScript, introduced with Mac System 7 in 1991, which uses an English-like syntax to make it usable by coders and non-coders alike.
The second is JavaScript for Automation (JXA), introduced by OSX Yosemite, which lets coders use the familiar JavaScript syntax to build their automation tasks.
The scripts in this tutorial will be presented in both AppleScript and JXA, so you’re free to wander down the path of whichever language you’d like to explore. :]
Note: Throughout this tutorial, the scripting code snippets are presented in AppleScript first, and immediately followed by the equivalent JavaScript version.
Exploring App Scripting With TextEdit
There’s a great little app already installed on your Mac that supports scripting: TextEdit. In the Script Editor, select Window/Library and look for the TextEdit entry. If it’s not there, click the Plus button at the top, navigate to your Applications folder and add TextEdit. Then double-click the TextEdit entry to open the TextEdit dictionary:
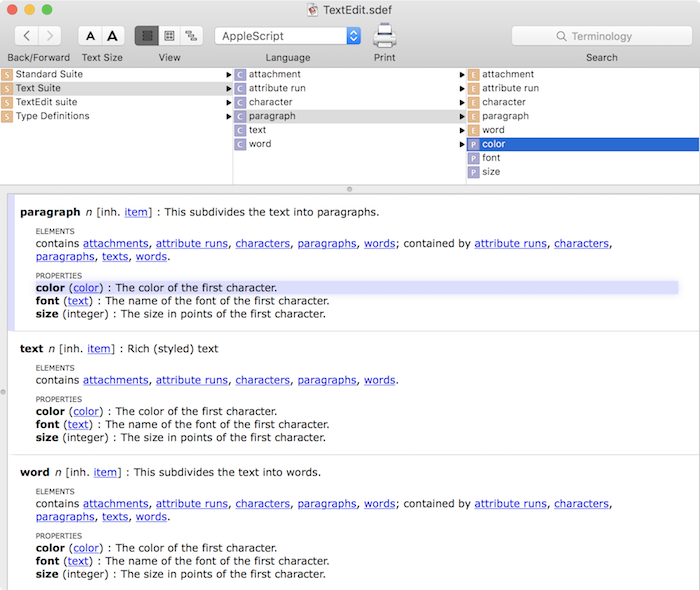
Every scriptable app has a dictionary, stored in a scripting definition (SDEF) file. The dictionary tells you what objects the app has, what properties the objects have and what commands the app responds to. In the above screen shot, you can see that TextEdit has paragraphs, and paragraphs have color and font properties. You will use this information to style some text.
Open 1. TextEdit Write.scpt from either the AppleScript or the JavaScript folder. Run the script; you’ll see TextEdit create and save a document.
You now have a new document, but it needs a bit of styling. Open 2. TextEdit Read Edit.scpt, run this script and you’ll see the document re-opened and styled as per the script.
Although delving into the actual script is beyond the scope of this tutorial, feel free to read the scripts in detail to see how they act on the TextEdit document.
As mentioned in the introduction, all apps are scriptable to some extent. To see this in action, ensure Scriptable Tasks is running. Next, open a new script window in Script Editor and enter one of the following scripts, depending on which language you’re using:
-- AppleScript
tell application "Scriptable Tasks" to quit
// JavaScript
Application("Scriptable Tasks"). quit();
Click Run and Scriptable Tasks should quit. Change the script to the following and click Run again:
tell application "Scriptable Tasks" to launch
Application("Scriptable Tasks").launch();
The app restarts, but doesn’t come to the foreground. To bring the app into focus, change launch to activate in the script above and click Run.
Now that you’ve seen that apps can respond to scripting commands, it’s time to add this ability to your app.
Making Your App Scriptable
The scripting definition file of your app defines what the app can do; it’s a little like an API. This file lives in your app project and specifies several things:
- Standard scripting objects and commands, such as
window,make,delete,count,openandquit. - Your own scriptable objects, properties and custom commands.
In order to make classes in your app scriptable, there are a few changes you’ll need to make to the app.
First, the scripting interface uses Key-Value-Coding to get and set the properties of objects. In Objective-C, all objects conformed to the KVC protocol automatically, but Swift objects don’t do so unless you make them subclasses of NSObject.
Next, scriptable classes need an Objective-C name that the scripting interface can recognize. To avoid namespace conflicts, Swift object names are mangled to give a unique representation. By prefixing the class definitions with @objc(YourClassName), you give them a name that can be used by the scripting engine.
Scriptable classes need object specifiers to help locate a particular object within the application or parent object, and finally, the app delegate must have access to the data store so it can return the application’s data to the scripts.
You don’t necessarily have to start your own scripting definition file from scratch, as Apple provides a standard SDEF file that you can use. Look in the /System/Library/ScriptingDefinitions/ directory for CocoaStandard.sdef. Open this file in Xcode and have a look; it’s XML with specific headers, a dictionary and inside that, the Standard Suite.
This is a useful starting point, and you could copy and paste this XML into your own SDEF file. However, in the interest of clean code, it’s not a good idea to leave your SDEF file full of commands and objects that your app does not support. To this end, the sample project contains a starter SDEF file with all unnecessary entries removed.
Close CocoaStandard.sdef and open ScriptableTasks.sdef. Add the following code near the end at the Insert Scriptable Tasks suite here comment:
<!-- 1 -->
<suite name="Scriptable Tasks Suite" code="ScTa" description="Scriptable Tasks suite.">
  <!-- 2 -->
  <class name="application" code="capp" description="An application's top level scripting object.">
    <cocoa class="NSApplication"/>

    <!-- 3 -->
    <element type="task" access="r">
      <cocoa key="tasks"/>
    </element>
  </class>

  <!-- Insert command here -->

  <!-- 4 -->
  <class name="task" code="TaSk" description="A task item" inherits="item" plural="tasks">
      <cocoa class="Task"/>

      <!-- 5 -->
      <property name="id" code="ID  " type="text" access="r"
          description="The unique identifier of the task.">
          <cocoa key="id"/>
      </property>

      <property name="name" code="pnam" type="text" access="rw"
          description="The title of the task.">
          <cocoa key="title"/>
      </property>

      <!-- 6 -->
      <property name="daysUntilDue" code="CrDa" type="number" access="rw"
      description="The number of days before this task is due."/>
      <property name="completed" code="TrFa" type="boolean" access="rw"
      description="Has the task been completed?"/>

      <!-- 7 -->
      <!-- Insert element of tags here -->

      <!-- Insert responds-to command here -->

  </class>

  <!-- Insert tag class here -->

</suite>
This chunk of XML does a lot of work. Taking it bit by bit:
- The outermost element is a
suite, so your SDEF file now has two suites: Standard Suite and Scriptable Tasks Suite. Everything in the SDEF file needs a four-character code. Apple codes are nearly always in lower-case and you will use a few of them for specific purposes. For your own suites, classes and properties, it’s best to use a random mix of upper-case, lower-case and symbols to avoid conflicts. - The next section defines the application and must use the code
"capp". You must specify the class of the application; if you had subclassedNSApplication, you would use your subclass name here. - The application contains
elements. In this app, the elements are stored in an array calledtasksin the app delegate. In scripting terms, elements are the objects that the app or other objects can contain. - The last chunk defines the
Taskclass that the application contains. The plural name for accessing multiples istasks. The class in the app that backs this object type isTask. - The first two properties are special. Look at their codes:
"ID "and"pnam"."ID "(note the two spaces after the letters) identifies the unique identifier of the object."pnam"specifies thenameproperty of the object. You can access objects directly using either of these properties."ID "is read-only, as scripts should not change a unique identifier, but"pnam"is read-write. Both of these are text properties. The"pnam"property maps to thetitleproperty of theTaskobject. - The remaining two properties are a number property for
daysUntilDueand a Boolean forcompleted. They use the same name in the object and the script, so you don’t need to specify thecocoa key. - The “Insert…” comments are placeholders for when you need to add more to this file.
Open Info.plist, right-click in the blank space below the entries and select Add Row. Type an upper-case S and the list of suggestions will scroll to Scriptable. Select it and change the setting to YES.
Repeat this process to select the next item down: Scripting definition file name. Set this to the name of your SDEF file: ScriptableTasks.sdef
If you prefer to edit the Info.plist as source code, you can alternatively add the following entries inside the main dict:
<key>NSAppleScriptEnabled</key>
<true/>
<key>OSAScriptingDefinition</key>
<string>ScriptableTasks.sdef</string>
Now you have to modify the app delegate to handle requests that come via script.
Open AppDelegate.swift file and add the following to the end of the file:
extension AppDelegate {
  // 1
  override func application(_ sender: NSApplication, delegateHandlesKey key: String) -> Bool {
    return key == "tasks"
  }

  // 2
  func insertObject(_ object: Task, inTasksAtIndex index: Int) {
    tasks = dataProvider.insertNew(task: object, at: index)
  }

  func removeObjectFromTasksAtIndex(_ index: Int) {
    tasks = dataProvider.deleteTask(at: index)
  }
}
Here’s what’s going on in the code above:
- When a script asks for
tasksdata, this method will confirm that the app delegate can handle it. - If a script tries to insert, edit or delete data, these methods will pass those requests along to
dataProvider.
To make the Task model class available to the scripts, you have to do a bit more coding.
Open Task.swift and change the class definition line to the following:
@objc(Task) class Task: NSObject {
Xcode will immediately complain that init requires the override keyword, so let Fix-It do that. This is required as this class now has a superclass:
override init() {
Task.swift needs one more change: an object specifier. Insert the following method into the Task class:
override var objectSpecifier: NSScriptObjectSpecifier {
  // 1
  let appDescription = NSApplication.shared().classDescription as! NSScriptClassDescription

  // 2
  let specifier = NSUniqueIDSpecifier(containerClassDescription: appDescription,
                                      containerSpecifier: nil, key: "tasks", uniqueID: id)
  return specifier
}
Taking each numbered comment in turn:
- Get a description of the app’s class since the app is the container for tasks.
- Get a description of the task by id within the app. This is why the Task class has an
idproperty – so that each task can be correctly specified.
You’re finally ready to start scripting your app!
Scripting Your App
Before you start, make sure to quit any running instance of the app that Script Editor might have opened.
Build and run Scriptable Tasks; right-click on the icon in the Dock and select Options/Show in Finder. Quit the Script Editor app and restart it to let it pick up the changes to your app.
Open the Library window, and drag the Scriptable Tasks app from the Finder into the Library window.
If you get an error saying the app is not scriptable, try quitting Script Editor and starting it again as it sometimes doesn’t register a freshly built app. If it still fails to import, go back and double-check your changes to the SDEF file.
Double-click Scriptable Tasks in the Library to see the app’s dictionary:

You’ll see the Standard Suite and the Scriptable Tasks Suite. Click on the Scriptable Tasks suite, and you will see what you put into the SDEF file. The application contains tasks, and a task has four properties.
Change the scripting language in the dictionary to JavaScript using the Language popup in the toolbar. You will see the same information but with one important change. The cases of classes and properties have changed. I have no idea why this is, but it’s one of those “gotchas” you need to watch out for.
In Script Editor, make a new script file and set the editor to show Log/Replies. Test either of the following scripts, making sure to select the appropriate language in the language pop-up:
tell application "Scriptable Tasks"
  get every task
end tell
app = Application("Scriptable Tasks");
app.tasks();
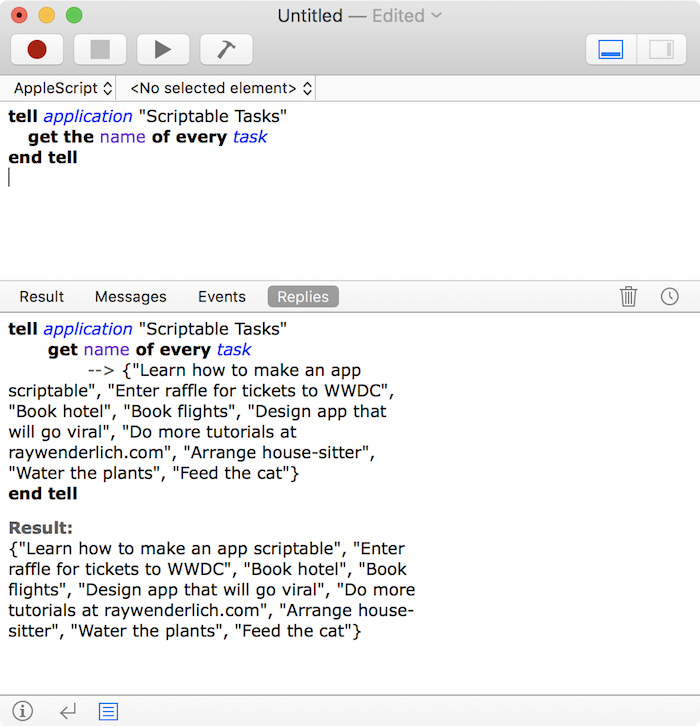
In the log, you will see a list of the tasks by ID. For more useful information, edit the scripts as follows:
tell application "Scriptable Tasks"
  get the name of every task
end tell
app = Application("Scriptable Tasks");
app.tasks.name();
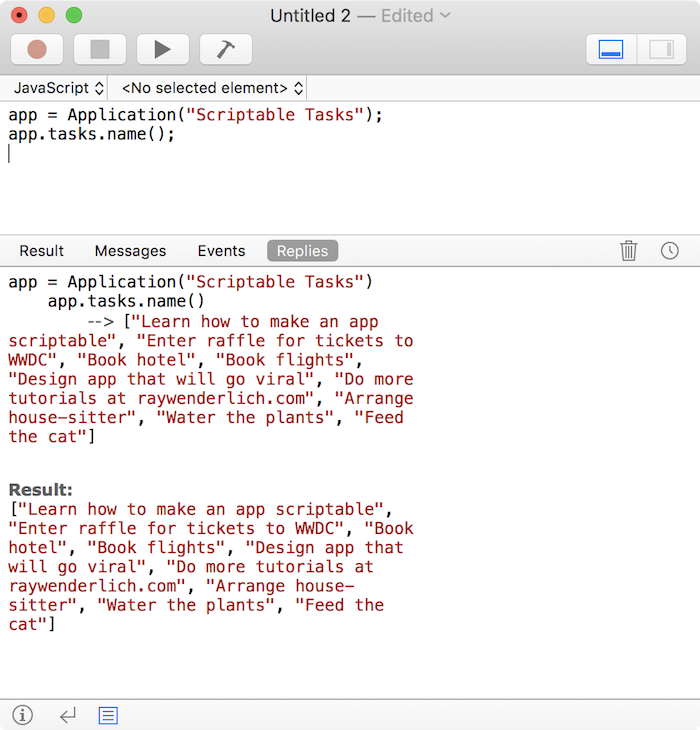
Try out a few more of the sample scripts you downloaded earlier. When running the scripts, make sure you set the Script Editor to show Log/Replies so that you can see the results along the way.
Each script quits the app before running it again; this is to reset the data after any edits so that the sample scripts work as expected. You wouldn’t normally do this in your own scripts.
Note: Script Editor can get very confused as you build updated versions of the app, because it tries to keep a version running at all times if you have an open script that is using the app. This often ends up as an older version of the app, so before every build, quit the app.
If you see two copies of the Scriptable Tasks app running at any time, or if there appears to be a script error in any of the samples, you can be sure that Script Editor has glommed on to the wrong version of the app. The easiest fix is to quit all copies of the app and quit Script Editor. Clean the Xcode build (Product/Clean), then build and run again.
Restart Script Editor and when it opens the script, click Compile and then click Run. And if THAT doesn’t work, delete Derived Data for the app in ~/Library/Developer/Xcode/DerivedData.
Try out the next two sample scripts:
3. Get Tasks.scpt
This script retrieves the number of tasks and the names of tasks using various filters. Make note of the following:
- JavaScript counts from 0, AppleScript counts from 1.
- Text searches are case-insensitive.
4. Add Edit Tasks.scpt
This script adds new tasks, toggles the completed flag on the first task, and tries to create a task with the same name as another.
Hmmm… creating a task with the same name worked! Now you have two “Feed the cat” tasks. The cat will be thrilled, but for the purposes of this app, task names should be unique. Trying to add a task with a name that is already in use should have produced an error.
Back in Xcode, look in AppDelegate.swift and you can see that when the script wants to insert an object, the app delegate passes that call to its dataProvider. In DataProvider.swift, look at insertNew(task:at:), which inserts an existing task into the array or appends a new task to the end.
Time to add a check here. Replace the function with the following:
mutating func insertNew(task: Task, at index: Int) -> [Task] {
  // 1
  if taskExists(withTitle: task.title) {
    // 2
    let command = NSScriptCommand.current()
    command?.scriptErrorNumber = errOSACantAssign
    command?.scriptErrorString = "Task with the title '\(task.title)' already exists"
  } else {
    // 3
    if index >= tasks.count {
      tasks.append(task)
    } else {
      tasks.insert(task, at: index)
    }

    postNotificationOfChanges()
  }

  return tasks
}
Here’s what each commented section does:
- Use an existing function to check if a task with this name already exists.
- If the name is not unique:
- Get a reference to the scripting command that called this function.
- Set the command’s
errorNumberanderrorStringproperties;errOSACantAssignis one of the standard AppleScript error codes. These will be sent back to the calling script.
- If the name is unique:
- Process the task as before.
- Post a notification of data changes. The ViewController will see this and update the display.
Quit the app if running, then build and run your app. Run the 4. Add Edit Tasks scripts again. This time you should get an error dialog and no duplicate tasks will be created. Sorry about that, cat…

5. Delete Tasks.scpt
This script deletes a task, checks if a particular task exists and deletes it if possible, and finally deletes all completed tasks.
Working With Nested Objects
In the sample app, the second column displays a list of tags assigned to each task. So far, you have no way of working with them via scripts – time to fix that!
Object specifiers can handle a hierarchy of objects. That’s what you have here, with the application owning the tasks and each task owning its tags.
As with the Task class, you need to make the Tag scriptable.
Open Tag.swift and make the following changes:
- Change the class definition line to
@objc(Tag) class Tag: NSObject { - Add the
overridekeyword toinit. - Add the object specifier method:
override var objectSpecifier: NSScriptObjectSpecifier {
  // 1
  guard let task = task else { return NSScriptObjectSpecifier() }

  // 2
  guard let taskClassDescription = task.classDescription as? NSScriptClassDescription else {
    return NSScriptObjectSpecifier()
  }

  // 3
  let taskSpecifier = task.objectSpecifier

  // 4
  let specifier = NSUniqueIDSpecifier(containerClassDescription: taskClassDescription,
    containerSpecifier: taskSpecifier, key: "tags", uniqueID: id)
  return specifier
}
The above code is relatively straightforward:
- Check that the tag has an assigned task.
- Check that the task has a class description of the correct class.
- Get the object specifier for the parent task.
- Construct the object specifier for the tag contained inside the task and return it.
Add the following to the SDEF file at the Insert tag class here comment:
<class name="tag" code="TaGg" description="A tag" inherits="item" plural="tags">
  <cocoa class="Tag"/>
  <property name="id" code="ID  " type="text" access="r"
    description="The unique identifier of the tag.">
    <cocoa key="uniqueID"/>
  </property>
  <property name="name" code="pnam" type="text" access="rw"
    description="The name of the tag.">
    <cocoa key="name"/>
  </property>
</class>
This is very similar to the data for the Task class, but a tag only has two exposed properties: id and name.
Now the Task section has to be edited to indicate that it contains tag elements.
Add the following code to the Task class XML, at the Insert element of tags here comment:
<element type="tag" access="rw">
  <cocoa key="tags"/>
</element>
Quit the app, then build and run the app again.
Go back to the Script Editor; if the Scriptable Tasks dictionary is open, close and re-open it. See if it contains information about tags.
If not, remove the Scriptable Tasks entry from the Library and add it again by dragging the app into the window:

Try one of the following scripts:
tell application "Scriptable Tasks"
  get the name of every tag of task 1
end tell
app = Application("Scriptable Tasks");
app.tasks[0].tags.name();
The app now lets you retrieve tags – but what about adding new ones?
You may have noticed in Tag.swift that each Tag object has a weak reference to its owning task. That helps create the links when getting the object specifier, so this task property must be set when assigning a new tag to a task.
Open Task.swift and add the following method to the Task class:
override func newScriptingObject(of objectClass: AnyClass,
                                 forValueForKey key: String,
                                 withContentsValue contentsValue: Any?,
                                 properties: [String: Any]) -> Any? {

  let tag: Tag = super.newScriptingObject(of: objectClass, forValueForKey: key,
                                          withContentsValue: contentsValue,
                                          properties: properties) as! Tag
  tag.task = self

  return tag
}
This method is sent to the container of the new object, which why you put it into the Task class and not the Tag class. The call is passed to super to get the new tag, and then the task property is assigned.
Quit and build and run your app. Now run the sample script 6. Tasks With Tags.scpt which lists tag names, lists the tasks with a specified tag, and deletes and create tags.
Adding Custom Commands
There is one more step you can take when making an app scriptable: adding custom commands. In earlier scripts, you toggled the completed flag of a task directly. But wouldn’t it be better – and safer – if scripts didn’t change the property directly, but instead used a command to do this?
Consider the following script:
mark the first task as "done"
mark task "Feed the cat" as "not done"
I’m sure you’re already reaching for the SDEF file and you would be correct: the command has to be defined there first.
There are two steps that need to happen here:
- Tell the application that this command exists and what its parameters will be.
- Tell the Task class that it responds to the command and what method to call to implement it.
Inside the Scriptable Tasks suite, but outside any class, add the following at the Insert command here comment:
<command name="mark" code="TaSktext">
  <direct-parameter description="One task" type="task"/>
  <parameter name="as" code="DFLG" description="'done' or 'not done'" type="text">
    <cocoa key="doneFlag"/>
  </parameter>
</command>
“Wait a minute!” you say. “Earlier you said that codes had to be four characters, and now I have one with eight? What’s going on here?”
When defining a method, you provide a two part code. This one combines the codes or types of the parameters – in this case a Task object with some text.
Inside the Task class definition, at the Insert responds-to command here comment, add the following code:
<responds-to command="mark">
  <cocoa method="markAsDone:"/>
</responds-to>
Now head back to Task.swift and add the following method:
func markAsDone(_ command: NSScriptCommand) {
  if let task = command.evaluatedReceivers as? Task,
    let doneFlag = command.evaluatedArguments?["doneFlag"] as? String {
    if self == task {
      if doneFlag == "done" {
        completed = true
      } else if doneFlag == "not done" {
        completed = false
      }
      // if doneFlag doesn't match either string, leave un-changed
    }
  }
}
The parameter to markAsDone(_:) is an NSScriptCommand which has two properties of interest: evaluatedReceivers and evaluatedArguments. From them, you try to get the task and the string parameter and use them to adjust the task accordingly.
Quit and build and run your app again. Check the dictionary in the Script Editor, and delete and re-import it if the mark command is not showing:

You should now be able to run the 7. Custom Command.scpt scripts and see your new command in operation.
mark command does not work in JavaScript. I have added manual toggling of the completed property to the JavaScript version of 7. Custom Command.scpt but left the original there too. Hopefully it will work after an update.Where to Go From Here?
You can download the final version of the sample project here.
There wasn’t room to cover inter-app communication in this making a mac app scriptable tutorial, but to see how to work between apps, check out 8. Inter-App Communication.scpt for some examples. This script gathers a list of incomplete tasks due today and tomorrow, inserts them into a new TextEdit file, styles the text and saves the file.
For more information about scriptable apps, the official Apple docs on Scriptable Applications are a good start, as is Apple’s Overview of Cocoa Support for Scriptable Applications.
Interested in learning more about JXA? Check out the Introduction to JavaScript for Automation Release Notes.
I hope you enjoyed this making a mac app scriptable tutorial; if you have any questions or comments, please join the forum discussion below!

Contributors
Author
Over 300 content creators. Join our team.
Recommend
About Joyk
Aggregate valuable and interesting links.
Joyk means Joy of geeK