
133

基于Nginx负载均衡方案
source link: https://zhuanlan.zhihu.com/p/32122459?
Go to the source link to view the article. You can view the picture content, updated content and better typesetting reading experience. If the link is broken, please click the button below to view the snapshot at that time.

基于Nginx负载均衡方案
项目背景
公司一直使用商用负载均衡(LB),基于以下几点原因考虑用开源产品来替代:
- 价格昂贵,HTTPS支持并发数太低
- 技术门槛比较高,学习成本大
- 技术Bug修复方面都太慢
- 商用产品在新功能技术支持方面(如H2,protocol_proxy支持)滞后
技术选型
主要调研了lvs/haproxy/nginx这三种开源产品在四层负载方面功能特性,新LB方案水平扩展相对容易,选型阶段主要考察功能支持情况,情况如下:
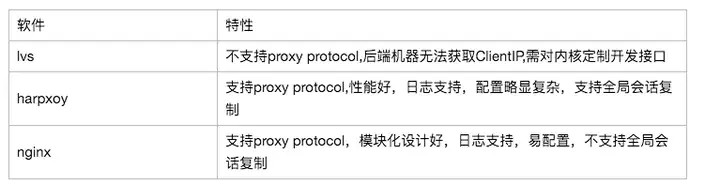
综上,同时负载均衡主要业务对象是web类型,现有运维人员对nginx比较熟悉,最终先把nginx做四层负载
方案设计
四层负载在最前端,后端七层负载。四层负载主要负责对外暴露公网IP,七层负载主要业务规则重写。同时考虑多机房的容灾,架构设计如下:
" width="937" />
上图主要做到以下组件冗余:
- 机房A和机房B即可主备也可双主,避免单点
- 四层接入方面,当OSPF发生故障,可以用Nginx做备用,直接指向L7服务器组
- 双机房L7服务器组也可以同时提供服务,避免单点
- 双机房L7服务器组配置保持同步,安装方式采用静态编译安装,复制考贝启动即可
相关配置
- 网络相关配置
- 服务器部分配置如下:
#OS基于Centos7,测试环境,生产环境根据实际情况修改
#安装路由软件
yum install quagga
#配置zebra
#cat /etc/quagga/zebra.conf
!
! Zebra configuration saved from vty
!   2017/09/28 15:57:12
!
hostname test-ssl-10-231.test.org #这个每台名字要不同
password 8 WuN0UOEsh./0U
enable password 8 g9UPXyneQv2n.
log file /var/log/quagga/zebra.log
service password-encryption
#配置ospfd
# cat /etc/quagga/ospfd.conf
hostname test-ssl-10-231.test.org #每台要不同
password 8 cQGHF4e9QbcA
enable password 8 RBUKMtvgMhU3M
log file /var/log/quagga/ospfd.log
service password-encryption
!
!
!
interface eth2
 ip ospf authentication message-digest
 ip ospf message-digest-key 1 md5 pIW87ypU3d4v3pG7 #此处密码告知网络工程师
 ip ospf hello-interval 1
 ip ospf dead-interval 4
 ip ospf priority 0

router ospf
 ospf router-id 10.10.41.130 #每台router-id要不一样
 log-adjacency-changes
 network 10.10.41.0/24 area 0.0.0.0
 network 10.10.100.100/32 area 0.0.0.0 #宣告自己的ospf互边地址和VIP地址,新增地址都在此处添加
 area 0.0.0.0 authentication message-digest
!
line vty
!

#启动服务
systemctl enable zebra.service
systemctl enable ospfd.service
systemctl start zebra.service
systemctl start ospfd.service
#添加ospf和zebra保活,打开配置文件打开如下行行
vim /etc/sysconfig/quagga
WATCH_DAEMONS="zebra ospfd"
######策略路由配置,eth0指向默认路由,在eth1模拟公网进行配置######
#cat /etc/iproute2/rt_tables增加
100 wan41
#增加路由表相关配置
ip route add 10.10.41.0/24 dev eth1 src 10.10.41.130 table wan41
ip route add default via 10.10.41.250 table wan41
ip rule add from 10.10.41.130 table wan41
持久化到配置文件
cat route-eth1
10.10.41.0/24 dev eth2 src 10.10.41.130 table wan41
default via 10.10.41.250 table 100
cat rule-eth1
from 10.10.41.130 table wan41
######策略路由配置结束######- 交换机配置部分(略)
- 增加zebra ospfd保活
- 打开/etc/sysconfig/quagga注释以下行:WATCH_DAEMONS="zebra ospfd"
- nginx 七层配置,关键是日志配置获取ClientIP如下:
server context listen增加如下:
listen 80 proxy_protocol;
listen 443 http2 proxy_protocol;
#log_format ,要配置$proxy_protocol_addr $proxy_protocol_port,
log_format  xff  '$proxy_protocol_addr:$proxy_protocol_port $http_x_forwarded_for - $remote_user [$time_local] "$request" '
                      '$status $body_bytes_sent "$http_referer" "$http_user_agent" "$host" '
'$request_time "$upstream_addr" "$upstream_response_time" "$server_protocol"';- nginx tcp 四层代理配置
stream {
log_format proxy '$remote_addr:$remote_port [$time_local] '
                 '$protocol $status $bytes_sent $bytes_received '
                 '$session_time "$upstream_addr" '
                 '"$upstream_bytes_sent" "$upstream_bytes_received" "$upstream_connect_time"';
upstream backend-test {
    server 10.x.x.233:80;
}
upstream backend-test_ssl {
    server 10.x.x.233:443;
}
        server {
                listen 80;
                proxy_protocol on;
                proxy_pass backend-test;
                access_log  /opt/test/logs/nginx/m.test.com.log proxy ;
        }
        server {
                listen 443;
                proxy_protocol on;
                proxy_pass backend-test_ssl;
                access_log  /opt/test/logs/nginx/m.test.com.log proxy buffer=1k flush=1s;
        }
}- nginx 加入sysctemctl管理,并加入开机启动
[Unit]
Description=nginx
After=network.target
[Service]
Type=forking
ExecStart=/opt/test/nginx/sbin/nginx
ExecReload=/opt/test/nginx/sbin/nginx -s reload
ExecStop=/opt/test/nginx/sbin/nginx -s stop
PrivateTmp=true
[Install]
WantedBy=multi-user.target
#开机启动
systemctl enable nginx.service
运维管理
cat addip.sh
#!/bin/bash
ip=$1
pswd="test123"
expect -c " set timeout 30
eval spawn -noecho telnet 127.0.0.1 2604
expect \"Password:\"
send \"$pswd\r\"
expect \" *>\"
send \"enable\r\"
expect \"Password:\"
send \"$pswd\r\"
expect \" *#\"
send \"configure t\r\"
expect \" *(config)#\"
send \"router ospf\r\"
expect \" *(config-router)#\"
send \"network $ip/32 area 0.0.0.0\r\"
expect \" *(config-router)#\"
send \"w\r\"
send \"exit\r\"
send \"exit\r\"
send \"exit\r\"
interact" >/dev/null
###增加策略路由
ip addr add 10.10.100.103/32 dev lo:1
ip rule add from 10.10.100.103 table wan41
###持久化到配置文件
#rule-lo:1
from 10.10.100.103 table wan41
#故障,OSPF下线,恢复自动上线,监控
set mailserver mail.test.com port 25
set mail-format {
from:[email protected]
subject:Nginx-L4 $SERVICE $EVENT at $DATE
message:Monit $ACTION $SERVICE at $DATE on $HOST: $DESCRIPTION.
}
set alert [email protected]
check process nginx with pidfile /opt/test/nginx/logs/nginx.pid
if does not exist for 3 cycles then exec "/bin/systemctl stop zebra" else if succeeded for 3 cycles then exec "/bin/sh /opt/test/sysadmin/o
spf_start.sh"
check host Nginx-L4 with address 10.x.x.250
if failed ping count 5 with timeout 1 seconds then exec "/bin/systemctl stop zebra" else if succeeded then exec "/bin/sh /opt/test/sysadmin/o
spf_start.sh"- 性能测试数据
主要测试七层SSL RSA 2048位加解密能力,2620CPU加装了加速卡之后,并发TPS能达到26000
数据分析
基于ES API获取 带宽,流量,PV数据 汇总后再次存入ES,最终使用grafana进行展示
</div
Recommend
About Joyk
Aggregate valuable and interesting links.
Joyk means Joy of geeK