

使用 TIS 增强 Istio:安装与监控指南
source link: https://jimmysong.io/blog/enhancing-istio-with-tis-comprehensive-installation-and-monitoring-guide/
Go to the source link to view the article. You can view the picture content, updated content and better typesetting reading experience. If the link is broken, please click the button below to view the snapshot at that time.

点击查看目录
在这篇博客中我将指导你如何安装 TIS 并启用监控插件。
什么是 TIS?
Tetrate Istio Subscription(TIS)是由 Tetrate 提供的企业级、全面支持的产品,提供了经过全面测试且适用于所有主要云平台的 Istio 版本。TIS 基于开源的 Tetrate Istio Distro 项目,增加了对这些构建版本的全面高级支持,并可选提供 FIPS 验证的加密模块。此外,TIS 包含一系列经过测试和支持的 Add-Ons 和 Integrations,使得 Istio 的功能扩展和与常用基础设施工具的集成变得简单安全。
为什么使用 TIS?
TIS 不是 Istio 的一个分支,而是提供针对特定环境进行测试的上游发行版。我们对 Istio 所做的任何增强都会应用于上游。TIS与普通的Istio相比有以下关键优势:
- 长期支持:TIS提供14个月的安全更新支持,确保稳定性和安全性。
- 商业支持:TIS有商业支持选项,适用于企业用例,包括合规性需求。
- 易于管理:TIS提供简化的安装和管理过程,减少了操作复杂性。
- 多环境适配:TIS支持不同云环境,满足各种部署需求。
- FIPS验证:提供FIPS验证版本,适用于高安全性要求的场景。
想要了解 TIS 的更多信息请访问:https://docs.tetrate.io/istio-subscription/
在安装 TIS 及其插件前,你需要准备:
- 安装 Terraform :用于导入 Dashboard 到 Grafana
- 向 Tetrate 请求安装 TIS 所需的 credentials
安装 Istio 及 Monitoring addons
首先使用下面的命令查看 TIS 支持的 Istio 版本:
helm search repo tetratelabs/base --versions
NAME            	CHART VERSION  	APP VERSION    	DESCRIPTION
tetratelabs/base	1.20.1+tetrate0	1.20.1-tetrate0	Helm chart for deploying Istio cluster resource...
tetratelabs/base	1.20.0+tetrate0	1.20.0-tetrate0	Helm chart for deploying Istio cluster resource...
tetratelabs/base	1.19.5+tetrate0	1.19.5-tetrate0	Helm chart for deploying Istio cluster resource...
tetratelabs/base	1.19.4+tetrate0	1.19.4-tetrate0	Helm chart for deploying Istio cluster resource...
tetratelabs/base	1.19.3+tetrate0	1.19.3-tetrate0	Helm chart for deploying Istio cluster resource...
tetratelabs/base	1.18.6+tetrate0	1.18.6-tetrate0	Helm chart for deploying Istio cluster resource...
tetratelabs/base	1.18.5+tetrate0	1.18.5-tetrate0	Helm chart for deploying Istio cluster resource...
tetratelabs/base	1.18.3+tetrate0	1.18.3-tetrate0	Helm chart for deploying Istio cluster resource...
tetratelabs/base	1.17.8+tetrate0	1.17.8-tetrate0	Helm chart for deploying Istio cluster resource...
tetratelabs/base	1.17.6+tetrate0	1.17.6-tetrate0	Helm chart for deploying Istio cluster resource...
tetratelabs/base	1.16.7+tetrate0	1.16.7-tetrate0	Helm chart for deploying Istio cluster resource...
tetratelabs/base	1.16.6+tetrate0	1.16.6-tetrate0	Helm chart for deploying Istio cluster resource...
我们将安装当前最新的 Istio 1.20.1 版本。
export TIS_USER=<tis_username>
export TIS_PASS=<tis-password>
# Helm chart version
export VERSION=1.20.1+tetrate0
# Image tag
export TAG=1.20.1-tetrate0
kubectl create namespace istio-system

kubectl create secret docker-registry tetrate-tis-creds \
    --docker-server="addon-containers.istio.tetratelabs.com" \
    --docker-username=${TIS_USER} \
    --docker-password=${TIS_PASS} \
    -n istio-system

# Install Istio
helm install istio-base tetratelabs/base -n istio-system \
    --set global.tag=${TAG} \
    --set global.hub="addon-containers.istio.tetratelabs.com" \
    --set "global.imagePullSecrets[0]=tetrate-tis-creds" \
    --version ${VERSION}

helm install istiod tetratelabs/istiod -n istio-system \
    --set global.tag=${TAG} \
    --set global.hub="addon-containers.istio.tetratelabs.com" \
    --set "global.imagePullSecrets[0]=tetrate-tis-creds" \
    --version ${VERSION} \
    --wait

# install ingress Gateway
kubectl create namespace istio-ingress

kubectl create secret docker-registry tetrate-tis-creds \
    --docker-server="addon-containers.istio.tetratelabs.com" \
    --docker-username=${TIS_USER} \
    --docker-password=${TIS_PASS} \
    -n istio-ingress

helm install istio-ingress tetratelabs/istio-ingress -n istio-ingress \
    --set global.tag=${TAG} \
    --set global.hub="addon-containers.istio.tetratelabs.com" \
    --set "global.imagePullSecrets[0]=tetrate-tis-creds" \
    --version ${VERSION} \
    --wait

# Install TIS addon
helm install istio-monitoring-demo tis-addons/istio-monitoring-demo --namespace tis --create-namespace
端口转发 Grafana 服务,然后在本地浏览器中打开 Grafana:http://localhost:3000
kubectl port-forward --namespace tis svc/grafana 3000:3000
注意:请保持该命令持续运行,因为我们在向 Grafana 导入 dashboard 时还需要访问该端口。
安装 Istio Monitoring Addons
使用默认的用户名密码 admin/admin 登录后,在左侧导航栏中选择 Administration - Service accounts,参考 Grafana 文档上的说明创建一个 admin 权限的 Service account。
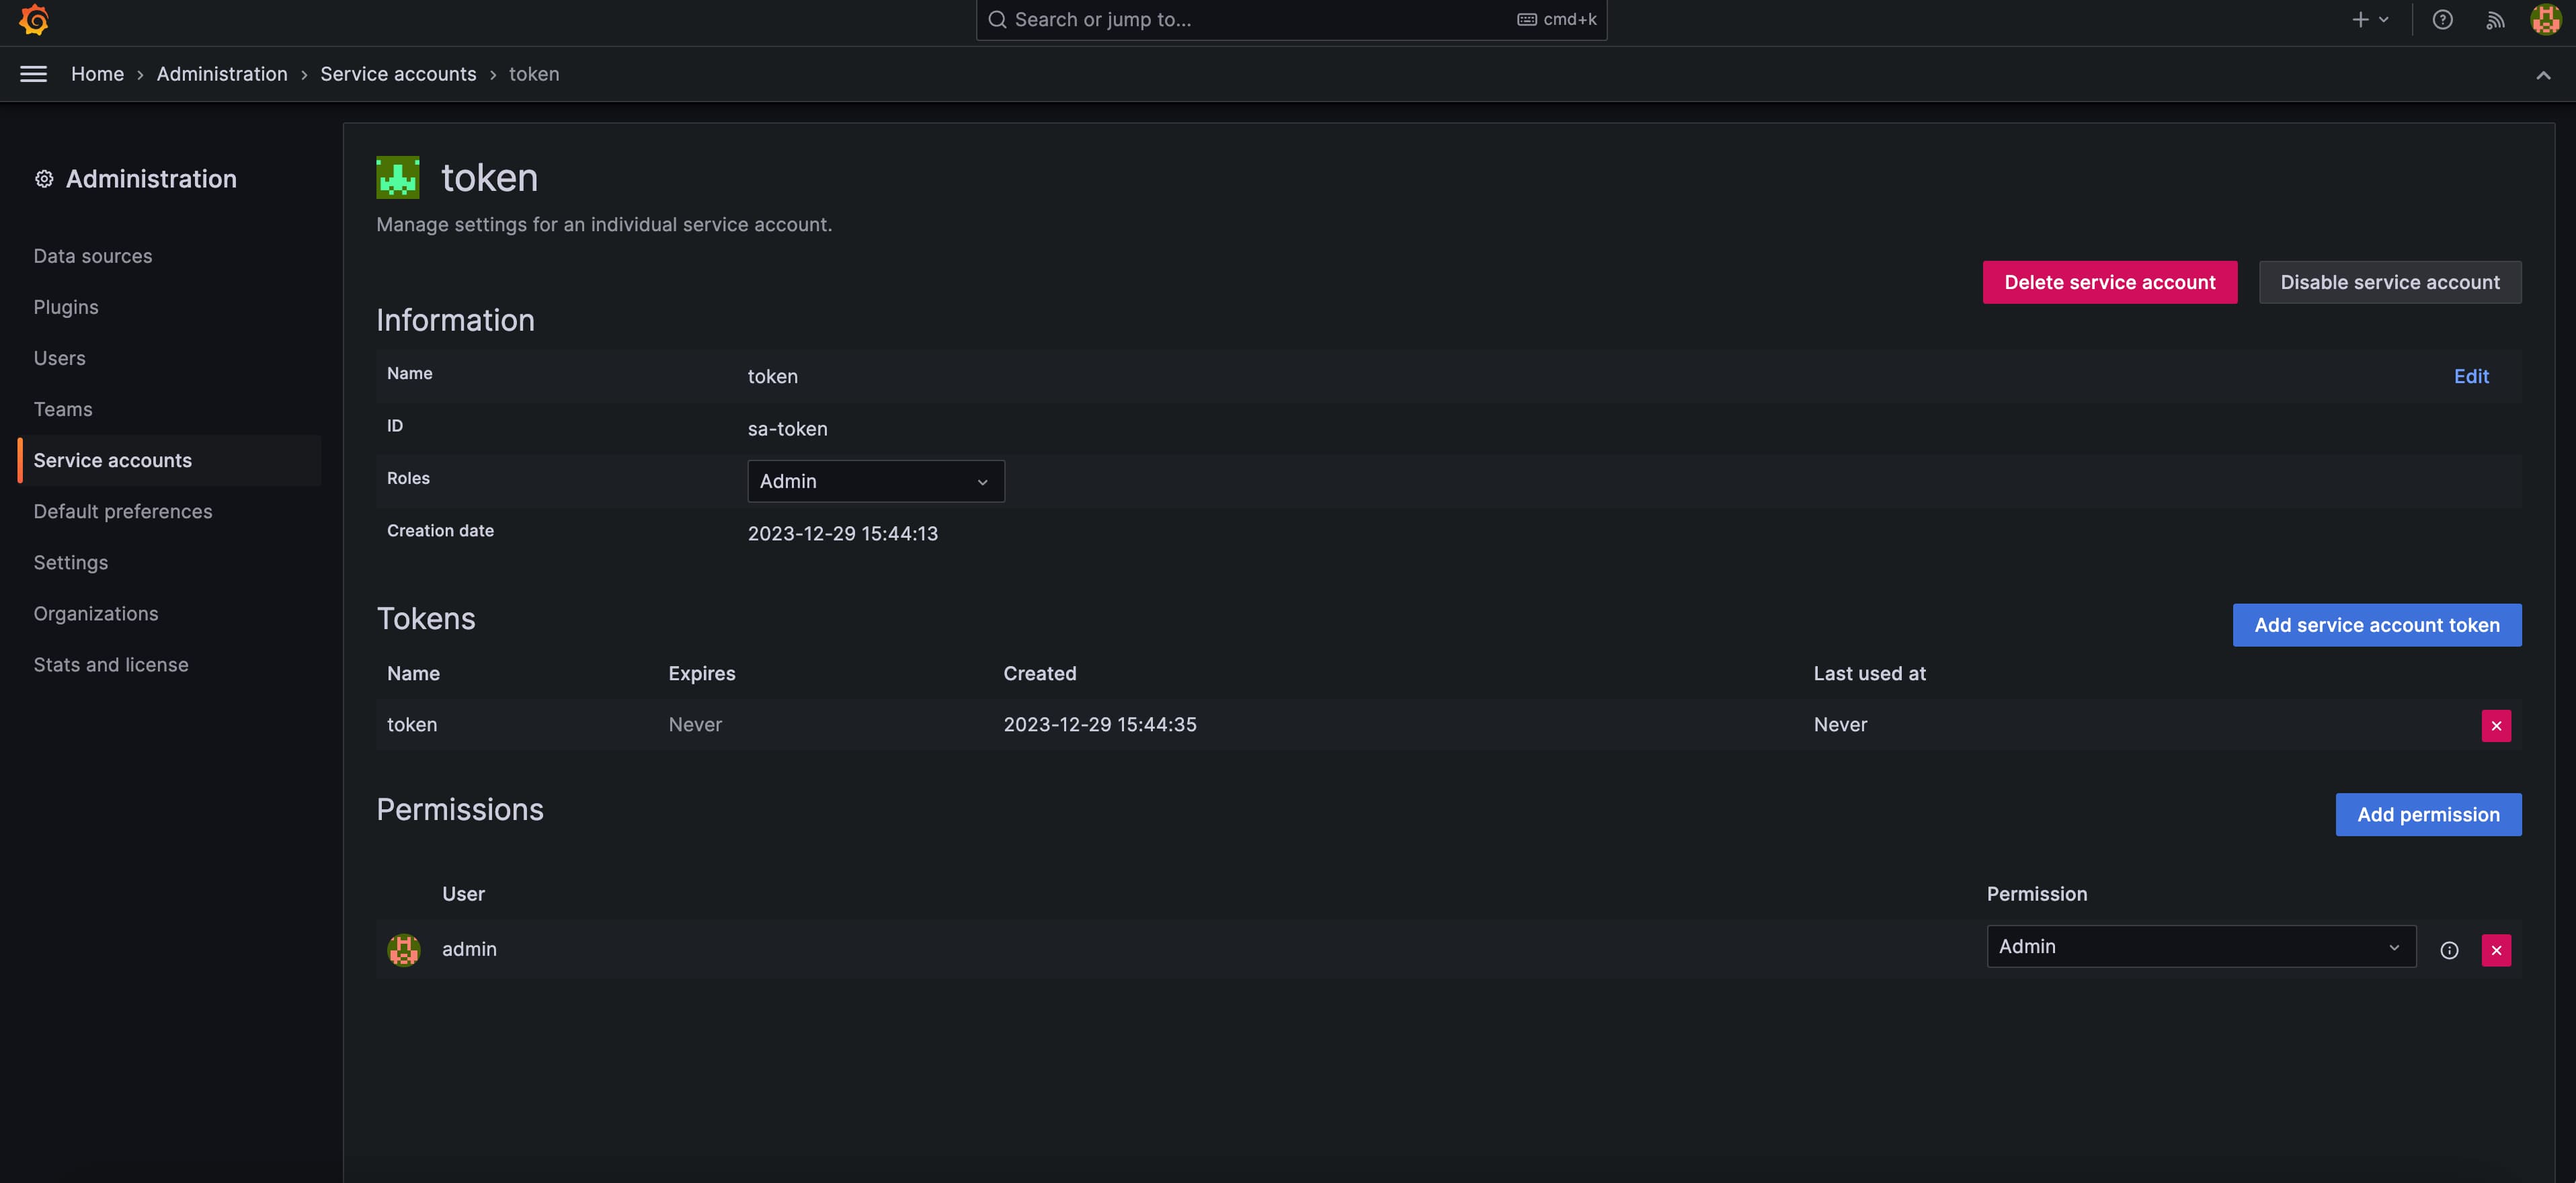
在 Grafana 中创建一个 Service account
记下这个 Token,我们将在下面的操作中用到。
使用 Terraform 向 Grafana 中导入 dashboard:
cat>~/.terraformrc<<EOF
credentials "terraform.cloudsmith.io" {
  token = "tetrate/tis-containers/kuhb8CPZhaOiR3v6"
}
EOF

# Create a terraform module file
cat>istio-monitoring-grafana.tf<<EOF
module "istio_monitoring_grafana" {
  source = "terraform.cloudsmith.io/tis-containers/istio-monitoring-grafana/tetrate"
  version = "v0.2.0"
  gf_url  = "<http://localhost:3000>"
  gf_auth = "<grafana_token>"
}
EOF

# Run the commands
terraform init
terraform plan
terraform apply -auto-approve
恭喜你现在已经成功的向 Grafana 中导入了以下四个 dashboard:
- TIS Workload Dashboard
- TIS Service Dashboard
- TIS Wasm Extension Dashboard
- TIS Control Plan Dashboard
但是现在有些 dashboard 还没有数据,我们需要在网格中制造一些流量。
部署 Bookinfo 应用和入口网关:
kubectl create secret docker-registry tetrate-tis-creds \
    --docker-server="addon-containers.istio.tetratelabs.com" \
    --docker-username=${TIS_USER} \
    --docker-password=${TIS_PASS} \
    -n default
kubectl label namespace default istio-injection=enabled
kubectl apply -f samples/bookinfo/platform/kube/bookinfo.yaml -n default
kubectl apply -f samples/bookinfo/networking/bookinfo-gateway.yaml -n default
获取入口网关的 IP 并发送一些流量:
export GATEWAY_IP=$(kubectl -n istio-ingress get service istio-ingressgateway -o jsonpath='{.status.loadBalancer.ingress[0].ip}')
for i in $(seq 1 100);do curl http://$GATEWAY_IP/productpage ; sleep 3;done
现在访问 Grafana dashboard,你可以看到监控数据了。
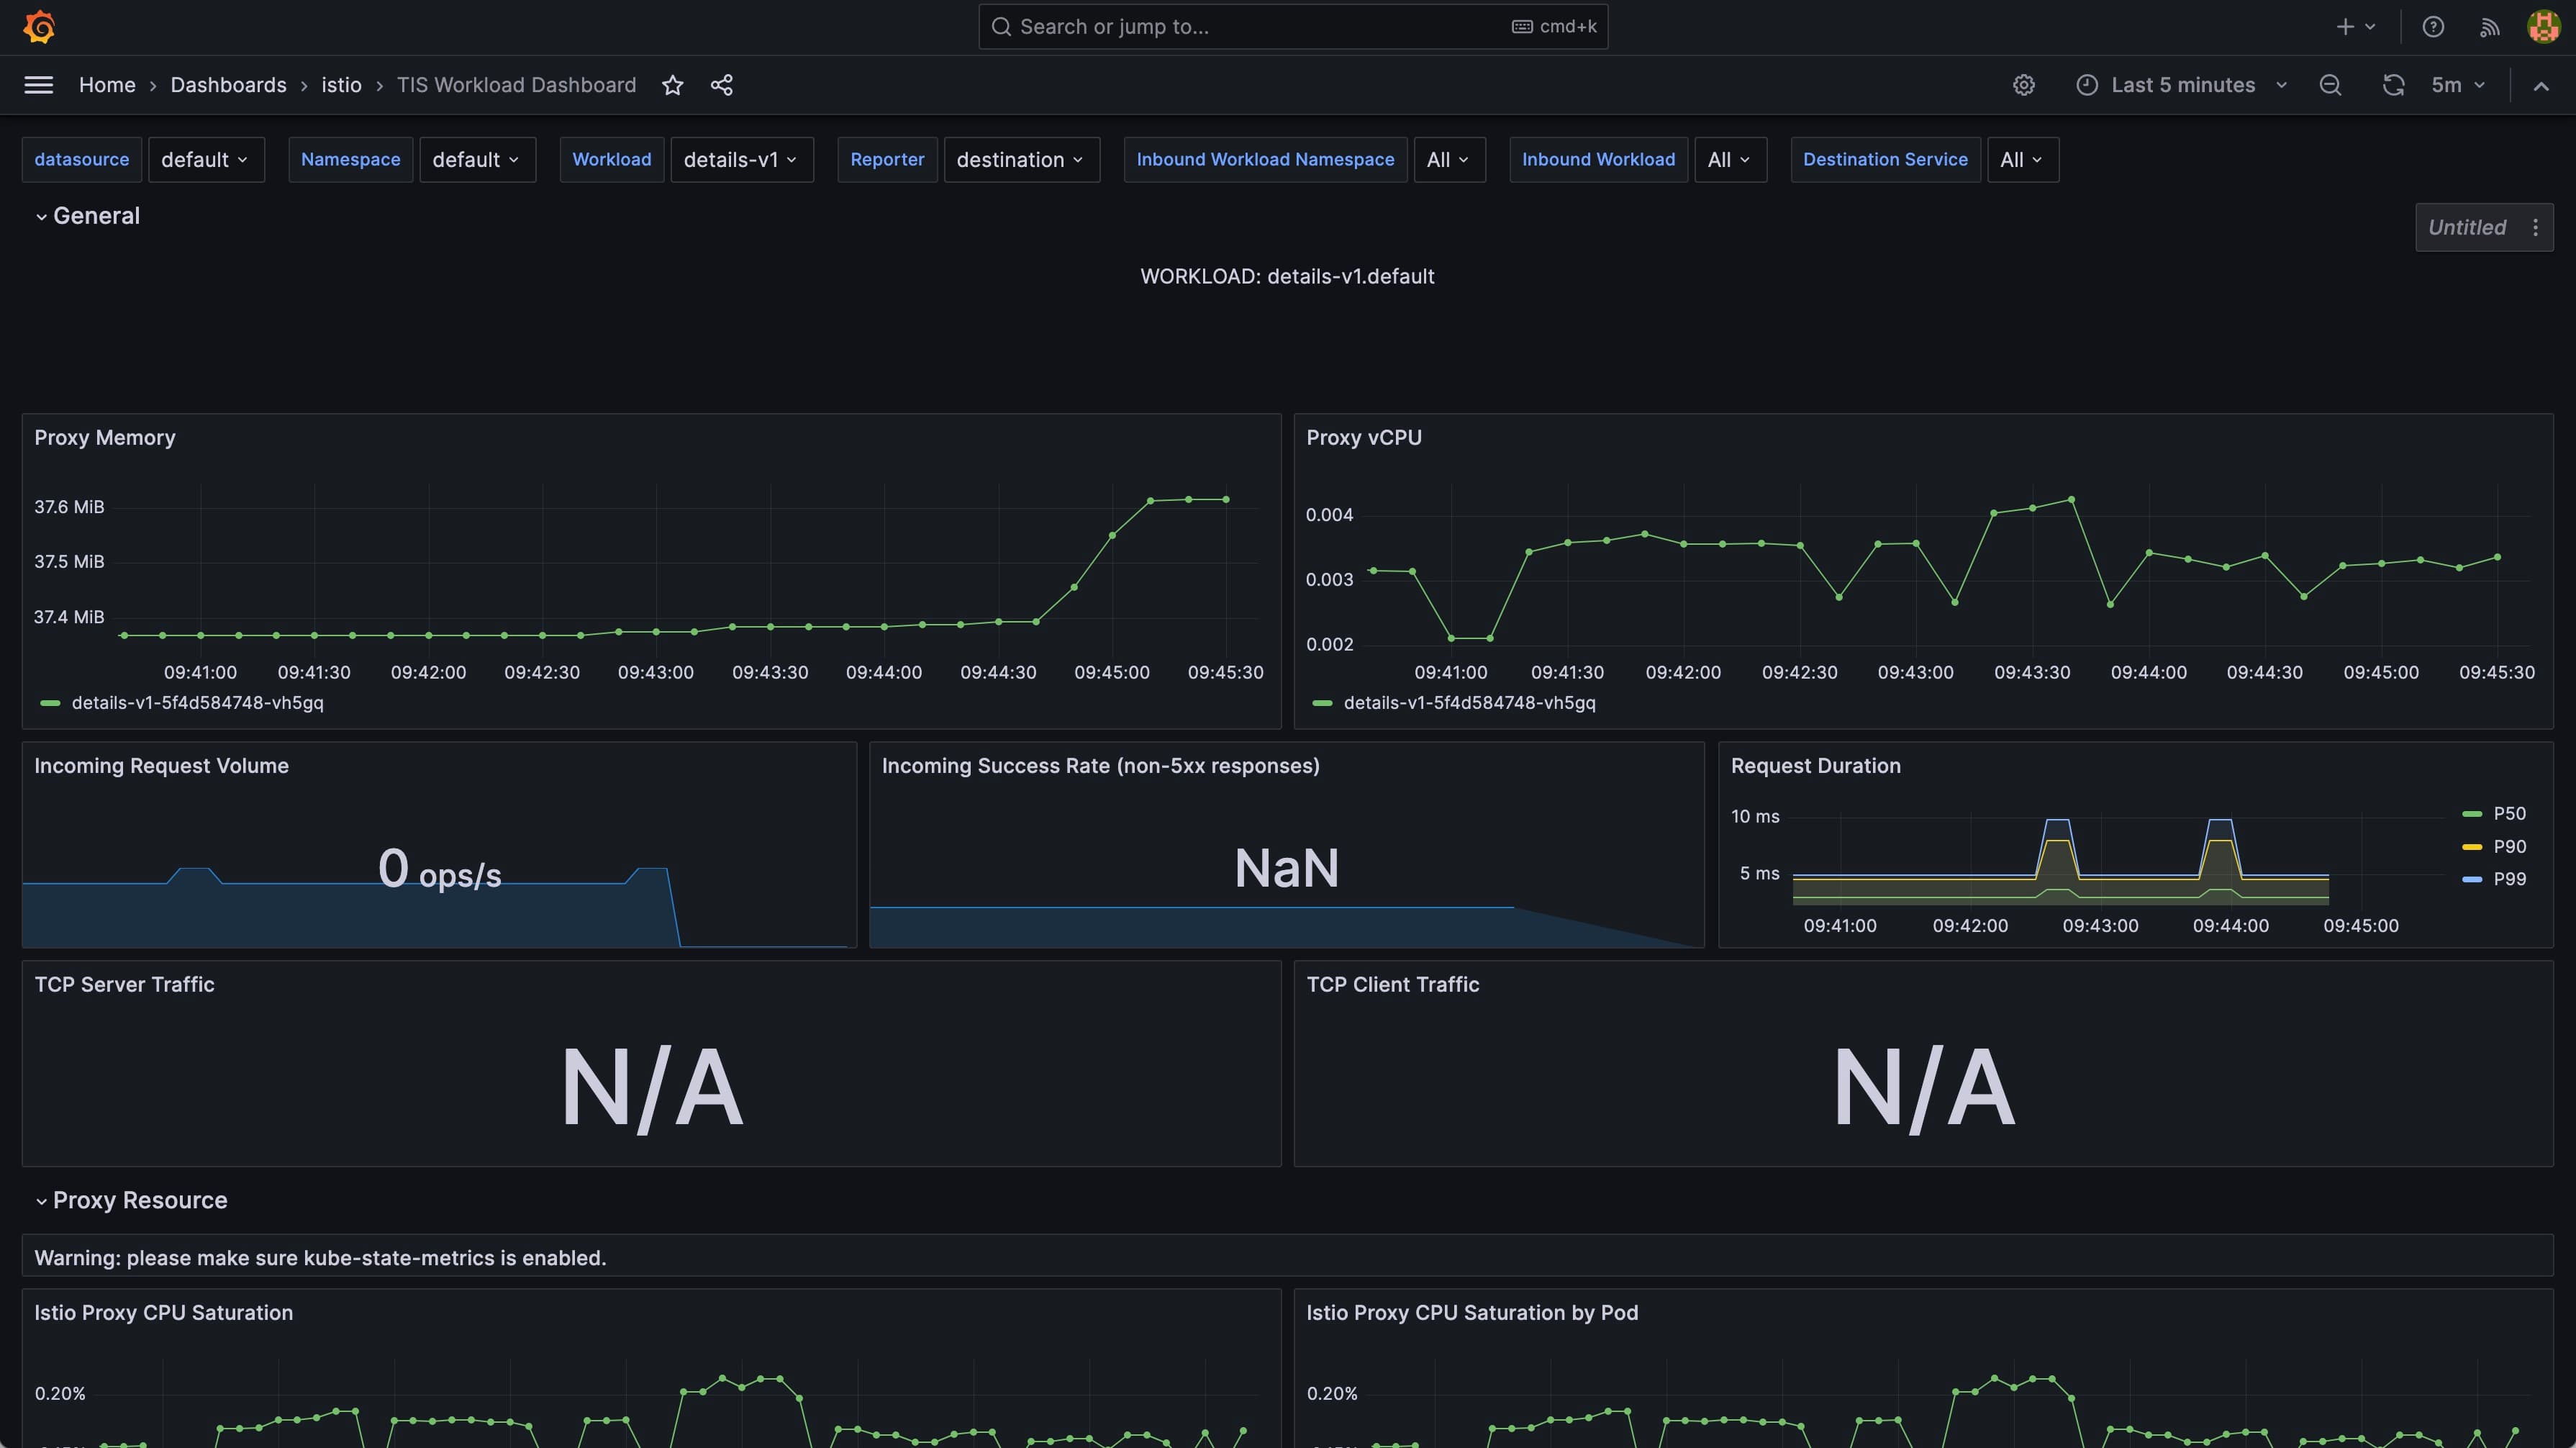
TIS Workload Dashboard
除此之外,在导入了这些 dashboard 的同时,我们还导入了以下警报规则:
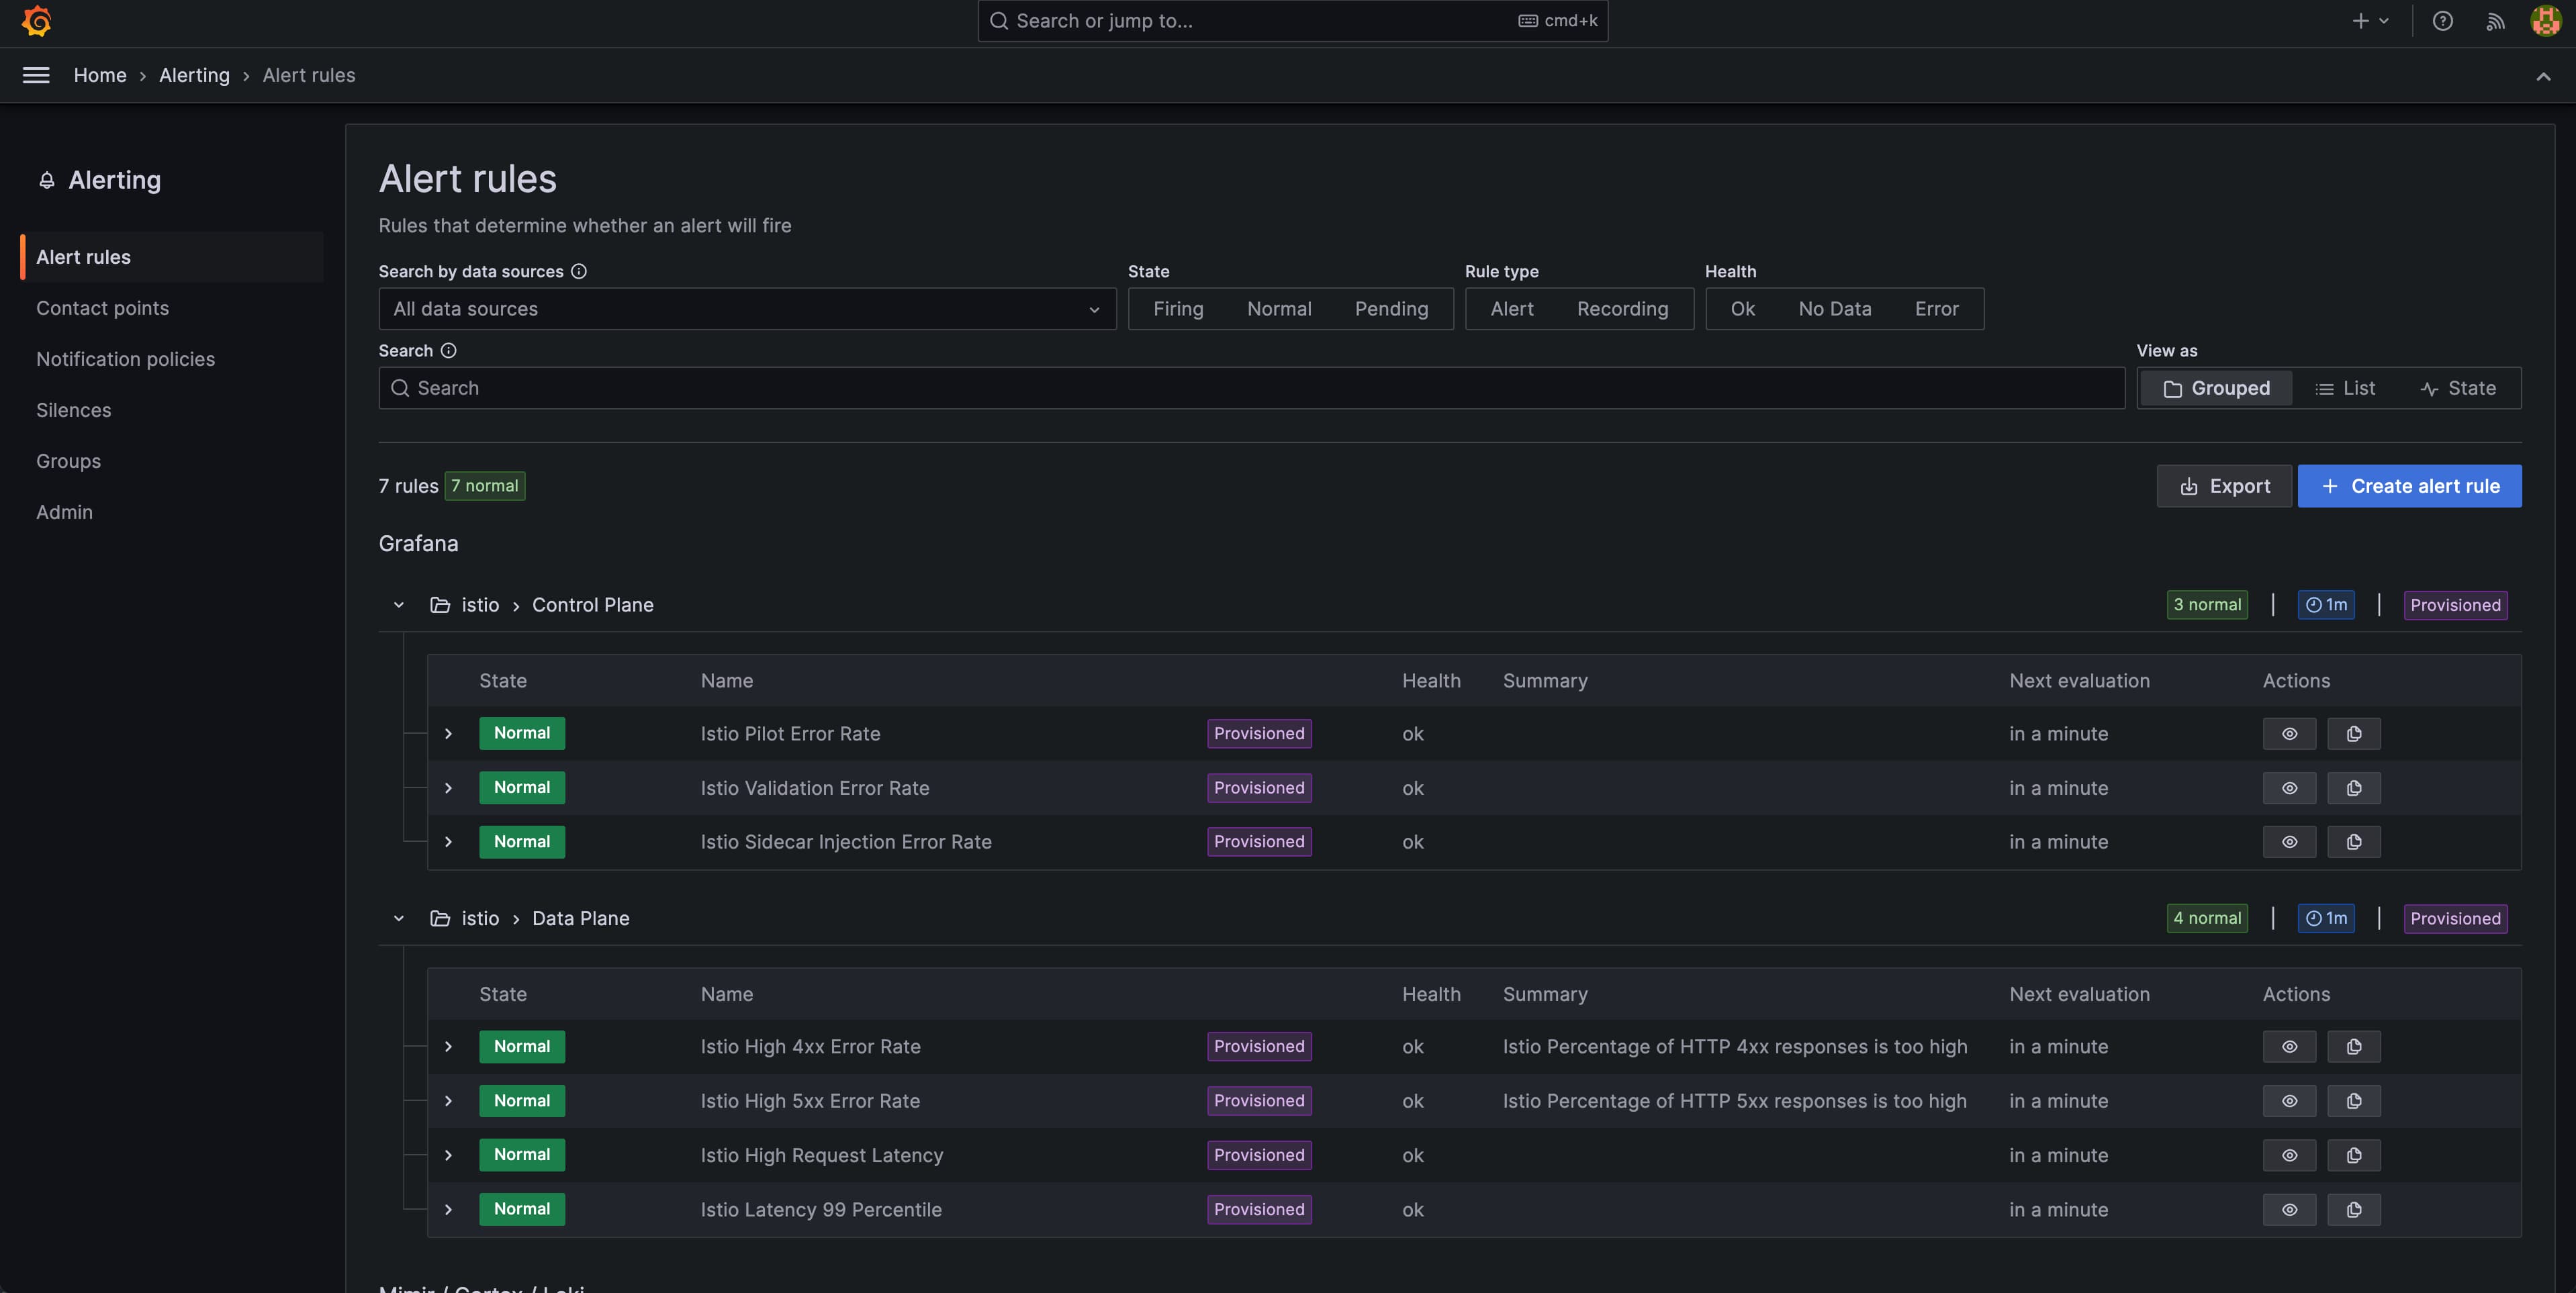
导入的警报规则
你也可以在Grafana中定义警报规则,比如整合 Telegram 或 Slack 来发送通知。
运行下面的命令清理 Bookinfo 应用和 TIS:
kubectl delete -f samples/bookinfo/platform/kube/bookinfo.yaml -n default
kubectl delete -f samples/bookinfo/networking/bookinfo-gateway.yaml -n default
helm uninstall istio-ingress -n istio-ingress
helm uninstall istio-monitoring-demo -n tis
helm uninstall istiod -n istio-system
helm uninstall istio-base -n istio-system
kubectl delete namespace tis
kubectl delete namespace istio-ingress
kubectl delete namespace istio-system
通过执行这些步骤,您已经使用TIS成功地在Istio中设置和测试了监视。在Istio环境中享受增强监控的见解和优势!
Recommend
About Joyk
Aggregate valuable and interesting links.
Joyk means Joy of geeK