

.NET领域性能最好的对象映射框架Mapster使用方法
source link: https://www.51cto.com/article/777313.html
Go to the source link to view the article. You can view the picture content, updated content and better typesetting reading experience. If the link is broken, please click the button below to view the snapshot at that time.

.NET领域性能最好的对象映射框架Mapster使用方法

Mapster是一个开源的.NET对象映射库,它提供了一种简单而强大的方式来处理对象之间的映射。在本文中,我将详细介绍如何在.NET中使用Mapster,并提供一些实例和源代码。
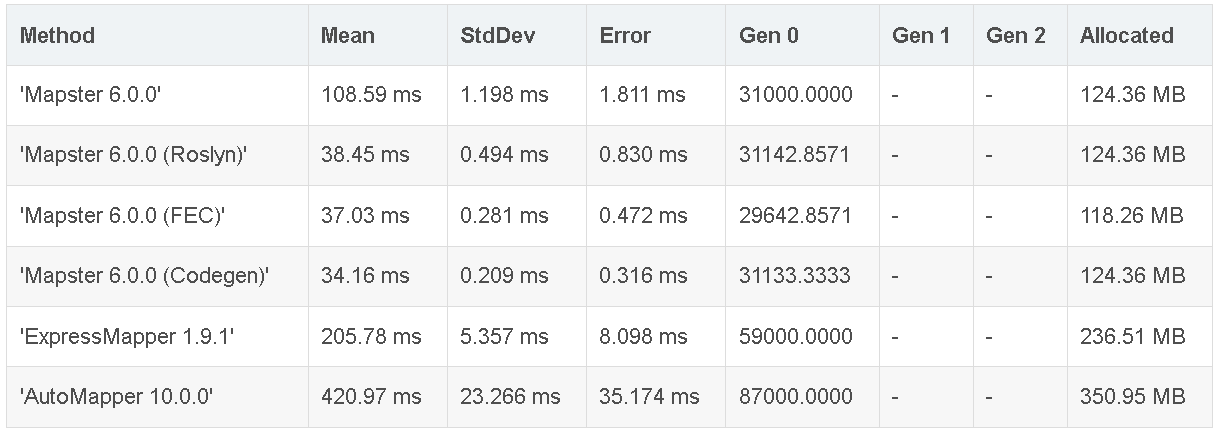
和其它框架性能对比:
Mapster的安装和配置:
- 首先,打开Visual Studio并创建一个新的.NET项目。
- 在NuGet包管理器控制台中运行以下命令来安装Mapster:Install-Package Mapster。
- 在项目中添加一个新的类文件,命名为MappingConfig.cs。这个类将用于配置Mapster的映射规则。
配置映射规则:
在MappingConfig.cs文件中,添加以下代码来配置映射规则:
using Mapster;

public static class MappingConfig
{
    public static void Configure()
    {
        TypeAdapterConfig.GlobalSettings.Default.NameMatchingStrategy(NameMatchingStrategy.Flexible);

        TypeAdapterConfig.GlobalSettings.Default.PreserveReference(true);

        // 添加映射规则
        TypeAdapterConfig<MySource, MyDestination>.NewConfig()
            .Map(dest => dest.DestinationProperty, src => src.SourceProperty)
            .Map(dest => dest.AnotherProperty, src => src.AnotherProperty);
    }
}
在上面的代码中,我们首先设置了Mapster的一些全局设置。
NameMatchingStrategy.Flexible表示属性名称不区分大小写。PreserveReference(true)表示保留引用关系。
然后,我们使用TypeAdapterConfig类的NewConfig方法来创建一个新的映射规则。在这个例子中,我们将MySource类映射到MyDestination类。使用Map方法来指定属性之间的映射关系。
使用Mapster进行对象映射:
在我们配置好映射规则后,我们可以在代码中使用Mapster来进行对象之间的映射。下面是一个简单的示例:
using Mapster;

public class MySource
{
    public string SourceProperty { get; set; }
    public string AnotherProperty { get; set; }
}

public class MyDestination
{
    public string DestinationProperty { get; set; }
    public string AnotherProperty { get; set; }
}

public class Program
{
    static void Main(string[] args)
    {
        // 配置映射规则
        MappingConfig.Configure();

        // 创建源对象
        var source = new MySource
        {
            SourceProperty = "Hello",
            AnotherProperty = "World"
        };

        // 执行映射
        var destination = source.Adapt<MyDestination>();

        // 输出结果
        Console.WriteLine(destination.DestinationProperty); // 输出:Hello
        Console.WriteLine(destination.AnotherProperty); // 输出:World
    }
}
在上面的示例中,我们首先调用MappingConfig.Configure方法来配置映射规则。然后,我们创建了一个源对象source,并设置了它的属性值。接下来,我们使用Adapt方法将源对象映射到目标对象destination。最后,我们可以通过访问目标对象的属性来获取映射结果。
高级用法:
Mapster还提供了一些高级用法,用于处理更复杂的映射场景。
忽略属性映射:
有时候,我们可能希望在映射过程中忽略某些属性。可以使用Ignore方法来实现:
TypeAdapterConfig<MySource, MyDestination>.NewConfig()
    .Ignore(dest => dest.DestinationProperty);
自定义属性映射:
可以使用MapWith方法来自定义属性之间的映射逻辑:
TypeAdapterConfig<MySource, MyDestination>.NewConfig()
    .Map(dest => dest.DestinationProperty, src => src.SourceProperty.ToUpper());
集合映射:
Mapster还支持集合之间的映射。例如,我们有一个包含多个MySource对象的列表,我们可以使用Adapt方法将它们映射到包含多个MyDestination对象的列表:
var sourceList = new List<MySource>
{
    new MySource { SourceProperty = "Hello", AnotherProperty = "World" },
    new MySource { SourceProperty = "Foo", AnotherProperty = "Bar" }
};

var destinationList = sourceList.Adapt<List<MyDestination>>();
嵌套对象映射:
如果源对象和目标对象中包含嵌套的对象,我们可以使用MapWith方法来处理嵌套对象的映射:
TypeAdapterConfig<MySource, MyDestination>.NewConfig()
    .Map(dest => dest.NestedObject, src => src.NestedObject.Adapt<NestedDestination>());
以上就是使用Mapster进行对象映射的方法、步骤和一些高级用法的介绍。通过使用Mapster,我们可以轻松地处理对象之间的映射,并且可以根据需要进行自定义和扩展。
Recommend
About Joyk
Aggregate valuable and interesting links.
Joyk means Joy of geeK