

【木棉花】基于ArkTS的应用入场动画-开源基础软件社区-51CTO.COM
source link: https://ost.51cto.com/posts/27032
Go to the source link to view the article. You can view the picture content, updated content and better typesetting reading experience. If the link is broken, please click the button below to view the snapshot at that time.

相信读者对应用入场动画并不陌生。当用户打开某个应用时,应用得到响应,与此同时其在屏幕中所渲染的第一个画面通常是它的入场动画。当然,应用响应后所抛出的不一定是动画,它也可以是一个静态的页面,不过不论是动画还是静态页面,它们所起到的功能是相同的——在后台完成应用中的重要模块的初始化,贴出开发团队的slogen,亦或展示一些甲方的产品推广广告。
本期笔者将以一个轻量Demo的开发流程为例,与笔者共同探索如何利于ArkTS生产应用的入场动画。
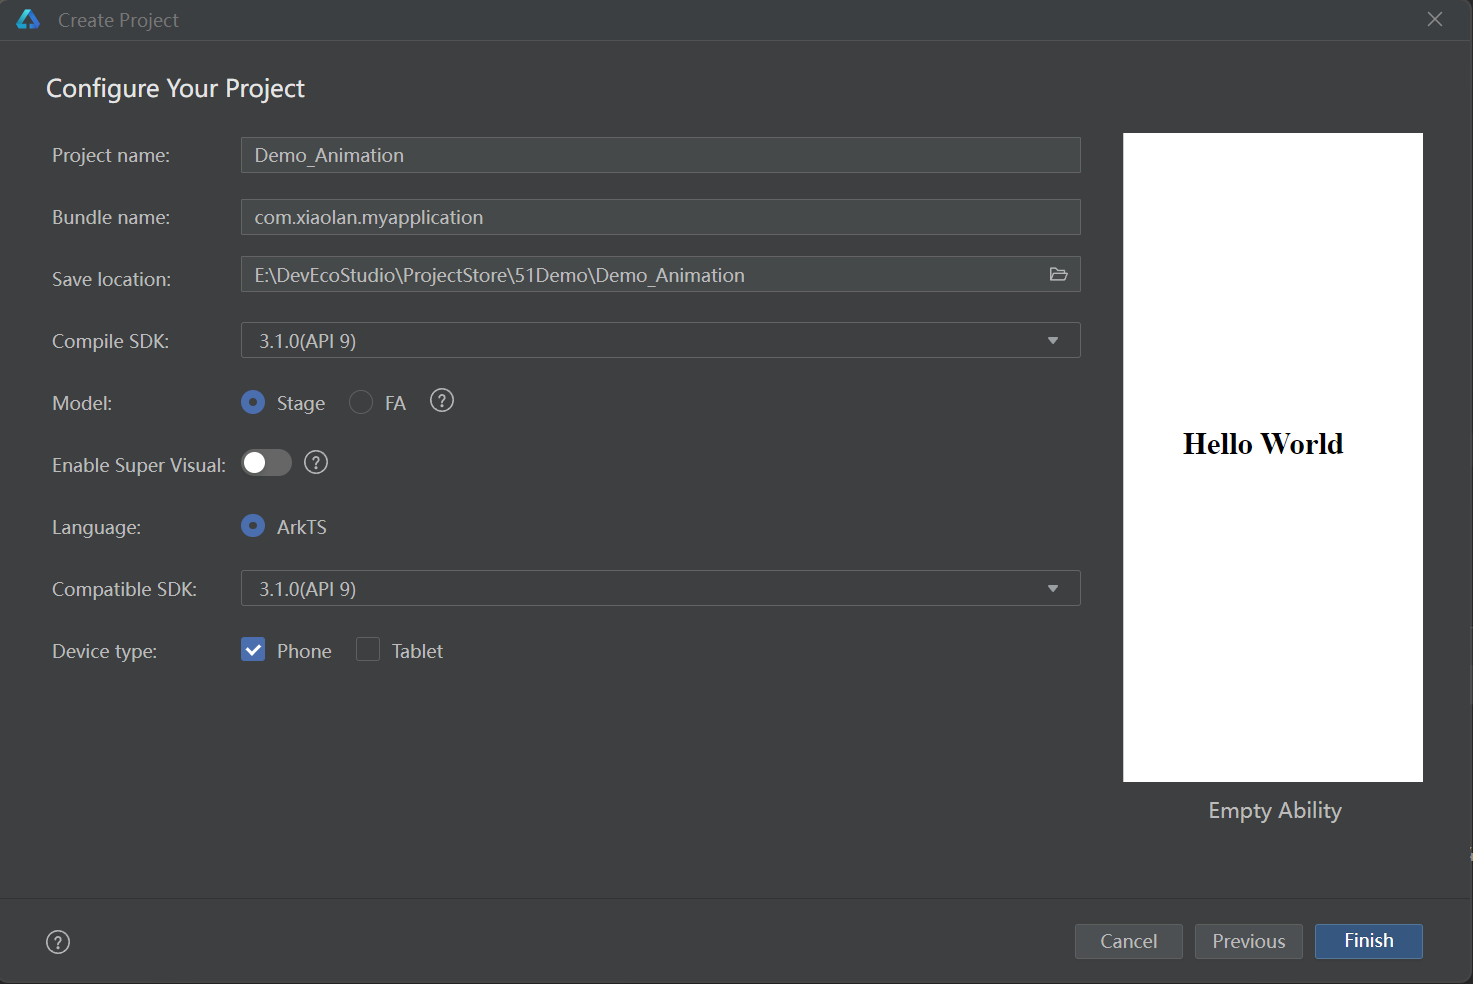
打开DevEco Studio(开发工具的版本必须支持API9),创建一个新的project,相关勾选如下

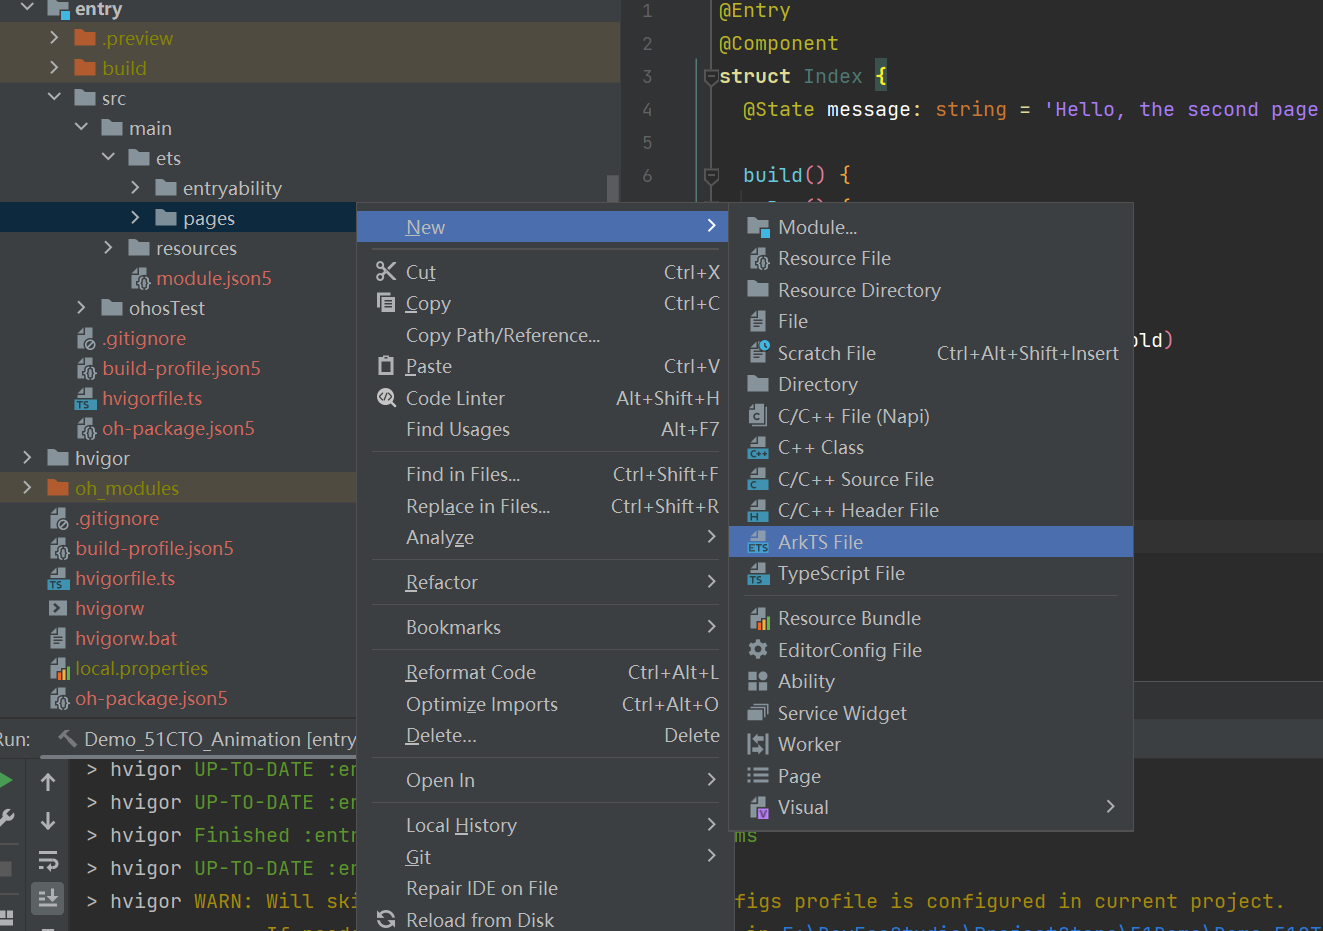
添加新页面
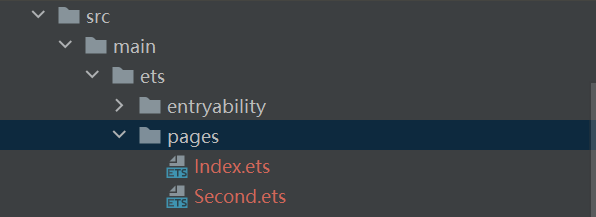
成功创建工程后,在工程文件目录中打开目录:Demo/entry/src/main/ets/pages, 接着右击page,选择New>TypeScript ArkTS File, 创建一个新的ArkTS文件,并将其命名为Second
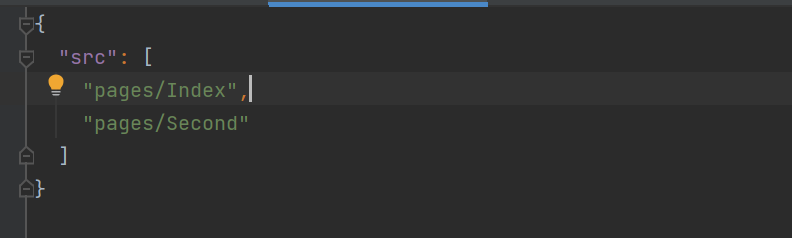
接着,在工程文件目录中打开目录:Demo/entry/src/resources/base/profile/main_pages,添加Second页面的路径信息。注意,字符串'pages/Index’后面的逗号不能漏写。
编写新页面的UI
在编辑器中打开新创建的Second.ets,添加如下代码:
@Entry
@Component
struct Index {
@State message: string = '主页面'
build() {
Row() {
Column() {
Text(this.message)
.fontSize(40)
.fontWeight(FontWeight.Bold)
}
.width('100%')
}
.height('100%')
.backgroundColor('#F1F1F1')
}
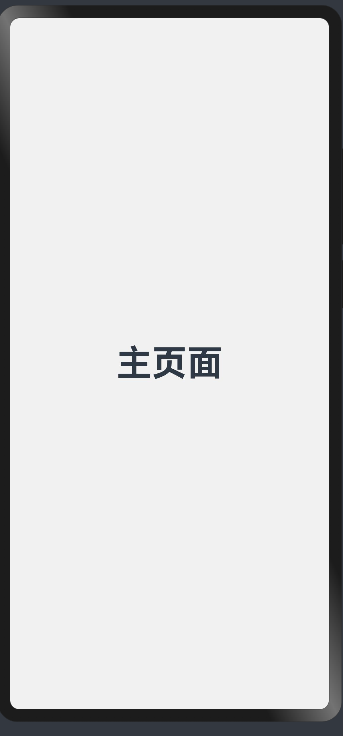
}事实上,这段代码来自于Index.ets, 我们只不过是将Index.ets的代码拷贝至Second.ets中后,修改了变量message的初值,并更换了页面的背景色。由于Second.ets所管理的页面在此次的开发案例中不是主角,所以我们简单设计一下它的UI就足够了。
Second.ets的最终预览效果如下:
编写入场页面的UI
加入图片资源
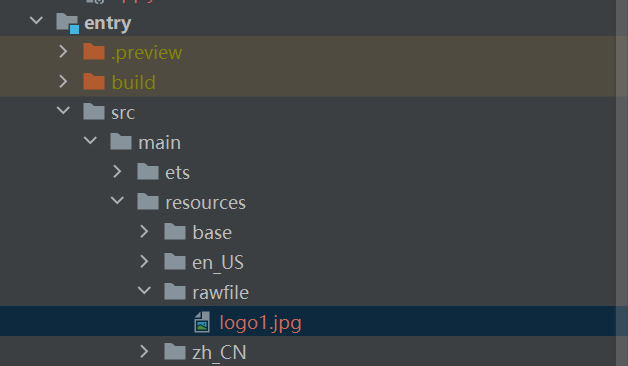
Before coding,我们需要添加一份图片资源到工程的指定目录内。
在工程文件目录中打开目录:Demo/entry/src/main/resources/rawfile, 添加一张任意的图片(可以在IDE中将待添加的图片资源直接粘贴至rawfile目录下,也可以在文件资源管理器中通过文件路径打开rawfile目录并添加图片资源),将其命名为logo1。当然,图片的格式没有要求,只要在之后的步骤中能被正确引用即可。
在编辑器中打开Index.ets(此页面将作为入场页面), 删除Column组件内关于Text组件的代码块,增添一个新的Image件和一个新的Text组件,并填充它们的UI属性,相关代码如下。其中,新增的Image组件所引用的图片资源是上一个步骤中所添加的logo1.jpg。
@Entry
@Component
struct First {
@State message: string = 'Hello World'
build() {
Row() {
Column() {
//删除页面初始化时默认带有的Text组件, 增加一个新的image件和一个新的Text组件
Image($rawfile('logo1.jpg'))
.height(120)
.width(120)
Text('Brunhild')
.fontSize(20)
.fontWeight(FontWeight.Bold)
.margin({
top:7
})
}
.width('100%')
}
.height('100%')
}
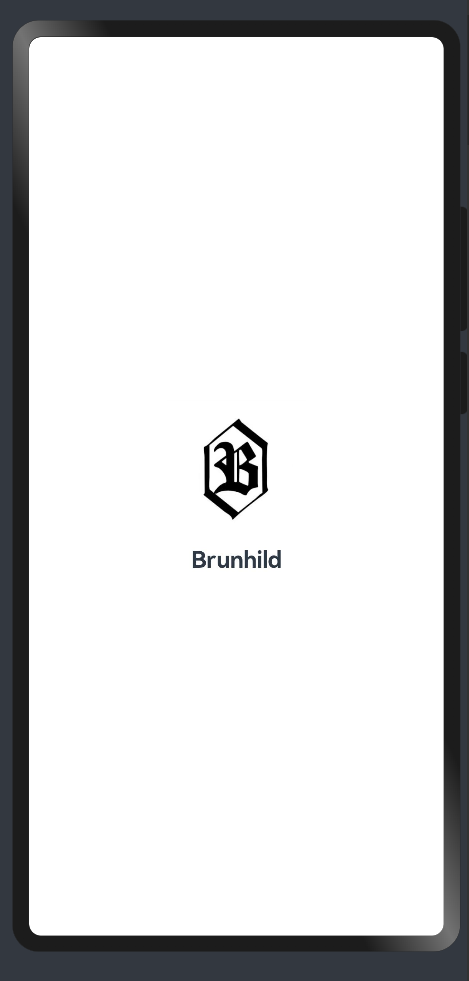
}预览器效果如下
至此,我们已完成对Index.ets的页面UI绘制。接下来,我们需要为这两个新添的组件设置与属性动画有关的属性。属性动画(animation)是ArkUI提供的最基础和常用的动画功能之一,它的功能逻辑是,当组件的布局属性(譬如位置,大小,背景颜色)发生变化时,组件会按照已设置好的动画参数,从原有的布局状态过渡到变化后的布局状态,而这个过渡的拟连续过程便是用户所见到的动画。在这个基础上,我们可以制作一个简单的应用入场动画效果。
添加关键属性
所涉及的两个重要属性分别是translate属性和animation属性。
事实上,系统为每个被渲染的组件都设置属于它的相对坐标系。这个坐标系是一个平面直角坐标系,并且,相对于屏幕,X坐标轴正方向水平向右,Y坐标轴正方向竖直向下。当一个组件的translate属性被设置时,它的实际位置会跟着translate属性而偏移。比如,一个原本位于屏幕中央的组件,更改其translate属性为{x:100,y:0}后,其位置会相对屏幕中央往右平移100px。
animation属性的可供设置的参数如下所示,每个参数都会在不同维度影响动画的最终效果
/**
   * Animation duration, in ms.
   * @since 7
   */
  /**
   * Animation duration, in ms.
   * @form
   * @since 9
   */
  duration?: number;
  /**
   * Animation playback speed. A larger value indicates faster animation playback, and a smaller value indicates slower
   * animation playback. The value 0 means that there is no animation.
   * @since 7
   */
  tempo?: number;
  /**
   * Animation curve.
   * @type { string | Curve}
   * @since 7
   */
  /**
   * Animation curve.
   * @type { string | Curve | ICurve}
   * @form
   * @since 9
   */
  curve?: Curve | string | ICurve;
  /**
   * Animation playback mode. By default, the animation is played from the beginning after the playback is complete.
   * @since 7
   */
  delay?: number;
  /**
   * Animation playback mode. By default, the animation is played from the beginning after the playback is complete.
   * @since 7
   */
  iterations?: number;
  /**
   * Animation playback mode. By default, the animation is played from the beginning after the playback is complete.
   * @since 7
   */
  /**
   * Animation playback mode. By default, the animation is played from the beginning after the playback is complete.
   * @form
   * @since 9
   */
  playMode?: PlayMode;
  /**
   * Callback invoked when the animation playback is complete.
   * @since 7
   */
  /**
   * Callback invoked when the animation playback is complete.
   * @form
   * @since 9
   */
  onFinish?: () => void;
接下来,我们为组件添加关键属性。
首先,定义变量 translateY_Logo,同时设置Image组件的translate属性和animation属性
@Entry
@Component
struct First {

 	 ......

  @State translateY_Logo:number = -200    //定义一个用@state修饰的number型变量translateY_Logo

  build() {
    Row() {
      Column() {

        //删除页面初始化时默认带有的Text组件, 增加一个新的image件和一个新的Text组件

        Image($rawfile('logo1.jpg'))
          .height(120)
          .width(120)
          //添加关键属性
          .translate({
            y:this.translateY_Logo
          })
          .animation({
            //播放时长(ms)
            duration:2000,
            //播放速度
            tempo:1,
            //播放曲线,所选择的是‘快出慢入’
            curve:Curve.FastOutSlowIn,
            //延迟(ms)
            delay:500,
            //循环次数(-1为无限循环)
            iterations:1,
            //播放模式
            playMode:PlayMode.Normal
          })

			......

      }
      .width('100%')
    }
    .height('100%')
  }
}
接着,定义变量 translateY_Title,同时设置Text组件的translate属性和animation属性
@Entry
@Component
struct First {
......
@State translateY_Title:number = 200 //定义一个用@state修饰的number型变量translateY_Title
build() {
Row() {
Column() {
//删除页面初始化时默认带有的Text组件, 增加一个新的image件和一个新的Text组件
......
Text('Brunhild')
.fontSize(20)
.fontWeight(FontWeight.Bold)
.margin({
top:7
})
//添加关键属性
.translate({
y:this.translateY_Title
})
.animation({
delay:500,
duration:2000,
curve:Curve.FastOutSlowIn,
tempo:1,
})
}
.width('100%')
}
.height('100%')
}
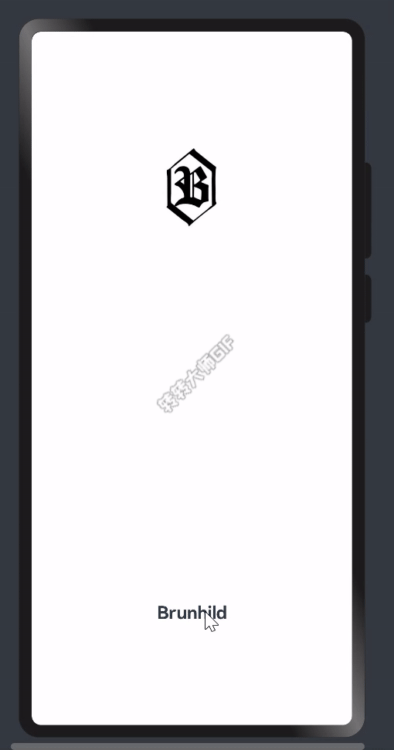
}页面起始状态的效果如下,可以看到,设置translate属性后,Image组件往Y轴负方向偏移,Text组件则往Y轴正方向偏移

最后,我们为Text组件添加onAppear回调。onAppear可以被理解为一个事件监听器,当一个绑定了onAppear的组件装载于显示器时,onAppear回调将被触发,执行onAppear()中所传入的操作语句。换句话说,Text组件在添加onAppear属性后,当此Text组件出现时(笔者也不清楚这个出现是如何定义的),onAppear立即触发,执行已写入的函数参数(即λ表达式中的内容)。
在如下代码中,笔者为Text组件增加了onAppear回调,导入了router模块,并写入了相关操作语句:首先,改变Image组件和Text组件的translate属性,激活属性动画;之后,设置定时器(每4秒执行一次),使得系统在属性动画结束后执行页面跳转(跳转至Second页面);最后,销毁先前设置的定时器。
import router from '@ohos.router';     //导入router模块

@Entry
@Component
struct First {

		......

  @State translateY_Title:number = 200    //定义一个用@state修饰的number型变量translateY_Title

  build() {
    Row() {
      Column() {

        //删除页面初始化时默认带有的Text组件, 增加一个新的image件和一个新的Text组件

      	......

        Text('Brunhild')
          .fontSize(20)
          .fontWeight(FontWeight.Bold)
          .margin({
            top:7
          })
          //添加关键属性
          .translate({
            y:this.translateY_Title
          })
          .animation({
            delay:500,
            duration:2000,
            curve:Curve.FastOutSlowIn,
            tempo:1,
          })
          //增加onAppear回调
          .onAppear(()=>{
          	//改变属性参数
            this.translateY_Logo = 0
            this.translateY_Title = 0

            //设置定时器
            let id = setInterval(()=>{
            	//打印日志
              console.info('router to Second')
              //页面跳转
              router.pushUrl({
                url:'pages/Second'
              })
              //定时器执行之后立即销毁
              clearInterval(id)
            },4000,[])
          })


      }
      .width('100%')
    }
    .height('100%')
  }
}
至此,一个关于入场动画的Demo便完成了。
预览效果如下
ArkTS的动画开发无疑是非常有趣的,如果读者想开发更加复杂的动画效果,不妨参考ArkTS的官方API文档,学习和玩转更多新奇的用法。文章所述仅代表个人理解,如有不足恳请读者不吝赐教。

Recommend
About Joyk
Aggregate valuable and interesting links.
Joyk means Joy of geeK