

How to Export Data to PDF with Kendo PDF Export and Angular
source link: https://www.telerik.com/blogs/exporting-data-pdf-kendo-pdf-export-angular
Go to the source link to view the article. You can view the picture content, updated content and better typesetting reading experience. If the link is broken, please click the button below to view the snapshot at that time.

How to Export Data to PDF with Kendo PDF Export and Angular

Empower your users to export data to PDF in your Angular apps with Kendo UI for Angular.
In web applications, the users visualize the data in several ways, like a grid, list or styled content. From there, sometimes the user wants to share the data by email, printing or downloading the data to preserve it in the original format, and one of the best formats to store or send data is PDF.
To enable users to export data to PDF, our team has several ways to generate PDF—build a backend to create the PDF, fight with styles or use JavaScript libraries. Some are very tricky or difficult to adapt to business and require spending time reading about the library without good documentation, examples or support.
One option to save time for your company and make life easier for your developers is using Progress Kendo UI for Angular’s PDF Export component. It allows you to create a PDF from data, markup with multi-page content, and more.
The Kendo UI PDF Export component is built natively for Angular, making it simple to integrate into an Angular application, with a straightforward API to quickly export data to PDF format.
The best way to show how easy it is to enable your users to export data to PDF in your Angular apps is with a real scenario. In this post, you will learn the following points:
- Install Kendo UI for Angular’s PDF Export Component
- Print Visible Content
- Add Dynamic Value to Hidden Data
- Print Remote Data
Scenario
We want to build an application to get a list of NBA Players from API and the user.
- First, get the list of players and export it to PDF.
- After accepting TACOS (terms and conditions of service), download the PDF with the user’s name and TACOS. 🌮
- Get the complete list of players from the API and save it to a PDF with the user’s name.
Let’s go! 🏀📄
Set up the Project
If you don’t already have the application created, create a new app, export-data-pdf, by running the command in the terminal:
ng new export-data-pdf
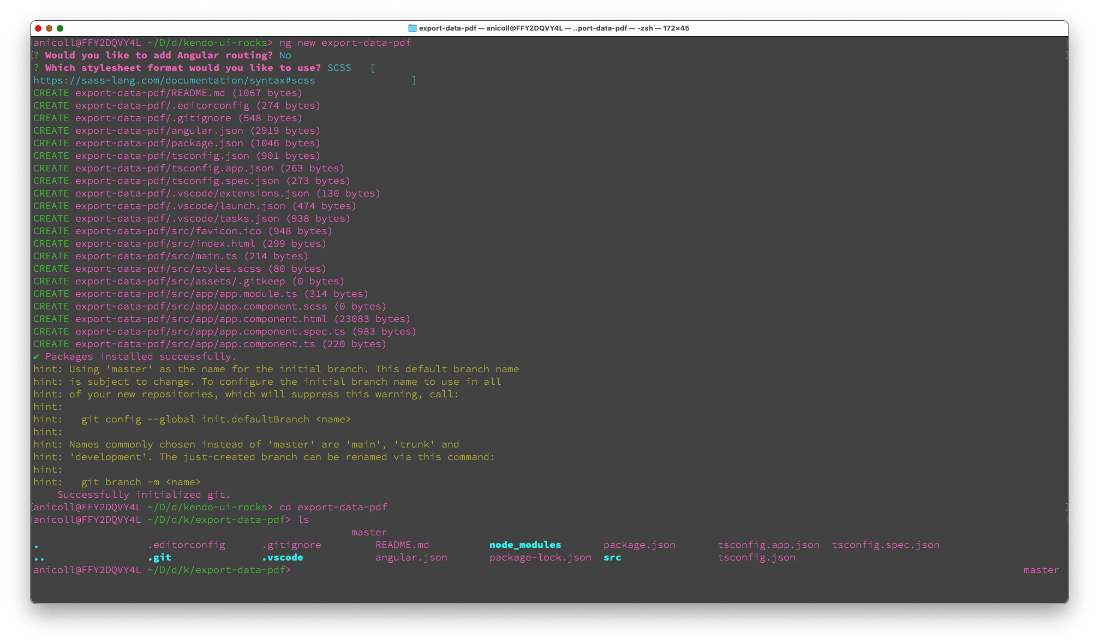
Go to the export-data-pdf folder, edit the app.component.html and remove the default HTML to be ready for our next step.
Install Kendo UI for Angular’s PDF Export Component
Now, continuing to use the Angular schematic to install the Kendo UI for Angular PDF Export into our app by running the following command in the terminal.
ng add @progress/kendo-angular-pdf-export
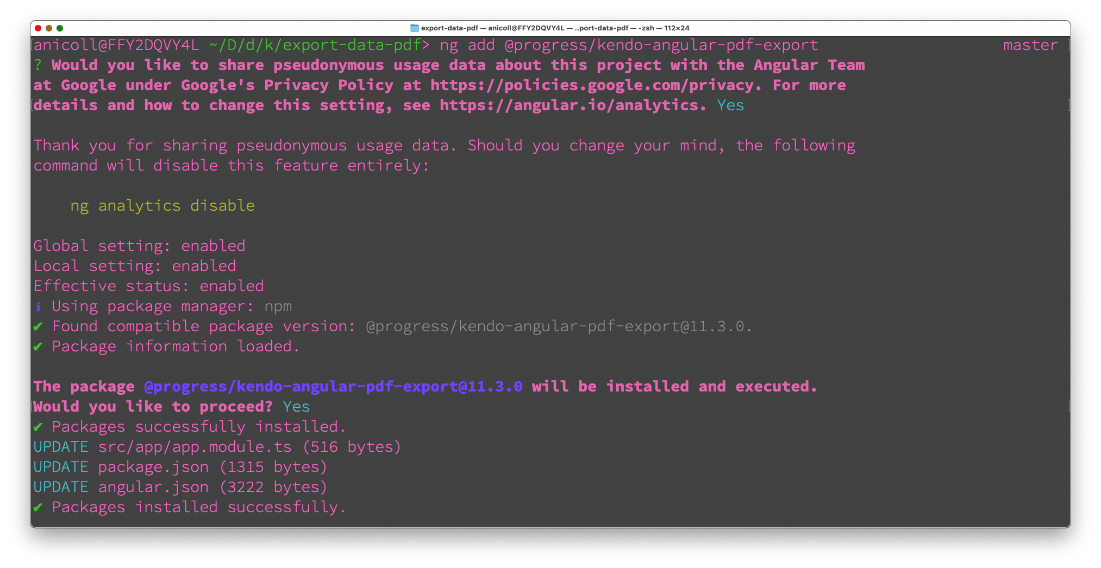
It automatically adds the PDF Export Module in the app.module and makes make the Kendo UI PDF Export component available for use:
{ PDFExportModule } from '@progress/kendo-angular-pdf-export';

@NgModule({
  imports: [
    PDFExportModule
  ],
  ...
})
export class AppModule { }
But don’t worry, if you have special constraints, perhaps feature modules or even a module-less structure in your app, Kendo UI will still work. Check out their manual install instructions that they have for each grouping of components: https://www.telerik.com/kendo-angular-ui-develop/components/pdf-export/get-started/#toc-manual-setup
Introducing Standalone Components
Angular 14 introduced the standalone component—a component not part of any ngModule that can be used with either other standalone or module-based components. Learn more about standalone components.
The Service
To provide data in our app using the API, it is helpful to create a service NbaService to request the data to the API and return the list of players. We could do this logic in our component, but we aren’t barbarians.
🥴
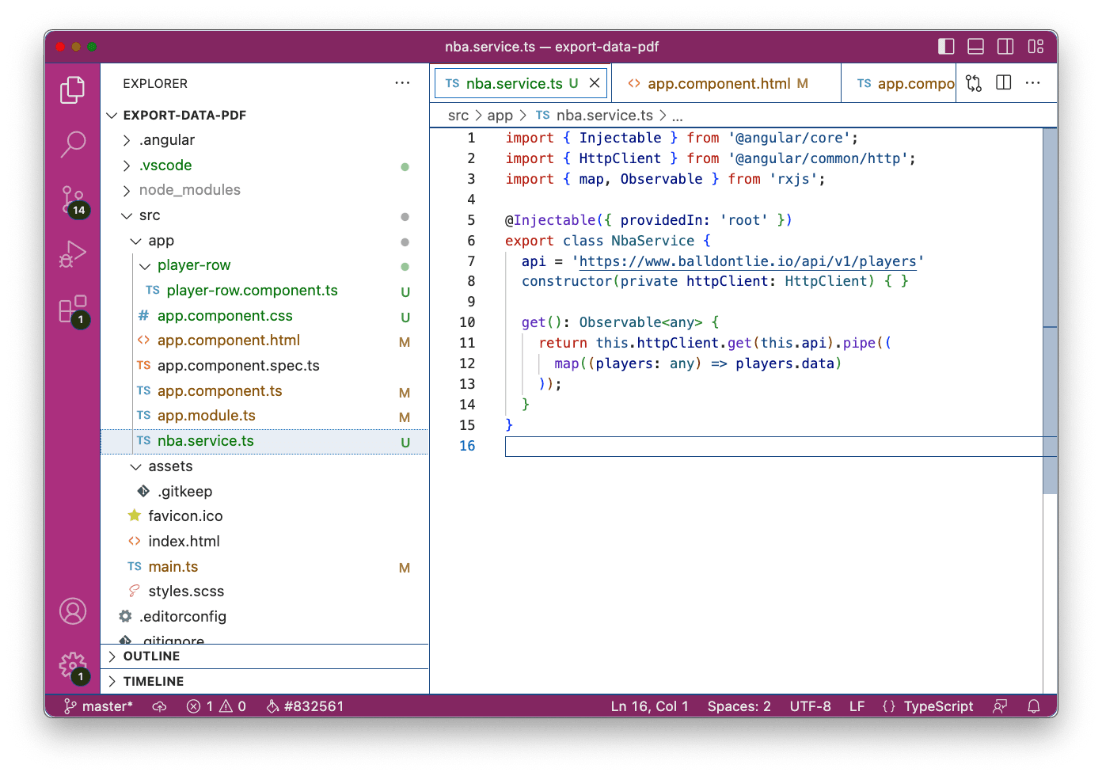
Create the file nba.service.ts using the Angular CLI:
ng g s nba
CREATE src/app/nba.service.spec.ts (342 bytes)
CREATE src/app/nba.service.ts (132 bytes)

Add the HttpClient using the inject function and add the method getPlayers() to use http to request the data. (Make sure you include HTTPClient in your
app.module.ts providers, so you have access to use it in our nba service file.)
The final code looks like this:
import { Injectable } from '@angular/core';
import { HttpClient } from '@angular/common/http';
import { map, Observable } from 'rxjs';

@Injectable({ providedIn: 'root' })
  export class NbaService {
    api = 'https://www.balldontlie.io/api/v1/players'
  constructor(private httpClient: HttpClient) { }

  get(): Observable<any> {
    return this.httpClient.get(this.api).pipe((
      map((players: any) => players.data)
    ));
  }
}
We don’t get deep about creating a service, but if you are interested, check out these resources in the Angular docs:
List the Players
Before showing the players list, we want to create a component PlayerRow responsible for rendering the player information.
Next, using the Angular CLI, we will create the home component using the -t flag for inline template, preventing html file creation by running the following command.
ng g c -t player-row

CREATE src/app/player-row/player-row.component.scss (0 bytes)
CREATE src/app/player-row/player-row.component.spec.ts (621 bytes)
CREATE src/app/player-row/player-row.component.ts (232 bytes)

Inside the newly created player-row folder, navigate to player-row.component.ts and change the selector from app-player to player.
Then add the new property player using the Input() decorator to use it in the template and bind to the player properties.
import { Component, Input } from '@angular/core';

@Component({
  selector: 'player',
  template: `
   <div>
      {{ player.first_name }} {{ player.last_name }} |
      {{ player.team.full_name }} |
      {{ player.position }}
    </div>
  `,
})
export class PlayerRowComponent {
  @Input() player: any;

}
Next, open the app.component.ts and inject the NBAService using the inject function; it provides the getPlayers() to store
in the variable players.
@Component({
  selector: 'app-root',
  templateUrl: './app.component.html',
  styleUrls: ['./app.component.css']
})
export class AppComponent {
  nba = inject(NbaService)
  players$ = this.nba.get();
  ....
Next, render the players list in the app.component.html using the pipe async and the ngFor directive and take five players using the slice function. We
get the value by passing the player object to the player component.
The markup looks like this:
<div class="players" *ngIf="players$ | async as players">
   <kendo-pdf-export #pdfArea>
     <div *ngFor="let player of players.slice(0, 5)">
       <br />
       <player [player]="player"></player>
     </div>
  </kendo-pdf-export>
</div>
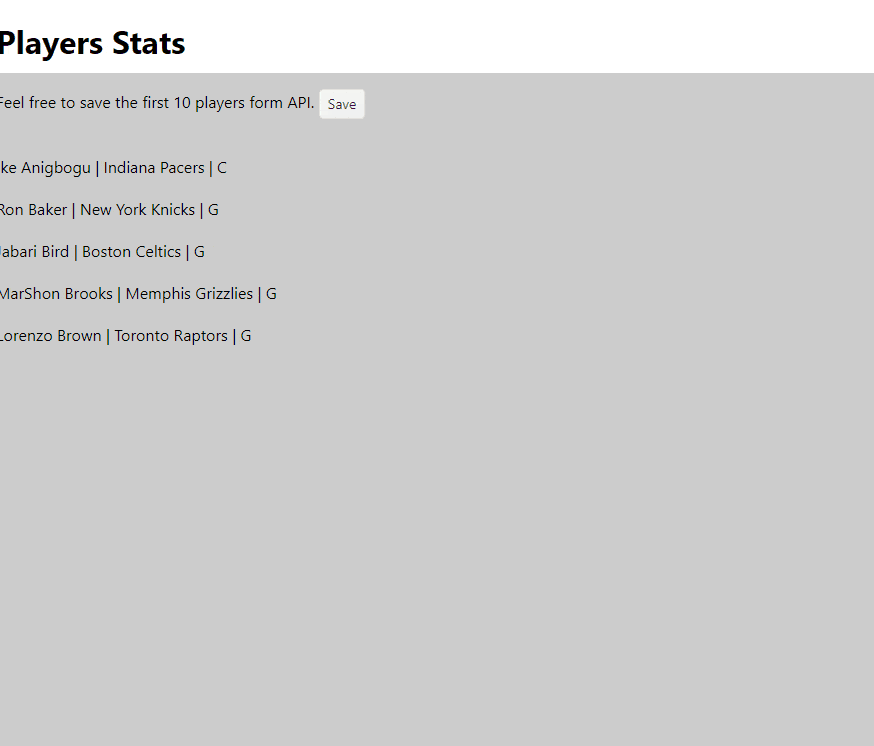
<div class="players" *ngIf="players$ | async as players">
<div class="message-area">
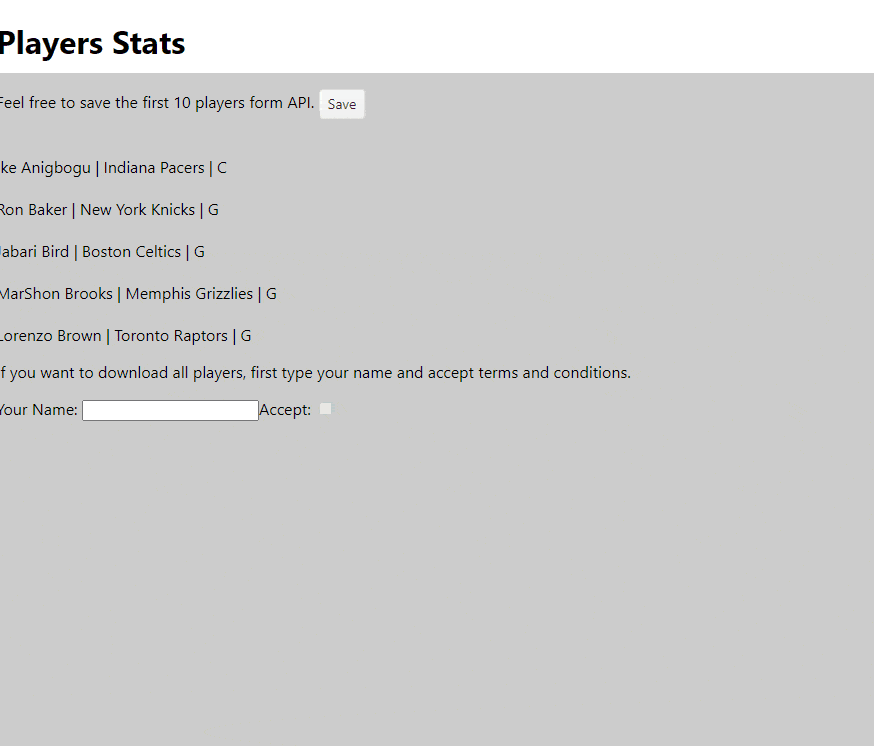
<p>Feel free to save the first 10 players form API.
<button kendoButton (click)="pdfArea.saveAs('players.pdf')">Save</button></p>
</div>
<kendo-pdf-export #pdfArea>
<ul *ngFor="let player of players.slice(0, 5)">
<li>
<player [player]="player"></player>
</li>
</ul>
</kendo-pdf-export>
</div>
Save the changes and run the ng serve -o the app must render the list of players.

Angular Basics: Introduction to ngFor Directive in Angular
Learn more about looping through lists in Angular using the ngFor directive and keywords like index, first and last.
Export to PDF
We have two goals in our current step when the user clicks a button: print to PDF the list of players and set the name to the PDF. Both tasks are so easy, thanks to the Kendo UI for Angular PDF Export Component.
First, we declare the area to print to PDF with kendo-pdf-export—in our case, the area with the list of players. Also, add a template variable to the kendo-pdf-export as
pdfArea to get access and interact with the component.
<kendo-pdf-export #pdfArea>
    <div *ngFor="let player of players.slice(0, 5)">
      <br />
      <player [player]="player"></player>
    </div>
</kendo-pdf-export>
Next, we add a button and attach the click event trigger to the kendo-pdf-export reference pdfArea, using the method saveAs with the name players.pdf.
<div class="message-area">
  <p>Feel free to save the first ten players from API. <button (click)="pdfArea.saveAs('players.pdf')">Save</button></p>
</div>
The saveAs method saves the content as a PDF file with a name.
Save the changes, then test it out. Click Save and the area in the pdfArea will be saved as a PDF with the name players.pdf.
Perfect, we are saving the data to PDF!
Print Hidden Content
We already know how to print data, but our next challenge is to print data with dynamic values. When the user activates the checkbox to accept the terms and adds their name in the terms PDF, the filename is updated with that same user’s name.
First, declare a new variable for userName in the app.component.ts:
export class AppComponent {
  nba = inject(NbaService)
  players$ = this.nba.get();
  userName!: string;
In the app.component.html, add a new div with the class hide. The hide class uses a negative margin to hide the user:
.hide {
  position: absolute;
  left: -1000px;
}
Wrap the kendo-pdf-export with a template variable reference termsPdf and use interpolation to render the value of userName. It has the option to customize
the PDF properties while generating. We will use the paperSize to “A4” and “2cm” margin for the example.
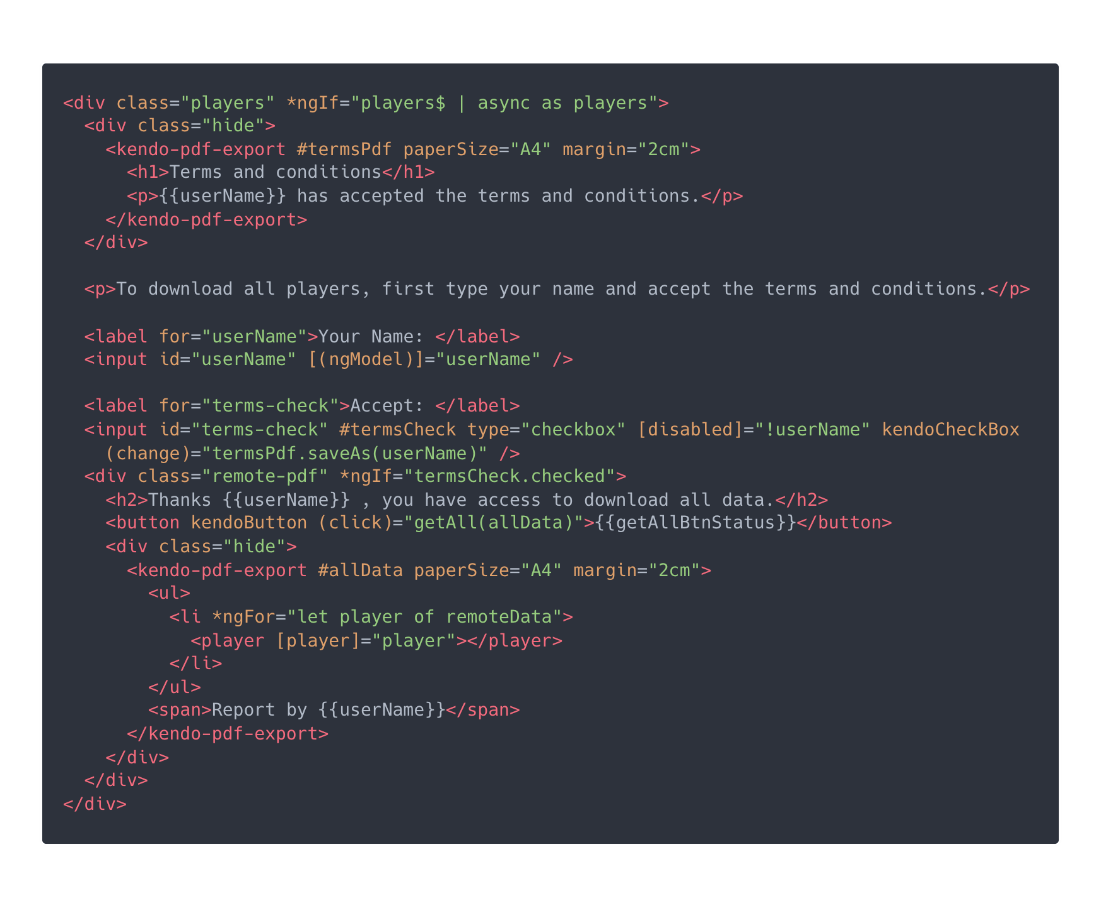
<div class="hide">
  <kendo-pdf-export #termsPdf paperSize="A4" margin="2cm">
    <h1>Terms and conditions</h1>
    <p>{{userName}} has accepted the terms and conditions.</p>
  </kendo-pdf-export>
</div>
The final steps add an input using [(ngModel)] to dynamically bind the value userName, add a checkbox using the binding property for the [disabled] with
the userName, listen to the change event and use the reference to termsPdf, and use the method saveAs with the variable
userName.
<p>To download all players, first type your name and accept the terms and conditions.</p>
  <label for="userName">Your Name: </label><input id="userName" [(ngModel)]="userName"/>
  <label for="terms-check">Accept: </label><input id="terms-check" #termsCheck type="checkbox" [disabled]="!userName" (change)="termsPdf.saveAs(userName)" />
We must import
FormModuleto use thengModel. Do this in your app.module.tsimports.
What does this code do? We enabled the checkbox to download the PDF with the user’s typed name in the file and content.
Export Remote Data
The final challenge is enabling an area with the userName and adding a button when the user accepts terms. When the user clicks, it shows a downloading message to get the data from the API and export the response to a
PDF.
First, let’s add a template variable reference to the checkbox termsCheck to read the value checked to show the area with the username.
<input id="terms-check" #termsCheck type="checkbox" [disabled]="!userName" kendoCheckBox (change)="terms.saveAs(userName)" />
<div class="remote-pdf" *ngIf="termsCheck.checked">
Edit the app.componet.ts, and add the variable getAllBtnStatus. It shows the message when downloading the PDF and remoteData to store the response from
the API.
getAllBtnStatus = 'Get All Players';
remoteData: any;
Next, create the async method getAll(pdfExport: PDFExportComponent), passing the PDFExportComponent as a parameter. It updates the getAllBtnStatus to Downloading Data..., waits for the API response, and updates the value for remoteData.
Using the setTimeOut function, we wait two seconds to update the message again and use the pdfExport component to save the data to PDF.
async getAll(pdfExport: PDFExportComponent) {
  this.getAllBtnStatus = "Downloading Data..."
  const data = await firstValueFrom(this.players$);
  this.remoteData = data;
  setTimeout(() => {
    this.getAllBtnStatus = "Get All Players"
    pdfExport.saveAs('all-data.pdf');
  }, 2000)
}
Using the hide class again, we add a div, wrap the pdfArea with the kendo-pdf-export, and with the variable name #allDataPdf render the data from the
remoteData variable again using ngFor.
<div class="hide">
  <kendo-pdf-export #allDataPdf paperSize="A4" margin="2cm">
    <ul>
      <li *ngFor="let player of remoteData">
        <player [player]="player"></player>
      </li>
    </ul>
    <span>Report by {{userName}}</span>
  </kendo-pdf-export>
</div>
Finally, add the button to call the getAll method passing the allDataPdf component reference.
<button kendoButton (click)="getAll(allDataPdf)">{{getAllBtnStatus}}</button>
Our final app.component.html should look something like this:
Save and see the changes.
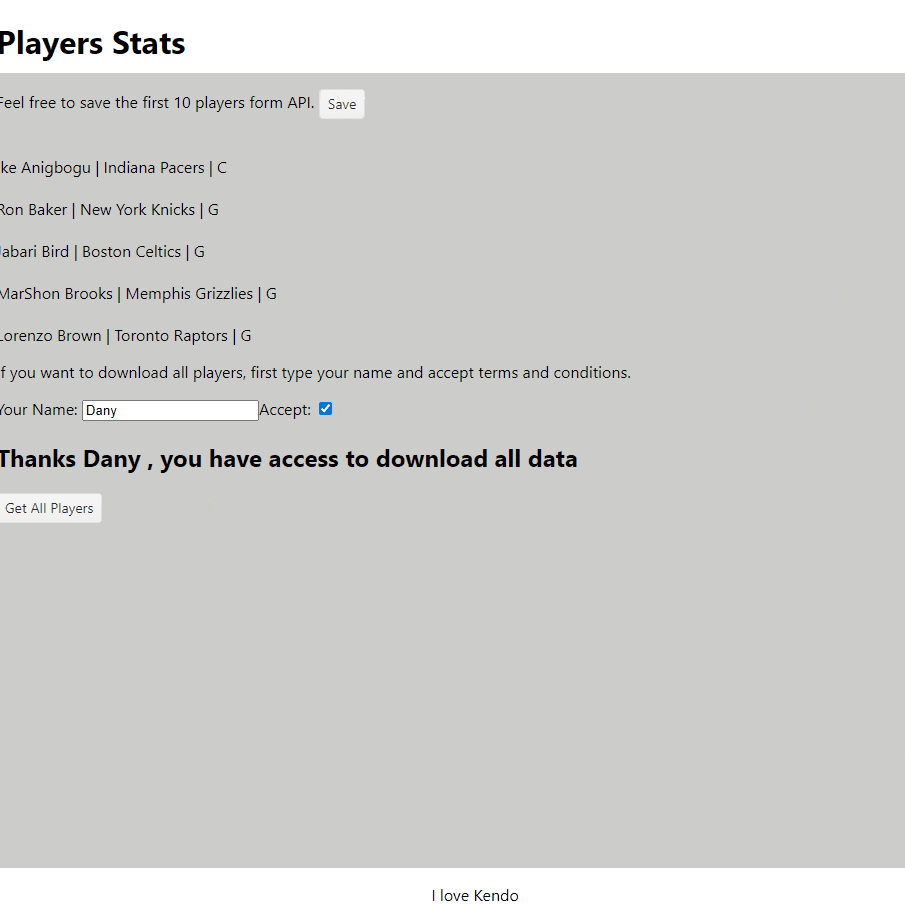
Perfect! We get remote data, show the status to the user, and convert it to PDF! Great!!!
Conclusion
We learned how to use Kendo UI for Angular PDF Export in a few scenarios, with static data, adding new data or remote HTTP content—but even though it’s super simple to use, it offers a high degree of customization and flexibility. It allows us to export specific data, customize the appearance and layout of the exported PDF, and even export the current view of the Angular application.
This is just the beginning of what you can do with Kendo UI for Angular PDF Export. Check out the official documentation with many examples and customizations.
Recommend
About Joyk
Aggregate valuable and interesting links.
Joyk means Joy of geeK