

浅析Nordic nRF5 SDK例程架构 - HannibalWang
source link: https://www.cnblogs.com/HannibalWang/p/17287352.html
Go to the source link to view the article. You can view the picture content, updated content and better typesetting reading experience. If the link is broken, please click the button below to view the snapshot at that time.
浅析Nordic nRF5 SDK例程架构
很多刚接触Nordic nRF5 SDK的初学者出于对新平台的不熟悉,会觉得这个SDK很难,本文讲浅析nRF5 SDK中例程的架构,让初学者能够快速上手SDK。
在开始之前,先推荐阅读观看下面这些文章和视频,这些文章和视频都出自Nordic中国区的FAE,强烈推荐。
1、【[nRF5] nRF5 SDK Getting Start-哔哩哔哩】 https://b23.tv/FxfJBVW
2、【Nordic nRF5 SDK和softdevice介绍】https://www.cnblogs.com/iini/p/9095551.html
3、【nRF5 SDK软件架构及softdevice工作原理】https://www.cnblogs.com/iini/p/9332463.html
其实在【nRF5 SDK软件架构及softdevice工作原理】这篇文章中已经总结了SDK的软件架构,这里我直接引用出来:
“当我们开发Nordic平台的BLE应用时,主要需要做两件事:
- 第1件事:初始化。为了简化初始化工作,Nordic SDK所有模块初始化时,只需要将相应API输入结构体参数清0即可完成初始化工作,也就是说,只要你保证初始化参数为0,蓝牙协议栈就可以工作起来,这对很多Nordic初学者来说,大大减轻了开发工作量。
- 第2件事:写蓝牙事件回调处理函数。一般来说,你的应用逻辑都是放在蓝牙事件回调处理函数中,所以写好回调处理函数代码,你的开发工作就完成了大半了。”
本文将通过介绍 bsp 和 ble_app_uart 这两个例程来分析nRF5 SDK的例程架构,这两个例程可以在nRF5_SDK_17.1.0_ddde560\examples\peripheral和nRF5_SDK_17.1.0\examples\ble_peripheral下找到。
一、bsp 例程浅析
bsp是不带协议栈的裸机例程,所以main函数非常简单,下面具体分析一下这几个函数的作用。
int main(void)
{
    clock_initialization();

    uint32_t err_code = app_timer_init();
    APP_ERROR_CHECK(err_code);

    APP_ERROR_CHECK(NRF_LOG_INIT(NULL));
    NRF_LOG_DEFAULT_BACKENDS_INIT();

    NRF_LOG_INFO("BSP example started.");
    bsp_configuration();

    while (true)
    {
        NRF_LOG_FLUSH();
        __SEV();
        __WFE();
        __WFE();
        // no implementation needed
    }
}
1、clock_initialization是直接通过配置寄存器来配置低频时钟,这里是使用了外部32.768kHz晶振做为时钟源。需要注意的是,因为bsp是不带协议栈的裸机工程,所以如果用到低频时钟源的时候,需要对其初始化。
/**@brief Function for initializing low frequency clock.
 */
void clock_initialization()
{
    NRF_CLOCK->LFCLKSRC            = (CLOCK_LFCLKSRC_SRC_Xtal << CLOCK_LFCLKSRC_SRC_Pos);
    NRF_CLOCK->EVENTS_LFCLKSTARTED = 0;
    NRF_CLOCK->TASKS_LFCLKSTART    = 1;

    while (NRF_CLOCK->EVENTS_LFCLKSTARTED == 0)
    {
        // Do nothing.
    }
}
在带协议栈的例程中,因为协议栈会用到低频时钟源。协议栈初始化的时候调用了nrf_sdh_enable_request,我们可以从该函数中看到在sd_softdecice_enable写入低频时钟配置对低频时钟源进行了初始化,所以在带协议栈的例程中只要初始化协议栈即可,不用再初始化低频时钟源。
ret_code_t nrf_sdh_enable_request(void)
{
    ret_code_t ret_code;

    if (m_nrf_sdh_enabled)
    {
        return NRF_ERROR_INVALID_STATE;
    }

    m_nrf_sdh_continue = true;

    // Notify observers about SoftDevice enable request.
    if (sdh_request_observer_notify(NRF_SDH_EVT_ENABLE_REQUEST) == NRF_ERROR_BUSY)
    {
        // Enable process was stopped.
        return NRF_SUCCESS;
    }

    // Notify observers about starting SoftDevice enable process.
    sdh_state_observer_notify(NRF_SDH_EVT_STATE_ENABLE_PREPARE);
  //配置低频时钟的参数
    nrf_clock_lf_cfg_t const clock_lf_cfg =
    {
        .source       = NRF_SDH_CLOCK_LF_SRC,
        .rc_ctiv      = NRF_SDH_CLOCK_LF_RC_CTIV,
        .rc_temp_ctiv = NRF_SDH_CLOCK_LF_RC_TEMP_CTIV,
        .accuracy     = NRF_SDH_CLOCK_LF_ACCURACY
    };

    CRITICAL_REGION_ENTER();
#ifdef ANT_LICENSE_KEY
    ret_code = sd_softdevice_enable(&clock_lf_cfg, app_error_fault_handler, ANT_LICENSE_KEY);
#else
    ret_code = sd_softdevice_enable(&clock_lf_cfg, app_error_fault_handler);
#endif
    m_nrf_sdh_enabled = (ret_code == NRF_SUCCESS);
    CRITICAL_REGION_EXIT();

    if (ret_code != NRF_SUCCESS)
    {
        return ret_code;
    }

    m_nrf_sdh_continue  = false;
    m_nrf_sdh_suspended = false;

    // Enable event interrupt.
    // Interrupt priority has already been set by the stack.
    softdevices_evt_irq_enable();

    // Notify observers about a finished SoftDevice enable process.
    sdh_state_observer_notify(NRF_SDH_EVT_STATE_ENABLED);

    return NRF_SUCCESS;
}
完成低频时钟的配置后,接下来是调用 app_timer_init 对定时器进行初始化。这个函数是Nordic的库中已经封装好的函数,所以在main直接调用即可,nRF52系列有 Timer0-Timer4 一共5个Timer可以用,这里需要注意的是协议栈开启后会占用Timer0。
这里推荐阅读Nordic中国区FAE写的一篇文章,详细介绍了app_timer的用法和常见问题:https://www.cnblogs.com/iini/p/9347460.html
2、NRF_LOG_INIT 和 NRF_LOG_DEFAULT_BACKENDS_INIT 的作用是Log模块初始化,调用这两个函数之后,就可以在代码中调用 NRF_LOG_INFO、NRF_LOG_ERROR、NRF_LOG_WARNING、NRF_LOG_DEBUG 这几个函数来打印LOG。Noridc在SDK的代码中通过上述的四个LOG等级写入了大量的日志,通过打印不同级别的LOG日志,可以帮助开发者调试和快速找到代码不合理的设计导致的出错。
关于如何调试Debug问题,可以参考Nordic中国区FAE的文章 https://www.cnblogs.com/iini/p/9279618.html
我们也可以在bsp的main函数中看到,LOG模块初始化完成后,调用NRF_LOG_INFO打印了“BSP example started.”
3、接下来就是bsp的初始化,这里也是调用了SDK中的库函数bsp_init,在里面写入了两个参数。
/**@brief Function for initializing bsp module.
 */
void bsp_configuration()
{
    uint32_t err_code;

    err_code = bsp_init(BSP_INIT_LEDS | BSP_INIT_BUTTONS, bsp_evt_handler);
    APP_ERROR_CHECK(err_code);
}
bsp_init的函数定义在bsp.h中,查看其注释可以知道两个入参分别是使用外设的类型和回调函数。在main 中 BSP_INIT_LEDS 和 BSP_INIT_BUTTONS 分别是对LED和BUTTON进行了初始化。
/**@brief       Function for initializing BSP.
 *
 * @details     The function initializes the board support package to allow state indication and
 *              button reaction. Default events are assigned to buttons.
 * @note        Before calling this function, you must initiate the following required modules:
 *              - @ref app_timer for LED support
 *              - @ref app_gpiote for button support
 *
 * @param[in]   type               Type of peripherals used.
 * @param[in]   callback           Function to be called when button press/event is detected.
 *
 * @retval      NRF_SUCCESS               If the BSP module was successfully initialized.
 * @retval      NRF_ERROR_INVALID_STATE   If the application timer module has not been initialized.
 * @retval      NRF_ERROR_NO_MEM          If the maximum number of timers has already been reached.
 * @retval      NRF_ERROR_INVALID_PARAM   If GPIOTE has too many users.
 * @retval      NRF_ERROR_INVALID_STATE   If button or GPIOTE has not been initialized.
 */
uint32_t bsp_init(uint32_t type, bsp_event_callback_t callback);
下面我们来看看bsp的回调函数bsp_evt_handler,在回调中使用了按键中断,DK板上的Button1和Button2按下的时候,会产生相对应的事件。
/**@brief Function for handling bsp events.
 */
void bsp_evt_handler(bsp_event_t evt)
{
    uint32_t err_code;
    switch (evt)
    {
        case BSP_EVENT_KEY_0:
            if (actual_state != BSP_INDICATE_FIRST)
                actual_state--;
            else
                actual_state = BSP_INDICATE_LAST;
            break;

        case BSP_EVENT_KEY_1:

            if (actual_state != BSP_INDICATE_LAST)
                actual_state++;
            else
                actual_state = BSP_INDICATE_FIRST;
            break;

        default:
            return; // no implementation needed
    }
    err_code = bsp_indication_set(actual_state);
    NRF_LOG_INFO("%s", (uint32_t)indications_list[actual_state]);
    APP_ERROR_CHECK(err_code);
}
我们可以在bsp_event_t中找到全部bsp事件。
/**@brief BSP events.
*
* @note Events from BSP_EVENT_KEY_0 to BSP_EVENT_KEY_LAST are by default assigned to buttons.
*/
typedef enum
{
    BSP_EVENT_NOTHING = 0,                  /**< Assign this event to an action to prevent the action from generating an event (disable the action). */
    BSP_EVENT_DEFAULT,                      /**< Assign this event to an action to assign the default event to the action. */
    BSP_EVENT_CLEAR_BONDING_DATA,           /**< Persistent bonding data should be erased. */
    BSP_EVENT_CLEAR_ALERT,                  /**< An alert should be cleared. */
    BSP_EVENT_DISCONNECT,                   /**< A link should be disconnected. */
    BSP_EVENT_ADVERTISING_START,            /**< The device should start advertising. */
    BSP_EVENT_ADVERTISING_STOP,             /**< The device should stop advertising. */
    BSP_EVENT_WHITELIST_OFF,                /**< The device should remove its advertising whitelist. */
    BSP_EVENT_BOND,                         /**< The device should bond to the currently connected peer. */
    BSP_EVENT_RESET,                        /**< The device should reset. */
    BSP_EVENT_SLEEP,                        /**< The device should enter sleep mode. */
    BSP_EVENT_WAKEUP,                       /**< The device should wake up from sleep mode. */
    BSP_EVENT_SYSOFF,                       /**< The device should enter system off mode (without wakeup). */
    BSP_EVENT_DFU,                          /**< The device should enter DFU mode. */
    BSP_EVENT_KEY_0,                        /**< Default event of the push action of BSP_BUTTON_0 (only if this button is present). */
    BSP_EVENT_KEY_1,                        /**< Default event of the push action of BSP_BUTTON_1 (only if this button is present). */
    BSP_EVENT_KEY_2,                        /**< Default event of the push action of BSP_BUTTON_2 (only if this button is present). */
    BSP_EVENT_KEY_3,                        /**< Default event of the push action of BSP_BUTTON_3 (only if this button is present). */
    BSP_EVENT_KEY_4,                        /**< Default event of the push action of BSP_BUTTON_4 (only if this button is present). */
    BSP_EVENT_KEY_5,                        /**< Default event of the push action of BSP_BUTTON_5 (only if this button is present). */
    BSP_EVENT_KEY_6,                        /**< Default event of the push action of BSP_BUTTON_6 (only if this button is present). */
    BSP_EVENT_KEY_7,                        /**< Default event of the push action of BSP_BUTTON_7 (only if this button is present). */
    BSP_EVENT_KEY_LAST = BSP_EVENT_KEY_7,
} bsp_event_t;
在 bsp 原始例程中的bsp回调函数中,按下Button1是倒序显示bsp_indication_t这个结构体中定义好的LED状态并在串口打印bsp_indication_t中的事件。
/**@brief BSP indication states.
 *
 * @details See @ref examples_bsp_states for a list of how these states are indicated for the PCA10028/PCA10040 board and the PCA10031 dongle.
 */
typedef enum
{
    BSP_INDICATE_FIRST = 0,
    BSP_INDICATE_IDLE  = BSP_INDICATE_FIRST, /**< See \ref BSP_INDICATE_IDLE.*/
    BSP_INDICATE_SCANNING,                   /**< See \ref BSP_INDICATE_SCANNING.*/
    BSP_INDICATE_ADVERTISING,                /**< See \ref BSP_INDICATE_ADVERTISING.*/
    BSP_INDICATE_ADVERTISING_WHITELIST,      /**< See \ref BSP_INDICATE_ADVERTISING_WHITELIST.*/
    BSP_INDICATE_ADVERTISING_SLOW,           /**< See \ref BSP_INDICATE_ADVERTISING_SLOW.*/
    BSP_INDICATE_ADVERTISING_DIRECTED,       /**< See \ref BSP_INDICATE_ADVERTISING_DIRECTED.*/
    BSP_INDICATE_BONDING,                    /**< See \ref BSP_INDICATE_BONDING.*/
    BSP_INDICATE_CONNECTED,                  /**< See \ref BSP_INDICATE_CONNECTED.*/
    BSP_INDICATE_SENT_OK,                    /**< See \ref BSP_INDICATE_SENT_OK.*/
    BSP_INDICATE_SEND_ERROR,                 /**< See \ref BSP_INDICATE_SEND_ERROR.*/
    BSP_INDICATE_RCV_OK,                     /**< See \ref BSP_INDICATE_RCV_OK.*/
    BSP_INDICATE_RCV_ERROR,                  /**< See \ref BSP_INDICATE_RCV_ERROR.*/
    BSP_INDICATE_FATAL_ERROR,                /**< See \ref BSP_INDICATE_FATAL_ERROR.*/
    BSP_INDICATE_ALERT_0,                    /**< See \ref BSP_INDICATE_ALERT_0.*/
    BSP_INDICATE_ALERT_1,                    /**< See \ref BSP_INDICATE_ALERT_1.*/
    BSP_INDICATE_ALERT_2,                    /**< See \ref BSP_INDICATE_ALERT_2.*/
    BSP_INDICATE_ALERT_3,                    /**< See \ref BSP_INDICATE_ALERT_3.*/
    BSP_INDICATE_ALERT_OFF,                  /**< See \ref BSP_INDICATE_ALERT_OFF.*/
    BSP_INDICATE_USER_STATE_OFF,             /**< See \ref BSP_INDICATE_USER_STATE_OFF.*/
    BSP_INDICATE_USER_STATE_0,               /**< See \ref BSP_INDICATE_USER_STATE_0.*/
    BSP_INDICATE_USER_STATE_1,               /**< See \ref BSP_INDICATE_USER_STATE_1.*/
    BSP_INDICATE_USER_STATE_2,               /**< See \ref BSP_INDICATE_USER_STATE_2.*/
    BSP_INDICATE_USER_STATE_3,               /**< See \ref BSP_INDICATE_USER_STATE_3.*/
    BSP_INDICATE_USER_STATE_ON,              /**< See \ref BSP_INDICATE_USER_STATE_ON.*/
    BSP_INDICATE_LAST = BSP_INDICATE_USER_STATE_ON
} bsp_indication_t;
4、最后就是while死循环中的函数,NRF_LOG_FLUSH是用来处理缓存中的LOG,__SEV() 和 __WFE() 是ARM的指令,用来上报事件和在低功耗下等待事件发生。
    while (true)
    {
        NRF_LOG_FLUSH();
        __SEV();
        __WFE();
        __WFE();
        // no implementation needed
    }
5、练习:
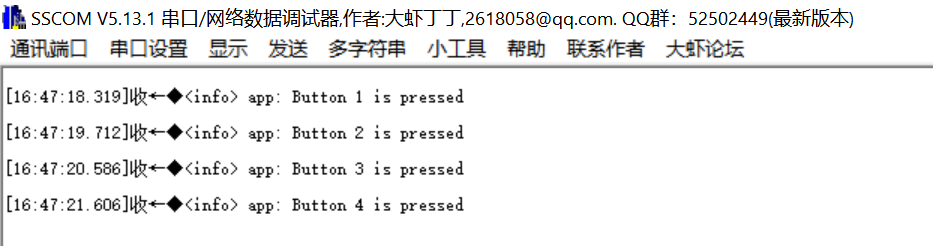
原始 bsp 例程中的bsp回调函数对于初学者而言不太友好,我们可以写一个简单的 bsp 回调函数,在按下DK板上对应的按键1-4的时候,在RTT打印相应的Log。
void bsp_evt_handler(bsp_event_t evt)
{
    switch (evt)
    {
        case BSP_EVENT_KEY_0:
            NRF_LOG_INFO("Button 1 is pressed");
            break;

        case BSP_EVENT_KEY_1:
            NRF_LOG_INFO("Button 2 is pressed");
            break;

        case BSP_EVENT_KEY_2:
            NRF_LOG_INFO("Button 3 is pressed");
            break;

        case BSP_EVENT_KEY_3:
            NRF_LOG_INFO("Button 4 is pressed");
            break;


        default:
            return;
    }
}
将 bsp 例程中的 bsp_evt_handler 替换为上面的代码,编译并下载到DK中,打开串口工具,按下对应的按键就可以看到串口打印相应的LOG。
小结:熟悉了 bsp 这个例程,我们再去看examples\ble_peripheral下其他的外设例程,就会发现架构是相同的,都是先初始化外设,写入外设的配置参数,然后再根据相应事件结构体中给出的事件编写回调函数,在回调中处理中断发生时要做的事即可。
二、ble_app_uart 例程浅析
ble_app_uart 是带协议栈的一个例程,此例程是一个较为实用的例程,它使用了NUS服务(Nordic UATR Service)可以通过串口实现蓝牙的上下行收发数据,因此只要改变发送的外设,就可以改为其他外设,如SPI或者I2C来收发数据。熟悉了 bsp 例程,你就会发现 ble_app_uart 例程是一个放大版的 bsp 例程,下面我们将分析这个例程。
1、首先来看main函数,从这个例程中就更可以看出NRF5 SDK的例程软件架构,在main中初始化了所有的功能模块,然后在初始化中配置相应模块的回调,当回调中的事件触发时来做中断处理。
int main(void)
{
    bool erase_bonds;

    // Initialize.
    uart_init();
    log_init();
    timers_init();
    buttons_leds_init(&erase_bonds);
    power_management_init();
    ble_stack_init();
    gap_params_init();
    gatt_init();
    services_init();
    advertising_init();
    conn_params_init();

    // Start execution.
    printf("\r\nUART started.\r\n");
    NRF_LOG_INFO("Debug logging for UART over RTT started.");
    advertising_start();

    // Enter main loop.
    for (;;)
    {
        idle_state_handle();
    }
}
2、第一个函数 uart_init 中是定义了串口相关的一些参数,如串口引脚、流控、波特率等参数,然后把这些参数写入APP_UART_FIFO_INIT来初始化串口。
/**@brief  Function for initializing the UART module.
 */
/**@snippet [UART Initialization] */
static void uart_init(void)
{
    uint32_t                     err_code;
    app_uart_comm_params_t const comm_params =
    {
        .rx_pin_no    = RX_PIN_NUMBER,
        .tx_pin_no    = TX_PIN_NUMBER,
        .rts_pin_no   = RTS_PIN_NUMBER,
        .cts_pin_no   = CTS_PIN_NUMBER,
        .flow_control = APP_UART_FLOW_CONTROL_DISABLED,
        .use_parity   = false,
#if defined (UART_PRESENT)
        .baud_rate    = NRF_UART_BAUDRATE_115200
#else
        .baud_rate    = NRF_UARTE_BAUDRATE_115200
#endif
    };

    APP_UART_FIFO_INIT(&comm_params,
                       UART_RX_BUF_SIZE,
                       UART_TX_BUF_SIZE,
                       uart_event_handle,
                       APP_IRQ_PRIORITY_LOWEST,
                       err_code);
    APP_ERROR_CHECK(err_code);
}
APP_UART_FIFO_INIT的定义如下,要初始化串口需要写入五个参数,串口相关参数的结构体、RX和TX的buffer大小、回调函数、IRQ优先级。
/**@brief Macro for safe initialization of the UART module in a single user instance when using
 *        a FIFO together with UART.
 *
 * @param[in]   P_COMM_PARAMS   Pointer to a UART communication structure: app_uart_comm_params_t
 * @param[in]   RX_BUF_SIZE     Size of desired RX buffer, must be a power of 2 or ZERO (No FIFO).
 * @param[in]   TX_BUF_SIZE     Size of desired TX buffer, must be a power of 2 or ZERO (No FIFO).
 * @param[in]   EVT_HANDLER     Event handler function to be called when an event occurs in the
 *                              UART module.
 * @param[in]   IRQ_PRIO        IRQ priority, app_irq_priority_t, for the UART module irq handler.
 * @param[out]  ERR_CODE        The return value of the UART initialization function will be
 *                              written to this parameter.
 *
 * @note Since this macro allocates a buffer and registers the module as a GPIOTE user when flow
 *       control is enabled, it must only be called once.
 */
#define APP_UART_FIFO_INIT(P_COMM_PARAMS, RX_BUF_SIZE, TX_BUF_SIZE, EVT_HANDLER, IRQ_PRIO, ERR_CODE) \
    do                                                                                             \
    {                                                                                              \
        app_uart_buffers_t buffers;                                                                \
        static uint8_t     rx_buf[RX_BUF_SIZE];                                                    \
        static uint8_t     tx_buf[TX_BUF_SIZE];                                                    \
                                                                                                   \
        buffers.rx_buf      = rx_buf;                                                              \
        buffers.rx_buf_size = sizeof (rx_buf);                                                     \
        buffers.tx_buf      = tx_buf;                                                              \
        buffers.tx_buf_size = sizeof (tx_buf);                                                     \
        ERR_CODE = app_uart_init(P_COMM_PARAMS, &buffers, EVT_HANDLER, IRQ_PRIO);                  \
    } while (0)
接下来我们来看uart的事件,从这里我们可以看出,串口收到数据后会产生一个事件APP_UART_DATA_READY
typedef enum
{
    APP_UART_DATA_READY,          /**< An event indicating that UART data has been received. The data is available in the FIFO and can be fetched using @ref app_uart_get. */
    APP_UART_FIFO_ERROR,          /**< An error in the FIFO module used by the app_uart module has occured. The FIFO error code is stored in app_uart_evt_t.data.error_code field. */
    APP_UART_COMMUNICATION_ERROR, /**< An communication error has occured during reception. The error is stored in app_uart_evt_t.data.error_communication field. */
    APP_UART_TX_EMPTY,            /**< An event indicating that UART has completed transmission of all available data in the TX FIFO. */
    APP_UART_DATA,                /**< An event indicating that UART data has been received, and data is present in data field. This event is only used when no FIFO is configured. */
} app_uart_evt_type_t;
所以我们可以在回调函数中使用这个事件,当产生这个事件的时候说明串口有数据发过来,可以调用app_uart_get来接收串口数据,收到数据后再调用ble_nus_data_send向蓝牙发送串口收到的数据。
/**@brief   Function for handling app_uart events.
 *
 * @details This function will receive a single character from the app_uart module and append it to
 *          a string. The string will be be sent over BLE when the last character received was a
 *          'new line' '\n' (hex 0x0A) or if the string has reached the maximum data length.
 */
/**@snippet [Handling the data received over UART] */
void uart_event_handle(app_uart_evt_t * p_event)
{
    static uint8_t data_array[BLE_NUS_MAX_DATA_LEN];
    static uint8_t index = 0;
    uint32_t       err_code;

    switch (p_event->evt_type)
    {
        case APP_UART_DATA_READY:
            UNUSED_VARIABLE(app_uart_get(&data_array[index]));
            index++;

            if ((data_array[index - 1] == '\n') ||
                (data_array[index - 1] == '\r') ||
                (index >= m_ble_nus_max_data_len))
            {
                if (index > 1)
                {
                    NRF_LOG_DEBUG("Ready to send data over BLE NUS");
                    NRF_LOG_HEXDUMP_DEBUG(data_array, index);

                    do
                    {
                        uint16_t length = (uint16_t)index;
                        err_code = ble_nus_data_send(&m_nus, data_array, &length, m_conn_handle);
                        if ((err_code != NRF_ERROR_INVALID_STATE) &&
                            (err_code != NRF_ERROR_RESOURCES) &&
                            (err_code != NRF_ERROR_NOT_FOUND))
                        {
                            APP_ERROR_CHECK(err_code);
                        }
                    } while (err_code == NRF_ERROR_RESOURCES);
                }

                index = 0;
            }
            break;

        case APP_UART_COMMUNICATION_ERROR:
            APP_ERROR_HANDLER(p_event->data.error_communication);
            break;

        case APP_UART_FIFO_ERROR:
            APP_ERROR_HANDLER(p_event->data.error_code);
            break;

        default:
            break;
    }
}
3、log_init、timers_init、buttons_leds_init这三个函数的作用分别在 bsp 例程中已经有过详细介绍,在此不多做赘述。
4、power_management_init中调用了nrf_pwr_mgmt_init(),其函数定义如下,主要是用于初始化低功耗管理模块,在实际的应用中可以直接使用。
/**@brief   Function for initializing power management.
 *
 * @warning Depending on configuration, this function sets SEVONPEND in System Control Block (SCB).
 *          This operation is unsafe with the SoftDevice from interrupt priority higher than SVC.
 *
 * @retval NRF_SUCCESS
 */
ret_code_t nrf_pwr_mgmt_init(void);
5、ble_stack_init 是一个非常重要的函数,其作用是初始化BLE协议栈,对于初学者而言不需要过多去查看协议栈初始化的具体细节,只要照搬例程中的初始化函数即可,这些需要关注的是回调函数ble_evt_handler
/**@brief Function for the SoftDevice initialization.
 *
 * @details This function initializes the SoftDevice and the BLE event interrupt.
 */
static void ble_stack_init(void)
{
    ret_code_t err_code;

    err_code = nrf_sdh_enable_request();
    APP_ERROR_CHECK(err_code);

    // Configure the BLE stack using the default settings.
    // Fetch the start address of the application RAM.
    uint32_t ram_start = 0;
    err_code = nrf_sdh_ble_default_cfg_set(APP_BLE_CONN_CFG_TAG, &ram_start);
    APP_ERROR_CHECK(err_code);

    // Enable BLE stack.
    err_code = nrf_sdh_ble_enable(&ram_start);
    APP_ERROR_CHECK(err_code);

    // Register a handler for BLE events.
    NRF_SDH_BLE_OBSERVER(m_ble_observer, APP_BLE_OBSERVER_PRIO, ble_evt_handler, NULL);
}
这里我们分析一下例程中的ble_evt_handler,首先来看ble_evt_t这个结构体,这是一个非常复杂的结构体,给出了Gap、Gattc、Gatts、L2CAP等会产生的所有事件对应的结构体。
/**@brief Common BLE Event type, wrapping the module specific event reports. */
typedef struct
{
  ble_evt_hdr_t header;           /**< Event header. */
  union
  {
    ble_common_evt_t  common_evt; /**< Common Event, evt_id in BLE_EVT_* series. */
    ble_gap_evt_t     gap_evt;    /**< GAP originated event, evt_id in BLE_GAP_EVT_* series. */
    ble_gattc_evt_t   gattc_evt;  /**< GATT client originated event, evt_id in BLE_GATTC_EVT* series. */
    ble_gatts_evt_t   gatts_evt;  /**< GATT server originated event, evt_id in BLE_GATTS_EVT* series. */
    ble_l2cap_evt_t   l2cap_evt;  /**< L2CAP originated event, evt_id in BLE_L2CAP_EVT* series. */
  } evt;                          /**< Event union. */
} ble_evt_t;
这里涉及到BLE协议相关的知识,简单来说BLE协议栈的host层可以从下到上分为L2CAP、ATT、GAP、GATT四层,一般而言只需要应用程序中只需要处理GAP和Gatt层的事件即可。
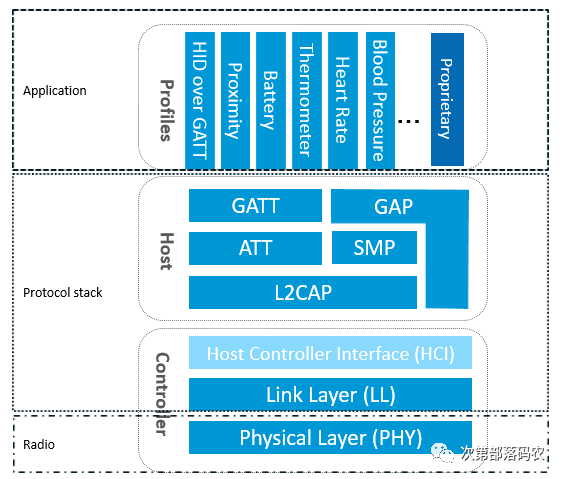
对于初学者而言,在没有详细了解蓝牙协议的情况下,建议照搬例程中已经写好的ble_evt_handler函数,只在应用层在ble_evt_handler的事件中根据自己的需求加入一些逻辑处理,例如BLE连接、断开后串口打印数据或是改变某个GPIO的状态。协议栈产生的GAP和GATT事件在ble_gap.h、ble_gattc.h、ble_gatts.h这三个文件中,感兴趣的朋友可以自己去这两个文件中查看所有事件和其注释,这里我们只分析例程中的回调给出的这些事件的作用。
/**@brief Function for handling BLE events.
 *
 * @param[in]   p_ble_evt   Bluetooth stack event.
 * @param[in]   p_context   Unused.
 */
static void ble_evt_handler(ble_evt_t const * p_ble_evt, void * p_context)
{
    uint32_t err_code;

    switch (p_ble_evt->header.evt_id)
    {
        case BLE_GAP_EVT_CONNECTED:
            NRF_LOG_INFO("Connected");
            err_code = bsp_indication_set(BSP_INDICATE_CONNECTED);
            APP_ERROR_CHECK(err_code);
            m_conn_handle = p_ble_evt->evt.gap_evt.conn_handle;
            err_code = nrf_ble_qwr_conn_handle_assign(&m_qwr, m_conn_handle);
            APP_ERROR_CHECK(err_code);
            break;

        case BLE_GAP_EVT_DISCONNECTED:
            NRF_LOG_INFO("Disconnected");
            // LED indication will be changed when advertising starts.
            m_conn_handle = BLE_CONN_HANDLE_INVALID;
            break;

        case BLE_GAP_EVT_PHY_UPDATE_REQUEST:
        {
            NRF_LOG_DEBUG("PHY update request.");
            ble_gap_phys_t const phys =
            {
                .rx_phys = BLE_GAP_PHY_AUTO,
                .tx_phys = BLE_GAP_PHY_AUTO,
            };
            err_code = sd_ble_gap_phy_update(p_ble_evt->evt.gap_evt.conn_handle, &phys);
            APP_ERROR_CHECK(err_code);
        } break;

        case BLE_GAP_EVT_SEC_PARAMS_REQUEST:
            // Pairing not supported
            err_code = sd_ble_gap_sec_params_reply(m_conn_handle, BLE_GAP_SEC_STATUS_PAIRING_NOT_SUPP, NULL, NULL);
            APP_ERROR_CHECK(err_code);
            break;

        case BLE_GATTS_EVT_SYS_ATTR_MISSING:
            // No system attributes have been stored.
            err_code = sd_ble_gatts_sys_attr_set(m_conn_handle, NULL, 0, 0);
            APP_ERROR_CHECK(err_code);
            break;

        case BLE_GATTC_EVT_TIMEOUT:
            // Disconnect on GATT Client timeout event.
            err_code = sd_ble_gap_disconnect(p_ble_evt->evt.gattc_evt.conn_handle,
                                             BLE_HCI_REMOTE_USER_TERMINATED_CONNECTION);
            APP_ERROR_CHECK(err_code);
            break;

        case BLE_GATTS_EVT_TIMEOUT:
            // Disconnect on GATT Server timeout event.
            err_code = sd_ble_gap_disconnect(p_ble_evt->evt.gatts_evt.conn_handle,
                                             BLE_HCI_REMOTE_USER_TERMINATED_CONNECTION);
            APP_ERROR_CHECK(err_code);
            break;

        default:
            // No implementation needed.
            break;
    }
}
下面是我直接从SDK中拷贝了这些事件的注释,从注释中可以看出这些事件基本是把BLE连接过程中会发生的事件列了出来。
BLE_GAP_EVT_CONNECTED                      /**< Connected to peer
BLE_GAP_EVT_DISCONNECTED                  /**< Disconnected from peer.
BLE_GAP_EVT_PHY_UPDATE_REQUEST        /**< PHY Update Request.
BLE_GAP_EVT_SEC_PARAMS_REQUEST          /**< Request to provide security parameters.
BLE_GATTS_EVT_SYS_ATTR_MISSING           /**< A persistent system attribute access is pending.
BLE_GATTC_EVT_TIMEOUT                      /**< Timeout event.
BLE_GATTS_EVT_TIMEOUT                      /**< Peer failed to respond to an ATT request in time.
(1)、手机或者其他主机设备后,BLE协议栈会产生BLE_GAP_EVT_CONNECTED这个事件,在这个事件产生后,回调函数在应用层对其的处理是首先使用LOG函数打印连接信息。然后调用bsp_indication_set改变DK板上LED的状态,让LED状态进入BSP_INDICATE_CONNECTED这个连接状态,通过查看 bsp.c 中的相关函数,我们可以知道这个连接状态是让DK板上的LED1进入常亮状态。最后是调用nrf_ble_qwr_conn_handle_assign,这个函数的功能是用于将连接句柄m_conn_handle分配给 Queued Writes 模块。 简单来说,这个m_conn_handle相当于协议栈给连接的对端设备分配的号码,nrf_ble_qwr_conn_handle_assign的作用就是把这个号码与 Queued Writes 模块关联起来,Queued Writes 模块用于处理对端BLE设备在GATT上的操作。
        case BLE_GAP_EVT_CONNECTED:
            NRF_LOG_INFO("Connected");
            err_code = bsp_indication_set(BSP_INDICATE_CONNECTED);
            APP_ERROR_CHECK(err_code);
            m_conn_handle = p_ble_evt->evt.gap_evt.conn_handle;
            err_code = nrf_ble_qwr_conn_handle_assign(&m_qwr, m_conn_handle);
            APP_ERROR_CHECK(err_code);
            break;
NRF_BLE_QWR_DEF(m_qwr); /**< Context for the Queued Write module.*/
(2)、手机或者其他主机设备后,BLE协议栈会产生BLE_GAP_EVT_DISCONNECTED这个事件,从例程中可以看到,在这个事件产生后,回调函数对其的处理是使用LOG函数打印断开连接的信息,然后重置m_conn_handle的值。
        case BLE_GAP_EVT_DISCONNECTED:
            NRF_LOG_INFO("Disconnected");
            // LED indication will be changed when advertising starts.
            m_conn_handle = BLE_CONN_HANDLE_INVALID;
            break;
(3)、BLE_GAP_EVT_PHY_UPDATE_REQUEST这个事件主要是针对对端设备请求更新PHY的速率,当对端设备请求更新PHY速率后,协议栈会产生此事件,从例程中可以看到,在这个事件产生后对其的处理是配置PHY参数,并调用sd_ble_gap_phy_update更新PHY速率。
        case BLE_GAP_EVT_PHY_UPDATE_REQUEST:
        {
            NRF_LOG_DEBUG("PHY update request.");
            ble_gap_phys_t const phys =
            {
                .rx_phys = BLE_GAP_PHY_AUTO,
                .tx_phys = BLE_GAP_PHY_AUTO,
            };
            err_code = sd_ble_gap_phy_update(p_ble_evt->evt.gap_evt.conn_handle, &phys);
            APP_ERROR_CHECK(err_code);
        } break;
(4)、BLE_GAP_EVT_SEC_PARAMS_REQUEST是安全相关参数请求事件,在配对信息交换阶段,BLE_GAP_EVT_SEC_PARAMS_REQUEST事件会由协议栈上报给应用层。在这个事件中,从机会把自己的信息与主机进行交换,其中就包含了从机的IO能力、配对完成是否绑定等信息。
        case BLE_GAP_EVT_SEC_PARAMS_REQUEST:
            // Pairing not supported
            err_code = sd_ble_gap_sec_params_reply(m_conn_handle, BLE_GAP_SEC_STATUS_PAIRING_NOT_SUPP, NULL, NULL);
            APP_ERROR_CHECK(err_code);
            break;
(5)、BLE_GATTS_EVT_SYS_ATTR_MISSING这是事件是当没有存储系统属性时,协议栈上报此事件,回调函数中的处理是调用sd_ble_gatts_sys_attr_set函数来设置系统属性。
        case BLE_GATTS_EVT_SYS_ATTR_MISSING:
            // No system attributes have been stored.
            err_code = sd_ble_gatts_sys_attr_set(m_conn_handle, NULL, 0, 0);
            APP_ERROR_CHECK(err_code);
            break;
(6)、BLE_GATTC_EVT_TIMEOUT和BLE_GATTS_EVT_TIMEOUT是当主机和从机连接超时协议栈产生的事件,回调函数中的处理是调用sd_ble_gap_disconnect函数来断开连接。
        case BLE_GATTC_EVT_TIMEOUT:
            // Disconnect on GATT Client timeout event.
            err_code = sd_ble_gap_disconnect(p_ble_evt->evt.gattc_evt.conn_handle,
                                             BLE_HCI_REMOTE_USER_TERMINATED_CONNECTION);
            APP_ERROR_CHECK(err_code);
            break;

        case BLE_GATTS_EVT_TIMEOUT:
            // Disconnect on GATT Server timeout event.
            err_code = sd_ble_gap_disconnect(p_ble_evt->evt.gatts_evt.conn_handle,
                                             BLE_HCI_REMOTE_USER_TERMINATED_CONNECTION);
            APP_ERROR_CHECK(err_code);
            break;
6、gap_params_init函数是用来配置gap的相关参数,包括设备名称、连接间隔、Slave latency、监督超时时间、GAP连接的安全模式等。一般来说,配置比较多的是设备名称、连接间隔、Slave latency这三个参数,其他沿用例程中的配置即可。
/**@brief Function for the GAP initialization.
 *
 * @details This function will set up all the necessary GAP (Generic Access Profile) parameters of
 *          the device. It also sets the permissions and appearance.
 */
static void gap_params_init(void)
{
    uint32_t                err_code;
    ble_gap_conn_params_t   gap_conn_params;
    ble_gap_conn_sec_mode_t sec_mode;

    BLE_GAP_CONN_SEC_MODE_SET_OPEN(&sec_mode);

    err_code = sd_ble_gap_device_name_set(&sec_mode,
                                          (const uint8_t *) DEVICE_NAME,
                                          strlen(DEVICE_NAME));
    APP_ERROR_CHECK(err_code);

    memset(&gap_conn_params, 0, sizeof(gap_conn_params));

    gap_conn_params.min_conn_interval = MIN_CONN_INTERVAL;
    gap_conn_params.max_conn_interval = MAX_CONN_INTERVAL;
    gap_conn_params.slave_latency     = SLAVE_LATENCY;
    gap_conn_params.conn_sup_timeout  = CONN_SUP_TIMEOUT;

    err_code = sd_ble_gap_ppcp_set(&gap_conn_params);
    APP_ERROR_CHECK(err_code);
}
7、gatt_init用于初始化GATT库。其中,nrf_ble_gatt_init 函数用于初始化GATT协议栈,gatt_evt_handler 函数用于处理GATT事件。nrf_ble_gatt_att_mtu_periph_set函数用于设置GATT服务器的MTU大小。
/**@brief Function for initializing the GATT library. */
void gatt_init(void)
{
    ret_code_t err_code;

    err_code = nrf_ble_gatt_init(&m_gatt, gatt_evt_handler);
    APP_ERROR_CHECK(err_code);

    err_code = nrf_ble_gatt_att_mtu_periph_set(&m_gatt, NRF_SDH_BLE_GATT_MAX_MTU_SIZE);
    APP_ERROR_CHECK(err_code);
}
在gatt_init的回调函数gatt_evt_handler中主要处理当ATT MTU更新之后的事,这里ATT MTU是L2CAP层的内容,对于初学者而言不需要去深入了解,在自己的项目中只需要照搬例程中的代码即可。
/**@brief Function for handling events from the GATT library. */
void gatt_evt_handler(nrf_ble_gatt_t * p_gatt, nrf_ble_gatt_evt_t const * p_evt)
{
    if ((m_conn_handle == p_evt->conn_handle) && (p_evt->evt_id == NRF_BLE_GATT_EVT_ATT_MTU_UPDATED))
    {
        m_ble_nus_max_data_len = p_evt->params.att_mtu_effective - OPCODE_LENGTH - HANDLE_LENGTH;
        NRF_LOG_INFO("Data len is set to 0x%X(%d)", m_ble_nus_max_data_len, m_ble_nus_max_data_len);
    }
    NRF_LOG_DEBUG("ATT MTU exchange completed. central 0x%x peripheral 0x%x",
                  p_gatt->att_mtu_desired_central,
                  p_gatt->att_mtu_desired_periph);
}
7、services_init也是一个非常重要的函数,从机端所有的服务都是在这里添加并初始化,Nordic为我们提供了一个库在SDK根目录下的components\ble\ble_services这个文件夹中,这里有常用的一些服务的库,例如DIS(Devies Information、Service)、DFU、HIDS等,所以想要在从机添加服务只需要在services_init函数中调用对应的服务初始化接口,然后编写对应服务的回调函数即可,具体可以参考NUS服务的初始化。
需要注意的是在这里的nrf_ble_qwr_init是用来初始化之前提到的Queued Writes 模块的函数,在初始化服务的时候首先要初始化Queued Writes模块。
/**@snippet [Handling the data received over BLE] */


/**@brief Function for initializing services that will be used by the application.
 */
static void services_init(void)
{
    uint32_t           err_code;
    ble_nus_init_t     nus_init;
    nrf_ble_qwr_init_t qwr_init = {0};

    // Initialize Queued Write Module.
    qwr_init.error_handler = nrf_qwr_error_handler;

    err_code = nrf_ble_qwr_init(&m_qwr, &qwr_init);
    APP_ERROR_CHECK(err_code);

    // Initialize NUS.
    memset(&nus_init, 0, sizeof(nus_init));

    nus_init.data_handler = nus_data_handler;

    err_code = ble_nus_init(&m_nus, &nus_init);
    APP_ERROR_CHECK(err_code);
}
这里ble_app_uart例程只使用了NUS服务,所以我们来看看NUS服务的回调函数nus_data_handler做了什么,当产生BLE_NUS_EVT_RX_DATA这个事件时,p_evt->params.rx_data.p_data这个指针收到BLE的数据,回调函数中调用app_uart_put这个函数将收到的数据打印到串口。
/**@brief Function for handling the data from the Nordic UART Service.
 *
 * @details This function will process the data received from the Nordic UART BLE Service and send
 *          it to the UART module.
 *
 * @param[in] p_evt       Nordic UART Service event.
 */
/**@snippet [Handling the data received over BLE] */
static void nus_data_handler(ble_nus_evt_t * p_evt)
{

    if (p_evt->type == BLE_NUS_EVT_RX_DATA)
    {
        uint32_t err_code;

        NRF_LOG_DEBUG("Received data from BLE NUS. Writing data on UART.");
        NRF_LOG_HEXDUMP_DEBUG(p_evt->params.rx_data.p_data, p_evt->params.rx_data.length);

        for (uint32_t i = 0; i < p_evt->params.rx_data.length; i++)
        {
            do
            {
                err_code = app_uart_put(p_evt->params.rx_data.p_data[i]);
                if ((err_code != NRF_SUCCESS) && (err_code != NRF_ERROR_BUSY))
                {
                    NRF_LOG_ERROR("Failed receiving NUS message. Error 0x%x. ", err_code);
                    APP_ERROR_CHECK(err_code);
                }
            } while (err_code == NRF_ERROR_BUSY);
        }
        if (p_evt->params.rx_data.p_data[p_evt->params.rx_data.length - 1] == '\r')
        {
            while (app_uart_put('\n') == NRF_ERROR_BUSY);
        }
    }

}
8、advertising_init也是一个非常重要的函数,所有的广播参数都在这里设置,包括广播周期、广播包中的相关参数等,配置的方式通过配置相对应的参数,然后调用ble_advertising_init去设置。这些需要注意的是,配置完广播参数之后,还要调用ble_advertising_conn_cfg_tag_set来更改即将用于连接的连接设置标记。
/**@brief Function for initializing the Advertising functionality.
 */
static void advertising_init(void)
{
    uint32_t               err_code;
    ble_advertising_init_t init;

    memset(&init, 0, sizeof(init));

    init.advdata.name_type          = BLE_ADVDATA_FULL_NAME;
    init.advdata.include_appearance = false;
    init.advdata.flags              = BLE_GAP_ADV_FLAGS_LE_ONLY_LIMITED_DISC_MODE;

    init.srdata.uuids_complete.uuid_cnt = sizeof(m_adv_uuids) / sizeof(m_adv_uuids[0]);
    init.srdata.uuids_complete.p_uuids  = m_adv_uuids;

    init.config.ble_adv_fast_enabled  = true;
    init.config.ble_adv_fast_interval = APP_ADV_INTERVAL;
    init.config.ble_adv_fast_timeout  = APP_ADV_DURATION;
    init.evt_handler = on_adv_evt;

    err_code = ble_advertising_init(&m_advertising, &init);
    APP_ERROR_CHECK(err_code);

    ble_advertising_conn_cfg_tag_set(&m_advertising, APP_BLE_CONN_CFG_TAG);
}
广播相关参数的设置都在ble_advertising_init_t这个结构体中,一般用到比较多的是config、advata和srdata,config中主要是涉及配置广播周期参数,广播超时时间等,advata和srdata主要是配置广播包和扫描响应包。一般而言,建议是把数据放在广播包中,但广播包只有31个字节,如果你的广播数据比较长,例如你希望在广播包加入设备名称、UUID、地址等数据,如果在广播包中放不下全部数据,也可以把不重要的数据放在扫描响应包中,广播包和扫描响应包的长度都是31个字节。
typedef struct
{
    ble_advdata_t           advdata;       /**< Advertising data: name, appearance, discovery flags, and more. */
    ble_advdata_t           srdata;        /**< Scan response data: Supplement to advertising data. */
    ble_adv_modes_config_t  config;        /**< Select which advertising modes and intervals will be utilized.*/
    ble_adv_evt_handler_t   evt_handler;   /**< Event handler that will be called upon advertising events. */
    ble_adv_error_handler_t error_handler; /**< Error handler that will propogate internal errors to the main applications. */
} ble_advertising_init_t;
广播初始化中还有一个广播的回调函数on_adv_evt,这个回调主要处理在广播模式下的事件,例程中只罗列了两个简单的事件,BLE_ADV_EVT_FAST是在快速广播模式下,改变LED灯的状态,进入BSP_INDICATE_ADVERTISING模式,从bsp.c中可以得知此状态是让DK板上的LED1闪烁。BLE_ADV_EVT_IDLE是广播超时之后产生的事件,广播超时时间可以在上面结构体的config中找到相应参数去配置,例程中对此的处理是此事件产生后,进入休眠模式。
/**@brief Function for handling advertising events.
 *
 * @details This function will be called for advertising events which are passed to the application.
 *
 * @param[in] ble_adv_evt  Advertising event.
 */
static void on_adv_evt(ble_adv_evt_t ble_adv_evt)
{
    uint32_t err_code;

    switch (ble_adv_evt)
    {
        case BLE_ADV_EVT_FAST:
            err_code = bsp_indication_set(BSP_INDICATE_ADVERTISING);
            APP_ERROR_CHECK(err_code);
            break;
        case BLE_ADV_EVT_IDLE:
            sleep_mode_enter();
            break;
        default:
            break;
    }
}
9、conn_params_init这个函数的作用是初始化连接参数,连接参数包括了BLE主机与从机连接过程中协商的一些参数,例如连接间隔、从启动事件(连接或通知开始)到第一次调用sd_ble_gap_conn_param_update的时间、第一次之后每次调用sd_ble_gap_conn_param_update之间的时间、在放弃协商之前尝试的次数等参数。
/**@brief Function for initializing the Connection Parameters module.
 */
static void conn_params_init(void)
{
    uint32_t               err_code;
    ble_conn_params_init_t cp_init;

    memset(&cp_init, 0, sizeof(cp_init));

    cp_init.p_conn_params                  = NULL;
    cp_init.first_conn_params_update_delay = FIRST_CONN_PARAMS_UPDATE_DELAY;
    cp_init.next_conn_params_update_delay  = NEXT_CONN_PARAMS_UPDATE_DELAY;
    cp_init.max_conn_params_update_count   = MAX_CONN_PARAMS_UPDATE_COUNT;
    cp_init.start_on_notify_cccd_handle    = BLE_GATT_HANDLE_INVALID;
    cp_init.disconnect_on_fail             = false;
    cp_init.evt_handler                    = on_conn_params_evt;
    cp_init.error_handler                  = conn_params_error_handler;

    err_code = ble_conn_params_init(&cp_init);
    APP_ERROR_CHECK(err_code);
}
具体的连接参数可以在ble_conn_params_init_t这个结构体中找到。对于初学者而言,如果你对BLE协议不熟悉,对这些参数具体的用途不清楚,这里建议照搬例程中的代码,不去做改动,只需要知道此函数的作用即可。
/**@brief Connection Parameters Module init structure. This contains all options and data needed for
 *        initialization of the connection parameters negotiation module. */
typedef struct
{
    ble_gap_conn_params_t *       p_conn_params;                    //!< Pointer to the connection parameters desired by the application. When calling ble_conn_params_init, if this parameter is set to NULL, the connection parameters will be fetched from host.
    uint32_t                      first_conn_params_update_delay;   //!< Time from initiating event (connect or start of notification) to first time sd_ble_gap_conn_param_update is called (in number of timer ticks).
    uint32_t                      next_conn_params_update_delay;    //!< Time between each call to sd_ble_gap_conn_param_update after the first (in number of timer ticks). Recommended value 30 seconds as per BLUETOOTH SPECIFICATION Version 4.0.
    uint8_t                       max_conn_params_update_count;     //!< Number of attempts before giving up the negotiation.
    uint16_t                      start_on_notify_cccd_handle;      //!< If procedure is to be started when notification is started, set this to the handle of the corresponding CCCD. Set to BLE_GATT_HANDLE_INVALID if procedure is to be started on connect event.
    bool                          disconnect_on_fail;               //!< Set to TRUE if a failed connection parameters update shall cause an automatic disconnection, set to FALSE otherwise.
    ble_conn_params_evt_handler_t evt_handler;                      //!< Event handler to be called for handling events in the Connection Parameters.
    ble_srv_error_handler_t       error_handler;                    //!< Function to be called in case of an error.
} ble_conn_params_init_t;
在ble_conn_params_init_t中有两个回调函数,分别是事件回调和错误回调,在例程中对应的是on_conn_params_evt和conn_params_error_handler,这两个回调函数用于处理连接过程中的事件和连接参数错误的情况。
可以看到在 on_conn_params_evt 中,只对BLE_CONN_PARAMS_EVT_FAILED这个事件做了处理,查看注释可以知道此事件是连接参数协商失败会产生的,对其的处理是调用sd_ble_gap_disconnect断开连接。
conn_params_error_handler是对连接参数错误的回调,例程中对其处理是直接调用 APP_ERROR_HANDLER 来检查错误。
/**@brief Function for handling an event from the Connection Parameters Module.
 *
 * @details This function will be called for all events in the Connection Parameters Module
 *          which are passed to the application.
 *
 * @note All this function does is to disconnect. This could have been done by simply setting
 *       the disconnect_on_fail config parameter, but instead we use the event handler
 *       mechanism to demonstrate its use.
 *
 * @param[in] p_evt  Event received from the Connection Parameters Module.
 */
static void on_conn_params_evt(ble_conn_params_evt_t * p_evt)
{
    uint32_t err_code;

    if (p_evt->evt_type == BLE_CONN_PARAMS_EVT_FAILED)
    {
        err_code = sd_ble_gap_disconnect(m_conn_handle, BLE_HCI_CONN_INTERVAL_UNACCEPTABLE);
        APP_ERROR_CHECK(err_code);
    }
}


/**@brief Function for handling errors from the Connection Parameters module.
 *
 * @param[in] nrf_error  Error code containing information about what went wrong.
 */
static void conn_params_error_handler(uint32_t nrf_error)
{
    APP_ERROR_HANDLER(nrf_error);
}
10、完成初始化所有模块的初始化之后,例程中是调用了 printf 和 NRF_LOG_INFO 打印了Log,二者的区别是printf直接在串口打印,而NRF_LOG_INFO是需要开启Log打印模块的。advertising_start的作用是开启广播,例程中的advertising_start函数是调用了ble_advertising_start这个函数来实现开启广播的。
/**@brief Function for starting advertising.
 */
static void advertising_start(void)
{
    uint32_t err_code = ble_advertising_start(&m_advertising, BLE_ADV_MODE_FAST);
    APP_ERROR_CHECK(err_code);
}
11、最后就是for循环中的代码,在带协议栈的例程中,是调用idle_state_handle来实现CPU在低功耗状态等待和上报事件,其效果和 __SEV() 和 __WFE() 类似。但是因为在BLE协议栈开启后,CPU要优先处理协议栈相关的任务,且协议栈开启后不能直接操作底层寄存器和指令,所以需要调用协议栈提供的接口来实现, 这就是nrf_pwr_mgmt_run的作用 ,它用于处理空闲模式并进入System ON睡眠模式,在BLE状态下,如果CPU处于空闲状态,就会进入sd_app_evt_wait()函数,来等待协议栈上报事件。这就是之前 power_management_ini t中要调用 nrf_pwr_mgmt_init 对低功耗管理模块初始化的原因,因为要在for循环中使用nrf_pwr_mgmt_run。
/**@brief Function for handling the idle state (main loop).
 *
 * @details If there is no pending log operation, then sleep until next the next event occurs.
 */
static void idle_state_handle(void)
{
    if (NRF_LOG_PROCESS() == false)
    {
        nrf_pwr_mgmt_run();
    }
}
12、练习
介绍完ble_app_uart这个例程,我们来做一个小练习,修改设备的广播名称、连接间隔、广播周期。
(1)广播名称在例程中是在 gap_params_init 函数中通过sd_ble_gap_device_name_set来设置的,例程中是用了DEVICE_NAME这个宏定义来控制,所以只需要更改这个宏定义即可。
#define DEVICE_NAME                     "Nordic_UART"

err_code = sd_ble_gap_device_name_set(&sec_mode,
                                          (const uint8_t *) DEVICE_NAME,
                                          strlen(DEVICE_NAME));
(2)、连接间隔同样是在gap_params_init 函数配置,通过配置ble_gap_conn_params_t中的min_conn_interval和max_conn_interval来实现,这是一个范围值,之所以是一个范围值是为了兼容不同的主机设备,因为不同的主机设备的连接间隔是不同的。ble_app_uart例程中默认的范围值是20-75ms,我们可以通过修改最小连接间隔和最大连接间隔来修改实际的连接间隔。连接间隔越大,功耗越低,但是相对应的,连接时间和发送数据的速率会降低。
#define MIN_CONN_INTERVAL            MSEC_TO_UNITS(20, UNIT_1_25_MS)/**< Minimum acceptable connection interval (20 ms), Connection interval uses 1.25 ms units. */
#define MAX_CONN_INTERVAL            MSEC_TO_UNITS(75, UNIT_1_25_MS)/**< Maximum acceptable connection interval (75 ms), Connection interval uses 1.25 ms units. */

gap_conn_params.min_conn_interval = MIN_CONN_INTERVAL;
gap_conn_params.max_conn_interval = MAX_CONN_INTERVAL;
(3)、广播周期则是在advertising_init中通过配置ble_advertising_init_t中的ble_adv_fast_interval或者ble_adv_slow_interval来实现,需要注意的是ble_app_uart中使用的是fast advertising,相对应的还有slow advertising,二者的区别只是广播数据包的发送频率,fast advertising的发送频率比slow advertising的发送频率更高。
#define APP_ADV_INTERVAL           64  /**< The advertising interval (in units of 0.625 ms. This value corresponds to 40 ms). */

init.config.ble_adv_fast_interval = APP_ADV_INTERVAL;
小结:从ble_app_uart的例程就更可以看出,Nordic的例程的软件架构主要就是相应模块的初始化和回调函数,在开发自己的工程的时候,建议在SDK中找一个和你实际产品类似例程,在其基础上去做开发,而不是新建一个新的工程从零开始,因为例程中已经完成了主体软件架构的搭建,可以直接使用例程中BLE部分的相关初始化代码和回调函数,只需要根据实际情况去做微调一些参数即可,剩余的只是开发者在相应的例程中根据自己产品的实际需求去添砖加瓦即可。
Recommend
About Joyk
Aggregate valuable and interesting links.
Joyk means Joy of geeK