

【深入浅出 Yarn 架构与实现】4-5 RM 行为探究 - 启动 ApplicationMaster - 大数据王...
source link: https://www.cnblogs.com/shuofxz/p/17165917.html
Go to the source link to view the article. You can view the picture content, updated content and better typesetting reading experience. If the link is broken, please click the button below to view the snapshot at that time.

本节开始,将对 ResourceManager 中一些常见行为进行分析探究,看某些具体关键的行为,在 RM 中是如何流转的。本节将深入源码探究「启动 ApplicationMaster」的具体流程。
一、整体流程#
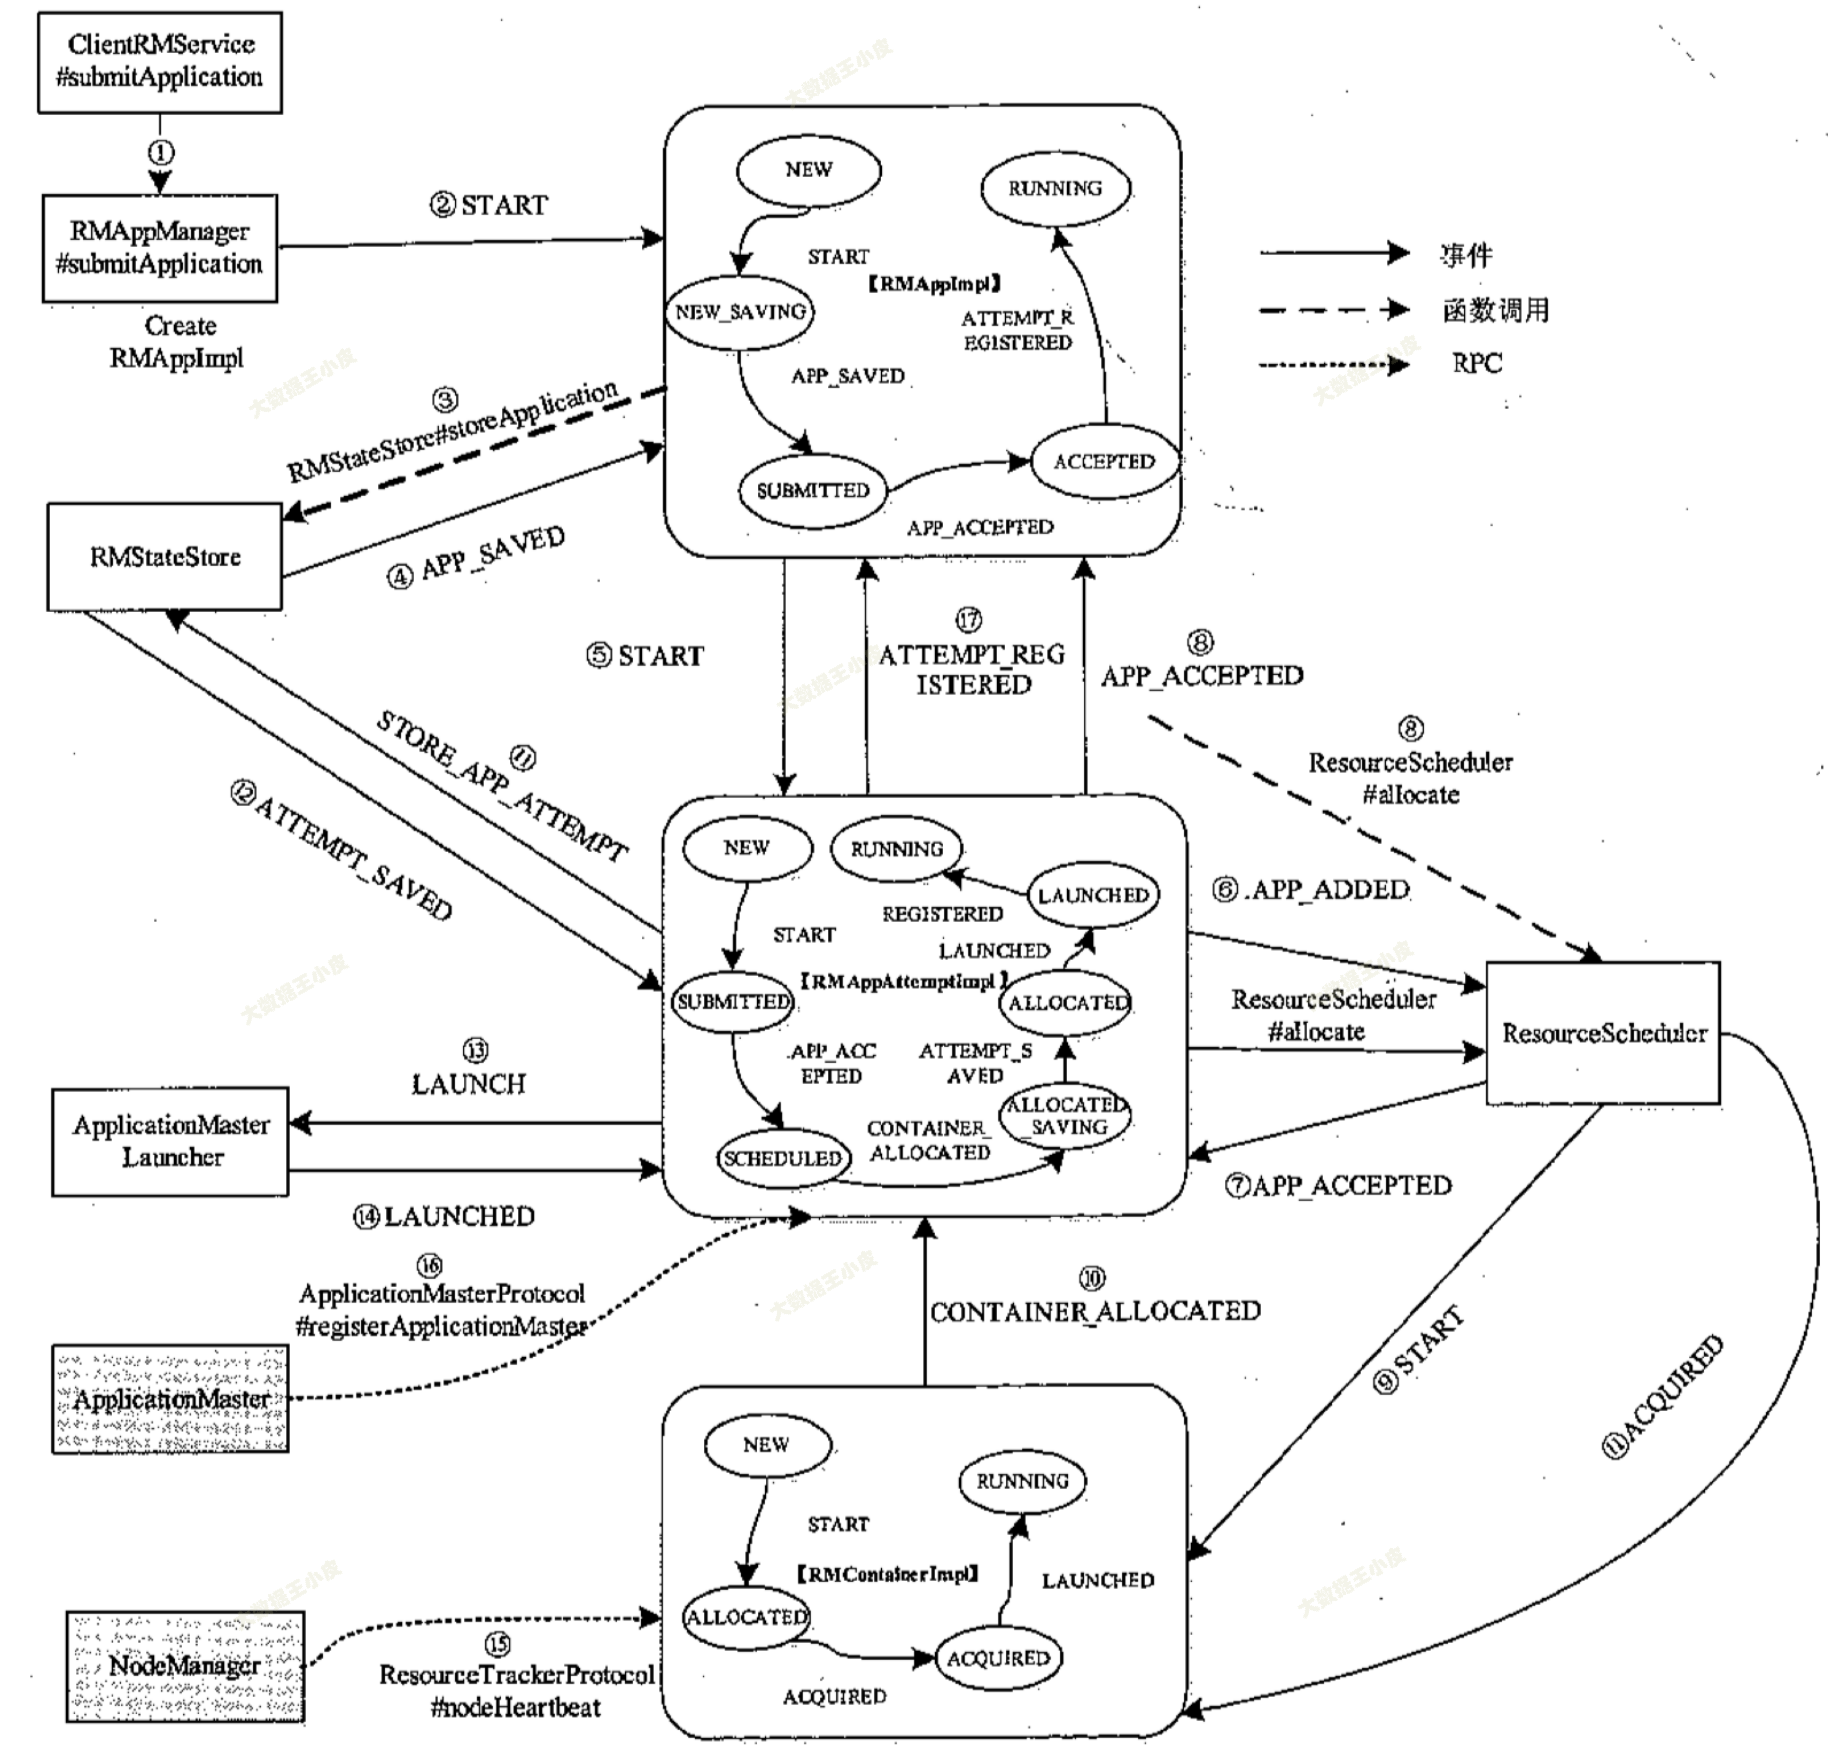
本小节介绍从应用程序提交到启动 ApplicationMaster 的整个过程,期间涉及 Client、RMService、 RMAppManager、RMApplmpl、RMAppAttemptImpl、RMNode、ResourceScheduler 等几个主要组件。当客户端调用 RPC 函数 ApplicationClientProtocol#submitApplication 后, ResourceManager 端的处理过程如下图所示。
二、具体流程分析#
接下来跟随上面的流程图,我们深入源码具体分析每一步都是如何执行的:
最开始由客户端发起任务提交 submitApplication(),经过 ClientRMService 和 RMAppManager 发送 RMAppEventType.START 事件,之后交由 RMAppImpl 处理。
  protected void submitApplication(
      ApplicationSubmissionContext submissionContext, long submitTime,
      String user) throws YarnException {
    ApplicationId applicationId = submissionContext.getApplicationId();

    RMAppImpl application =
        createAndPopulateNewRMApp(submissionContext, submitTime, user, false);
    Credentials credentials = null;
    try {
      credentials = parseCredentials(submissionContext);
      if (UserGroupInformation.isSecurityEnabled()) {
        this.rmContext.getDelegationTokenRenewer()
            .addApplicationAsync(applicationId, credentials,
                submissionContext.getCancelTokensWhenComplete(),
                application.getUser());
      } else {
        // Dispatcher is not yet started at this time, so these START events
        // enqueued should be guaranteed to be first processed when dispatcher
        // gets started.
        // 这里发送 RMAppEventType.START 事件
        this.rmContext.getDispatcher().getEventHandler()
            .handle(new RMAppEvent(applicationId, RMAppEventType.START));
      }
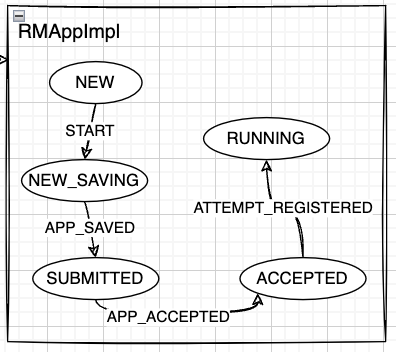
RMAppImpl 这东西是个状态机,收到事件之后会自己转换状态并且处理相应的逻辑。
(状态机还不熟悉的同学,可翻到我前面的文章进行学习《2-4 Yarn 基础库 - 状态机库》)
截取一部分状态转换代码:
  private static final StateMachineFactory<RMAppImpl,
                                           RMAppState,
                                           RMAppEventType,
                                           RMAppEvent> stateMachineFactory
                               = new StateMachineFactory<RMAppImpl,
                                           RMAppState,
                                           RMAppEventType,
                                           RMAppEvent>(RMAppState.NEW)


     // Transitions from NEW state
    .addTransition(RMAppState.NEW, RMAppState.NEW,
        RMAppEventType.NODE_UPDATE, new RMAppNodeUpdateTransition())
     // 收到 RMAppEventType.START 事件
    .addTransition(RMAppState.NEW, RMAppState.NEW_SAVING,
        RMAppEventType.START, new RMAppNewlySavingTransition())
    .addTransition(RMAppState.NEW, EnumSet.of(RMAppState.SUBMITTED,
            RMAppState.ACCEPTED, RMAppState.FINISHED, RMAppState.FAILED,
            RMAppState.KILLED, RMAppState.FINAL_SAVING),
        RMAppEventType.RECOVER, new RMAppRecoveredTransition())
    .addTransition(RMAppState.NEW, RMAppState.KILLED, RMAppEventType.KILL,
        new AppKilledTransition())
    .addTransition(RMAppState.NEW, RMAppState.FINAL_SAVING,
        RMAppEventType.APP_REJECTED,
        new FinalSavingTransition(new AppRejectedTransition(),
          RMAppState.FAILED))
一)RMAppImpl - START#
收到 RMAppEventType.START 事件之后,会执行 RMAppNewlySavingTransition()。
  private static final class RMAppNewlySavingTransition extends RMAppTransition {
    @Override
    public void transition(RMAppImpl app, RMAppEvent event) {

      // If recovery is enabled then store the application information in a
      // non-blocking call so make sure that RM has stored the information
      // needed to restart the AM after RM restart without further client
      // communication
      LOG.info("Storing application with id " + app.applicationId);
      app.rmContext.getStateStore().storeNewApplication(app);
    }
  }
跟下去会发现它发出 RMStateStoreEventType.STORE_APP 事件,去 RMStateStore 中找一下对应的事件处理。发现也是个状态机:
.addTransition(RMStateStoreState.ACTIVE,
    EnumSet.of(RMStateStoreState.ACTIVE, RMStateStoreState.FENCED),
    RMStateStoreEventType.STORE_APP, new StoreAppTransition())
跟着 StoreAppTransition 看看做了啥(发送 RMAppEventType.APP_NEW_SAVED 事件)
  private static class StoreAppTransition
      implements MultipleArcTransition<RMStateStore, RMStateStoreEvent,
          RMStateStoreState> {
    @Override
    public RMStateStoreState transition(RMStateStore store,
        RMStateStoreEvent event) {
      if (!(event instanceof RMStateStoreAppEvent)) {
        // should never happen
        LOG.error("Illegal event type: " + event.getClass());
        return RMStateStoreState.ACTIVE;
      }
      boolean isFenced = false;
      ApplicationStateData appState =
          ((RMStateStoreAppEvent) event).getAppState();
      ApplicationId appId =
          appState.getApplicationSubmissionContext().getApplicationId();
      LOG.info("Storing info for app: " + appId);
      try {
        store.storeApplicationStateInternal(appId, appState);
        // 这里发送了 RMAppEventType.APP_NEW_SAVED 事件
        store.notifyApplication(new RMAppEvent(appId,
               RMAppEventType.APP_NEW_SAVED));
      } catch (Exception e) {
        LOG.error("Error storing app: " + appId, e);
        isFenced = store.notifyStoreOperationFailedInternal(e);
      }
      return finalState(isFenced);
    };
  }
二)RMAppImpl - APP_NEW_SAVED#
我们再回到 RMAppImpl,找到对应的状态转移逻辑。
    // 刚刚我们的状态是 NEW_SAVING,收到了 APP_NEW_SAVED 事件,执行 AddApplicationToSchedulerTransition() 后,转换为 SUBMITTED 状态
    .addTransition(RMAppState.NEW_SAVING, RMAppState.SUBMITTED,
        RMAppEventType.APP_NEW_SAVED, new AddApplicationToSchedulerTransition())
在 AddApplicationToSchedulerTransition() 中会发送 SchedulerEventType.APP_ADDED 事件。之后 RMAppImpl 转换为 RMAppState.SUBMITTED 状态。SchedulerEventType.APP_ADDED 会被多个事件处理器捕获处理:
1)ResourceSchedulerWrapper 事件处理器,仅记录
      } else if (schedulerEvent.getType() == SchedulerEventType.APP_ADDED
          && schedulerEvent instanceof AppAddedSchedulerEvent) {
        AppAddedSchedulerEvent appAddEvent =
                (AppAddedSchedulerEvent) schedulerEvent;
        String queueName = appAddEvent.getQueue();
        appQueueMap.put(appAddEvent.getApplicationId(), queueName);
      }
2)各个 AbstractYarnScheduler 的实现类。以 CapacityScheduler 为例:
执行 addApplication()
    case APP_ADDED:
    {
      AppAddedSchedulerEvent appAddedEvent = (AppAddedSchedulerEvent) event;
      String queueName = resolveReservationQueueName(appAddedEvent.getQueue(),
          appAddedEvent.getApplicationId(), appAddedEvent.getReservationID(),
          appAddedEvent.getIsAppRecovering());
      if (queueName != null) {
        if (!appAddedEvent.getIsAppRecovering()) {
          addApplication(appAddedEvent.getApplicationId(), queueName,
              appAddedEvent.getUser(), appAddedEvent.getApplicatonPriority());
        } else {
          addApplicationOnRecovery(appAddedEvent.getApplicationId(), queueName,
              appAddedEvent.getUser(), appAddedEvent.getApplicatonPriority());
        }
      }
    }
在 addApplication() 中会提交 Application 并发送 RMAppEventType.APP_ACCEPTED 事件。
	queue.submitApplication(applicationId, user, queueName);
    rmContext.getDispatcher().getEventHandler()
        .handle(new RMAppEvent(applicationId, RMAppEventType.APP_ACCEPTED));
三)RMAppImpl - APP_ACCEPTED(重点)#
继续回到 RMAppImpl,执行 StartAppAttemptTransition(),创建 newAttempt,发送事件RMAppAttemptEventType.START
    .addTransition(RMAppState.SUBMITTED, RMAppState.ACCEPTED,
        RMAppEventType.APP_ACCEPTED, new StartAppAttemptTransition())
  private static final class StartAppAttemptTransition extends RMAppTransition {
    @Override
    public void transition(RMAppImpl app, RMAppEvent event) {
      app.createAndStartNewAttempt(false);
    };
  }
  private void
      createAndStartNewAttempt(boolean transferStateFromPreviousAttempt) {
    createNewAttempt();
    handler.handle(new RMAppStartAttemptEvent(currentAttempt.getAppAttemptId(),
      transferStateFromPreviousAttempt));
  }
在 RMAppAttemptImpl 中会捕获这个事件,执行 AttemptStartedTransition(),其中会发送 SchedulerEventType.APP_ATTEMPT_ADDED 事件,由 AbstractYarnScheduler 实现类处理
      .addTransition(RMAppAttemptState.NEW, RMAppAttemptState.SUBMITTED,
          RMAppAttemptEventType.START, new AttemptStartedTransition())
如在 CapacityScheduler 中由 addApplicationAttempt 处理,会提交 ApplicationAttempt,并发送 RMAppAttemptEventType.ATTEMPT_ADDED 事件
private synchronized void addApplicationAttempt() {
    // 提交 attempt
	queue.submitApplicationAttempt(attempt, application.getUser());
    // 发送 RMAppAttemptEventType.ATTEMPT_ADDED 事件
	rmContext.getDispatcher().getEventHandler().handle(
    		new RMAppAttemptEvent(applicationAttemptId,
            RMAppAttemptEventType.ATTEMPT_ADDED));
}
RMAppAttemptImpl 收到 event 后继续处理,在 ScheduleTransition 会 allocate am container 资源。
      .addTransition(RMAppAttemptState.SUBMITTED,
          EnumSet.of(RMAppAttemptState.LAUNCHED_UNMANAGED_SAVING,
                     RMAppAttemptState.SCHEDULED),
          RMAppAttemptEventType.ATTEMPT_ADDED,
          new ScheduleTransition())
        // AM resource has been checked when submission
        Allocation amContainerAllocation =
            appAttempt.scheduler.allocate(
                appAttempt.applicationAttemptId,
                Collections.singletonList(appAttempt.amReq),
                EMPTY_CONTAINER_RELEASE_LIST,
                amBlacklist.getBlacklistAdditions(),
                amBlacklist.getBlacklistRemovals(), null, null);
ResourceScheduler 将资源返回给它之前,会向 RMContainerlmpl 发送一个 RMContainerEventType.ACQUIRED 事件。
在 RMContainerImpl 接到 RMContainerEventType.START,发送 RMAppAttemptEventType.CONTAINER_ALLOCATED 事件。
    .addTransition(RMContainerState.NEW, RMContainerState.ALLOCATED,
        RMContainerEventType.START, new ContainerStartedTransition())
  private static final class ContainerStartedTransition extends
      BaseTransition {

    @Override
    public void transition(RMContainerImpl container, RMContainerEvent event) {
      container.eventHandler.handle(new RMAppAttemptEvent(
          container.appAttemptId, RMAppAttemptEventType.CONTAINER_ALLOCATED));
    }
  }
又回到RMAppAttemptImpl 后续状态机,执行 AMContainerAllocatedTransition,在其中又一次为 am allocate,和上一个状态中 allocate 仅参数不同,没搞懂为啥。这里如果发现 allocate container 资源还是 0,会退回上一步,状态还是 RMAppAttemptState.SCHEDULED 等待再次获取资源。如果正常获取到了资源,就会转为 RMAppAttemptState.ALLOCATED_SAVING 状态。
      .addTransition(RMAppAttemptState.SCHEDULED,
          EnumSet.of(RMAppAttemptState.ALLOCATED_SAVING,
            RMAppAttemptState.SCHEDULED),
          RMAppAttemptEventType.CONTAINER_ALLOCATED,
          new AMContainerAllocatedTransition())
      Allocation amContainerAllocation =
          appAttempt.scheduler.allocate(appAttempt.applicationAttemptId,
            EMPTY_CONTAINER_REQUEST_LIST, EMPTY_CONTAINER_RELEASE_LIST, null,
            null, null, null);
日志记录完成后,RMStateStore 向 RMAppAttemptImpl 发送 RMAppAttemptEventType.ATTEMPT_NEW_SAVED 事件。RMAppAttemptImpl 后续向 ApplicationMasterLauncher 发 送 AMLauncherEventType.LAUNCH 事件(实际执行是在 AMLauncher 中),并将状态从 ALLOCATED_SAVING 转移为 ALLOCATED。
      .addTransition(RMAppAttemptState.ALLOCATED_SAVING,
          RMAppAttemptState.ALLOCATED,
          RMAppAttemptEventType.ATTEMPT_NEW_SAVED, new AttemptStoredTransition())
ApplicationMasterLauncher 收到 AMLauncherEventType.LAUNCH 事件后,会将该事件放到事件队列中,等待 AMLauncher 线程池中的线程处理该事件。它将与对应的 NodeManager 通信,启动 ApplicationMaster,一旦成功启动后,将向 RMAppAttemptImpl 发送 RMAppAttemptEventType.LAUNCHED 事件。
  public void run() {
    switch (eventType) {
    case LAUNCH:
      try {
        LOG.info("Launching master" + application.getAppAttemptId());
        launch();
        handler.handle(new RMAppAttemptEvent(application.getAppAttemptId(),
            RMAppAttemptEventType.LAUNCHED));
RMAppAttemptImpl 收到 RMAppAttemptEventType.LAUNCHED 事件后,会向 AMLivelinessMonitor 注册,以监控运行状态。RMAppAttemptImpl 状态从 ALLOCATED 转移为 LAUNCHED。
之后,NodeManager 通过心跳机制汇报 ApplicationMaster 所在 Container 已经成功启动,收到该信息后,ResourceScheduler 将发送一个 RMContainerEventType.LAUNCHED 事件,RMContainerImpl 收到该事件后,会从 ContainerAllocationExpirer 监控列表中移除。
启动的 ApplicationMaster 通过RPC 函数 ApplicationMasterProtocol#registerApplicationMaster 向 ResourceManager 注册,ResourceManager 中的 ApplicationMasterService 服务接收到该请求后,发送 RMAppAttemptEventType.REGISTERED 事件。
// ApplicationMasterService#registerApplicationMaster

	LOG.info("AM registration " + applicationAttemptId);
      this.rmContext
        .getDispatcher()
        .getEventHandler()
        .handle(
          // 这里发送 RMAppAttemptEventType.REGISTERED 事件
          new RMAppAttemptRegistrationEvent(applicationAttemptId, request
            .getHost(), request.getRpcPort(), request.getTrackingUrl()));
RMAppAttemptImpl 收到该事件后,首先保存该 ApplicationMaster 的基本信息(比如所在 host、启用的 RPC 端口号等),然后向 RMApplmpl 发送一个 RMAppEventType.ATTEMPT_REGISTERED 事件。RMAppAttemptImpl 状态从 LAUNCHED 转移为 RUNNING。
      .addTransition(RMAppAttemptState.LAUNCHED, RMAppAttemptState.RUNNING,
          RMAppAttemptEventType.REGISTERED, REGISTERED_TRANSITION)
// AMRegisteredTransition
	appAttempt.eventHandler.handle(new RMAppEvent(appAttempt
          .getAppAttemptId().getApplicationId(),
          RMAppEventType.ATTEMPT_REGISTERED));
四)RMAppImpl - ATTEMPT_REGISTERED#
RMAppImpl 收到 RMAppEventType.ATTEMPT_REGISTERED 事件后,将状态从 ACCEPTED 转换为 RUNNING。
    .addTransition(RMAppState.ACCEPTED, RMAppState.RUNNING,
        RMAppEventType.ATTEMPT_REGISTERED, new RMAppStateUpdateTransition(
            YarnApplicationState.RUNNING))
到这里,启动 ApplicationMaster 的整体流程分析完毕!
三、总结#
本篇文章分析了从应用程序提交到启动 ApplicationMaster 的整个过程,分析具体过程看的可能会有些繁琐。但只要抓住核心本质,就很容易捋清楚。重点就是事件处理和状态机,这两个部件理解清楚,就很容易看明白程序的流转。
实际逻辑无非就是几个服务之间互相发送对应的事件,接收到事件后会执行启动服务、记录日志、监控状态,然后再发送个新的事件。
本身不难,但需要耐下心来一点点去梳理。
Recommend
-
41
点击关注上方“ 知了小巷 ”, 设为“置顶或星标”,第一时间送达干货。 ApplicationMaster<-->Reso...
-
5
最近给一个tomcat服务加上nginx代理,陆续遇到一些问题(坑)。第一个坑,一个接口直接访问正常,经nginx代理后报104错误(104: Connection reset by peer)。奇葩之处在于,只有特定的接口出现这种错。先说解决方案:配置反向代理长链接...
-
3
本文将介绍如何使用 idea 搭建 Hadoop 源码阅读环境。(默认已安装好 Java、Maven 环境) 一、搭建源码阅读环境 一)idea 导入 hadoop 工程 从 github 上拉取代码。
-
2
了解 Yarn 基础库是后面阅读 Yarn 源码的基础,本节对 Yarn 基础库做总体的介绍。并对其中使用的第三方库 Protocol Buffers 和 Avro 是什么、怎么用做简要的介绍。 一、主要使用的库 Protocol Buffers
-
1
RPC(Remote Procedure Call) 是 Hadoop 服务通信的关键库,支撑上层分布式环境下复杂的进程间(Inter-Process Communication, IPC)通信逻辑,是分布式系统的基础。允许运行于一台计算机上的程序像调用本地方法一样,调用另一台计算机的子程序。由于 RPC 服...
-
3
一个庞大的分布式系统,各个组件间是如何协调工作的?组件是如何解耦的?线程运行如何更高效,减少阻塞带来的低效问题?本节将对 Yarn 的服务库和事件库进行介绍,看看 Yarn 是如何解决这些问题的。 一、服务库 对于生命周期较长的对...
-
2
当一个服务拥有太多处理逻辑时,会导致代码结构异常的混乱,很难分辨一段逻辑是在哪个阶段发挥作用的。 这时就可以引入状态机模型,帮助代码结构变得清晰。 一、状态机库概述 状态机由一组状态组成: 【初始状态 -...
-
1
【深入浅出 Yarn 架构与实现】3-1 Yarn Application 流程与编写方法 本篇学习 Yarn Application 编写方法,将带你更清楚的了解一个任务是如何提交到 Ya...
-
12
本篇文章继续介绍 Yarn Application 中 ApplicationMaster 部分的编写方法。 一、Application Master 编写方法 上一节讲了 Client 提交任务给 RM 的全流程,RM 收到任务后,由 ApplicationsManager...
-
5
本小节介绍应用程序的 ApplicationMaster 在 NodeManager 成功启动并向 ResourceManager 注册后,向 ResourceManager 请求资源(Container)到获取到资源的整个过程,以及 ResourceManager 内部涉及的主要工作流程。 一、整体流程
About Joyk
Aggregate valuable and interesting links.
Joyk means Joy of geeK