

Spring Boot自动配置原理懂后轻松写一个自己的starter - 程序员xiaozhang
source link: https://www.cnblogs.com/scott1102/p/17140461.html
Go to the source link to view the article. You can view the picture content, updated content and better typesetting reading experience. If the link is broken, please click the button below to view the snapshot at that time.

Spring Boot自动配置原理懂后轻松写一个自己的starter
目前很多Spring项目的开发都会直接用到Spring Boot。因为Spring原生开发需要加太多的配置,而使用Spring Boot开发很容易上手,只需遵循Spring Boot开发的约定就行了,也就是约定大于配置,无需觉得它神奇,它的底层都是使用的Spring。聊完这个原理带着大家轻松写一个自己的starter。
要学习它的自动配置原理首先自己要创建一个Spring Boot项目,创建项目过程很简单就不介绍了。学习它的自动配置原理,首先要看的就是如下这个注解(SpringBootApplication)。这个注解大家都是很熟悉,这个注解是由如下三个注解组成如下:
//第一个注解
@SpringBootConfiguration
//第二个注解
@EnableAutoConfiguration
//第三个注解
@ComponentScan(excludeFilters = { @Filter(type = FilterType.CUSTOM, classes = TypeExcludeFilter.class),
    @Filter(type = FilterType.CUSTOM, classes = AutoConfigurationExcludeFilter.class) })
public @interface SpringBootApplication {
上面三个注解都是太太重要了,本文由于聊自动配置所以就只讲EnableAutoConfiguration这个注解,Spring Boot的自动配置原理精髓都在这个注解里面。好了那就先看这个注解的代码如下:
@Target(ElementType.TYPE)
@Retention(RetentionPolicy.RUNTIME)
@Documented
@Inherited
@AutoConfigurationPackage
@Import(AutoConfigurationImportSelector.class)
public @interface EnableAutoConfiguration {
看到这个注解一眼就能瞧到它帮助我们导入了一个AutoConfigurationImportSelector 。由于很多地方遇到了这个Import注解,所以先简单说一下这个注解的作用。
1:给Spring容器自动注入导入的类。如下使用,就是帮助Spring容器自动导入了一个TableEntity对象,在项目中你不需要new 对象,也不需要给这个对象加任何注解了,就可以直接使用TableEntity对象了。
@Configuration
@Import(TableEntity.class)
public class TestConfig {
}
2:给容器导入一个ImportSelector,比如上文讲的那个AutoConfigurationImportSelector 。通过字符串数组的方式返回配置类的全限定名,然后把这些类注入到Spring容器中,我们也就可以直接在Spring容器中使用这些类了。
好了讲了上面那2段作用我们主要分析的也就是下面这段代码了。
public class AutoConfigurationImportSelector {
  @Override
  //作用就是Spring会把这个方法返回的数组中所有全限定名的类注入到Spring容器中
  //供使用者直接去使用这些类。
  public String[] selectImports(AnnotationMetadata annotationMetadata) {
    if (!isEnabled(annotationMetadata)) {
      return NO_IMPORTS;
    }
    AutoConfigurationMetadata autoConfigurationMetadata = AutoConfigurationMetadataLoader
        .loadMetadata(this.beanClassLoader);
        //这个方法是Spring Boot 自动配置要说的
    AutoConfigurationEntry autoConfigurationEntry = getAutoConfigurationEntry(autoConfigurationMetadata,
        annotationMetadata);
    return StringUtils.toStringArray(autoConfigurationEntry.getConfigurations());
  }
然后我们后面主要分析的也就是getAutoConfigurationEntry(autoConfigurationMetadata,annotationMetadata),这个方法。
//这个方法中的每个方法都很重要,一个一个说
  protected AutoConfigurationEntry getAutoConfigurationEntry(AutoConfigurationMetadata autoConfigurationMetadata,
      AnnotationMetadata annotationMetadata) {
    AnnotationAttributes attributes = getAttributes(annotationMetadata);
    //1:见名知意,获取候选配置类
    List<String> configurations = getCandidateConfigurations(annotationMetadata, attributes);
    // 2:去除重复的配置类,这个方法太好了。
    configurations = removeDuplicates(configurations);
    //3 :去除使用者排除的配置类。
    Set<String> exclusions = getExclusions(annotationMetadata, attributes);
    checkExcludedClasses(configurations, exclusions);
    configurations.removeAll(exclusions);
    configurations = filter(configurations, autoConfigurationMetadata);
    fireAutoConfigurationImportEvents(configurations, exclusions);
    return new AutoConfigurationEntry(configurations, exclusions);
  }
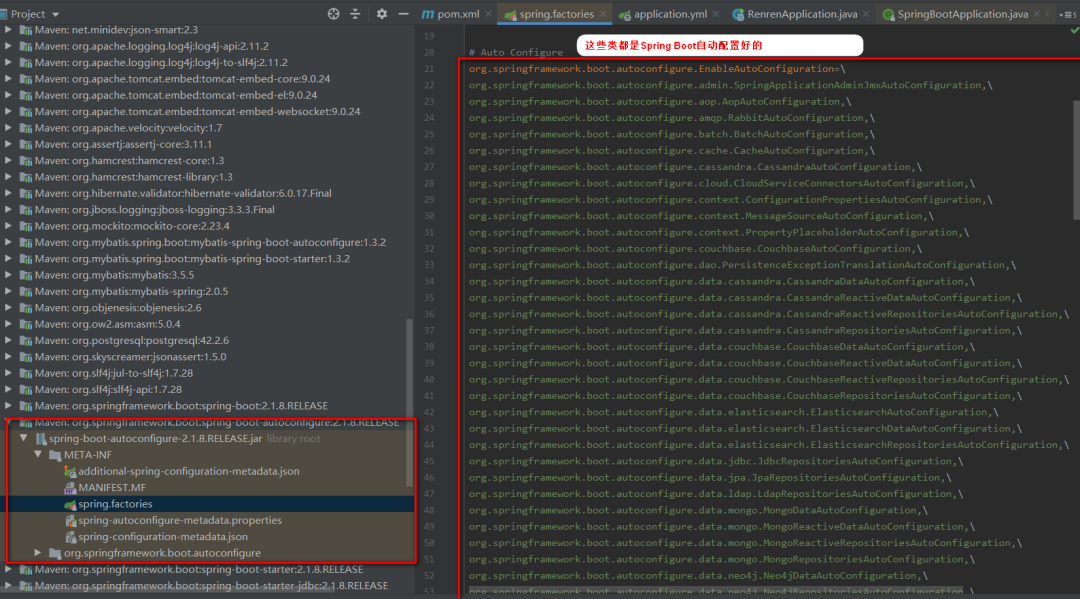
getCandidateConfigurations这个方法的意思就是获取候选的配置类(也就是Spring Boot已经自动配置的那些类),如下:(PS我们一看那个报错信息就能猜出来Spring从这个【META-INF/spring.factories】下找配置类)
protected List<String> getCandidateConfigurations(AnnotationMetadata metadata, AnnotationAttributes attributes) {
    List<String> configurations = SpringFactoriesLoader.loadFactoryNames(getSpringFactoriesLoaderFactoryClass(),
        getBeanClassLoader());
    Assert.notEmpty(configurations, "No auto configuration classes found in META-INF/spring.factories. If you "
        + "are using a custom packaging, make sure that file is correct.");
    return configurations;
  }
主要找配置类信息的就是如下代码了。
public static List<String> loadFactoryNames(Class<?> factoryClass, @Nullable ClassLoader classLoader) {
    String factoryClassName = factoryClass.getName();
    return loadSpringFactories(classLoader).getOrDefault(factoryClassName, Collections.emptyList());
  }

  private static Map<String, List<String>> loadSpringFactories(@Nullable ClassLoader classLoader) {
   // 1:第一步先从缓存中找,找不到在循环遍历找,
   // 由于Spring代码逻辑太复杂,Spring很多地方都采用这种缓存的设计
    MultiValueMap<String, String> result = cache.get(classLoader);
    if (result != null) {
      return result;
    }
   // public static final String 下面代码用到的常量值如下
   // FACTORIES_RESOURCE_LOCATION = "META-INF/spring.factories";
    try {
    // 扫描 代码中的所有META-INF/spring.factories"文件
      Enumeration<URL> urls = (classLoader != null ?
          classLoader.getResources(FACTORIES_RESOURCE_LOCATION) :
          ClassLoader.getSystemResources(FACTORIES_RESOURCE_LOCATION));
      result = new LinkedMultiValueMap<>();
      //循环遍历加载上面所说的文件下的文件,并把它们放入到
      // LinkedMultiValueMap中
       while (urls.hasMoreElements()) {
        URL url = urls.nextElement();
        UrlResource resource = new UrlResource(url);
        Properties properties = PropertiesLoaderUtils.loadProperties(resource);
        for (Map.Entry<?, ?> entry : properties.entrySet()) {
          String factoryClassName = ((String) entry.getKey()).trim();
          for (String factoryName : StringUtils.commaDelimitedListToStringArray((String) entry.getValue())) {
            result.add(factoryClassName, factoryName.trim());
          }
        }
      }
      //放缓存中一份,后面要加载从这个缓存中直接取,
      // 如果看全代码可知Spring Boot 缓存的不止有配置类,还有其他类。
      cache.put(classLoader, result);
      return result;
    }
    catch (IOException ex) {
      throw new IllegalArgumentException("Unable to load factories from location [" +
          FACTORIES_RESOURCE_LOCATION + "]", ex);
    }
  }
从上面代码可知Spring主要是从META-INF/spring.factories文件中加载配置类,那么就带大家看一看Spring Boot自己已经配置的类有哪些。
后面就回到这个(removeDuplicates)去重方法,如下:
protected final <T> List<T> removeDuplicates(List<T> list) {
    return new ArrayList<>(new LinkedHashSet<>(list));
  }
为什么要把这单独一行代码列出来呢?是因为我感觉这段去重复代码用的太好了,自从看了这段代码,后面博主自己写去重逻辑的时候也就参照Spring大佬这一行代码写去重逻辑(PS:如果自己业务去重逻辑没有其他逻辑的时候参考使用),简单,效率应该也不低毕竟大佬们这样用了。
后面代码逻辑就是一些去除用户自己要排除,要过滤掉的配置类。然后就会使用Spring的ImportSelector这个特性(PS具体Spring是怎么把这些返回权限定名的类加载的容器中的,是Spring加载类方面的知识,本文不做具体介绍)
好了,然后带着大家创建一个自己的starter(PS:命名规范我是参考了mybatis-spring,毕竟是大神们的命名规范,记好约定大于配置,哈哈哈)的starter 。
1: 创建一个工程,信息如下:
       <groupId>scott-spring-boot-starter</groupId>
       <artifactId>scottspringbootstarter</artifactId>
          <version>0.0.1-SNAPSHOT</version>
2:再创建一个工程 也就是autoconfigure项目。
如下:
      <groupId>com.spring.starter</groupId>
      <artifactId>scott-spring-boot-starter-autoconfigure</artifactId>
      <version>0.0.1-SNAPSHOT</version>
  在pom文件中引入如下(一般下面的是必须引入的):
<parent>
            <groupId>org.springframework.boot</groupId>
            <artifactId>spring-boot-starter-parent</artifactId>
            <version>2.1.8.RELEASE</version>
            <relativePath></relativePath>
      </parent>
      <dependencies>
            <dependency>
                  <groupId>org.springframework.boot</groupId>
                  <artifactId>spring-boot-starter</artifactId>
            </dependency>
      </dependencies>
3:创建HelloService。
public class HelloService {
    HelloProperties helloProperties ;

    public String sayHello(String name){
        return helloProperties.getPrefix()+"-"+name+helloProperties.getSuffix() ;
    }
    public HelloProperties getHelloProperties() {
        return helloProperties;
    }
    public void setHelloProperties(HelloProperties helloProperties) {
        this.helloProperties = helloProperties;
    }
}


4: 创建相应的properies文件。
@ConfigurationProperties(prefix="scott.hello")  //以 scott.hello开头的。
public class HelloProperties {

      private String prefix ;

      private String suffix ;
      public String getPrefix() {
            return prefix;
      }
      public void setPrefix(String prefix) {
            this.prefix = prefix;
      }
      public String getSuffix() {
            return suffix;
      }
      public void setSuffix(String suffix) {
            this.suffix = suffix;
      }

5:创建自定义的配置文件如下:
@Configuration
@ConditionalOnWebApplication // 在web环境下才生效
@EnableConfigurationProperties(HelloProperties.class) // 属性文件生效
public class HelloServiceAutoConfiguration {
      @Autowired
      HelloProperties helloProperties;

      @Bean
      public HelloService helloService() {
            HelloService service = new HelloService();
            service.setHelloProperties(helloProperties);
            return service;
      };
}
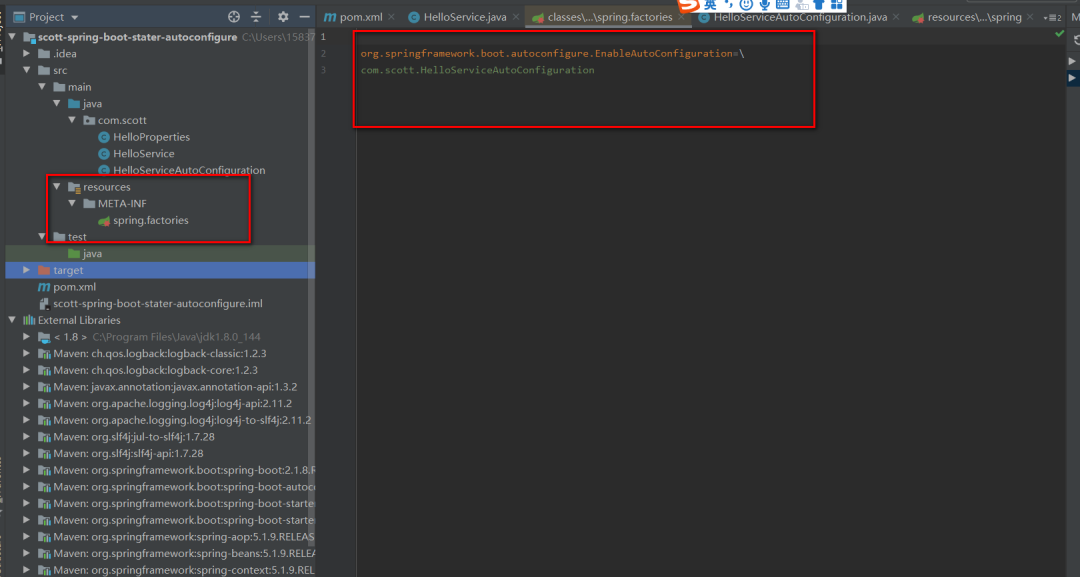
6:在META-INF 文件夹下创建 spring.factories 文件,写入如下自己的配置类 。Spring Boot自动配置规约,约定大于规范,如下图的配置所示:
7:在scottspringbootstarter项目的pom文件中引入自定义的 autoconfigure如下:
<groupId>scott-spring-boot-starter</groupId>
    <artifactId>scottspringbootstarter</artifactId>
    <version>1.0-SNAPSHOT</version>
    <dependencies>
        <dependency>
            <groupId>com.spring.starter</groupId>
            <artifactId>scott-spring-boot-starter-autoconfigure</artifactId>
            <version>1.0-SNAPSHOT</version>
        </dependency>

    </dependencies>
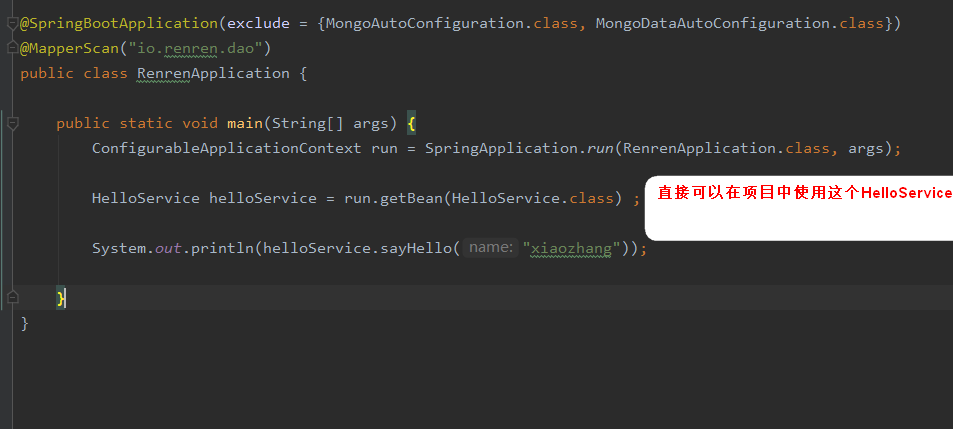
8:自定义starter就好了,然后就可以在我们自定义的工程中引入scottspringbootstarter就可以使用了。
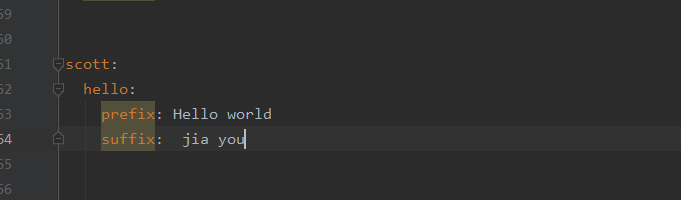
如下使用方法,配置yml文件,然后使用对应的服务,So Easy:
Recommend
About Joyk
Aggregate valuable and interesting links.
Joyk means Joy of geeK