

Automated Performance Testing With ArgoCD and Iter8
source link: https://dzone.com/articles/automated-performance-testing-with-argocd-and-iter8
Go to the source link to view the article. You can view the picture content, updated content and better typesetting reading experience. If the link is broken, please click the button below to view the snapshot at that time.

Automated Performance Testing With ArgoCD and Iter8
In this article, readers will learn about AutoX, which allows users to launch performance experiments on Kubernetes apps, along with code and visuals.
Say you are building a cloud app. Clearly, you will unit test the app during development to ensure it behaves the way you expect. And no matter how you develop your app, your favorite unit testing tool will make it easy to author, execute, and obtain results from your tests.
What about testing your app when you deploy it in a Kubernetes cluster (test/dev/staging/prod)? Does the app handle realistic load conditions with acceptable performance? Does the new version of the app improve business metrics relative to the earlier version? Is it resilient?
In this article, I will introduce Iter8 and one of it’s new features, AutoX. Iter8 is an open-source Kubernetes release optimizer that can help you get started with testing of Kubernetes apps (experiments) in seconds. With Iter8, you can perform various kinds of experiments, such as performance testing, A/B/n test, chaos injection test, and more.
Iter8 recently introduced a new feature: AutoX. AutoX, short for automatic experiments, allows you to perform the above experiments automatically by leveraging Argo CD, a popular continuous delivery tool. We will explore automatically launching performance testing experiments for an HTTP service deployed in Kubernetes. You can familiarize yourself with Iter8 on Iter8’s official website.
AutoX
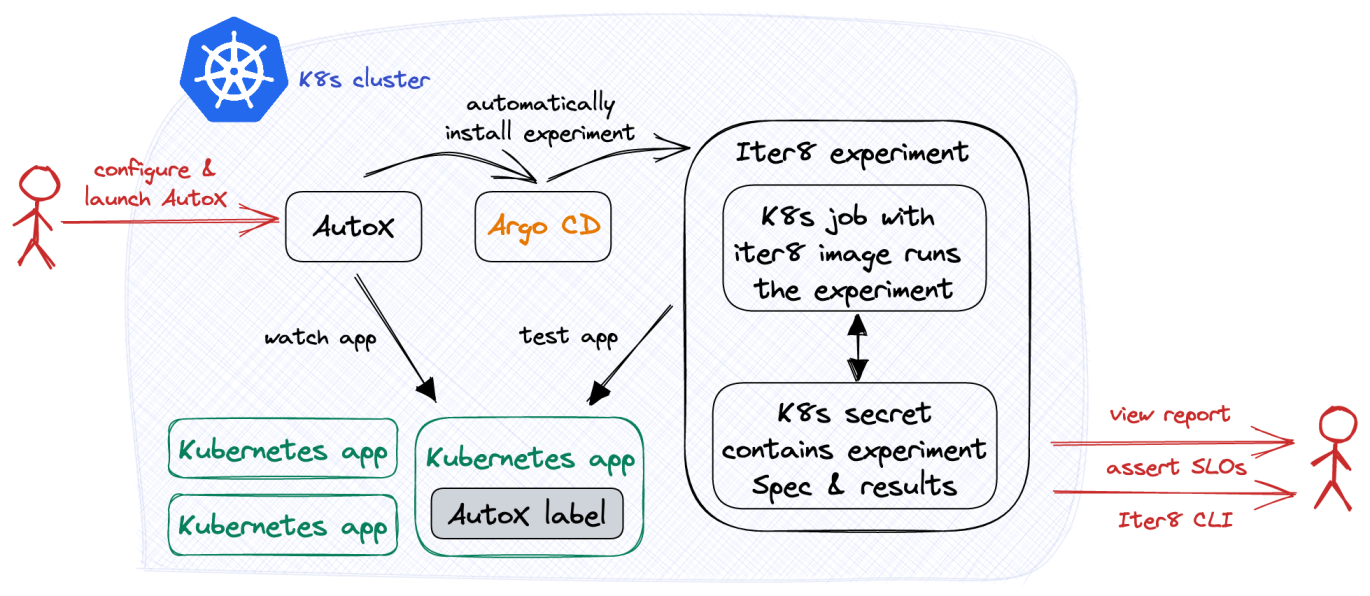
Releasing a new version of an application typically involves the creation of new Kubernetes resource objects and/or updates to existing ones. AutoX can be configured to watch for such changes and automatically launch new experiments. You can configure AutoX with multiple experiment groups and, for each group, specify the Kubernetes resource object that AutoX will watch and one or more experiments to be performed in response to new versions of this object.
Let us now see this in action using a Kubernetes HTTP service and configuring AutoX, so whenever a new version of the service is released, AutoX will start a new HTTP performance test that will validate if the service meets latency and error-related requirements.
Download Iter8 CLI
brew tap iter8-tools/iter8
brew install [email protected]
The Iter8 CLI provides the commands needed to see experiment reports.
Setup the Kubernetes Cluster With ArgoCD
As mentioned previously, AutoX is built on top of ArgoCD, so we will also need to install it.
A basic install of Argo CD can be done as follows:
kubectl create namespace argocd
kubectl apply -n argocd -f https://raw.githubusercontent.com/argoproj/argo-cd/stable/manifests/install.yaml
Deploy Application
Now, we will create an httpbin deployment and service:
kubectl create deployment httpbin --image=kennethreitz/httpbin --port=80
kubectl expose deployment httpbin --port=80
Apply the Version Label
Next, we will assign httpbin deployment the app.kubernetes.io/version label (version label). AutoX will launch experiments only when this label is present on your trigger object. It will relaunch experiments whenever this version label is modified.
kubectl label deployment httpbin app.kubernetes.io/version=1.0.0Setup Kubernetes Cluster With Iter8 AutoX
Next, we will configure and install the AutoX controller:
helm install autox autox --repo https://iter8-tools.github.io/hub/ --version 0.1.6 \
--set 'groups.httpbin.trigger.name=httpbin' \
--set 'groups.httpbin.trigger.namespace=default' \
--set 'groups.httpbin.trigger.group=apps' \
--set 'groups.httpbin.trigger.version=v1' \
--set 'groups.httpbin.trigger.resource=deployments' \
--set 'groups.httpbin.specs.iter8.name=iter8' \
--set 'groups.httpbin.specs.iter8.values.tasks={ready,http,assess}' \
--set 'groups.httpbin.specs.iter8.values.ready.deploy=httpbin' \
--set 'groups.httpbin.specs.iter8.values.ready.service=httpbin' \
--set 'groups.httpbin.specs.iter8.values.ready.timeout=60s' \
--set 'groups.httpbin.specs.iter8.values.http.url=http://httpbin.default/get' \
--set 'groups.httpbin.specs.iter8.values.assess.SLOs.upper.http/error-count=0' \
--set 'groups.httpbin.specs.iter8.values.assess.SLOs.upper.http/latency-mean=50' \
--set 'groups.httpbin.specs.iter8.version=0.13.0' \
--set 'groups.httpbin.specs.iter8.values.runner=job'
The configuration of the AutoX controller is composed of a trigger object definition and a set of experiment specifications. In this case, the trigger object is the httpbin deployment and there is only one experiment, an HTTP performance test with SLO validation associated with this trigger.
To go into more detail, the configuration is a set of groups, and each group is composed of a trigger object definition and a set of experiment specifications. This enables AutoX to manage one or more trigger objects, each associated with one or more experiments. In this tutorial, there is only one group named httpbin (groups.httpbin...), and within that group, there is the trigger object definition (groups.httpbin.trigger...), and a single experiment spec named iter8 (groups.httpbin.specs.iter8...).
The trigger object definition is a combination of the name, namespace, and the group-version-resource (GVR) metadata of the trigger object. In this case, httpbin, default, and GVR apps, deployments, and v1, respectively.
The experiment is an HTTP SLO validation test on the httpbin service. This Iter8 experiment is composed of three tasks, ready, http, and assess. The ready task will ensure that the httpbin deployment and service are running. The http task will make requests to the specified URL and will collect latency and error-related metrics. Lastly, the assess task will ensure that the mean latency is less than 50 milliseconds and the error count is “0.” In addition, the runner is set to “job” as this will be a single-loop experiment.
Observe Experiment
After starting AutoX, the HTTP SLO validation test should quickly follow. You can now use the Iter8 CLI to check the status and see the results of the test.
The following command allows you to check the status of the test.
Note: You need to specify an experiment group via the -g option. The experiment group for experiments started by AutoX is in the form autox-<group name>-<experiment spec name>, so, in this case, it would be autox-httpbin-iter8:
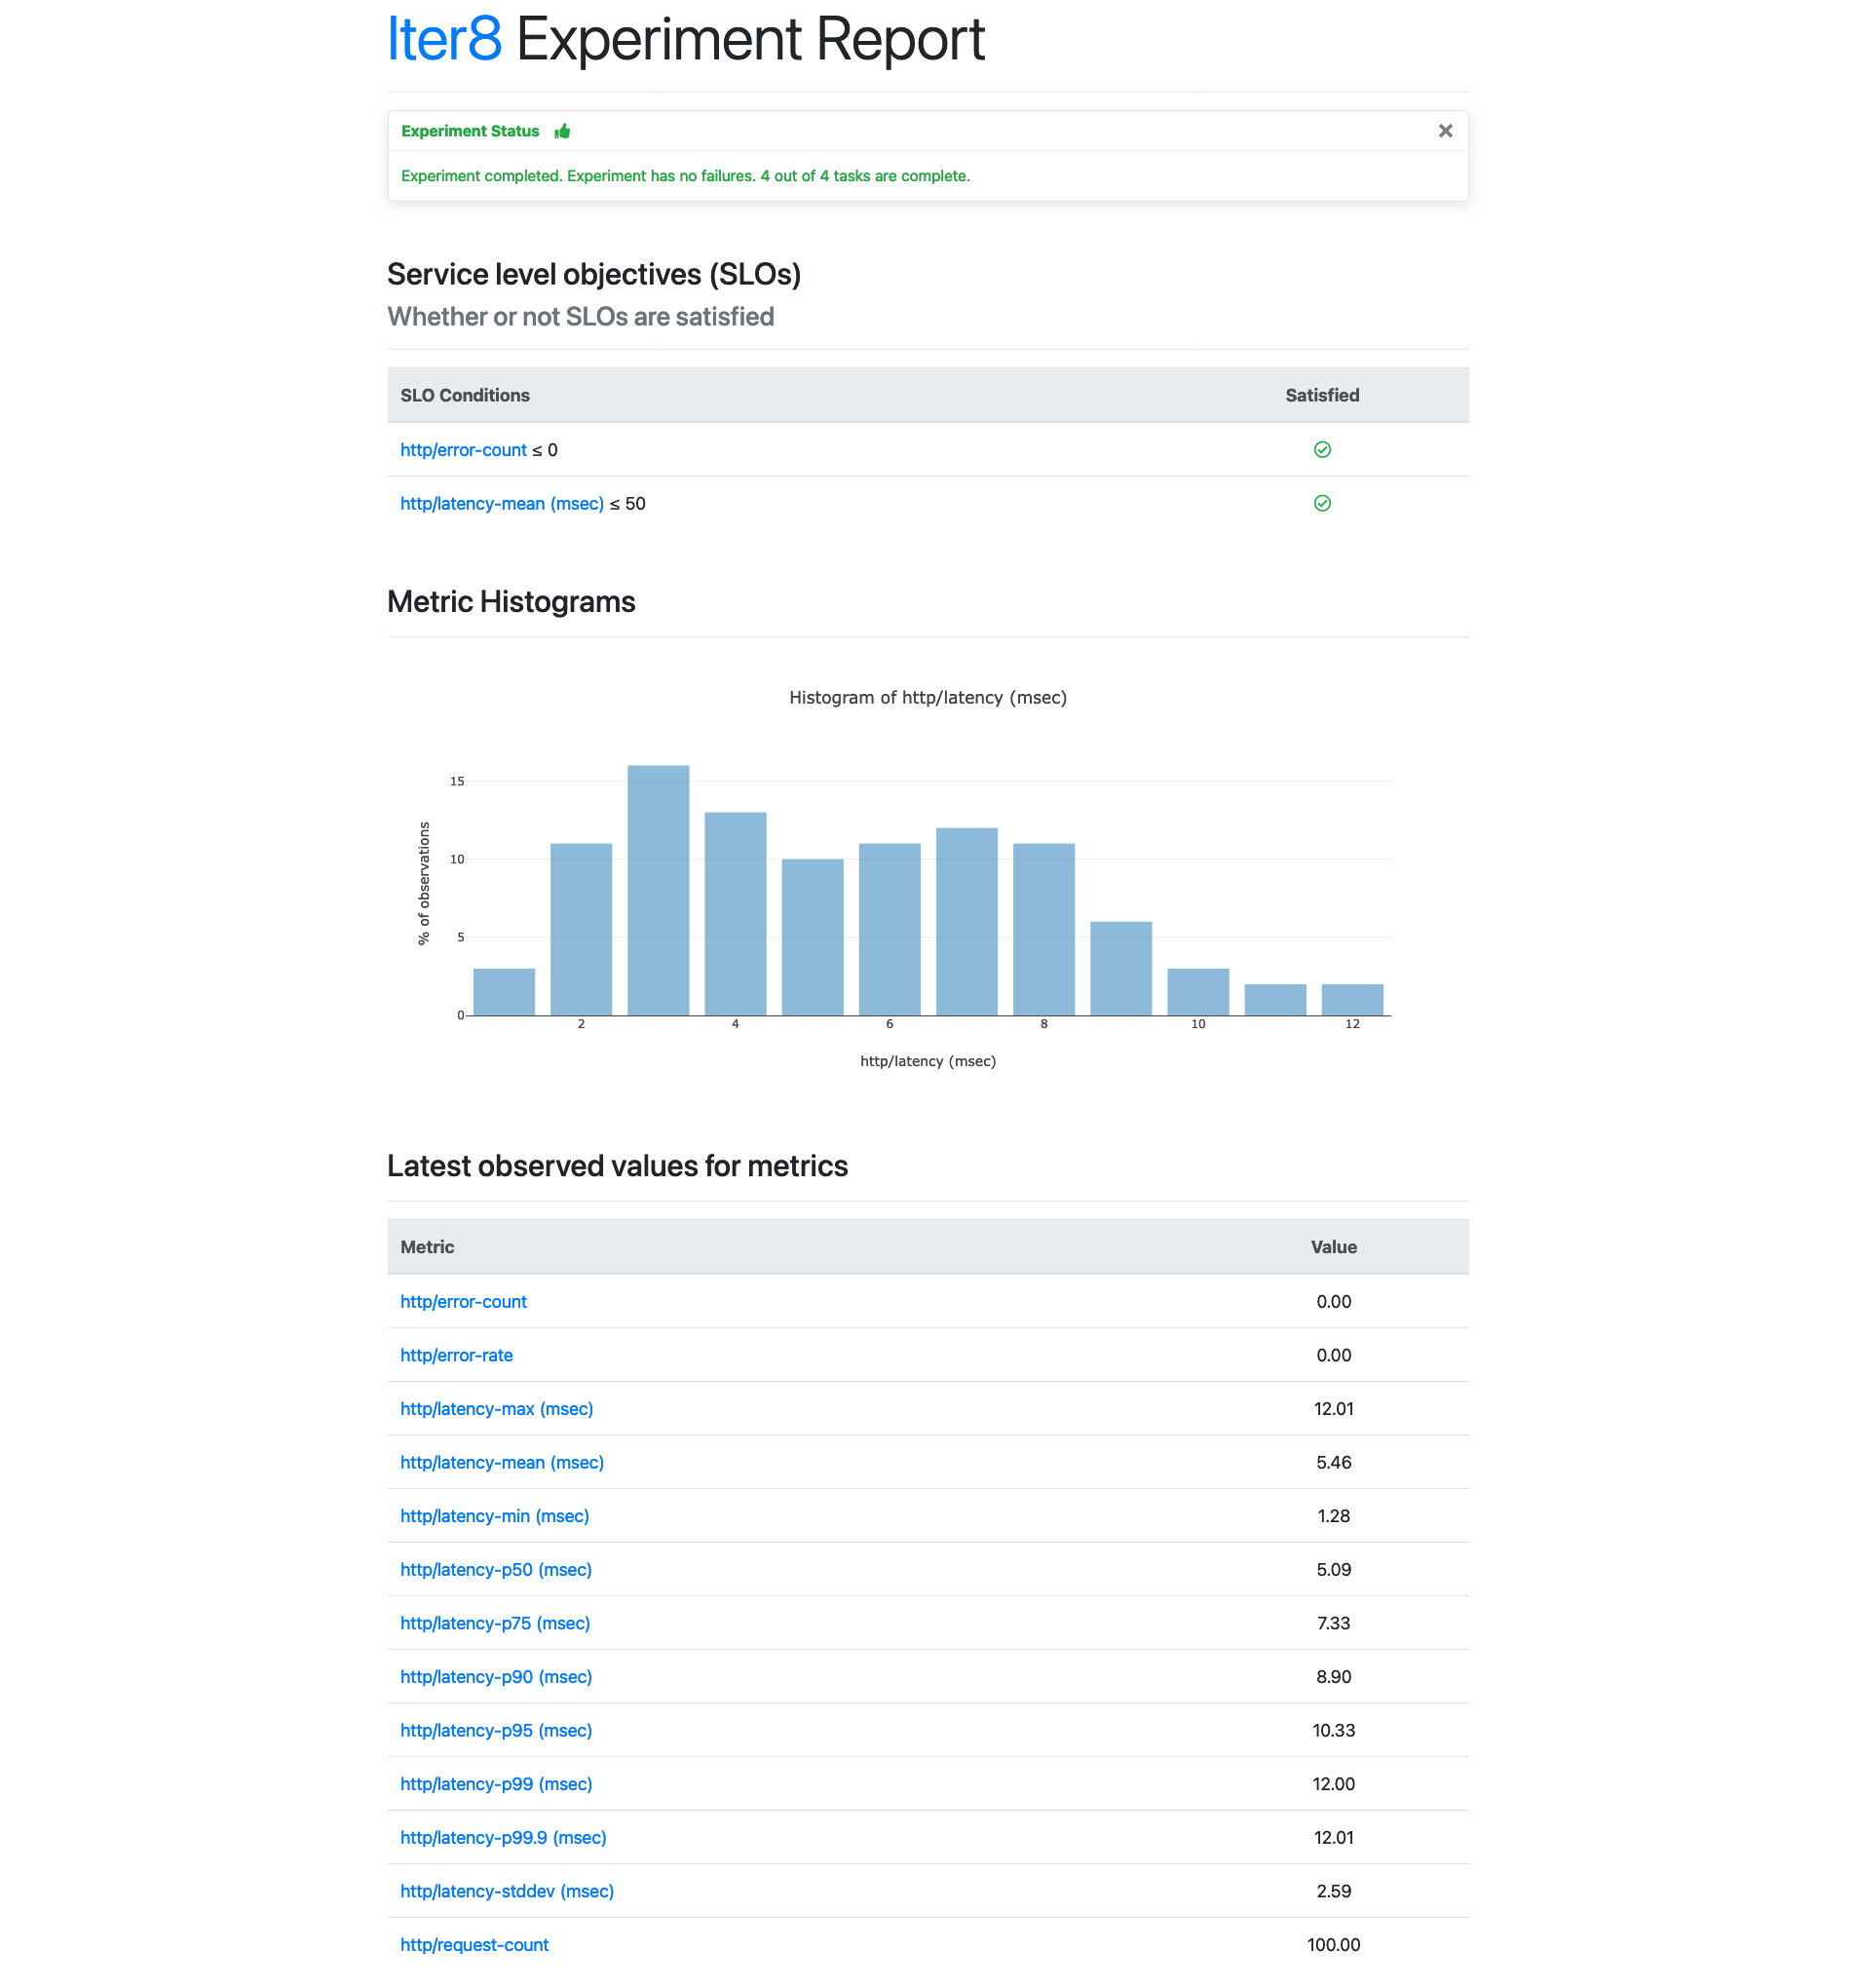
iter8 k assert -c completed -c nofailure -c slos -g autox-httpbin-iter8We can see in the sample output that the test has completed, there were no failures, and all SLOs and conditions were satisfied.
INFO[2023-01-11 14:43:45] inited Helm config
INFO[2023-01-11 14:43:45] experiment completed
INFO[2023-01-11 14:43:45] experiment has no failure
INFO[2023-01-11 14:43:45] SLOs are satisfied
INFO[2023-01-11 14:43:45] all conditions were satisfied
The following command allows you to see the results as a text report:
iter8 k report -g autox-httpbin-iter8You can also produce an HTML report that you can view in the browser:
iter8 k report -g autox-httpbin-iter8 -o html > report.htmlThe HTML report will look similar to the following:
Continuous and Automated Experimentation
Now that AutoX is watching the httpbin deployment, the new version will relaunch the HTTP SLO validation test. The version update must be accompanied by a change to the deployment’s app.kubernetes.io/version label (version label); otherwise, AutoX will not do anything.
For simplicity, we will change the version label to the deployment to relaunch the HTTP SLO validation test. In the real world, a new version would typically involve a change to the deployment spec (e.g., the container image) and this change should be accompanied by a change to the version label:
kubectl label deployment httpbin app.kubernetes.io/version=2.0.0 --overwriteObserve the New Experiment
Check if a new experiment has been launched. Refer to the previous “Observe Experiment”section for the necessary commands.
If we were to continue to update the deployment (and change its version label), then AutoX would relaunch the experiment for each such change.
Takeaways
AutoX is a powerful new feature of Iter8 that lets you automatically launch performance experiments on your Kubernetes applications as soon as you release a new version. Configuring AutoX is straightforward, and requires specifying a trigger Kubernetes resource object and the experiments you want to associated with this trigger object. After trying out the tutorial, consider trying it out on your own Kubernetes apps.
Recommend
About Joyk
Aggregate valuable and interesting links.
Joyk means Joy of geeK