

How to use React or Vue with Vite and Docker
source link: https://dev.to/ysmnikhil/how-to-build-with-react-or-vue-with-vite-and-docker-1a3l
Go to the source link to view the article. You can view the picture content, updated content and better typesetting reading experience. If the link is broken, please click the button below to view the snapshot at that time.

Introduction
Hello fellow developers!
With this guide, we will be creating a project that includes React or Vue as the front-end framework and Vite as the server, and Docker as the development environment.
Prerequisites
These should be available on the host machine
- Docker, Docker Compose (In any form CLI / Desktop client)
Basic knowledge of
- React
- Docker
- Makefile (not mandatory, just to make life easier)
These definitions will be in the references of the article and give you a very small idea of these terms. For more information, use the links provided with the definitions.
What is Vite?
Vite is a revolutionary frontend development tool that provides a more rapid development environment for developers as compared to existing solutions.
Vite uses source code over native ESM. And by using ES build and ESM under the hood, Vite enhances startup speed 10-100x.
This supports almost every frontend framework, react, vue, and so on.
I suggest you go ahead and look at their website and specifically this one
What is Docker?
Docker is an environment provider for your application regardless of the technology and it separates that from the host (based on your choice).
Although it does so many things and makes the life of dev to ops very easy. I will leave those things to you.
What is Makefile?
Make is a Linux utility that allows us to bind multiple shell commands to a single command. The Makefile is used for it.
We can use package.json > scripts for the same as well but I prefer to use it as it works with non-node projects as well.
Let's Start.
Step 1: Create the project
First, we will use this command to create a Vite project
npm create vite@latest
In this step, it will ask you these questions
- App Name
- Js Framework - React / Vue ..
- Framework Variant - Javascript / TypeScript


Choose accordingly. I have selected React for now.
Note: I am using node version v17.8.0
Step 2: Update Vite Config
We need to specify the host and port in vite.config.js in order to work with the Docker.
export default defineConfig({
 plugins: [react()],
 server: {
   host: true,
   port: 8000, // This is the port which we will use in docker
 }
})
Step 3: Setup Docker
I am intending to use docker-composer for it as it's easier to scale as compared to relying on Dockerfile.
First, we will add docker-compose.yml within the root of the project.
version: "3.4"
services:
 vite_docker:
   image: node:alpine
   container_name: vite_docker
   entrypoint: /bin/sh
   ports:
     - 8000:8000
   working_dir: /srv/app
   volumes:
     - type: bind
       source: ./
       target: /srv/app
   tty: true
This is pretty straightforward from the labels. I am adding the meaning again.
image: node:alpine
Docker will choose the node:alpine image to build this env. You can choose node:lts, node:latest but I prefer alpine as it's small in size and suitable for production as well.
container_name: vite_docker
The container name will be vite_docker which we will use to execute future commands and refer to this application.
entrypoint: /bin/sh
The entry point refers to the application that will execute at the time of entry within the container. It could be /bin/bash etc but as I am using an Alpine image, you have to add those dependecies.
ports
The ports on which the application will run, in our case 8000, and with this mapping, we will be able to access the host machine using the same port.
working_dir
The working_dir is the directory for the project within the container. When you log into the container, you will land in this directory.
volumes
The key configuration here is the volumes. This will allow us to use the host file within the container and we will be able to work on it by building or restarting the container.
Here I am using type: bind which allows us to do this and update the files within the container as we update/ add anything in the host and vice versa.
Also with this, you need to build and run it every time as you will modify the host.
   volumes:
     ./: /srv/app
It is useful in other situations, but avoids syncing between hosts and containers.
tty
The tty is used to run the container continuously.
Step 4: Build the Docker Container
So far, we have added scripts to build our environment and have these files in our project.
Run this command to build the image on your local machine and start the container. You only need to run this command the first time, and whenever you make changes to docker-compose.yml.
docker-compose up --build --no-recreate -d
From the second time, we can use
docker-compose up -d
Now our container is up and you should be able to test it using the following command.
docker-compose ps
This is what it should look like
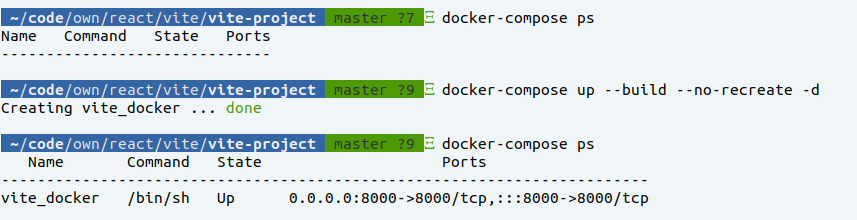
Step 5: Build and start the Application
Just to clarify, we have a running container, but not the installed or running react app. For that, we need to log into the container and then execute the commands.
docker exec -it vite_docker sh
We have entered the container and now need to run the commands to install the Node packages and start the app.
npm i && npm run dev
It will install the packages and the application will run on the defined ports.

I already had the packages so it is not showing the logs related to the packages.
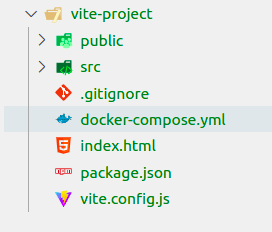
These will be the files in the project. Please ignore Makefile (it's a bonus for later :) )

and the running app

Step 6: Modification in the project files
So far, everything has been running smoothly. Using the browser, we can access the project from the host after creating the Docker container and installing the app packages.
But that's not everything, right?
What about changing the heading Vite + React or adding new components and different layouts? Also, we don't want to rebuild the container every time we make any changes and we are doing it to make our life easier, not difficult :)
Let's do it.

With this, we can see the changes from the host are getting reflected in the container (due to volumes > bind) and we can see those changes in the browser without any build or restarting of the container and Vite is doing its job perfectly.
Bonus
Throughout all the steps, we worked through various commands. If you are familiar with Docker, then that is great. Otherwise, it may seem overwhelming at first.
Therefore, I always prefer using something that allows me to combine these commands into one, with a more meaningful name or whatever I prefer.
Makefile
Here comes the Makefile, so with this you will need an extra utility on your OS but it will be very helpful. Make utility is used to combine various shell commands into one. Using what we did in steps 4 and 5, we can combine everything into a single command.
To install and run the dev server, we can have this
make first
// make is the utility
// first is command from the Makefile
And next time, we can always use
make start
There are various other commands related to restart, clear, stop which we can use to simply execute multiple commands at once.
and the commands are in the Makefile
CURRENT_DIR=$(patsubst %/,%,$(dir $(realpath $(firstword $(MAKEFILE_LIST)))))
ROOT_DIR=$(CURRENT_DIR)
CURRENT_USER=
DOCKER_NAME=vite_docker
DOCKER_COMPOSE?=docker-compose
DOCKER_EXEC_TOOLS_APP=$(CURRENT_USER) docker exec -it $(DOCKER_NAME) sh
NODE_INSTALL="npm i"
SERVER_RUN="npm run dev"


.PHONY: build install dev up start first stop restart clear


build:
 $(DOCKER_COMPOSE) up --build --no-recreate -d


install:
 $(DOCKER_EXEC_TOOLS_APP) -c $(NODE_INSTALL)


dev:
 $(DOCKER_EXEC_TOOLS_APP) -c $(SERVER_RUN)


up:
 $(DOCKER_COMPOSE) up -d


start: up dev
// this will up the docker env and run the npm run dev it to


first: build install dev
// this will build the env, up it and run the npm install and then run npm run dev it to


stop: $(ROOT_DIR)/docker-compose.yml
 $(DOCKER_COMPOSE) kill || true
 $(DOCKER_COMPOSE) rm --force || true


restart: stop start dev


clear: stop $(ROOT_DIR)/docker-compose.yml
 $(DOCKER_COMPOSE) down -v --remove-orphans || true
Note: You can always use package.json > scripts as a complete/ partial replacement for Make.
Final notes
I appreciate you taking the time to read the article! Feel free to comment if you have any questions.
I'd be pleased to connect with you on LinkedIn
Recommend
About Joyk
Aggregate valuable and interesting links.
Joyk means Joy of geeK