

How To Take A Screenshot Using Python and Selenium
source link: https://dzone.com/articles/how-to-take-a-screenshot-using-python-and-selenium
Go to the source link to view the article. You can view the picture content, updated content and better typesetting reading experience. If the link is broken, please click the button below to view the snapshot at that time.

How To Take A Screenshot Using Python and Selenium
This tutorial will guide you on using Selenium and Python to capture Python Selenium screenshots and check how your website is rendered over different browsers.
The goto software framework for any web developer looking for an open-source, free test automation tool is Selenium. It is used with various programming languages, including Java, Python, PHP, Perl, and C#. Selenium can also be used as a web-scraping tool or to create a human-replica bot to automate social media or test PDF files.
In this Python Selenium screenshot tutorial, we are going to explore different ways of taking screenshots using Selenium’s Python bindings. Before we hop into capturing Python Selenium screenshots, let’s acquaint ourselves with Selenium Python bindings.
What Is Selenium Python Bindings?
Selenium has different components. We have Selenium WebDriver, Selenium IDE, and Selenium Grid. Selenium Python bindings is an API interface to use Python with Selenium WebDriver for writing functional/acceptance tests. We shall be using these Python bindings for Selenium to capture full-page screenshots and HTML element-specific screenshots and save them in our desired location.
Installing Dependencies
Before we learn how to use Selenium Python for taking screenshots, we need to install some dependencies. Below is a list of all that you need on your machine:
- Python
- Selenium Python bindings
- GeckoDriver
- ChromeDriver
To learn how to use Selenium Python, you must have Python and pip installed on your system or server. Python comes pre-installed with Linux and Mac systems. For Windows, you may download the Python installer from Python’s official website:
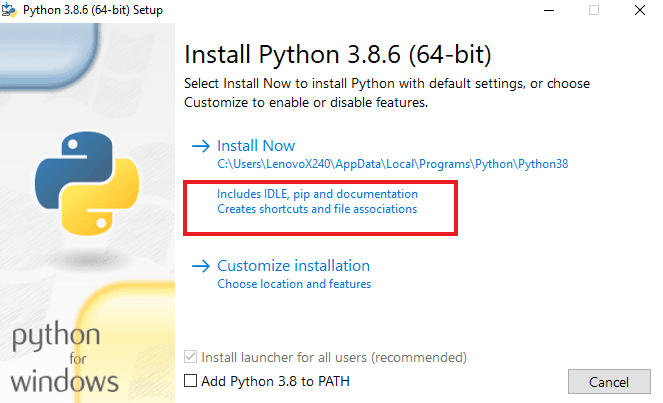
Note: Python 2 is redundant now. So, if your Linux or Mac system has the older version, you may consider updating them to the latest, most stable versions.
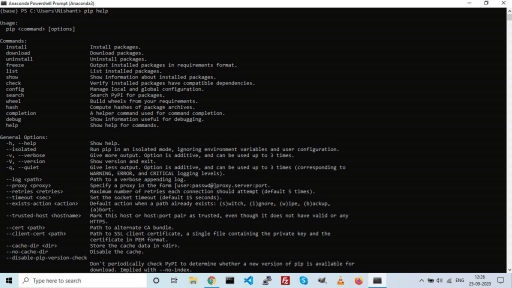
You would also need pip installed on your system. pip is a tool or a package manager tool for Python and comes pre-installed with the latest versions (as you can see in the image above). You can see if it exists on your system by running the following command in the command prompt:
pip help
If you get a response like the one below from pip, you are good to go:
If it displays something like this:
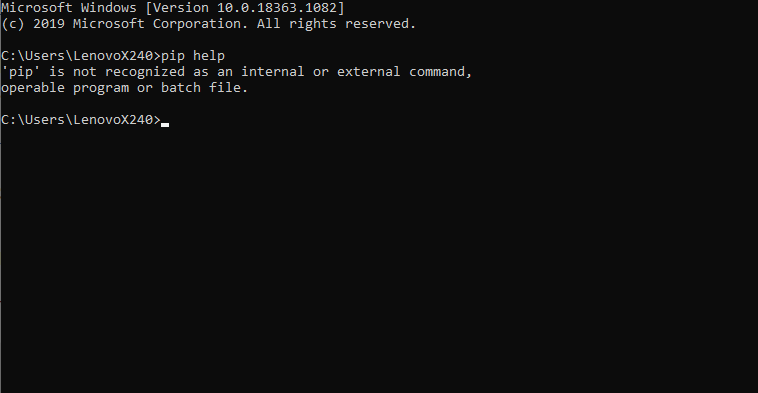
Then you have to download this get-pip.py file to any location in your system, but you should have the path to the file. Remember, you only have to do this if pip is not installed in your system.
Next, run this command to install pip:
python get-pip.py
If you aren’t in the directory as that of the downloaded file, replace the file name in the command given above with the full path to the file location.
Now, try the pip command again, you should see the screen we shared earlier.
Next, we will install Selenium Python bindings using pip. Then, you will have to run the following command:
pip install selenium
This installs Selenium’s Python bindings in your system. Alternatively, if you don’t like this installation mechanism, you can download the Selenium-Python source distribution from Pypi and unarchive it. Once you do this, run the following command to install the bindings:
python setup.py install
Again, remember you only need this if you don’t want to install using pip. Also, if you are not in the same folder where you have archived the downloaded Selenium Python bindings then replace setup.py with full path to setup.py.
Next, we need a driver to proceed with clicking Python Selenium screenshotsof webpages.
You can choose any browser of your choice and download the drivers from the following links:
- Chrome: “ChromeDriver—WebDriver for Chrome”
- Firefox
- Edge: “Microsoft Edge WebDriver”
- Internet Explorer: “Selenium Release Storage Google APIs”
Now, let’s make a trial file named check_setup.py. Write the following code in it:
from selenium import webdriver browser = webdriver.Firefox() browser.get(“https://www.lambdatest.com”) This should fire-up a Firefox instance and automatically load the LambdaTest homepage. If this works for you, we’re all set to capture Python Selenium screenshots of websites.
Capturing Screenshots Using Python and Selenium
I hope that now you have all the dependencies installed and know how to use Selenium Python. It is time to get to the good part.
In this section, we will see how to take a Python Selenium screenshot for any web page. We will see instances for both GeckoDriver and ChromeDriver. First, let’s see how to use Selenium Python with GeckoDriver or Selenium FirefoxDriver.
Using get_screenshot_as_file() With GeckoDriver for Python Selenium Screenshots
from selenium import webdriver
    from time import sleep
    browser = webdriver.Firefox()
    browser.get(“https://www.lambdatest.com/”)
    sleep(1)
    browser.get_screenshot_as_file(“LambdaTestVisibleScreen.png”)
    browser.quit()
If you would like to store these images in a specific location other than the project directory, please specify full path as the argument to get_screenshot_as_file.
Code Walkthrough
Let’s understand what we are doing here:
from selenium import webdriver: This line imports the WebDriver which we use to fire-up a browser instance and use APIs to interact with web elements.from time import sleep: This line imports the sleep function from Python’s ‘time’ module. This accepts integer arguments, which equals the number of seconds. The script waits for the specified number of seconds before executing the next line of code.browser = webdriver.Firefox(): This line is equivalent to saying, use the keyword ‘browser’ as you would usewebdriver.Firefox().
browser.get(“https://www.lambdatest.com”)This fires-up a Firefox instance controlled by a Selenium driver and fetches the URL specified as an argument to get(argument) function.
sleep(1): This halts the script from running for one second. This step is often required when there are animations on the page or when you explicitly want to wait for a while so that some actions can be performed or pages can load fully.
Note: Selenium WebDriver, by default, waits for the page to load completely before executing the next line of script or operation. But in some advanced JavaScript rendered websites, we may need to use ‘sleep’ for manually pausing the script for a while so that animations and the page itself is fully loaded.
browser.get_screenshot_as_file(“LambdaTestVisibleScreen.png”) The code above finally clicks the visible section of the webpage in the launched Firefox instance and saves the screenshot with the specified name and extension.
browser.quit(): The browser needs to be closed and this line does the same.
Using save_screenshot() With GeckoDriver for Python Selenium Screenshots
This is the easiest way to save the full page screenshot. Just replace the get_screenshot_as_file command with save_screenshot, as displayed below:
browser.get_screenshot_as_file(“LambdaTestVisibleScreen.png”) Will become the code as follows:
driver.save_screenshot(‘your_desired_filename.png’) Next, we will see how to use Selenium Python to capture screenshots with the help of Selenium ChromeDriver.
Using screenshot() With ChromeDriver for Python Selenium Screenshots
The save_screenshot function works with ChromeDriver, but to propose an alternative solution, we will also show you how to use the screenshot function to take a full-page screenshot. Here is the script:
from selenium import webdriver
    from time import sleep
    from selenium.webdriver import ChromeOptions
    options = ChromeOptions()
    options.headless = True
    browser = webdriver.Chrome(chrome_options=options)
    URI = “https://www.lambdatest.com”
    browser.get(URI)
    sleep(1)
    S = lambda X: browser.execute_script(‘return document.body.parentNode.scroll’+X) browser.set_window_size(S(‘width’), S(‘height’))
    browser.find_element_by_tag_name(‘body’).screenshot(‘LambdaTestFullPage.png’) browser.quit()
Code Walkthrough
Let’s understand what we are doing here. First of all, in this example, we are using ChromeDriver. Earlier we used a GeckoDriver for using Firefox as a browser. More or less, the other functionalities are the same.
from selenium.webdriver import ChromeOptionsWe import ChromeOptions to set the browser as headless so that it runs in the background. We could have directly used webdriver.ChromeOptions, but to make it more understandable, we split it into a separate line of code:
options = ChromeOptions()
    options.headless = True
    browser = webdriver.Chrome(chrome_options=options)
    URI = “https://www.lambdatest.com”
    browser.get(URI)
Here, we use the newly set ChromeOptions and pass it as parameter to the webdriver’s Chrome function. Observe, previously we used Firefox(). Browser.get, which launches the instance and fetches the URL.
S = lambda X: browser.execute_script(‘return document.body.parentNode.scroll’+X) browser.set_window_size(S(‘width’), S(‘height’)) The first line is a lambda function to find the value of “X.” We get the value by executing DOM JavaScript functions. The second line is to resize the window:
browser.find_element_by_tag_name(‘body’).screenshot(‘lambdaTestFullPage.png’) browser.quit() Finally, we track down the body element of the webpage by using the driver function find_element_by_tag_name and pass “body” as a parameter. You could also use find_element_by_id, find_element_by_xpath to locate the element.
We used a ‘.’ operator nested screenshot() function in the same line to capture the full page screenshot. Lastly, we terminate the Chrome instance using browser.quit().
Capturing Python Selenium Screenshots of a Particular Element
We now demonstrate how we can use the save_screenshot() function to capture any element on the page, say a button, image, or form. We shall use Python’s PIL library, which lets us perform image operations.
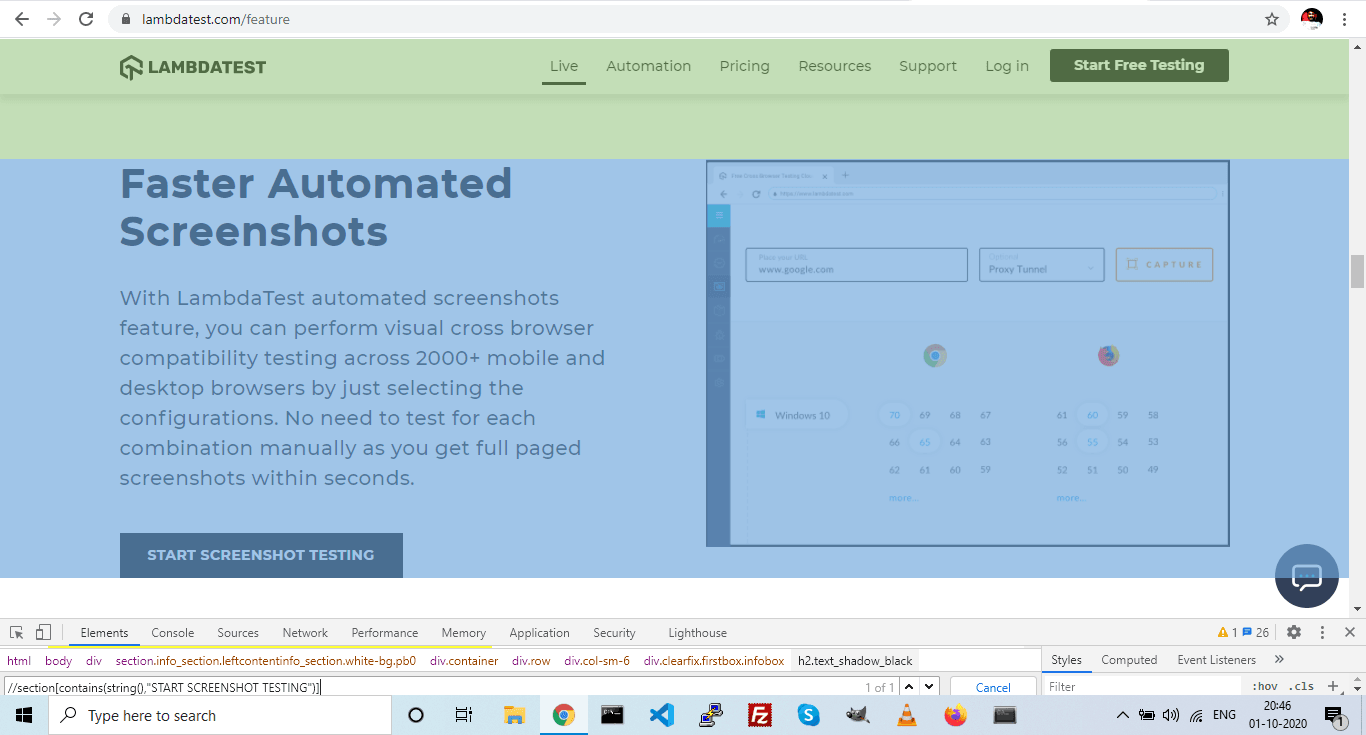
We shall capture a feature “section” element on the LambdaTest website with following: XPath – //section[contains(string(),’START SCREENSHOT TESTING’)].
The final script would be:
from selenium import webdriver
    from time import sleep
    from PIL import Image
    browser = webdriver.Chrome()
    browser.get(“https://www.lambdatest.com/feature”)
    sleep(1)
    featureElement = browser.find_element_by_xpath(“//section[contains(string(),’START SCREENSHOT TESTING’)]”)
    location = featureElement .location
    size = featureElement .size
    browser.save_screenshot(“fullPageScreenshot.png”)
    x = location[‘x’]
    y = location[‘y’]
    w = x + size[‘width’]
    h = y + size[‘height’]
    fullImg = Image.open(“fullPageScreenshot.png”)
    cropImg = fullImg.crop(x, y, w, h)
    cropImg.save(‘cropImage.png’)
    browser.quit()
This script, when executed, would save the cropped info-element from LambdaTest website as cropImage.png.
Code Walkthrough
from PIL import Image
This line imports the image module from the PIL library of Python.
featureElement = browser.find_element_by_xpath(“//section[contains(string(),’START SCREENSHOT TESTING’)]”)This line locates one of the features on LambdaTest website using XPath (as you can see below.)
location = featureElement .location
    size = featureElement .size
The first line fetches the vertical and horizontal start location of the feature-element. The second line gets the width and height of the element.
We store these in ‘x,’ ’y,’ ’w,’ and ‘h’ variables respectively.
fullImg = Image.open(“fullPageScreenshot.png”)
    cropImg = fullImg.crop(x, y, w, h)
    cropImg.save(‘cropImage.png’)
We first open the image and store bytes in a “fullImg” variable. Next, we crop it using the x, y, w, and h parameters we calculated. Lastly, we save the cropped image.
This should be the output that you will see after the successful execution of the code:
What Role Do Screenshots Play in Test Automation?
Automated screenshots could help in easy identification of the bugs and is faster than doing it all manually. Most importantly, it can be as scalable as the application you are testing without requiring extra testers. A direct implication of the above is—automated screenshots are a cost-effective and a time-efficient process.
Other Options To Take Python Selenium Screenshots
If you would rather use other ways to capture Python Selenium screenshots, you can also use the “Selenium-Screenshot 2.0.0” library to take screenshots. For installing it, execute the following command:
pip install Selenium-Screenshot
Example to Capture Full-Page Screenshot
from Screenshot import Screenshot_Clipping
    from selenium import webdriver
    ob=Screenshot_Clipping.Screenshot()
    driver = webdriver.Chrome()
    url = "https://www.google.com"
    driver.get(url)
    img_url=ob.full_Screenshot(driver, save_path=r'.', image_name='google.png')
    driver.quit()
Why Selenium and Python Are Well-Suited for Capturing Screenshots
Selenium and Python are the goto choices when it comes to Selenium test automation. And this is not just limited to capturing screenshots, there’s a lot more you can do using this awesome combination. Let’s find out why:
- The learning curve is very small for Selenium Python bindings as the language itself is very easy and intuitive to start with.
- We can use it with multiple browsers, including the popular ones.
- The number of lines of code you need to write in Python is far less than compared to other languages.
- Strong community support.
- Faster and efficient execution.
Conclusion
In this tutorial, we learned about using Selenium and Python to capture screenshots of web pages. This is essentially the best way to catch bugs efficiently and save your team a lot of time. The best way to perform cross browser testing is to compare how the web pages are rendered over multiple browsers or devices.
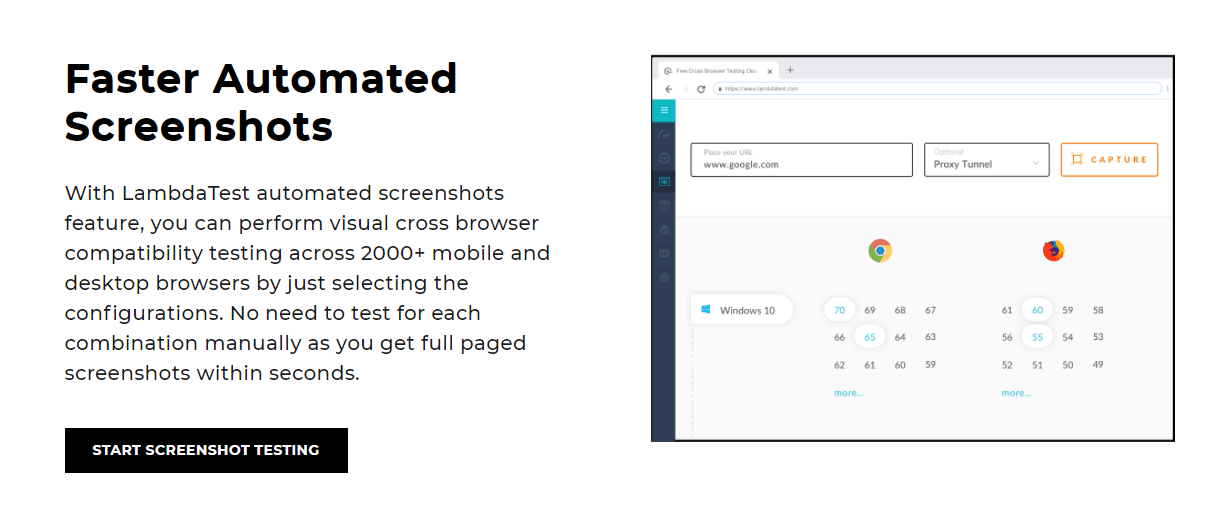
You can use a cloud-based platform like LambdaTest to capture your website’s screenshots or a particular web page without going through the trouble of writing the code. You can do this on a selection of 3000+ browsers and operating systems over a Selenium Grid cloud. We hope these tools will come in handy when you are not in the mood to write all that code but just want to hunt some bugs.
If you have any issues or questions don’t hesitate to reach out via the comment section.
Happy testing!
Recommend
About Joyk
Aggregate valuable and interesting links.
Joyk means Joy of geeK