

分布式文件系统之FastDFS - 与牛竞技
source link: https://www.cnblogs.com/gagaxiang/p/17028506.html
Go to the source link to view the article. You can view the picture content, updated content and better typesetting reading experience. If the link is broken, please click the button below to view the snapshot at that time.

分布式文件系统之FastDFS
目录结构:
一 分布式文件系统
分布式文件系统 (Distributed File System) 是一个软件/软件服务器,这个软件可以用来管理文件。但这个软件所管理的文件通常不是在一个服务器节点上,而是在多个服务器节点上,这些服务器节点通过网络相连构成一个庞大的文件存储服务器集群,这些服务器都用于存储文件资源,通过分布式文件系统来管理这些服务器上的文件。
常见的分布式文件系统有:FastDFS、GFS、HDFS、Lustre 、Ceph 、GridFS 、mogileFS、TFS等。
分布式文件系统与传统文件系统对比
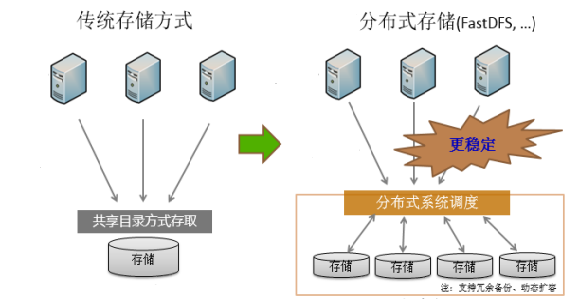
传统方式弊端:
- 如果用户数量多,IO操作比较多,对磁盘访问压力很大
- 如果磁盘发生故障,会造成数据丢失
- 存储容量有限
二 FastDFS入门
1 FastDFS简介
FastDFS是一个开源的轻量级分布式文件系统,为互联网应用量身定做,简单、灵活、高效,采用C语言开发,由阿里巴巴开发并开源。
FastDFS对文件进行管理,功能包括:文件存储、文件同步、文件访问(文件上传、文件下载、文件删除)等,解决了大容量文件存储的问题,特别适合以文件为载体的在线服务,如相册网站、文档网站、图片网站、视频网站等等。
FastDFS充分考虑了冗余备份、线性扩容等机制,并注重高可用、高性能等指标,使用FastDFS很容易搭建一套高性能的文件服务器集群提供文件上传、下载等服务。
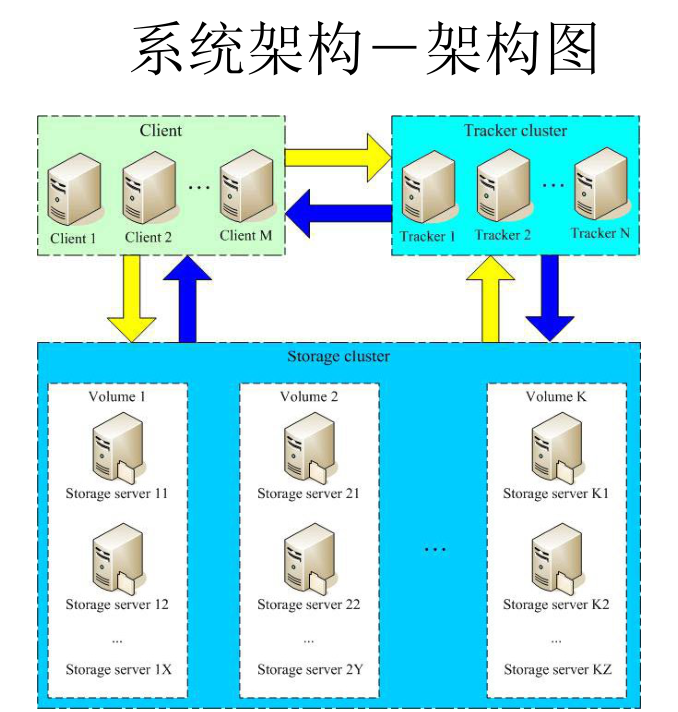
2 FastDFS整体架构
FastDFS文件系统由两大部分构成,一个是客户端,一个是服务端
客户端通常指我们的程序,比如我们的Java程序去连接FastDFS、操作FastDFS,那我们的Java程序就是一个客户端,FastDFS提供专有API访问,目前提供了C、Java和PHP几种编程语言的API,用来访问FastDFS文件系统。
服务端由两个部分构成:一个是跟踪器(tracker),一个是存储节点(storage)
tracker跟踪器主要做调度工作,起到均衡的作用;负责管理所有的 storage server和 group,每个 storage 在启动后会连接 tracker,告知自己所属 group 等信息,并保持周期性心跳。tracker记录group以及每个group的存储信息。在内存中记录集群中存储节点storage的状态信息,是前端Client和后端存储节点storage的枢纽。因为相关信息全部在内存中,Tracker server的性能非常高,一个较大的集群(比如上百个group)中有3台就足够了。
storage存储节点主要提供存储文件和备份服务;以 group 为单位,每个 group 内可以有多台 storage server,数据互为备份。存储文件和文件属性(meta data)都保存到存储服务器磁盘上,完成文件管理的所有功能:文件存储、文件同步和提供文件访问等。group内每个storage的存储依赖于本地文件系统,storage可配置多个数据存储目录,比如有10块磁盘,分别对应在/data/disk1-/data/disk10,则可将这10个目录都配置为storage的数据存储目录
2.1 文件上传:
- client询问tracker上传文件的storage,不需要附加参数
- tracker返回一台可用的storage
- client直接和storage通信完成文件上传
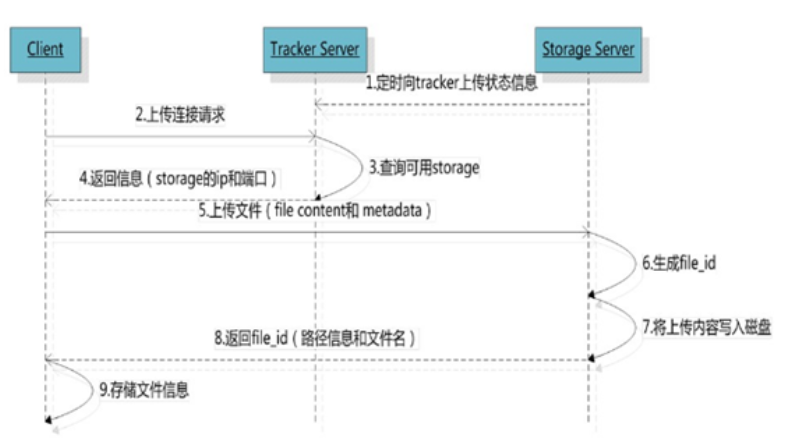
fileid:文件组名和路径

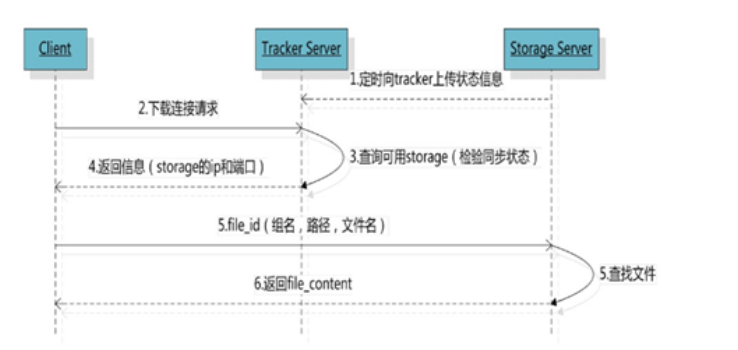
2.2 文件下载
客户端uploadfile成功后,会拿到一个storage生成的文件名,接下来客户端根据这个文件名即可访问到该文件。
- client询问tracker下载文件的storage,参数为文件标识(组名和文件名)
- tacker返回一台可用的storage
- client直接和storage通信完成下载
三 FastDFS环境搭建
1 FastDFS安装(单机版)
1.1 工具准备
(1)检查Linux上是否安装了 gcc、libevent、libevent-devel
libevent:是一个用C语言编写的、轻量级的开源高性能IO库,主要有以下几个亮点:事件驱动( event-driven),高性能;轻量级,专注于网络,线程安全。Libevent 已经被广泛的应用,作为底层的网络库;比如 memcached、 Vomit、 Nylon、 Netchat等等。 FastDFS v3.0 版本以后,使用到了libevent库来处理网络连接请求
libevent-devel:libevent 的头文件、库和开发文档 此软件包包含头文件、静态库和开发文档等
yum list installed | grep gcc
yum list installed | grep libevent
yum list installed | grep libevent-devel
(2)如果没有安装,需要进行安装
yum install gcc libevent libevent-devel -y
(3)虚拟机上安装的Linux是否是迷你版的,如果是,需要安装以下工具,否则不需要
yum install lrzsz wget vim unzip net-tools -y
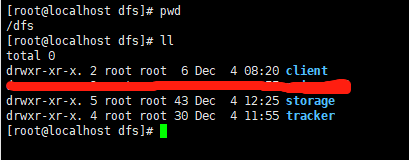
1.2 目录准备
在/目录下创建dfs目录,再创建子目录
/tracker:跟踪器的数据和日志目录
/storage:存储器的数据和日志目录
/storage/files:上传的文件目录
/client:客户端数据和日志目录
1.3 安装 libfastcommon 库
libfastcommon 库是FastDFS文件系统运行需要的公共 C 语言函数库
下载地址:https://github.com/happyfish100
(1)上传文件:将下载的压缩文件 libfastcommon-1.0.59.tar.gz 上传到/opt目录下
(2)解压文件:
[root@localhost opt]# tar -zxvf libfastcommon-1.0.59.tar.gz
(3)编译文件
[root@localhost libfastcommon-1.0.59]# ./make.sh
注意: make编译的时候如果报错,需解决错误后再次进行make,通常发生错误是由于Linux缺少某些依赖库导致,根据错误提示解决错误
(4)安装软件
[root@localhost libfastcommon-1.0.59]# ./make.sh install
1.4 安装FastDFS
FastDFS没有Windows版本,不能在Windows下使用。
下载地址:https://github.com/happyfish100
(1)上传文件:将下载的压缩文件 fastdfs-6.08.tar.gz 上传到/opt目录下
(2)解压文件
[root@localhost opt]# tar -zxvf fastdfs-6.08.tar.gz
(3)编译文件
[root@localhost fastdfs-6.08]# ./make.sh
(4)安装软件
[root@localhost fastdfs-6.08]# ./make.sh install
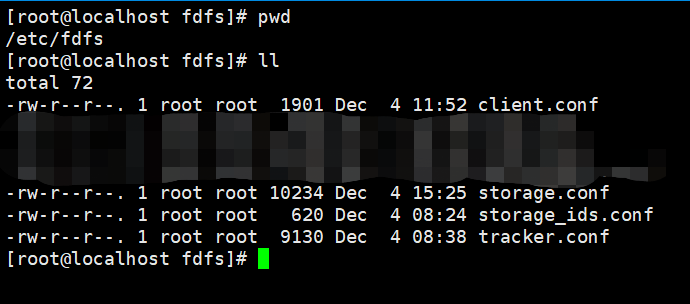
(5)查看配置文件目录
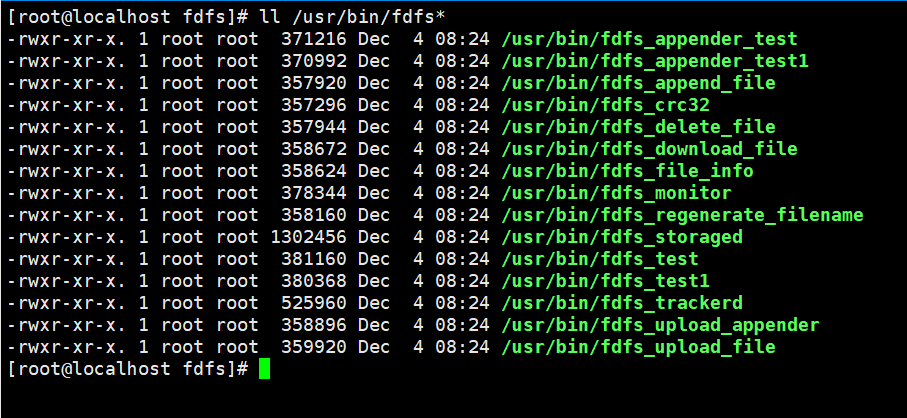
(6)查看安装的可执行文件
1.5 配置FastDFS
(1)修改配置文件tracker.conf
# the base path to store data and log files
base_path = /dfs/tracker
(2)修改配置文件storage.conf
# the base path to store data and log files
base_path = /dfs/tracker

store_path0 = /dfs/storage/files

tracker_server = IP地址:22122
1.6 启动tracker和storage服务
[root@localhost fdfs]# fdfs_trackerd /etc/fdfs/tracker.conf
[root@localhost fdfs]# fdfs_storaged /etc/fdfs/storage.conf
注意:首次启动storage后,会在配置的路径下创建存储文件的目录

在data目录下,创建了256个子目录,每个子目录下又有256个子目录,总共有256的平方个目录存储文件
1.7 查看storage是否已经注册到了tracker下
fdfs_monitor /etc/fdfs/storage.conf
1.8 重启tracker和storage服务
[root@localhost fdfs]# fdfs_trackerd /etc/fdfs/tracker.conf restart
[root@localhost fdfs]# fdfs_storaged /etc/fdfs/storage.conf restart
1.9 关闭tracker和storage服务
[root@localhost fdfs]# fdfs_trackerd /etc/fdfs/tracker.conf stop
[root@localhost fdfs]# fdfs_storaged /etc/fdfs/storage.conf stop
注意:可以使用kill关闭fastdfs,但不建议在线上使用 kill -9 强制关闭,因为可能会导致文件信息不同步问题
2 测试FastDFS
2.1 修改配置文件 client.conf
# the base path to store log files
base_path = /dfs/client

tracker_server = IP地址:22122
2.2 创建待上传的文件
/home路径下新建文件hello.txt
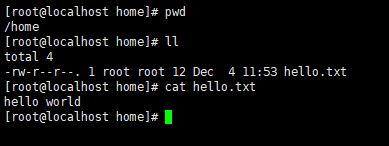
2.3 上传文件
[root@localhost home]# fdfs_test /etc/fdfs/client.conf upload /home/hello.txt
2.4 查看文件
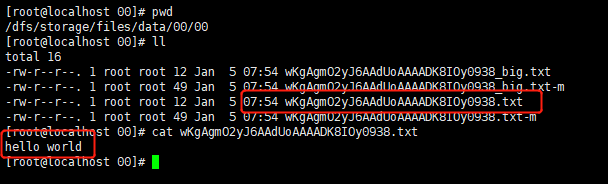
*_big.txt 代表从文件
*_big.txt-m 代表从属性信息
*.txt 代表主文件
*.txt-m 代表主属性信息meta-info
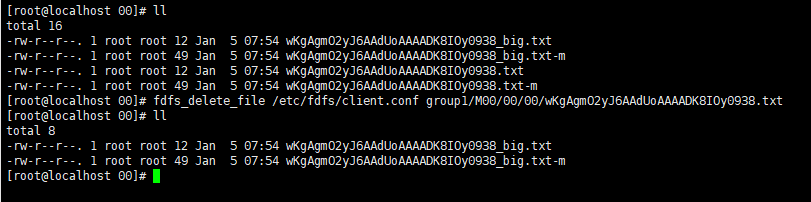
2.5 测试删除文件
fdfs_delete_file /etc/fdfs/client.conf group1/M00/00/00/wKgAgmO2yJ6AAdUoAAAADK8IOy0938.txt
其中:group1代表组名(这个在storage.cof文件中有配置),M00代表磁盘,/00/00是/dfs/storage/files/data/下的子目录
3 http访问文件
在文件上传的时候,上传成功的信息中有提示我们可以通过某个路径去访问上传的文件,但是我们直接访问这个路径,却不可以,那么已经上传到FastDFS文件系统中的文件,我们如何在浏览器中访问呢?
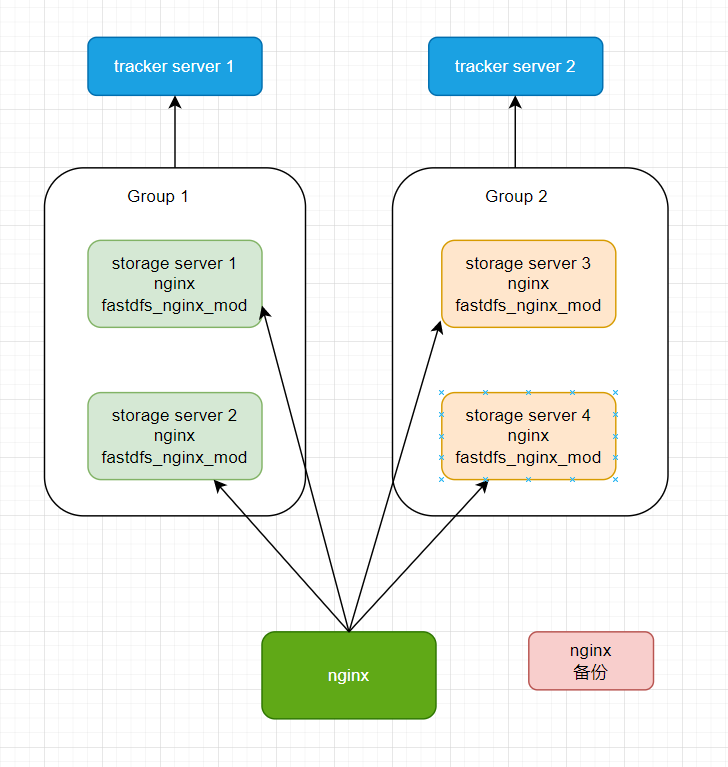
FastDFS提供了一个Nginx扩展模块,利用该模块,我们可以通过Nginx访问已经上传到FastDFS上的文件
Nginx访问示意图:

3.1 安装fastdfs-nginx-module
下载地址:https://github.com/happyfish100
(1)上传文件:将下载的压缩文件 fastdfs-nginx-module-1.22.tar.gz 上传到/opt目录下
(2)解压文件
[root@localhost opt]# tar -zxvf fastdfs-nginx-module-1.22.tar.gz
3.2 安装Nginx
Nginx是一个web服务器, 能够在浏览器,基于http协议访问文件等静态资源和反向代理
下载地址:https://nginx.org/en/download.html
(1)上传文件:将下载的压缩文件 nginx-1.22.0.tar.gz上传到/opt目录下
(2)解压文件
[root@localhost opt]# tar -zxvf nginx-1.22.0.tar.gz
(3)安装相关依赖库
Nginx的安装需要Linux安装相关的几个库,否则编译会出现错误
yum install gcc openssl openssl-devel pcre pcre-devel zlib zlib-devel –y
(4)配置Nginx安装位置和fastdfs-nginx-module的src目录
# 在/usr/local/nginx目录安装的nginx
# opt/fastdfs-nginx-module-1.22/src 是 fastdfs-nginx-module的src目录位置
[root@localhost nginx-1.22.0]# ./configure --prefix=/usr/local/nginx --add-module=/opt/fastdfs-nginx-module-1.22/src

# 拷贝 fastdfs-nginx-module 的配置文件
[root@localhost src]# pwd
/opt/fastdfs-nginx-module-1.22/src
[root@localhost src]# cp mod_fastdfs.conf /etc/fdfs/
(5)编译并安装Nginx
# 拷贝Nginx需要的配置文件
[root@localhost conf]# cp http.conf mime.types /etc/fdfs/

[root@localhost nginx-1.22.0]# pwd
/opt/nginx-1.22.0
[root@localhost nginx-1.22.0]# make
[root@localhost nginx-1.22.0]# make install
(6)配置fastdfs-nginx-module
修改配置文件mod_fastdfs.conf
[root@localhost fdfs]# pwd
/etc/fdfs
[root@localhost fdfs]# vim mod_fastdfs.conf
# the base path to store log files
base_path=/dfs/nginx_mod

# valid only when load_fdfs_parameters_from_tracker is true
tracker_server=IP地址:22122

# default value is false
url_have_group_name = true

# must same as storage.conf
store_path0=/dfs/storage/files
创建/dfs/nginx_mod目录
[root@localhost dfs]# pwd
/dfs
[root@localhost dfs]# mkdir nginx_mod
(7)配置Nginx
修改配置文件nginx.conf,添加一个server
[root@localhost conf]# pwd
/usr/local/nginx/conf
[root@localhost conf]# vim nginx.conf
server {
    listen       8888;
    server_name  nginx-fastdfs;

    location ~ /group[1-9]/ {
       ngx_fastdfs_module;
    }
}
检查配置文件是否正确
[root@localhost conf]# /usr/local/nginx/sbin/nginx -c /usr/local/nginx/conf/nginx.conf -t
3.3 测试http访问
(1)启动tracker和storage
(2)启动Nginx
[root@localhost conf]# /usr/local/nginx/sbin/nginx -c /usr/local/nginx/conf/nginx.conf
(3)上传文件
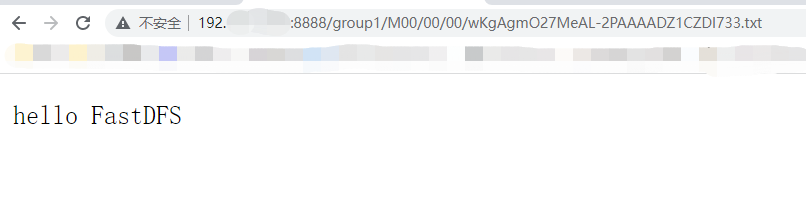
(4)浏览器访问
http://IP地址:8888/group1/M00/00/00/wKgAgmO22jKAaSM_AAAADK8IOy0566.txt
其中,这个端口8888是storage.conf配置文件中的web地址
# the port of the web server on this storage server
http.server_port = 8888
四 FastDFS在Java项目中开发示例
测试一下在实际项目开发中,FastDFS提供的三个主要功能
- upload:上传文件
- download:下载文件
- delete:删除文件
1 FastDFS文件系统的Java客户端
FastDFS文件系统Java客户端是指采用Java语言编写的一套程序,专门用来访问fastDFS文件系统,其实就是一个jar包。
注意:Maven仓库https://mvnrepository.com/搜索fastdfs-client,可以直接下载jar包使用,当然这个jar包也可以自己来打
1.1 下载fastdfs-client-java官方源码
下载地址:https://github.com/happyfish100
下载到本地文件,并解压

1.2 采用maven命令编译成jar包安装到本地maven库
mvn clean install

打包完成后,jar包在本地Maven仓库的保存路径

1.3 在Java程序中使用它提供的API来访问FastDFS文件系统
<!--引用打包好的fastdfs-client-java的依赖-->
<dependency>
    <groupId>org.csource</groupId>
    <artifactId>fastdfs-client-java</artifactId>
    <version>1.28-SNAPSHOT</version>
</dependency>
2 文件上传功能的实现
使用Java客户端,代码操作fastDFS分布式文件系统,上传本地文件到FastDFS服务器上
2.1 创建springboot项目,添加 fastdfs-client-java的依赖
2.2 配置文件拷贝
将保存fastdfs-client-java-1.28路径下的配置文件fdfs_client.conf 拷贝到项目中的resources目录下
2.3 添加本地待上传文件

2.4 编写测试代码,上传文件
 1 @Test
 2 void testUpload(){
 3     StorageClient storageClient = null;
 4     try {
 5         // 1.全局初始化
 6         ClientGlobal.init("fdfs_client.conf");
 7         // 2.创建TrackerServer、StorageServer
 8         TrackerServer trackerServer = null;
 9         StorageServer storageServer = null;
10         // 3.创建TrackerClient,用来创建TrackerServer、StorageServer对象
11         TrackerClient trackerClient = new TrackerClient();
12         // 4.赋值
13         trackerServer = trackerClient.getTrackerServer();
14         storageServer = trackerClient.getStoreStorage(trackerServer);
15         // 5.创建StorageClient,文件的上传和下载
16         storageClient = new StorageClient(trackerServer, storageServer);
17         // 6.上传文件
18         // 1.本地文件路径 2.文件扩展名 3.文件的元数据(文件大小,图片的宽高等)
19         String[] uploadFile = storageClient.upload_file("D:\\文件路径\\hello.txt", "txt", null);
20         System.out.println(Arrays.toString(uploadFile));
21     } catch (Exception e) {
22         e.printStackTrace();
23     } finally {
24         if (storageClient != null){
25             try {
26                 storageClient.close();
27             } catch (IOException e) {
28                 e.printStackTrace();
29             }
30         }
31     }
32
33 }
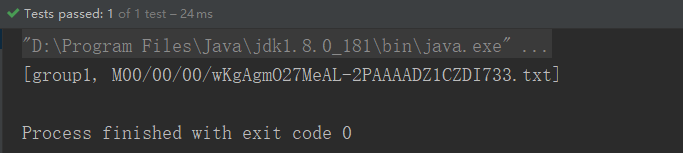
运行结果:
返回值是组名,以及磁盘、路径和文件名等
2.5 查看上传文件
Linux中保存的文件
浏览器访问文件
3 文件下载
3.1 编写测试代码
和文件上传代码大致相同,只是storageClient对象调用的方法不一样
1 // 下载文件
2 // 1.组名称 2.文件路径 3.本地存储路径
3 // 返回值result:0代表成功
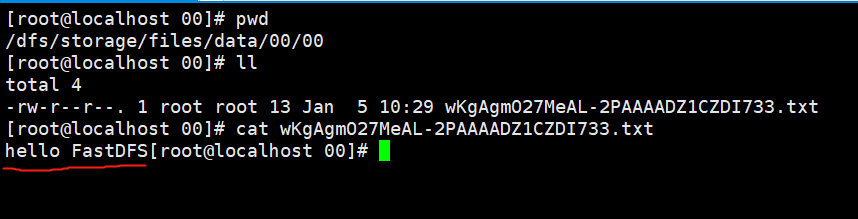
4 int result = storageClient.download_file("group1", "M00/00/00/wKgAgmO27MeAL-2PAAAADZ1CZDI733.txt",
5 "本地路径/down_hello.txt");
执行测试用例后,可到指定的本地路径下查看已下载的文件
4 文件删除
4.1 编写测试代码
和文件上传、下载代码大致相同,只是storageClient对象调用的方法不一样
1 // 删除文件
2 // 1.组名称 2.文件路径
3 // 返回值result:0代表成功
4 int result = storageClient.delete_file("group1", "M00/00/00/wKgAgmO27MeAL-2PAAAADZ1CZDI733.txt");
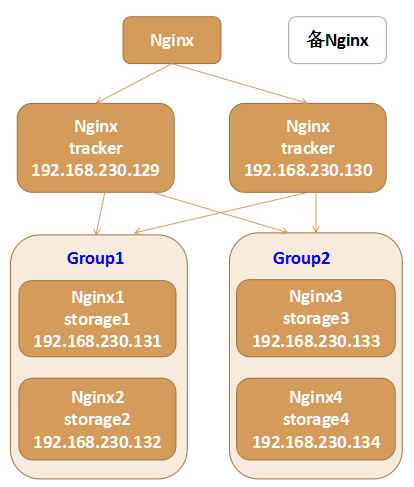
五 FastDFS分布式文件系统集群
1 架构图
2 集群环境搭建步骤
限于篇幅与设备,下次再更吧。。。
Recommend
About Joyk
Aggregate valuable and interesting links.
Joyk means Joy of geeK