

ReentrantLock可重入、可打断、锁超时实现原理
source link: https://www.51cto.com/article/743698.html
Go to the source link to view the article. You can view the picture content, updated content and better typesetting reading experience. If the link is broken, please click the button below to view the snapshot at that time.

ReentrantLock可重入、可打断、锁超时实现原理
前面讲解了ReentrantLock加锁和解锁的原理实现,但是没有阐述它的可重入、可打断以及超时获取锁失败的原理,本文就重点讲解这三种情况。建议大家先看下这篇文章了解下ReentrantLock加锁的基本原理,图解ReentrantLock公平锁和非公平锁实现原理。
可重入是指一个线程如果获取了锁,那么它就是锁的主人,那么它可以再次获取这把锁,这种就是理解为重入,简而言之,可以重复获取同一把锁,不会造成阻塞,举个例子如下:
@Test
    public void testRepeatLock() {
        ReentrantLock reentrantLock = new ReentrantLock();
        // 第一次获取锁
        reentrantLock.lock();
        try {
            System.out.println(Thread.currentThread().getName() + " first get lock");
            // 再次获取锁
            tryAgainLock(reentrantLock);
        }finally {
            reentrantLock.unlock();
        }
    }

    public void tryAgainLock(ReentrantLock reentrantLock) {
        // 第2次获取锁
        reentrantLock.lock();
        try {
            System.out.println(Thread.currentThread().getName() + " second get lock");
        }finally {
            reentrantLock.unlock();
        }
    }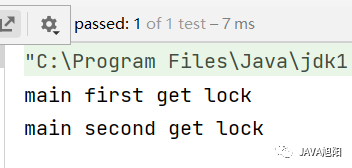
- 同一个线程使用ReentrantLock多次获取锁,不会阻塞
- 申请几把锁,最后需要解除几把锁
那你知道是怎么实现的吗?
概述的文章中已经讲解了ReentrantLock整个的加锁和解锁的过程,可重入实现就在其中,这里着重关注下申请锁的方法tryAcquire,最终会调用nonfairTryAcquire方法。
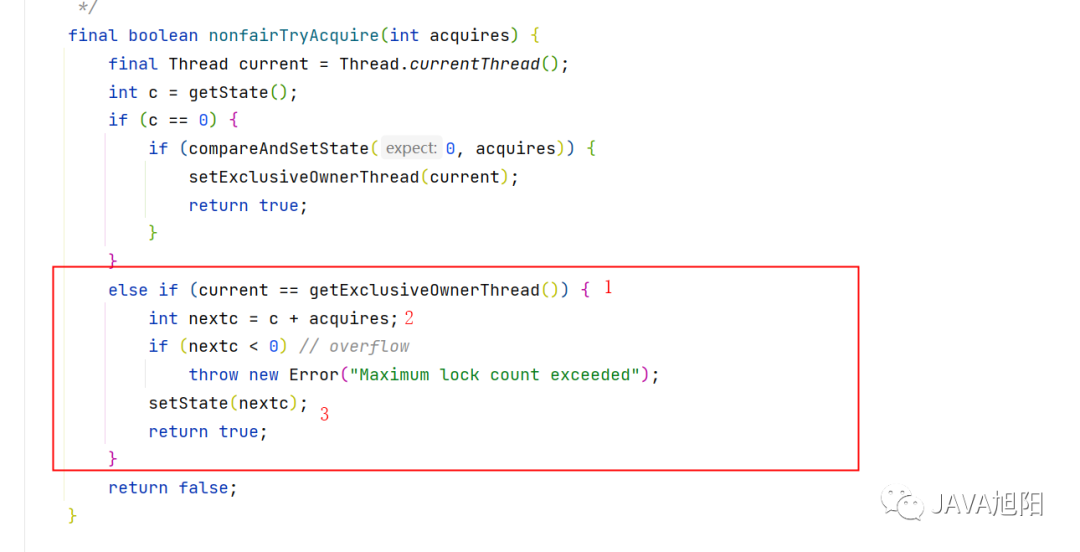
如果已经有线程获得了锁, 并且占用锁的线程是当前线程, 表示【发生了锁重入】,上图的1步骤
计算出冲入的次数nextc等于当前次数+新增次数,acquires等于1
更新 state 的值,这里不使用 cas 是因为当前线程正在持有锁,所以这里的操作相当于在一个管程内, 然后返回ture,表明再次申请锁成功。
ReentrantLock相比于synchronized加锁一大优势是可打断,那么什么是可打断呢?ReentrantLock通过lockInterruptibly()加锁,如果一直获取不到锁,可以通过调用线程的interrupt()提前终止线程。举个例子:
@Test
    public void testInterrupt() throws InterruptedException {
        ReentrantLock lock = new ReentrantLock();

        // 主线程普通加锁
        System.out.println("主线程优先获取锁");
        lock.lock();
        try {
            // 创建子线程
            Thread t1 = new Thread(() -> {
                try {
                    System.out.println("t1尝试获取打断锁");
                    lock.lockInterruptibly();
                } catch (InterruptedException e) {
                    System.out.println("t1没有获取到锁,被打断,直接返回");
                    return;
                }
                try {
                    System.out.println("t1成功获取锁");
                } finally {
                    System.out.println("t1释放锁");
                    lock.unlock();
                }
            }, "t1");
            t1.start();
            Thread.sleep(2000);
            System.out.println("主线程进行打断锁");
            t1.interrupt();
        } finally {
            // 主线程解锁
            System.out.println("主线程优先释放锁");
            lock.unlock();
        }
    }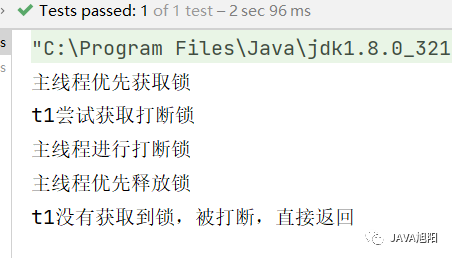
- 通过lockInterruptibly()方法获取锁期间,可以通过线程的interrupt()方法进行中断,跳出阻塞。
- 通过lock()方法获取锁,不会响应interrupt()方法的中断。
接下来我们看看它的实现原理。
public void lockInterruptibly() throws InterruptedException {
    sync.acquireInterruptibly(1);
}
public final void acquireInterruptibly(int arg) {
    // 被其他线程打断了直接返回 false
    if (Thread.interrupted())
        throw new InterruptedException();
    if (!tryAcquire(arg))
        // 没获取到锁,进入这里
        doAcquireInterruptibly(arg);
}
先判断一次线程是否中断了,是的话,直接抛出中断异常。
如果没有获取锁,调用doAcquireInterruptibly()方法。
private void doAcquireInterruptibly(int arg) throws InterruptedException {
    // 封装当前线程,加入到队列中
    final Node node = addWaiter(Node.EXCLUSIVE);
    boolean failed = true;
    try {
        // 自旋
        for (;;) {
            // shouldParkAfterFailedAcquire判断是否需要阻塞等待
            // parkAndCheckInterrupt方法是阻塞线程,返回true,表示线程被中断了
            if (shouldParkAfterFailedAcquire(p, node) && parkAndCheckInterrupt())
                // 【在 park 过程中如果被 interrupt 会抛出异常】, 而不会再次进入循环获取锁后才完成打断效果
                throw new InterruptedException();
        }
    } finally {
        // 抛出异常前会进入这里
        if (failed)
            // 取消当前线程的节点
            cancelAcquire(node);
    }
}
addWaiter将当前线程封装成节点,加入到队列中。
shouldParkAfterFailedAcquire()方法判断如果前一个节点的等待状态时-1,则返回true,表示当前线程需要阻塞。
parkAndCheckInterrupt()方法是阻塞线程,返回true,表示线程被中断了,抛出InterruptedException异常。
最后调用cancelAcquire()方法,将当前节点状态设置为cancel取消状态。
// 取消节点出队的逻辑
private void cancelAcquire(Node node) {
    // 判空
    if (node == null)
        return;
    // 把当前节点封装的 Thread 置为空
    node.thread = null;
    // 获取当前取消的 node 的前驱节点
    Node pred = node.prev;
    // 前驱节点也被取消了,循环找到前面最近的没被取消的节点
    while (pred.waitStatus > 0)
        node.prev = pred = pred.prev;

    // 获取前驱节点的后继节点,可能是当前 node,也可能是 waitStatus > 0 的节点
    Node predNext = pred.next;

    // 把当前节点的状态设置为 【取消状态 1】
    node.waitStatus = Node.CANCELLED;

    // 条件成立说明当前节点是尾节点,把当前节点的前驱节点设置为尾节点
    if (node == tail && compareAndSetTail(node, pred)) {
        // 把前驱节点的后继节点置空,这里直接把所有的取消节点出队
        compareAndSetNext(pred, predNext, null);
    } else {
        // 说明当前节点不是 tail 节点
        int ws;
        // 条件一成立说明当前节点不是 head.next 节点
        if (pred != head &&
            // 判断前驱节点的状态是不是 -1,不成立说明前驱状态可能是 0 或者刚被其他线程取消排队了
            ((ws = pred.waitStatus) == Node.SIGNAL ||
             // 如果状态不是 -1,设置前驱节点的状态为 -1
             (ws <= 0 && compareAndSetWaitStatus(pred, ws, Node.SIGNAL))) &&
            // 前驱节点的线程不为null
            pred.thread != null) {

            Node next = node.next;
            // 当前节点的后继节点是正常节点
            if (next != null && next.waitStatus <= 0)
                // 把 前驱节点的后继节点 设置为 当前节点的后继节点,【从队列中删除了当前节点】
                compareAndSetNext(pred, predNext, next);
        } else {
            // 当前节点是 head.next 节点,唤醒当前节点的后继节点
            unparkSuccessor(node);
        }
        node.next = node; // help GC
    }
}
ReentrantLock还具备锁超时的能力,调用tryLock(long timeout, TimeUnit unit)方法,在给定时间内获取锁,获取不到就退出,这也是synchronized没有的功能。
@Test
    public void testLockTimeout() throws InterruptedException {
        ReentrantLock lock = new ReentrantLock();
        Thread t1 = new Thread(() -> {
            try {
                // 调用tryLock获取锁
                if (!lock.tryLock(2, TimeUnit.SECONDS)) {
                    System.out.println("t1获取不到锁");
                    return;
                }
            } catch (InterruptedException e) {
                System.out.println("t1被打断,获取不到锁");
                return;
            }
            try {
                System.out.println("t1获取到锁");
            } finally {
                lock.unlock();
            }
        }, "t1");
        // 主线程加锁
        lock.lock();
        System.out.println("主线程获取到锁");

        t1.start();
        Thread.sleep(3000);
        try {
            System.out.println("主线程释放了锁");
        } finally {
            lock.unlock();
        }
    }
那这个原理实现是什么样的呢?
public boolean tryLock(long timeout, TimeUnit unit)
        throws InterruptedException {
    // 调用tryAcquireNanos方法
    return sync.tryAcquireNanos(1, unit.toNanos(timeout));
}

public final boolean tryAcquireNanos(int arg, long nanosTimeout) {
    if (Thread.interrupted())
        throw new InterruptedException();
    // tryAcquire 尝试一次,获取不到的话调用doAcquireNanos方法
    return tryAcquire(arg) || doAcquireNanos(arg, nanosTimeout);
}

protected final boolean tryAcquire(int acquires) {
    return nonfairTryAcquire(acquires);
}
private boolean doAcquireNanos(int arg, long nanosTimeout) {
if (nanosTimeout <= 0L)
return false;
// 获取最后期限的时间戳
final long deadline = System.nanoTime() + nanosTimeout;
// 将当前线程添加到队列中
final Node node = addWaiter(Node.EXCLUSIVE);
boolean failed = true;
try {
// 自旋
for (;;) {
// 获取前驱节点
final Node p = node.predecessor();
// 前驱节点是head,尝试获取锁
if (p == head && tryAcquire(arg)) {
setHead(node);
p.next = null; // help GC
failed = false;
return true;
}
// 计算还需等待的时间
nanosTimeout = deadline - System.nanoTime();
if (nanosTimeout <= 0L) //时间已到
return false;
if (shouldParkAfterFailedAcquire(p, node) &&
// 如果 nanosTimeout 大于该值,才有阻塞的意义,否则直接自旋会好点
nanosTimeout > spinForTimeoutThreshold)
LockSupport.parkNanos(this, nanosTimeout);
// 【被打断会报异常】
if (Thread.interrupted())
throw new InterruptedException();
}
}
}如果nanosTimeout小于0,表示到了指定时间没有获取锁成功,返回false
如果 nanosTimeout 大于spinForTimeoutThreshold,值为1000L,进行阻塞。因为时间太短阻塞没有意义,否则直接自旋会好点。
本文主要从使用到原理讲解了ReentrantLock锁的可重入、可打断和锁超时的特性,希望对大家有帮助。
Recommend
About Joyk
Aggregate valuable and interesting links.
Joyk means Joy of geeK