

How to Get an Azure Access Token Using Self-signed Certificate with Spring Boot
source link: https://medium.com/codex/how-to-get-an-azure-access-token-using-self-signed-certificate-with-spring-boot-140dac047454
Go to the source link to view the article. You can view the picture content, updated content and better typesetting reading experience. If the link is broken, please click the button below to view the snapshot at that time.

How to Get an Azure Access Token Using Self-signed Certificate with Spring Boot
How to generate client assertion from SSL certificate with Spring Boot

Most developers know how to authenticate their confidential web clients with client_secret.
But what’s the process of certificate client authentication? How do we authenticate the client with a certificate instead of a client secret in Spring Boot?
Spring Boot has support for client secrets and it’s easy to configure.
First, you add the Spring OAuth2 client configuration. Then you add the properties for the client id and client secret.
For certificate authentication, you’ll need to configure the private_key_jwt flow.
Good thing that the private key JWT option has Spring Boot support. Even so, it’s not trivial to configure the authorization code flow with a certificate.
Private key JWT is client authentication where the client creates and signs the JWT using the private key.
The private key is the one used to sign the certificate CSR. This CSR is then used to create the self-signed SSL certificate. More on this later in the story.
As already mentioned Spring Boot has support for this client authentication. What kind of support does Spring Boot offer?
You don’t have to create the client_assertion JWT. You just need to provide the public and private keys, Spring Boot signs the JWT for you.
Let’s go through the steps on how to get the Azure access token using an SSL certificate.
1. Create the Azure app registration
Azure apps support confidential clients with certificates and PKCE. So for this guide, we’ll use the Azure AD app.
First, we need to create the Azure app registration and configure the SSL certificate. Generate the self-signed certificate using this guide: How To Create Self-Signed Certificates Using OpenSSL
Here’s what the app registration will look like.
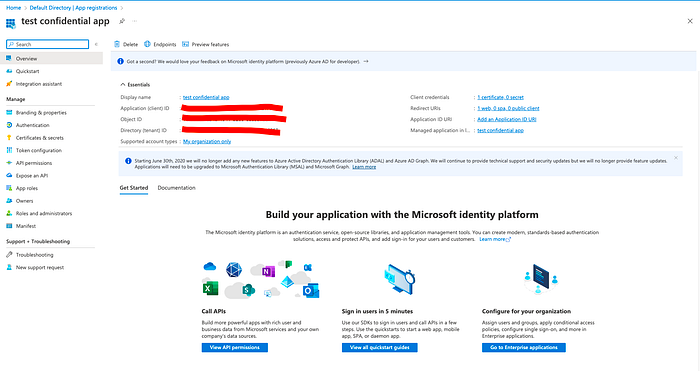
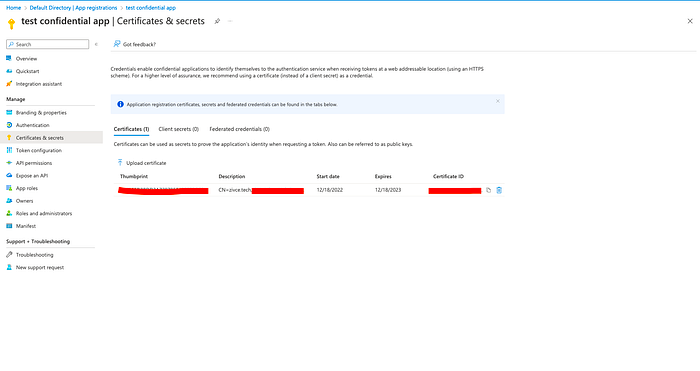
And in the secrets, we need to upload the generated self-signed certificate. And the certificates & secrets should contain a single certificate. The client secrets are empty as we don’t need them for private_key_jwt authentication method.
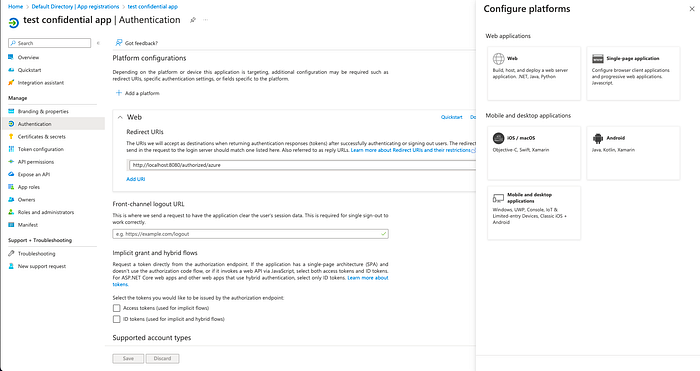
The last Azure config we need is the redirect URI config. This is the redirect URI we’ll use to redirect the app when the token is retrieved.
2. Configure Spring OAuth2 client
Get the endpoints and configure the spring oauth2 client as below.

security:
  oauth2:
    client:
      registration:
        azure:
          client-id: <your-azure-client-id>
          provider: azure
          scope:
            - https://graph.microsoft.com/User.Read
          redirect-uri: "{baseUrl}/authorized/azure"
          client-authentication-method: private_key_jwt
          authorization-grant-type: authorization_code
      provider:
        azure:
          authorization-uri: https://login.microsoftonline.com/<tenant-id>/oauth2/v2.0/authorize
          token-uri: https://login.microsoftonline.com/<tenant-id>/oauth2/v2.0/token
          issuer-uri: https://login.microsoftonline.com/<tenant-id>/v2.0
The client authentication method used is private_key_jwt. By default, Spring Boot adds PKCE when the client-authentication_method is none. So we'll need to add the PKCE through configuration.
3. Adjust the Spring Security configuration
You’ll need to add these adjustments to oauth2Client in the filter chain as well.
.oauth2Client(auth -> auth
    .authorizedClientService(defaultAuthorizedClientService)
    .authorizedClientRepository(defaultAuthorizedClientRepository)
    .authorizationCodeGrant(codeGrant -> codeGrant.authorizationRequestRepository(defaultOAuth2AuthzRequestRepository)
      .authorizationRequestResolver(authorizationRequestResolver)
      .accessTokenResponseClient(tokenResponseCertificateClient)));
I’ve configured H2 so we can save the authorization requests and the authorized clients later on. The defaultOAuth2AuthzRequestRepository is responsible for saving, loading and removing the requests. And defaultAuthorizedClientRepository is responsible for CRUD operations on authorized clients.
authorizationRequestResolver adds the PKCE customizer. Public clients need the PKCE by default, and confidential don't. That's why we need to add the PKCE through configuration.
@Configuration
@RequiredArgsConstructor
public class AuthorizationRequestResolverConfiguration {
  private final ClientRegistrationRepository clientRegistrationRepository;
@Bean
OAuth2AuthorizationRequestResolver authorizationRequestResolver() {
    var defaultRequestResolver = new DefaultOAuth2AuthorizationRequestResolver(clientRegistrationRepository,
        OAuth2AuthorizationRequestRedirectFilter.DEFAULT_AUTHORIZATION_REQUEST_BASE_URI);
    defaultRequestResolver.setAuthorizationRequestCustomizer(pkceCustomizer());
    return defaultRequestResolver;
  }
  private Consumer<Builder> pkceCustomizer() {
    return OAuth2AuthorizationRequestCustomizers.withPkce();
  }
}
Configure the token response client
The gist of the private key JWT flow is in the token response client. This is where the client assertion gets added. The goal is to get the following request in the console. This request holds the client_assertion and the PKCE code_verifier.

We can start with the following configuration from the official Spring site: Client Authentication Support:: Spring Security. The end result should be this kind of configuration.
@Configuration
public class TokenResponseClientConfiguration {
private static Base64URL thumbprint;
  @Bean
  OAuth2AccessTokenResponseClient<OAuth2AuthorizationCodeGrantRequest> tokenResponseCertificateClient() {
    Function<ClientRegistration, JWK> jwkResolver = (clientRegistration) -> {
      if (clientRegistration.getClientAuthenticationMethod().equals(ClientAuthenticationMethod.PRIVATE_KEY_JWT)) {
        RSAPublicKey publicKey;
        try {
          CertificateFactory certFactory = CertificateFactory.getInstance("X.509");
          var is = Files.newInputStream(ResourceUtils.getFile("classpath:certs/server.crt").toPath());
          X509Certificate cer = (X509Certificate) certFactory.generateCertificate(is);
          thumbprint = computeSHA1Thumbprint(cer);
          publicKey = (RSAPublicKey) cer.getPublicKey();
          return new RSAKey.Builder(publicKey)
              .privateKey(readPrivateKey(ResourceUtils.getFile("classpath:certs/server.key")))
              .keyID(thumbprint.toString())
              .build();
        } catch (CertificateException | IOException e) {
          throw new RuntimeException(e);
        }
      }
      return null;
    };
    OAuth2AuthorizationCodeGrantRequestEntityConverter requestEntityConverter =
        new OAuth2AuthorizationCodeGrantRequestEntityConverter();
    requestEntityConverter.addParametersConverter(new NimbusJwtClientAuthenticationParametersConverter<>(jwkResolver));
    DefaultAuthorizationCodeTokenResponseClient tokenResponseClient =
        new DefaultAuthorizationCodeTokenResponseClient();
    tokenResponseClient.setRequestEntityConverter(requestEntityConverter);
    return tokenResponseClient;
  }
  private RSAPrivateKey readPrivateKey(File file) throws IOException {
    try (FileReader keyReader = new FileReader(file)) {
      PEMParser pemParser = new PEMParser(keyReader);
      JcaPEMKeyConverter converter = new JcaPEMKeyConverter();
      PrivateKeyInfo privateKeyInfo = PrivateKeyInfo.getInstance(((PEMKeyPair)pemParser.readObject()).getPrivateKeyInfo());
      return (RSAPrivateKey) converter.getPrivateKey(privateKeyInfo);
    }
  }
  private static Base64URL computeSHA1Thumbprint(final X509Certificate cert) {
    try {
      byte[] derEncodedCert = cert.getEncoded();
      MessageDigest sha256 = MessageDigest.getInstance("SHA-1");
      return Base64URL.encode(sha256.digest(derEncodedCert));
    } catch (NoSuchAlgorithmException | CertificateEncodingException e) {
      return null;
    }
  }
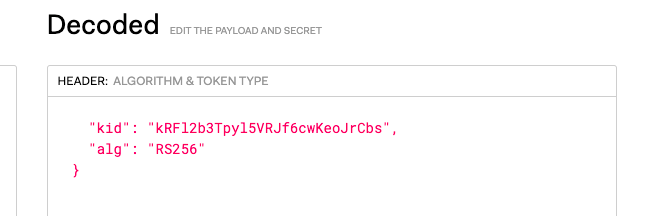
Most of the configuration is similar to the original one. The only difference is the addition of kid the JWT header. This will be the Base64URL SHA-1 thumbprint of your certificate.
The x5t JWT header attribute should carry this thumbprint. What I found out even kid with thumbprint works.
Here’s the decoded client_assertion JWT header. This header needs to contain the kid as or you'll get 401 Unauthorized when targetting token endpoint.
What did we accomplish?
To recap what we did, we have an OAuth2 authorization request with PKCE in place that retrieves the code. Here’s how the request looks:
authorization_uri,                                                  authorization_grant_type, client_id,  redirect_uri,                           state,                                        additional_parameters,                                                                                   authorization_request_uri, scopes
https://login.microsoftonline.com/<tenant-id>/oauth2/v2.0/authorize,authorization_code,       <client-id>,http://localhost:8080/authorized/azure, F2u2bCXfs9DniLytlt5s0Uzc1sxyQzXpacKot-0ErXQ=,"{""code_challenge"":""J1owlzyONnpMIq7cnnUnJVVp9iwTnl2Ioul_fsVUmP8"",""code_challenge_method"":""S256""}",https://login.microsoftonline.com/<tenant-id>/oauth2/v2.0/authorize?response_type=code&client_id=<client-id>&scope=https://graph.microsoft.com/User.Read&state=F2u2bCXfs9DniLytlt5s0Uzc1sxyQzXpacKot-0ErXQ%3D&redirect_uri=http://localhost:8080/authorized/azure&code_challenge=J1owlzyONnpMIq7cnnUnJVVp9iwTnl2Ioul_fsVUmP8&code_challenge_method=S256,"{""registration_id"":""azure"",""code_verifier"":""L4y6Uih0iq0oU2-Jmo5COLdZUZTxuh27svfvULDh_8MD3fltk76K2MQ6umbo3SEV4OGU6ONhHcKf2xHLXVX3EzowjlgXH09WNGH9atx6tiUXPjjYv6-XWIbix89gId5b""}","[""https://graph.microsoft.com/User.Read""]"
After the client is authorized we exchange code for token. The request is logged in the console:
Code verifier and client_assertion gets sent to the token endpoint along with the authorization code. In the end, we save the authorized client in the database.
Support my work
If you need the source code, you can find it on Gumroad and support my work on this problem.
Recommend
About Joyk
Aggregate valuable and interesting links.
Joyk means Joy of geeK