

How to Deploy a NestJS Application with AWS Elastic Beanstalk and CodePipeline
source link: https://blog.bitsrc.io/how-to-deploy-a-nestjs-application-with-aws-elastic-beanstalk-and-codepipeline-82aa98dcc48
Go to the source link to view the article. You can view the picture content, updated content and better typesetting reading experience. If the link is broken, please click the button below to view the snapshot at that time.

How to Deploy a NestJS Application with AWS Elastic Beanstalk and CodePipeline

AWS Elastic Beanstalk
A step-by-step guide to deploy a nest application using AWS Elastic Beanstalk and CodePipeline
Elastic Beanstalk and CodePipeline are two great services offered by AWS that allow you to quickly get up and running with your application on the cloud in a continuous delivery environment.
What is AWS Elastic Beanstalk?
EB is an orchestration service offered by AWS for deploying applications. Developers have to just focus on writing code for their application rather than spending time on managing and configuring servers, databases, firewalls, and networks.
What is AWS CodePipeline?
AWS CodePipeline is a continuous delivery service that enables you to model, visualize, and automate the steps required to release your software. CodePipeline automates the steps required to release your software changes continuously.
Lets get started.
Create a new nest project
1. Run the following command in the VS Code CLI to create a nest project.
nest new project

Create a Nest Project
2. Select the package manager you would like to use.

Select the Package Manager
You should get a project directory with files and folders looking like this:

Nest Project Directory
Configure your nest app for deployment
1. Create a Procfilein the root of your project and add the following lines. Procfile tells Elastic Beanstalk to run the commands defined here.
web: npm run deploy
2. Now you need to add the deploy script to the package.json file
"deploy": "npm install && npm run build && npm run start:dev"
3. Add port env variable to make sure your app can listen to a port environment variable.
import { NestFactory } from '@nestjs/core';
import { AppModule } from './app.module';

async function bootstrap() {
  const app = await NestFactory.create(AppModule);
  await app.listen(process.env.PORT || 3000);
}
bootstrap();
4. Create a new repository on GitHub and push your nest application code. Later on we will use it to configure the AWS CodePipeline.
Create a new EB environment and application.
Now since our application is ready and pushed to GitHub, logically the next step would be to deploy it to EB. To do this, we first need to create an EB environment and deploy a default application to see if its successful.
1. Open the AWS console, select Elastic Beanstalk and Click on create application.
2. In the application name write the name of the application that you would like to give it. In my case it is nest-eb-instance

Application Name
3. Choose Node.js as the platform.
4. Now we have the sample application selected. The sample application allows you to check if your EB instance has been successfully deployed.

Platform Name and Other Settings
5. Next click on Create Application and wait a few minutes while it gets created.
Voila! Now you should be able to see the running environment and its health.

Elastic Beanstalk Environments
Click on the environment name and then on the EB instance URL to see your sample application running.

Sample Application
You should see your sample application running on the EB instance as shown below:

Sample Running Application
Create the CodePipeline and connect it with the EB instance
Now the last step is to create a CodePipeline, so that every time we make a change in our application and push the code to our GitHub repository, it automatically updates the EB instance with our new changes and updates.
1. For that we need to go to the AWS Codepipeline and click on Create Pipeline.
2. In the pipeline settings, give your pipeline a name and simply click Next. In my case it is nestAWSPipeline.
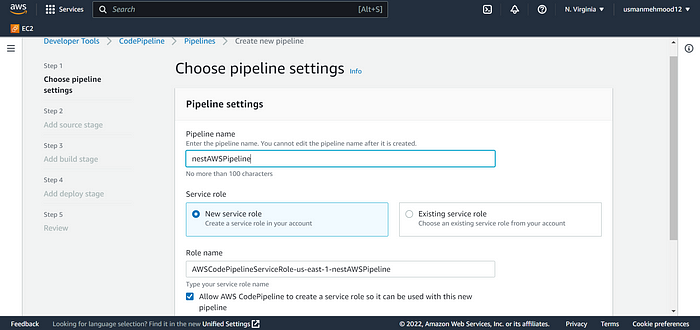
Pipeline Settings
3. In the add source stage select GitHub (Version 1) or GitHub (Version 2) as a source provider, whichever suits you.
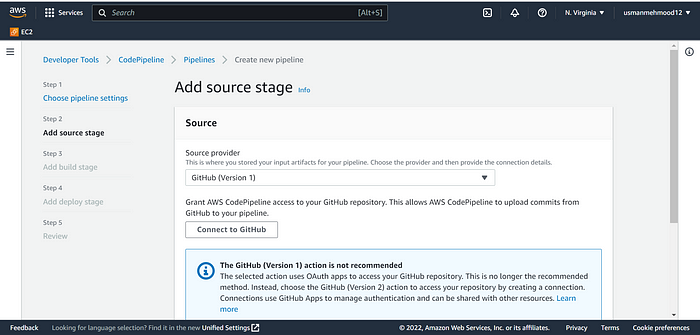
Select Source Provider & Connect GitHub
4. Now click on Connect GitHub to Grant AWS CodePipeline the access to your GitHub repository.
5. Once GitHub is connected, Select the repository and the branch and then click next.

Select Repository & Branch
6. In the Add Build stage click on Skip build stage as we do not have a build stage.

Build Stage
7. In the deploy provider we now select the AWS Elastic Beanstalk and choose the application and environment name we just created.
8. Click Next and then after reviewing all the settings you just defined, click on create pipeline.

Deploy Stage
Afterwards, your pipeline nestAWSPipeline should be created.

Pipeline Created
After a few minutes, your code from GitHub should be deployed and running and the health of the EB instance should be OK.
Sample Application
To check if your code has been deployed and running, click on the EB instance link (also shown above).

Deployed & Running Application Code from GitHub
Conclusion
This is a step-by-step guide to deploy a nest application using Elastic Beanstalk and CodePipeline. AWS CodePipeline and Elastic Beanstalk are great services to get you quickly up and running in CD environment. You can fully focus on developing great software and writing maintainable code instead of worrying about the underlying cloud infrastructure.
Recommend
About Joyk
Aggregate valuable and interesting links.
Joyk means Joy of geeK