

CompositionLocal in Jetpack Compose [FREE]
source link: https://www.kodeco.com/34513206-compositionlocal-in-jetpack-compose
Go to the source link to view the article. You can view the picture content, updated content and better typesetting reading experience. If the link is broken, please click the button below to view the snapshot at that time.

Learn about CompositionLocal in Jetpack Compose and implement an efficient way for multiple composables to access data.
Jetpack Compose lets you create UIs for your app using Kotlin. It works by passing data to each UI component — aka composable — to display its state.
But when you have several composables in your UI that use the same data or classes, passing them down can quickly result in messy and complicated code.
That’s why Android provides CompositionLocal. It helps you provide classes to a set of composables implicitly, so your code can be simpler and less complicated.
In this tutorial, you’ll enhance the UI of a reading list app and learn all about:
- How Jetpack Compose architecture works.
- What CompositionLocal is and its different types.
- Predefined CompositionLocals available to you.
- How to create your own CompositionLocal.
- When to use CompositionLocal.
- Alternatives to CompositionLocal.
Getting Started
Download the project app by clicking Download Materials at the top or bottom of this tutorial. Open Android Studio Chimpmunk or later and import the starter project.
You’ll build an app called ToReadList, which lets you search for books and add them to a reading list.
Below is a summary of what each package contains:
- di: Classes for providing dependency injection.
- models: Model definitions used in the app.
- network: Classes related to the connection with the API.
- repositories: Repository-related code.
- storage: Classes that handle the local storage.
- ui: Composables and theme definition.
-
viewmodels:
ViewModelclasses.
This sample app uses the OpenLibrary API. You don’t have to do any initial configuration because OpenLibrary doesn’t require an API key. Learn more about OpenLibrary on openlibrary.org.
Build and run the app. You’ll see an empty screen with a search floating action button:

If you press the search FAB you’ll notice that it doesn’t work, which is intentional.
You wanted to learn about CompositionLocal, right? Great! You’ll build out the missing functionality in this tutorial.
Introduction to Jetpack Compose Architecture
The days when you had to deal with the old View system to create UIs for your Android apps are thankfully in the past. With Jetpack Compose, you can create UIs using Kotlin — it’s faster and easier.
However, the way Jetpack Compose works is completely different than how it worked with Views.
For example, once the UI finishes displaying on the screen, there is no way to update it in Compose. Instead, you update the UI state.
Once you set the new state, a recomposition — the process that recreates the UI with the new state – takes place.
Recomposition is efficient and focused. It only recreates UI components that have a different state and preserves the components that don’t need to change.
But how can a composable know about its state and its changes? This is where unidirectional data flow comes into play.
Understanding Unidirectional Data Flow
Unidirectional data flow is the pattern that Jetpack Compose uses to propagate state to the different UI composables. It says that the state flows down to the composables and events flow up.
In other words, the state passes from one composable to another until it reaches the innermost composable.
On the other hand, each composable notifies its caller whenever an event takes place. Events include things like clicking a button or updating the content on an edit text field.

Implementing Unidirectional Data Flow
At present, the FAB composable doesn’t know about the navigation controller, so it can’t perform navigation to the search screen. You’ll add functionality to the search Floating Action Button (FAB) so that you can learn how unidirectional data flow works.
Open MainActivity.kt, the class where the UI tree begins. It also contains the definition for navController. You need to pass down navController so that it reaches the search FAB.
Update the call to BookListScreen() as follows:
BookListScreen(books, navController)
That’s how you pass the navController down to the BookListScreen. However, the method call will show a compiler error because the parameter is missing from the function definition. You’ll fix that next.
Open BookListScreen.kt then update the composable parameters as follows:
@Composable
fun BookListScreen(
  books: List<Book>,
  navController: NavHostController
)
You might see the NavHostController in red — that will vanish once you import the necessary class with this:
import androidx.navigation.NavHostController
BookListScreen() now is able to receive the navController. Finally, update the FloatingActionButton onClick, like this:
FloatingActionButton(onClick = { navController.navigate("search") }) {
  Icon(
    imageVector = Icons.Filled.Search,
    contentDescription = "Search"
  )
}
This code makes it so that when you press the FloatingActionButton, you navigate to the search screen.
Build and run. Tap the search FAB to navigate to the search screen, like this:

Search for any book or author you like to see a list of results:

Now you’re able to search for books and add them to your to-read list. Tap a few Add to List buttons to add some books to your reading list.
For now, you won’t get any feedback to confirm you’ve added a book to your list, but you’ll add that feature later.
Navigate back to see all the reading you need to do:
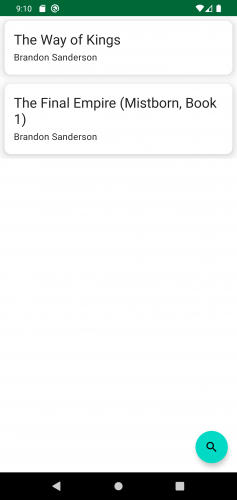
Great job, the basic functions are working now!
But the design is a bit off for the book elements — you get no confirmation after adding a book and there are no images. How can you judge a book by its cover when it doesn’t even have one?
Fortunately, you have data that every composable can use, such as context, navController and styles. You’ll add these UX-improving features in the following sections.
Getting to Know CompositionLocal
As you saw in the previous section, data flows down through the different composables — each parent passes down the necessary data to their children. So each composable knows explicitly which dependencies it needs.
This is particularly useful for data used by a specific composable that isn’t used elsewhere.
There are times when you want to use data in multiple composables along the UI tree. If you follow the idea that data flows down, then you would need to pass the same data along all composables, which may become inconvenient.
With CompositionLocal, you can create objects that are available throughout the UI tree or just a subset of it. You don’t need to pass down the data along all composables, so your data is implicitly available for the composables to use.
You can also change the values of a CompositionLocal to be different for a subset of the UI tree, making that implementation available only to the descendants in that subtree. The other nodes will not be affected.
Below is a diagram that represents the UI tree. Here’s an explanation of it:
- The red section is a
CompositionLocalimplementation. - The blue section represents a different implementation for the same
CompositionLocal. - Each implementation is only available to the composables in the subtree where you defined each implementation.

You can create your own CompositionLocal but don’t have to. Android and Jetpack provide you with several options.
Learning About Predefined CompositionLocals
Jetpack Compose provides multiple predefined CompositionLocal implementations that start with the word Local, so it’s easy for you to find them:

Using Existing CompositionLocals
For this exercise, you’ll add a book image to each book in your reading list by using the current context.
Open Book.kt. Add the following as the first line in the BookRow() composable:
val context = LocalContext.current
Android provides the LocalContext class that has access to the current context. To get the actual value of the context, and any other CompositionLocal, you access its current property.
Make the following code the first element of Row(), right before Column().
AsyncImage(
  modifier = Modifier
    .width(120.dp)
    .padding(end = 8.dp),
  model = ImageRequest
    .Builder(context)
    .data(book.coverUrl)
    .error(context.getDrawable(R.drawable.error_cover))
    .build(),
  contentScale = ContentScale.Crop,
  contentDescription = book.title
)
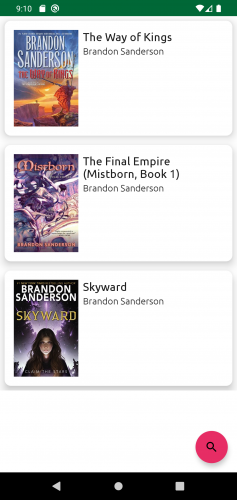
This code adds and loads an image to each book row using the Coil library. It uses the context provided by LocalContext.
Build and run. Now you can see those covers:

Next, you’ll use a Toast message to give feedback whenever you add a book to the list.
Open Book.kt and replace the Button code at the end of BookRow() composable with the following:
Button(
  onClick = {
    onAddToList(book)
    Toast.makeText(context, "Added to list", Toast.LENGTH_SHORT).show()
  },
  modifier = Modifier.fillMaxWidth()
) {
  Text(text = "Add to List")
}
This code displays the Toast message by using the context that you obtained previously with LocalContext.current. You didn’t have to pass the context down to this composable to use it.
Build and run. Add a book to your reading list. Notice the Toast:

Did you notice the keyboard stays on screen after you search for books in the search screen? You’ll fix that next!
Dismissing the Keyboard
Android provides LocalSoftwareKeyboardController that you can use to hide the soft keyboard when needed.
Open SearchScreen.kt and add the following line of code below the searchTerm definition:
val keyboardController = LocalSoftwareKeyboardController.current
LocalSoftwareKeyboardController that states This API is experimental and is likely to change in the future.
To make the warning go away, add @OptIn(ExperimentalComposeUiApi::class) outside the definition of SearchScreen().
Update keyboardActions inside the OutlinedTextField composable as follows:
keyboardActions = KeyboardActions(
  onSearch = {
    // 1.
    keyboardController?.hide()
    onSearch(searchTerm)
  },
  onDone = {
    // 2.
    keyboardController?.hide()
    onSearch(searchTerm)
  }
),
You just added the necessary code in sections one and two to hide the soft keyboard when the user presses the search or done buttons on the keyboard.
Build and run. Navigate to the search screen and search for a book. After you press the search key on the keyboard, the keyboard will disappear. Great work!
As you saw in this section, there are several existing CompositionLocal implementations for your use. You also have the option to create your own and will dig into that concept next.
Creating Your Own CompositionLocals
In some scenarios, you may want to implement your own CompositionLocal. For example, to provide the navigation controller to the different composables in your UI or implement a custom theme for your app.
You’re going to work through these two examples in the following sections.
Jetpack Compose provides two ways to use CompositionLocal, depending on the frequency that the data changes:
staticCompositionLocalOf()compositionLocalOf()
Using staticCompositionLocalOf()
One way to create your own CompositionLocal is to use staticCompositionLocalOf(). When using this, any change on the CompositionLocal value will cause the entire UI to redraw.
When the value of your CompositionLocal doesn’t change often, staticCompositionLocalOf() is a good choice. A good place to use it is with the navController in the app.
Several composables may use the controller to perform navigation. But passing the navController down to all the composables can quickly become inconvenient, especially if there multiple screens and places where navigation can take place.
Besides, for the entire lifetime of the app, the navigation controller remains the same.
So now that you understand its value, you’ll start working with CompositionLocal.
Open CompositionLocals.kt, and add the following code:
val LocalNavigationProvider = staticCompositionLocalOf<NavHostController> { error("No navigation host controller provided.") }
This line creates your static CompositionLocal of type NavHostController. During creation, you can assign a default value to use.
In this case, you can’t assign a default value to CompositionLocal because the navigation controller lives within the composables in MainActivity.kt. Instead, you throw an error.
It’s important to decide wether your CompositionLocal needs a default value now, or if you should provide the value later and plan to throw an error if it’s not populated.
CompositionLocal in your code.
Open MainActivity.kt then replace the creation of the navController with the following line:
val navController = LocalNavigationProvider.current
You get the actual value of your CompositionLocal with the current property.
Now, replace the call to BookListScreen() with the following:
BookListScreen(books)
This composable doesn’t need to receive the navController anymore, so you remove it.
Open BookListScreen.kt, and remove the navController parameter, like this:
@Composable
fun BookListScreen(
  books: List<Book>
) {
You removed the parameter, but you still need to provide the navController to handle the navigation.
Add the following line at the beginning of the method:
val navController = LocalNavigationProvider.current
You get the current value of your navigation controller, but instead of passing it explicitly, you have implicit access.
Build and run. As you’ll notice, the app crashes.
Open Logcat to see the following error:
2022-07-02 15:55:11.853 15897-15897/? E/AndroidRuntime: FATAL EXCEPTION: main
  Process: com.rodrigoguerrero.toreadlist, PID: 15897
  java.lang.IllegalStateException: No navigation host controller provided.
The app crashes because you didn’t provide a value for the LocalNavigationProvider — now you know you still need to do that!
Providing Values to the CompositionLocal
To provide values to your CompositionLocal, you need to wrap the composable tree with the following code:
CompositionLocalProvider(LocalNavigationProvider provides rememberNavController()) {

}
In this code:
-
CompositionLocalProviderhelps bind your CompositionLocal with its value. -
LocalNavigationProvideris the name of your own CompositionLocal. -
providesis the infix function that you call to assign the default value to your CompositionLocal. -
rememberNavController()— the composable function that provides thenavControlleras the default value.
Open MainActivity.kt and wrap the ToReadListTheme and its contents with the code above. After you apply these changes, onCreate() will look as follows:
override fun onCreate(savedInstanceState: Bundle?) {
  super.onCreate(savedInstanceState)

  setContent {
    // 1.
    CompositionLocalProvider(LocalNavigationProvider provides rememberNavController()) {
      ToReadListTheme {
        // 2.
        val navController = LocalNavigationProvider.current
        NavHost(navController = navController, startDestination = "booklist") {
          composable("booklist") {
            val books by bookListViewModel.bookList.collectAsState(emptyList())
            bookListViewModel.getBookList()
            BookListScreen(books)
          }
          composable("search") {
            val searchUiState by searchViewModel.searchUiState.collectAsState(SearchUiState())
            SearchScreen(
              searchUiState = searchUiState,
              onSearch = { searchViewModel.search(it) },
              onAddToList = { searchViewModel.addToList(it) },
              onBackPressed = {
                searchViewModel.clearResults()
                navController.popBackStack()
              }
            )
          }
        }
      }
    }
  }
}
Here, you:
- Wrap the code with
CompositionLocalProvider. - Read the current value of your CompositionLocal.
The value you provide is now available to the entire UI tree that CompositionLocalProvider surrounds.
Build and run once again — it shouldn’t crash anymore. Navigate to the search screen to observe that the navigation still works.
Using a Custom CompositionLocal With a Custom Theme
Jetpack Compose gives you access to MaterialTheme classes to style your app. However, some apps need their own design system.
With CompositionLocal, you have the option to provide the necessary classes to style all your composables. In fact, that is what MaterialTheme uses behind the scenes.
The starter includes two classes with custom colors and fonts:
-
MyReadingColors(), located in Colors.kt, defines a custom color palette. -
MyReadingTypography(), located in Type.kt, define the app’s custom fonts.
You need to create two instances of CompositionLocal to use these classes: one for the custom colors and another for the custom fonts.
Open CompositionLocals.kt, and add the following code at the end of the file:
// 1.
val LocalColorsProvider = staticCompositionLocalOf { MyReadingColors() }
// 2.
val LocalTypographyProvider = staticCompositionLocalOf { MyReadingTypography() }
Here, you create two static CompositionLocal instances:
1. The first holds the custom colors for your app’s theme, provided by MyReadingColors().
2. The second holds the custom fonts, provided by MyReadingTypography().
To make your custom theme accessible in a way similar to MaterialTheme, add the following code to the top of Theme.kt:
// 1.
object MyReadingTheme {
  // 2.
  val colors: MyReadingColors
  // 3.
  @Composable
  get() = LocalColorsProvider.current
  // 4.
  val typography: MyReadingTypography
  // 5.
  @Composable
  get() = LocalTypographyProvider.current
}
You do several things in this code:
- Create the object
MyReadingThemethat holds two style-related variables. - Add the
colorsvariable of typeMyReadingColors. - Create a custom getter for
colors. This method provides the current value of yourLocalColorsProvider. - Add the
typographyvariable of typeMyReadingTypography. - Add a custom getter for
typography. This method provides the current value of yourLocalTypographyProvider.
Now you can access your colors and typography using a syntax like this: MyReadingTheme.colors or MyReadingTheme.typography.
Stay in Theme.kt, and replace ToReadListTheme() with the following code:
@Composable
fun ToReadListTheme(content: @Composable () -> Unit) {
  // 1.
  CompositionLocalProvider(
    LocalColorsProvider provides MyReadingColors(),
    LocalTypographyProvider provides MyReadingTypography()
  ) {
    MaterialTheme(
      // 2.
      colors = lightColors(
        primary = MyReadingTheme.colors.primary100,
        primaryVariant = MyReadingTheme.colors.primary90,
        secondary = MyReadingTheme.colors.secondary100,
        secondaryVariant = MyReadingTheme.colors.secondary90
      ),
      content = content
    )
  }
}
Here, you:
- Provide values to your colors and typography providers. For this case, this is an optional step because you added the default values when you created two
CompositionLocal. - Set default color values according to your custom theme.
Build and run. Notice that the search FAB has a beautiful new color:

Finally, open Book.kt and replace the contents of the Column composable with the following:
Column {
  // 1.
  Text(text = book.title, style = MyReadingTheme.typography.H5)
  Spacer(modifier = Modifier.height(4.dp))
  // 2.
  Text(text = book.author, style = MyReadingTheme.typography.subtitle)
  Spacer(modifier = Modifier.height(4.dp))

  if (showAddToList) {
    Button(
      onClick = {
        onAddToList(book)
        Toast.makeText(context, "Added to list", Toast.LENGTH_SHORT).show()
      },
      modifier = Modifier.fillMaxWidth()
    ) {
      Text(text = "Add to List")
    }
  }
}
In this code, you:
- Use the
H5typography fromMyReadingThemefor the book title. - Use the
subtitletypography fromMyReadingThemefor the book author.
Build and run. You can see your new fonts in the list of book items:
Great job! Now you’re ready to use the other type of CompositionLocals: compositionLocalOf.
Using compositionLocalOf()
Contrary to staticCompositionLocalOf, compositionLocalOf will only invalidate the composables that read its current value. To make use of compositionLocalOf, you need to provide values for a couple of paddings used in the book lists.
Open Theme.kt and add the following code at the top of the file:
data class MyReadingPaddings(
  val small: Dp,
  val medium: Dp
)
This class holds two Dp values for a small and medium padding.
Now, open CompositionLocals.kt and add the following code at the bottom of the file:
val LocalPaddings = compositionLocalOf { MyReadingPaddings(small = 8.dp, medium = 16.dp) }
With this line, you create LocalPaddings as a compositionLocalOf, with the specified default values. Since you already provided default values, you don’t have to add LocalPaddings with the CompositionLocalProvider.
Open Book.kt then replace the content of Card() as follows:
Card(
  modifier = modifier
    .fillMaxWidth()
    // 1.
    .padding(all = LocalPaddings.current.small),
  elevation = 12.dp,
  shape = RoundedCornerShape(size = 11.dp)
) {
  Row(
    modifier = Modifier
      // 2.
      .padding(LocalPaddings.current.medium)
  ) {
    AsyncImage(
      modifier = Modifier
        .width(120.dp)
        // 3.
        .padding(end = LocalPaddings.current.small),
      model = ImageRequest
        .Builder(context)
        .data(book.coverUrl)
        .error(context.getDrawable(R.drawable.error_cover))
        .build(),
      contentScale = ContentScale.Crop,
      contentDescription = book.title
    )
    Column {
      Text(text = book.title, style = MyReadingTheme.typography.H5)
      Spacer(modifier = Modifier.height(4.dp))
      Text(text = book.author, style = MyReadingTheme.typography.subtitle)
      Spacer(modifier = Modifier.height(4.dp))

      if (showAddToList) {
        Button(
          onClick = {
            onAddToList(book)
            Toast.makeText(context, "Added to list", Toast.LENGTH_SHORT).show()
          },
          modifier = Modifier.fillMaxWidth()
        ) {
          Text(text = "Add to List")
        }
      }
    }
  }
}
In this code, you set the:
- Entire padding of the card with a value of
LocalPaddings.current.small. - Entire padding of the row with a value of
LocalPaddings.current.medium. - End padding of the image with a value of
LocalPaddings.current.small.
Build and run. Your screen should look the same, but you didn’t have to set the padding values manually everywhere, nor did you have to pass the values from one composable to the other.
Understanding When to Use CompositionLocal
It’s tempting to use CompositionLocal to pass data to all your composables. However, you need to be aware of some rules that help determine when to use them.
- You can provide a value through
CompositionLocalwhen the value is a UI tree-wide value. As you saw before withnavController, the theme-related values and paddings you implemented in the previous sections can be used by all composables, a subset, and even several composables at once. - You need to provide a good default value, or as you learned, throw an error if you forget to provide a default value.
If your use case doesn’t meet these criteria, you still have several options to pass data to your composables.
Alternatives to CompositionLocal
You can pass parameters explicitly to the composables, but you should only pass the data that each composable needs to ensure your composables remain reusable.
For example, in Book.kt you see the following code:
@Composable
fun BookRow(
  // 1.
  book: Book,
  modifier: Modifier = Modifier,
  // 2.
  showAddToList: Boolean = false,
  onAddToList: (Book) -> Unit = { }
)
This composable receives the following data:
- A
Bookobject. This composable usestitle,authorandcoverIdfrom theBookobject. - And
showAddToList. which determines if the composable needs to show the button to add a book to your list.
At a minimum, the composable needs both of these data points to work and be reusable. In fact, you use this composable in both BookListScreen() and SearchScreen().
Another alternative to CompositionLocal is to use inversion of control — the composable receives a lambda function as a parameter to use when needed.
For example, BookRow() receives the lambda function onAddToList.
You can see in the following code when the composable executes this function:
Button(
  onClick = {
    onAddToList(book)
    Toast.makeText(context, "Added to list", Toast.LENGTH_SHORT).show()
  },
  modifier = Modifier.fillMaxWidth()
) {
  Text(text = "Add to List")
}
The composable calls onAddToList(book) when the user taps the button, but the composable doesn’t know which logic to perform next.
Find the following code in MainActivity.kt:
SearchScreen(
  searchUiState = searchUiState,
  onSearch = { searchViewModel.search(it) },
  onAddToList = { searchViewModel.addToList(it) },
  onBackPressed = {
    searchViewModel.clearResults()
    navController.popBackStack()
  }
)
In onAddToList, you can see the logic that executes when a user taps the button. With this implementation, the BookRow() composable has no idea about the details around how to add the book the list, hence, you can reuse it elsewhere.
Now that you’re aware of the alternatives, you can decide when it’s appropriate to use CompositionLocal.
Where to Go From Here?
Download the completed project files by clicking the Download Materials button at the top or bottom of the tutorial.
Great work! You learned how CompositionLocal can help you simplify your composable code and when to use CompositionLocal over some of its alternatives.
If you want to learn more about Jetpack Compose, see Jetpack Compose by Tutorials book.
Another great resource to learn Jetpack Compose is this Jetpack Compose video course.
Finally, it’s always a good idea to visit the Jetpack Compose official documentation.
I hope you enjoyed this tutorial on CompositionLocals in Jetpack Compose. If you have any questions or comments, please join the forum discussion below.

Created by Rodrigo Guerrero.
Contributors
Over 300 content creators. Join our team.
Recommend
About Joyk
Aggregate valuable and interesting links.
Joyk means Joy of geeK