

Rock18框架之整体框架介绍 - Bonker
source link: https://www.cnblogs.com/Bonker/p/16850570.html
Go to the source link to view the article. You can view the picture content, updated content and better typesetting reading experience. If the link is broken, please click the button below to view the snapshot at that time.

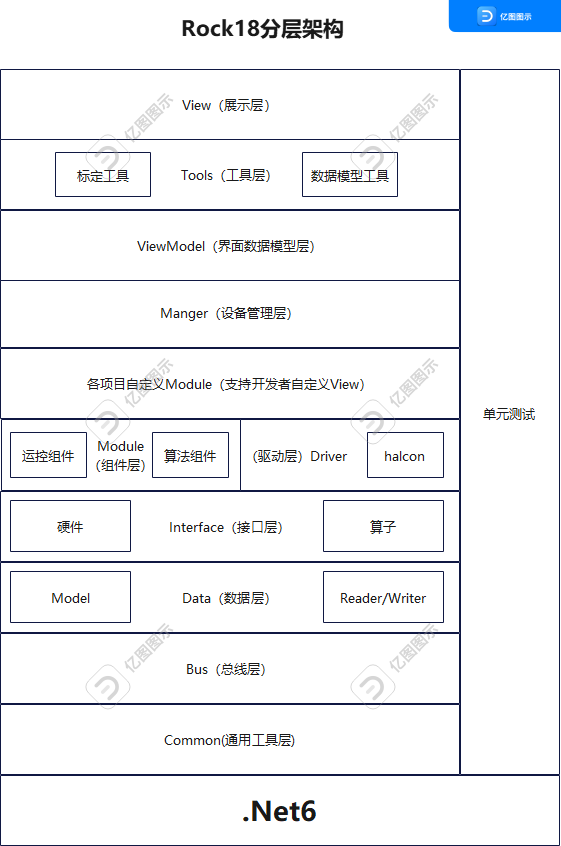
1. 总体框架图
2.框架能解决哪些问题?
自动化设备包含龙门架、机械手、伺服、步进等电机、IO控制、定位及纠偏、界面展示等部分。其中硬件(伺服、IO等)是需要更换的,硬件的更换不影响整套系统,不影响指:逻辑无影响、代码无编辑。
-
解决思路:
1、面向接口编程,所有硬件及算法在业务逻辑层都是接口
2、接口自动依赖注入,所有接口通过manger层反射、注入方式实例化接口
3、变更硬件只新增对应接口实现即可,所有业务代码无需更改
一台机器有很多通用的组件,如皮带、升降、翻转等,重复的逻辑太多,怎么减少重复逻辑?
-
解决办法:
1、组件化设计,把机器的皮带当成一个组件,升降为一个组件,一台机器是有N个独立组件构成,组件之间通过IO来交互(这部分思路参考一条整线有印刷机,贴片机、AOI等组成,机器之间通过IO来交互,机器内部也可以看做一条整线,由各个组件通过IO交互。只是交互是通过虚拟IO)
-
组件抽象出来后,组件内部的编程模型怎么抽象,才能让编程更为简单方便?
-
解决办法:
有限状态机模型,组件内部定义为很多状态,每个状态下做指定的动作,满足条件后跳转到下一个状态。- -
代码复用率90%以上,开发人员只关注业务本身
-
解决办法:
rock框架使用插件式编程,每个项目只需要写一个类库,系统自动机加载
-下面是一个从升降台取载具到轨道上,然后从升降台取pcb放在载具上,最后流出的一个组件,里面包涵了下相机定位,载具定位,cpk扣合检测的组件代码(这是rock17框架下组件实现,rock18已引入状态机,后续博文会介绍基于状态机的组件编写)
    /// <summary>
    /// 开线模式,从升降台取夹具,从升降台取pcb,扣合流出
    /// </summary>
    public class OpenLineModule : BasePlantModule
    {
        private enum Status
        {
            UnKnow,
            WaitTakeFix,
            TakeFix,
            WaitPutFix,
            PutFix,
            WaitTakePcb,
            TakePcb,
            WaitPutPcb,
            PutPcb,
            /// <summary>
            /// 扣合检测是否开启
            /// </summary>
            CheckCpk
        }
        /// <summary>
        /// 夹具吸嘴
        /// </summary>
        public ICylinder FixSuction { get; set; }
        /// <summary>
        /// 取光板位置
        /// </summary>
        public Position TakeFixPoi { get; set; }
        public Position PutFixPoi { get; set; }

        /// <summary>
        /// 允许取夹具
        /// </summary>
        public IInputIoDevice AllowTakeFix { set; get; }
        /// <summary>
        /// 取夹具完成
        /// </summary>
        public IOutputIoDevice TakeFixCompelte { set; get; }
        /// <summary>
        /// 下位机要夹具
        /// </summary>
        public IInputIoDevice AllowPutFix { set; get; }
        public IOutputIoDevice PutEmptyPcbCompelte { set; get; }
        /// <summary>
        /// 扩展轨道
        /// </summary>
        public ExtendTrackBaffleModule ExtendTrackBaffleModule { get; set; }
        private Status RobotStatus = Status.UnKnow;

        protected override void argsInit()
        {
            if (this.FixSuction.IsOpen())
            {
                throw new Exception(String.Format("{0} have object", this.FixSuction.GetName()));
            }
            this.RobotStatus = Status.UnKnow;
            this.TakeFixCompelte.Close();
            this.PutEmptyPcbCompelte.Close();
            this.FixSuction.Close();
            base.argsInit();
        }
        protected override void handler()
        {
            switch (this.RobotStatus)
            {
                case Status.UnKnow: this.unKnow(); break;
                case Status.WaitTakeFix: this.waitTakeFix(); break;
                case Status.TakeFix: this.takeFix(); break;
                case Status.WaitPutFix: this.waitPutFix(); break;
                case Status.PutFix: this.putFix(); break;
                case Status.WaitTakePcb: this.waitTakePcb(); break;
                case Status.TakePcb:
                    this.takePcb();
                    this.RobotStatus = Status.WaitPutPcb; break;
                case Status.WaitPutPcb: this.waitPutPcb(); break;
                case Status.PutPcb: this.putPcb(); break;
                case Status.CheckCpk: this.checkCpk(); break;
                default: break;
            }
            base.handler();
        }
        private void unKnow()
        {
            this.RobotStatus = Status.WaitTakeFix;
        }
        private void waitTakeFix()
        {
            if (this.AllowTakeFix.IsOpen())
            {
                this.RobotStatus = Status.TakeFix;
            }
        }
        private void takeFix()
        {
            this.FixSuction.Open();
            this.Robot.GoToPosition(this.TakeFixPoi);
            this.Sleep(100);
            //到达上方一点
            Position tempFixPoi= this.TakeFixPoi.Copy();
            tempFixPoi.Z += 10;
            this.Robot.GoToPosition(tempFixPoi);
            this.GotoPoiUp(this.Robot, this.TakeFixPoi);
            this.checkSuctionNozzle(this.FixSuction);
            this.TakeFixCompelte.Open();
            this.Robot.GoToPosition(this.SafePoi);
            this.RobotStatus = Status.WaitPutFix;
        }
        private void waitPutFix()
        {
            if (this.AllowPutFix.IsOpen())
            {
                this.RobotStatus = Status.PutFix;
            }
        }
        private void putFix()
        {
            this.Robot.GoToPosition(this.PutFixPoi);
            this.FixSuction.Close();
            this.Sleep(200);
            this.GotoPoiUp(this.Robot, this.PutFixPoi);
            this.ExtendTrackBaffleModule.SetStatusA();
            this.Robot.GoToPosition(this.SafePoi);
            this.RobotStatus = Status.WaitTakePcb;
        }
        private void waitTakePcb()
        {
            if (this.AllowTakeEmptyPcb.IsOpen())
            {
                this.RobotStatus = Status.TakePcb;
            }
        }
        private void waitPutPcb()
        {
            this.RobotStatus = Status.PutPcb;
        }
        private void putPcb()
        {
            if (this.AllowPutEmptyPcb.IsOpen())
            {
                this.fixEmptyPcb();
                this.RobotStatus = Status.CheckCpk;
            }
        }
        private void checkCpk()
        {
            //光板cpk
            this.emptyPcbCpk();
            //放板完成
            this.PutEmptyPcbCompelte.Open();
            this.Robot.GoToPosition(this.SafePoi);
            //到安全点为了给翻转组件留时间
            this.PutEmptyPcbCompelte.Close();
            this.RobotStatus = Status.WaitTakeFix;
        }
        public override bool Dispose()
        {
            this.TakeFixCompelte.Close();
            this.PutEmptyPcbCompelte.Close();
            return base.Dispose();
        }
    }
}
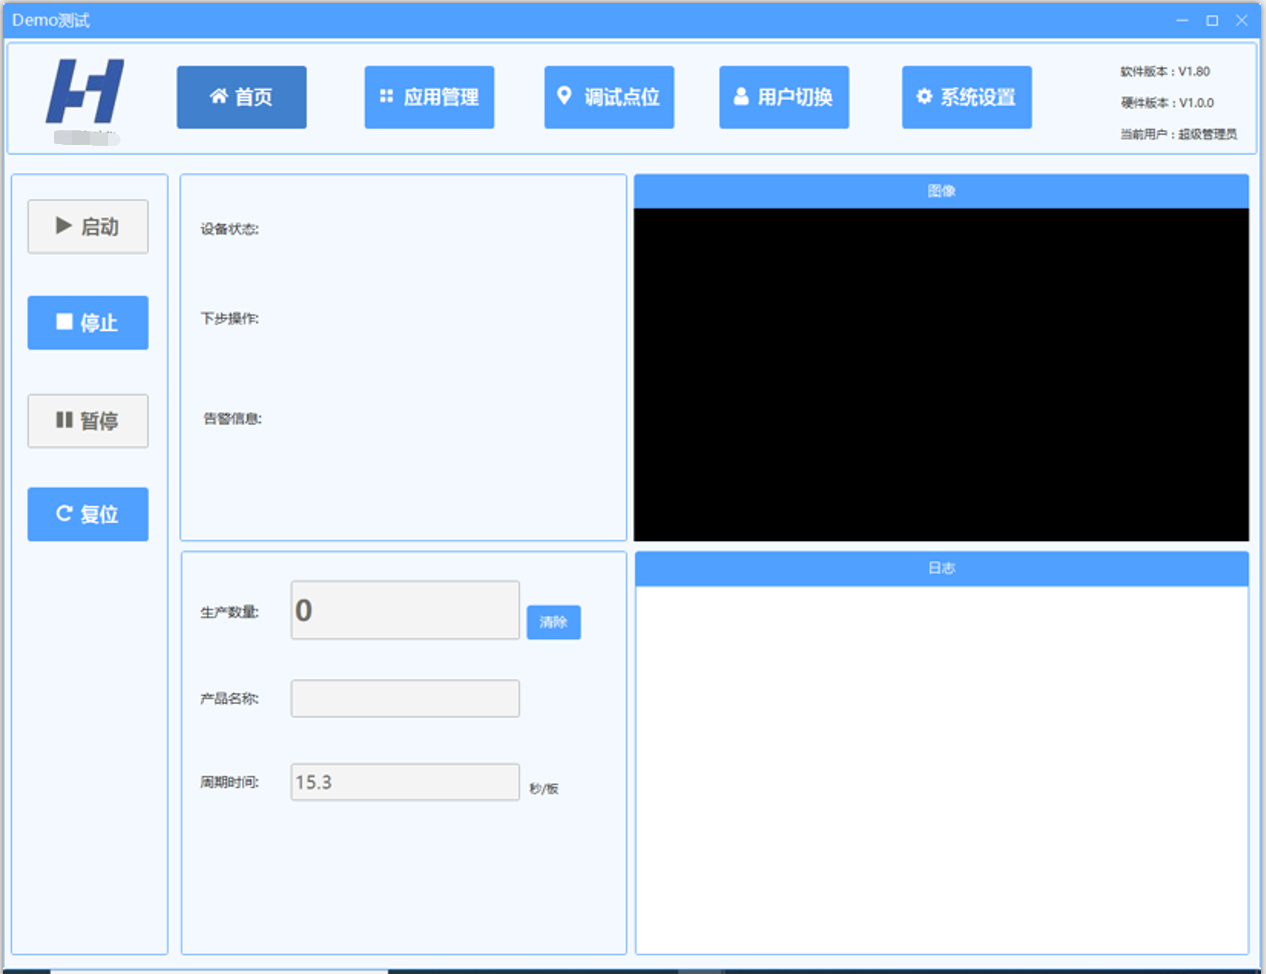
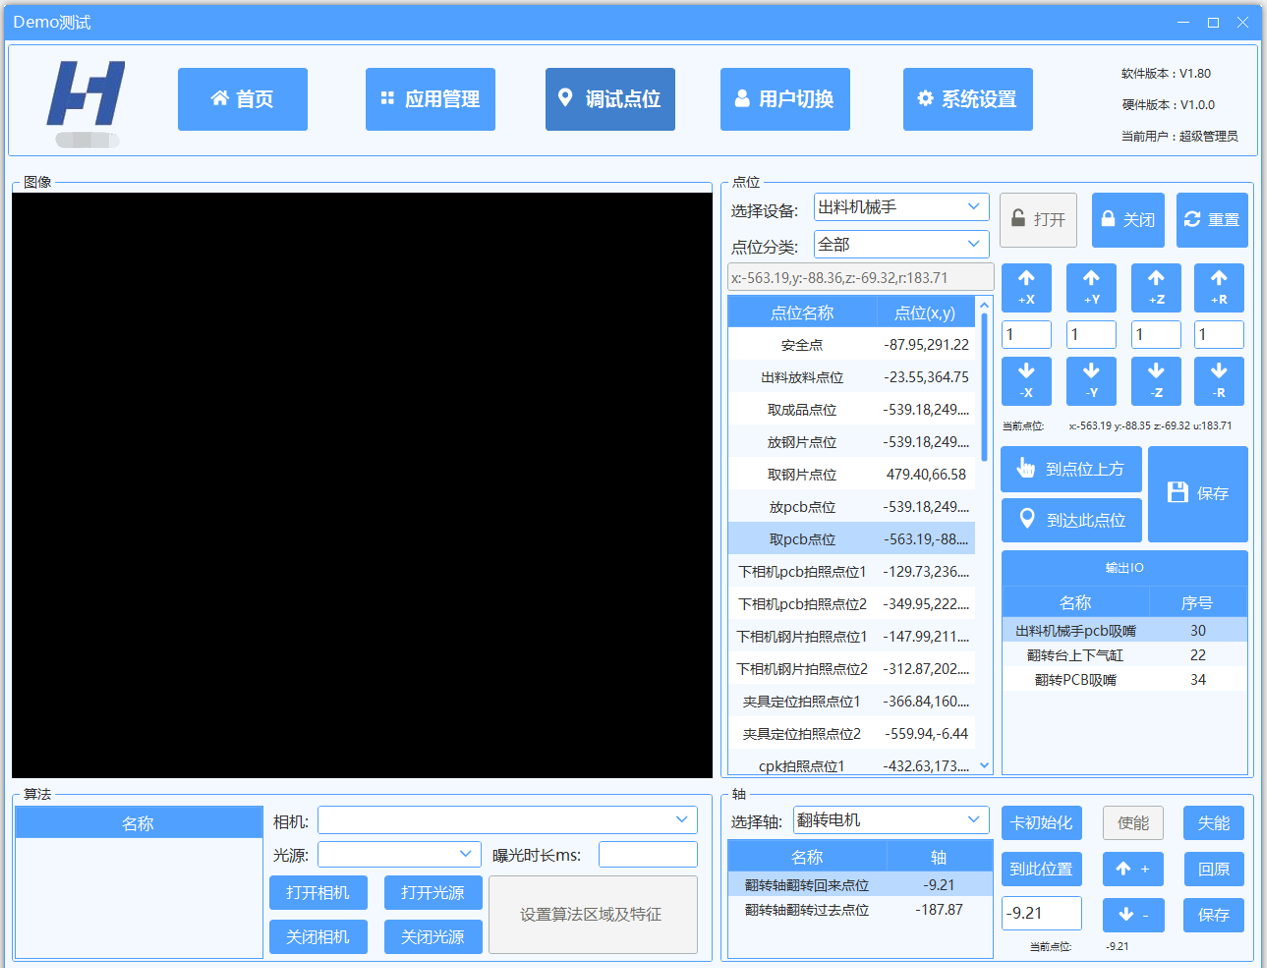
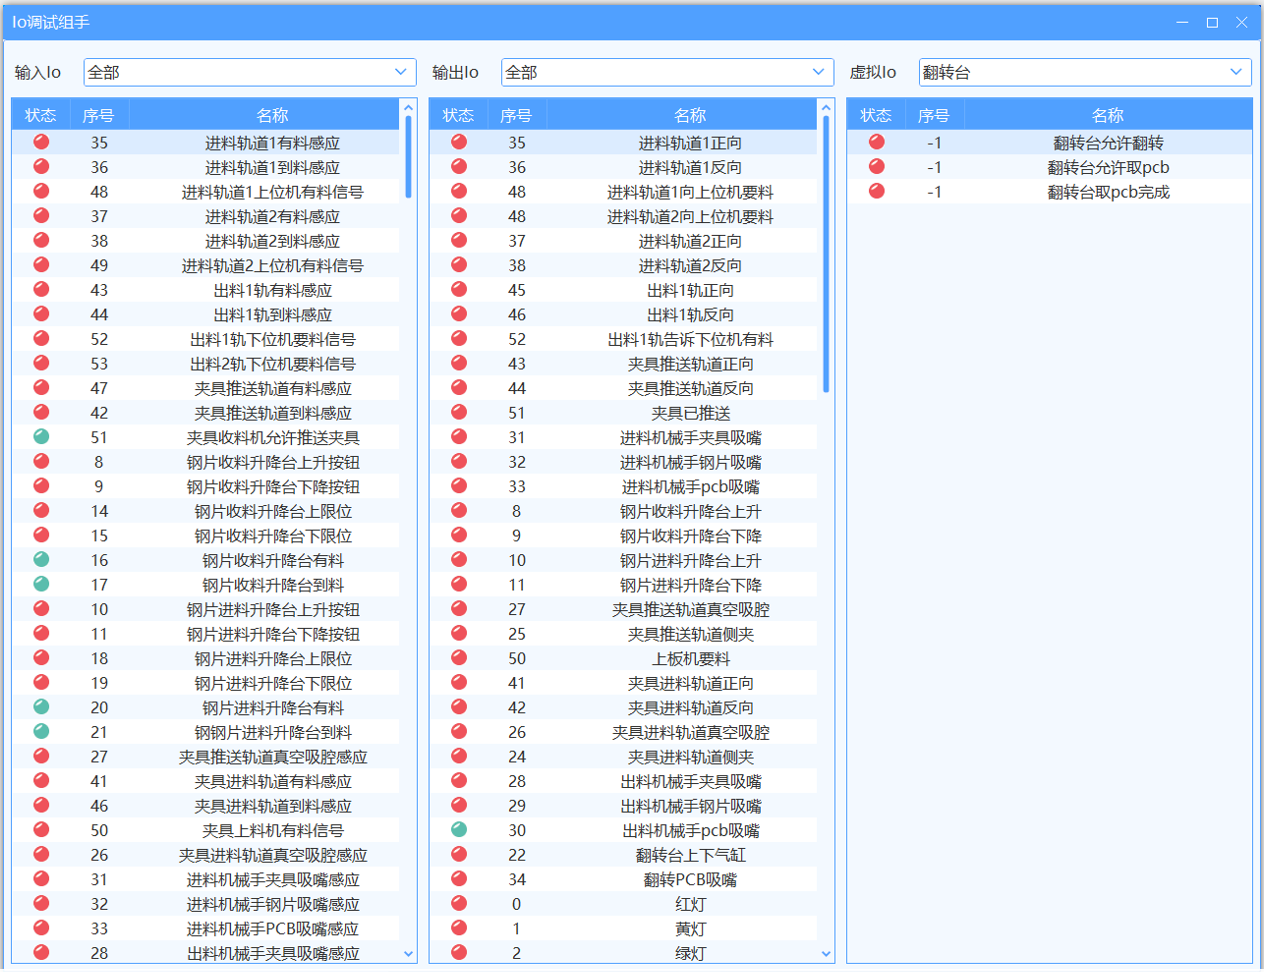
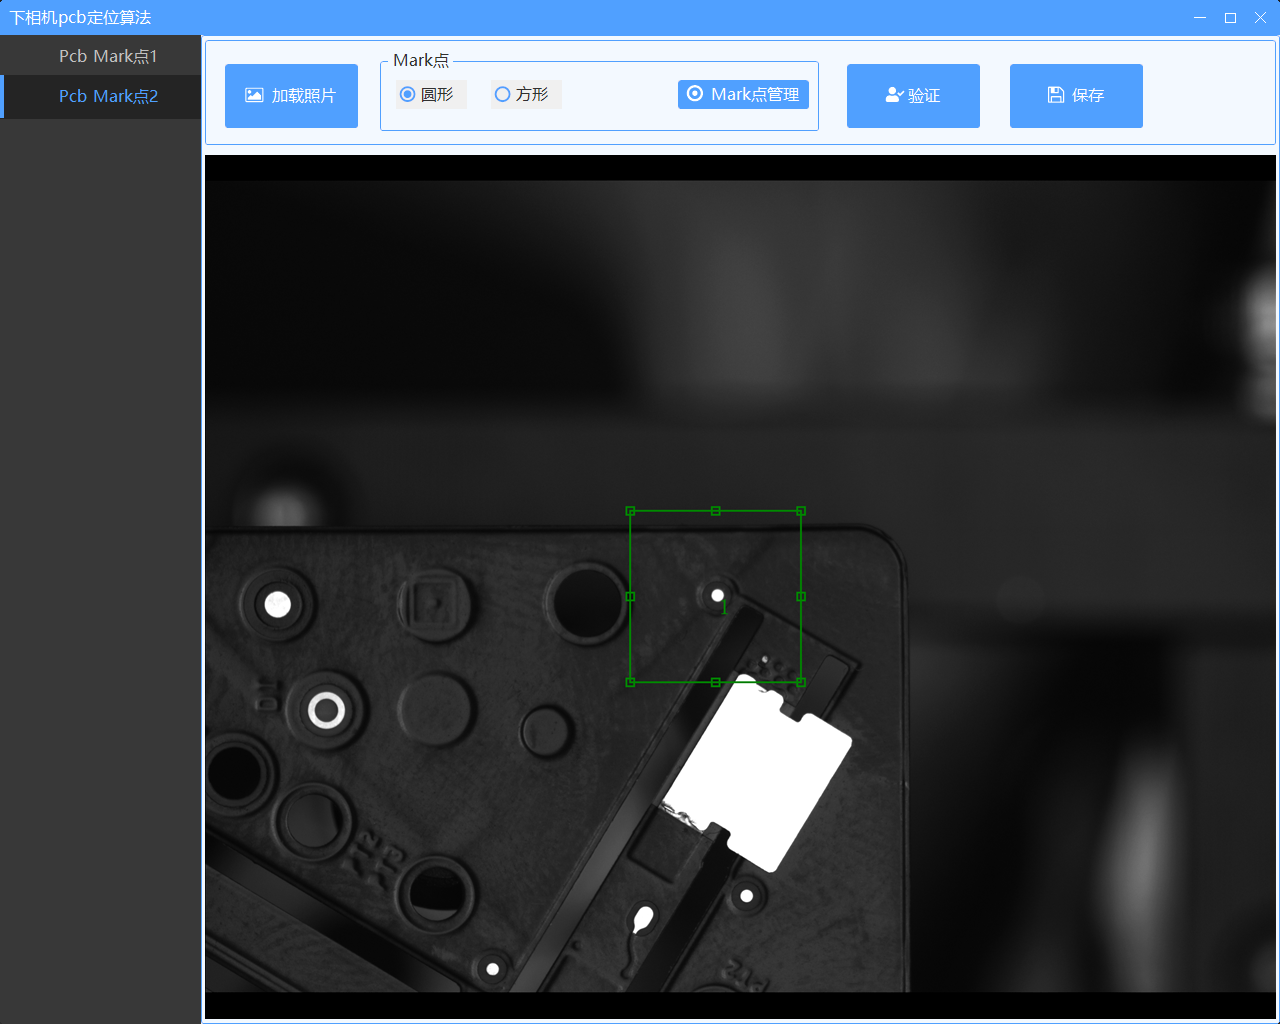
4.界面部分效果
主界面
点位调试,算法,轴,io与点位联动
io助手
算法调试
5.后续计划
- 组件配置的编写逻辑与注入实现
- 基于状态机的组件编写
- 系统暂停继续实现逻辑
- 异常报警继续实现逻辑
- 算法交互部分实现(矩形框的拖拽,缩放,等比例获取区域等)
- 配置热更新实现
Recommend
-
39
Hi,我们做了一款高质量的、免费的移动端UI框架。 经过将两年多开发和项目实践,我们终于把Touch UI开放出来了。这是一套基于vue.js打造的移动端UI框架,包含近百种组件,几乎囊括了开发移动应用的所有细节。 Touch UI有何亮点? 我们认为,一套足够好的移动端UI框...
-
79
社区零食大礼包限量发售: (豆干...
-
10
《ROS移动机器人从0到1》长篇小说第一章----《ROS移动小车整体框架详解》 ...
-
30
高性能消息中间件 NSQ 解析-整体介绍
-
1
Angular框架解读--Ivy编译器整体设计 By 被删 2021-08-15 更新...
-
2
Linux网络源代码学习——整体介绍 | 李乾坤的博客 以下来自linux1.2.13源码,算是参见
-
5
指导整体思维:7 个创新框架,助你超越传统的设计创新点 三分设 2022-10-17 0 评论...
-
6
1. 矩形框控件效果如何? 上下左右等8...
-
3
关于增长,我们可以从很多角度切入,那么在寻求产品商业价值增长的过程中,业务人员要如何找到关键要素,解决产品的增长难题、搭建增长框架?可能你需要抓住“用户规模、用户价值、成本”这三点要素。在本篇文章里,作者便结合经验发表了他关于增长、增长...
-
5
Tomcat 系列篇二-介绍下整体架构前面那一篇感觉上来的有点突兀,还是应该按照架构去慢慢解析,所以这里回归下我们整体的 Tomcat 架构,这里我们通过一个 Tomcat 的配置文件来看看<Server> <Service>...
About Joyk
Aggregate valuable and interesting links.
Joyk means Joy of geeK