
3

业务日志告警如何做?
source link: https://www.yp14.cn/2022/10/23/%E4%B8%9A%E5%8A%A1%E6%97%A5%E5%BF%97%E5%91%8A%E8%AD%A6%E5%A6%82%E4%BD%95%E5%81%9A/
Go to the source link to view the article. You can view the picture content, updated content and better typesetting reading experience. If the link is broken, please click the button below to view the snapshot at that time.

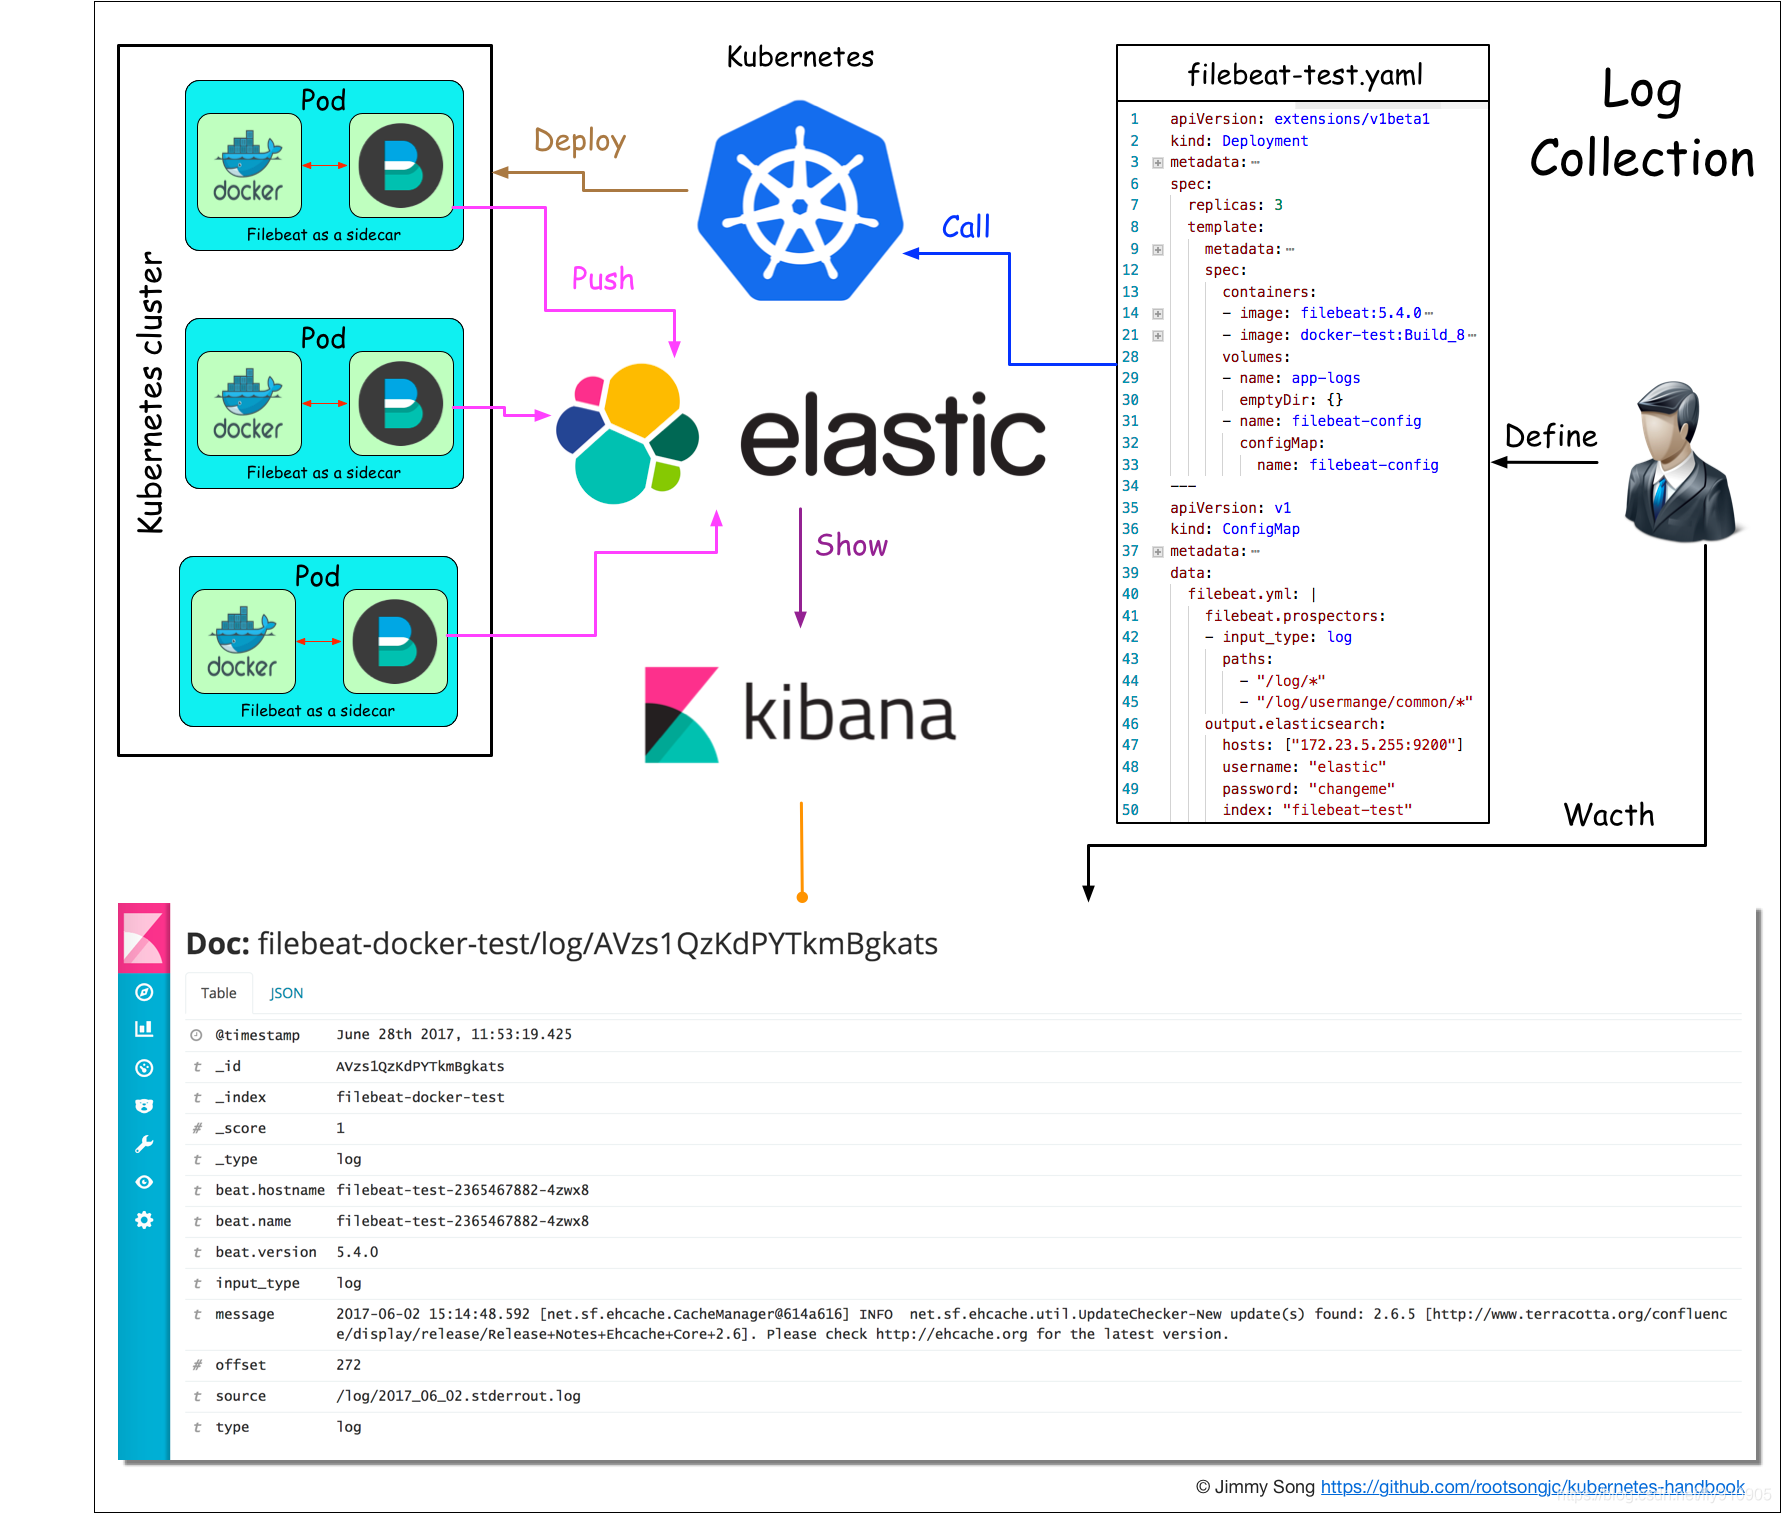
随着 Kubernetes 使用越来越广泛,日志集中收集、展示、告警等都需要考虑的事情。Kubernetes 日志收集方案一般有下面几种:
- 1、日志收集组件以
Daemonset形式运行在 Kubernetes Node 中,业务容器日志目录统一挂载到Node节点指定的目录,日志收集组件读取对应的目录。 - 2、日志收集组件以
Daemonset形式运行在 Kubernetes Node 中,收集业务容器标准输出stdout和stderr日志。 - 3、日志收集组件以
Sidecar形式和业务容器运行在一个pod中,把业务日志目录挂载出来,让同一个Pod中日志收集容器能读取到。
日志收集到集中日志平台,但是另一个问题来了,应该如何对业务日志告警?
下面是一个 Kubernetes 日志收集架构图,比较开源的解决方案。
二、日志格式
下面例举两个日志例子,一个是 Nginx 访问日志,另一个是 Java 业务日志格式
- 1、nginx 访问日志格式
{
  "@timestamp": "2022-10-20T11:47:05+08:00",
  "servername": "www.example.com",
  "remote_addr": "172.20.199.10",
  "referer": "-",
  "request_method": "GET",
  "request_uri": "/",
  "server_protocol": "HTTP/1.1",
  "request_time": "0.000",
  "status": 200,
  "bytes": 577,
  "useragent": "Mozilla/5.0 (Windows NT 6.1; WOW64) AppleWebKit/537.36 (KHTML, like Gecko) Chrome/65.0.3325.162 Safari/537.36",
  "x_forwarded": "172.18.25.11, 100.122.43.140",
  "upstr_addr": "172.20.199.20:8080",
  "upstr_host": "-",
  "ups_resp_time": "0.01"
}
- 2、java 业务日志格式
{
  "@timestamp": "2022-10-20T19:14:26.875+08:00",
  "level": "INFO",
  "appName": "test-service",
  "requestId": "",
  "remoteIp": "",
  "traceId": "",
  "spanId": "",
  "parent": "",
  "thread": "XNIO-1 task-14",
  "class": "c.c.common.security.util.SecurityUtil",
  "line": "118",
  "message": "没有登录",
  "stack_trace": "java.lang.ClassCastException: null\n"
}
三、告警要求
- 1、Nginx 访问日志,1分钟内,需要把 Http 状态码是
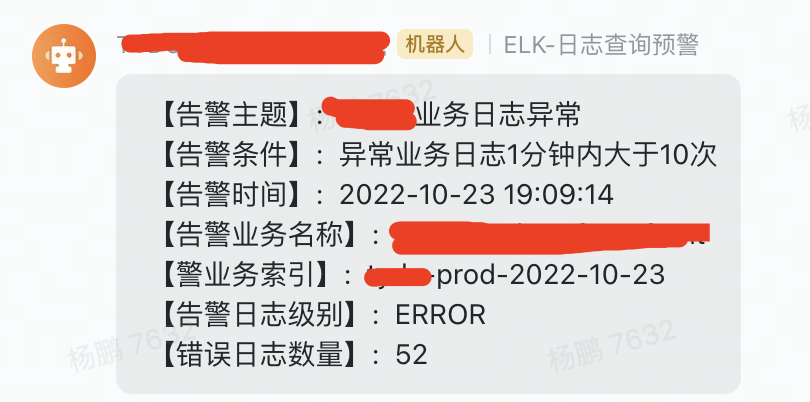
404、429、499、5xx大于10条就告警 - 2、java 业务日志格式,1分钟内,日志级别(level)是
ERROR并且总数大于10条就告警 - 3、通过
钉钉机器人或者飞书机器人告警
四、如何根据日志告警?
本文日志存储在
Elasticsearch中
本文使用 ElastAlert 服务来实现告警,简单介绍下 ElastAlert 是什么?
ElastAlert 是一个简单的框架,用于从检索Elasticsearch中的数据异常,尖峰等来实现告警。
它通过将Elasticsearch与两种类型的组件(规则类型和警报)结合使用。定期查询Elasticsearch,并将数据传递到规则类型,该规则类型确定找到任何匹配项。发生匹配时,它会发出一个或多个警报,这些警报根据不同的类型采取相应的措施。
ElastAlert由一组规则配置,每个规则定义一个查询,一个规则类型和一组警报。
ElastAlert 特性
- 架构简单,定制灵活
- 支持多种匹配规则(频率、阈值、数据变化、黑白名单、变化率等)
- 支持多种警报类型(邮件、HTTP POST、自定义脚本等,
默认不支持 钉钉机器人、飞书机器人等) - 匹配项汇总报警,重复警报抑制,报警失败重试和过期
- 可用性强,状态信息保存到Elasticsearch的索引中
- 过程的调试和审计等
ElastAlert 可用性
- ElastAlert 将其状态保存到 Elasticsearch,启动后,将恢复之前停止的状态
- 如果 Elasticsearch 没有响应,ElastAlert 将等到恢复后才继续
- 抛出错误的警报可能会在一段时间内自动重试
ElastAlert 部署
项目地址:https://github.com/bitsensor/elastalert.git,官方提供 docker 镜像,但并不是很好用,这里作者重新构建一个docker镜像。
ElastAlert 告警监控展示
- 1、钉钉机器人告警展示

- 2、飞书机器人告警展示
构建 elastalert 镜像
# 下载 ElastAlert 代码
$ git clone https://github.com/bitsensor/elastalert.git
$ cd elastalert

# 创建 Dockerfile,ElastAlert 默认不支持 钉钉机器人、飞书机器人,这里需要扩展下
$ vim Dockerfile

FROM python:3.6-alpine as pyea

ENV ELASTALERT_VERSION=v0.2.4
ENV ELASTALERT_URL=https://github.com/Yelp/elastalert/archive/$ELASTALERT_VERSION.zip
ENV ELASTALERT_HOME /opt/elastalert

WORKDIR /opt

RUN sed -i 's/dl-cdn.alpinelinux.org/mirrors.aliyun.com/g' /etc/apk/repositories && \
    apk add --update --no-cache ca-certificates openssl-dev openssl libffi-dev gcc musl-dev wget && \
    apk add --update --no-cache curl tzdata make libmagic nodejs npm && \
    apk add --update --no-cache tzdata && \
    cp /usr/share/zoneinfo/Asia/Shanghai /etc/localtime && \
    echo "Asia/Shanghai" > /etc/timezone && \
    wget -O elastalert.zip "${ELASTALERT_URL}" && \
    unzip elastalert.zip && \
    rm elastalert.zip && \
    mv e* "${ELASTALERT_HOME}"

ENV TZ Asia/Shanghai

WORKDIR "${ELASTALERT_HOME}"

RUN mkdir ~/.pip && \
    echo '[global]' >> ~/.pip/pip.conf && \
    echo 'index-url = https://pypi.tuna.tsinghua.edu.cn/simple' >> ~/.pip/pip.conf && \
    /usr/local/bin/python3 -m pip install --upgrade pip && \
    pip3 install cryptography==3.3.2 && \
    sed -i 's/jira>=1.0.10,<1.0.15/jira>=2.0.0/g' setup.py && \
    python3 setup.py install && \
    pip3 install "setuptools==46.1.3" && \
    pip3 install pyOpenSSL==16.2.0 && \
    sed -i 's/jira>=1.0.10,<1.0.15/jira>=2.0.0/g' requirements.txt && \
    pip3 install -r requirements.txt

RUN cd /opt && \
    wget https://github.com/xuyaoqiang/elastalert-dingtalk-plugin/archive/master.zip && \
    unzip master.zip && \
    rm -f master.zip && \
    cd elastalert-dingtalk-plugin-master && \
    cp -r elastalert_modules /opt/elastalert/

COPY . /opt/elastalert-server

WORKDIR /opt/elastalert-server

RUN sed -i '1i process.env.TZ = "Asia/Shanghai";' index.js && \
    npm --registry https://registry.npm.taobao.org install --production --quiet

COPY config/elastalert.yaml /opt/elastalert/config.yaml
COPY config/elastalert-test.yaml /opt/elastalert/config-test.yaml
COPY config/config.json config/config.json
COPY rule_templates/ /opt/elastalert/rule_templates
COPY elastalert_modules/ /opt/elastalert/elastalert_modules

RUN mkdir -p /opt/elastalert/rules/ /opt/elastalert/server_data/tests/ && \
    cd /opt/elastalert/elastalert_modules && \
    wget https://raw.githubusercontent.com/gpYang/elastalert-feishu-plugin/main/elastalert_modules/feishu_alert.py

EXPOSE 3030
ENTRYPOINT ["npm", "start"]

# 构建 ElastAlert 镜像
$ docker build -t yangpeng2468/elastalert:v0.2.4 . -f Dockerfile
上传到 dockerhub 个人仓库中,提供给大家下载
$ docker push yangpeng2468/elastalert:v0.2.4
配置 ElastAlert 并启动
- 1、首先创建 config.json 配置文件
# 创建配置文件目录
$ mkdir -p /data/elastalert/config /data/elastalert/rules /data/elastalert/rule_templates

$ vim config/config.json

{
  "appName": "elastalert-server",
  "port": 3030,
  "wsport": 3333,
  "elastalertPath": "/opt/elastalert",
  "verbose": false,
  "es_debug": false,
  "debug": false,
  "rulesPath": {
    "relative": true,
    "path": "/rules"
  },
  "templatesPath": {
    "relative": true,
    "path": "/rule_templates"
  },
  "es_host": "xx.xx.xx.xx", # es 地址
  "es_port": 9200,
  "writeback_index": "elastalert_status"
}
- 2、创建 elastalert.yaml 配置文件
$ vim config/elastalert.yaml

# The elasticsearch hostname for metadata writeback
# Note that every rule can have its own elasticsearch host
es_host: xx.xx.xx.xx # es 地址

# The elasticsearch port
es_port: 9200

# ElastAlert从中加载规则配置文件的位置
rules_folder: rules

# ElastAlert多久查询一次Elasticsearch的时间
run_every:
  minutes: 10

# 用来设置请求里时间字段的范围,默认是15分钟
buffer_time:
  minutes: 10

# Option basic-auth username and password for elasticsearch
es_username: elastic
es_password: xxx # es 密码

# 是ElastAlert将在其中存储数据的索引的名称
writeback_index: elastalert_status

# 别名
writeback_alias: elastalert_alerts

# 失败警报的重试窗口
alert_time_limit:
  days: 2
- 3、创建 nginx 访问日志报警文件
$ vim rules/nginx.yaml

#rule name 必须是独一的,不然会报错,这个定义完成之后,会成为报警的标题
name: nginx-access-alert

#配置的是frequency,需要两个条件满足,在相同 query_key条件下,timeframe 范围内有num_events个被过滤出来的异常
type: frequency

#指定index,支持正则匹配同时如果嫌麻烦直接* 也可
index: nginx-*-prod-%Y-%m-%d
use_strftime_index: true

#时间触发的次数
num_events: 10

#和num_events参数关联,也就是说1分钟内出现10次会报警
timeframe:
  minutes: 1

#同一规则的两次警报之间的最短时间。在此时间内发生的任何警报都将被丢弃。默认值为一分钟。
realert:
  minutes: 3

#防止同一条规则在一段时间内发出两次警报
#realert:
#  days: 1

# query_key 用来防止基于某个字段的重复项
realert:
  minutes: 10
query_key: servername

#用来拼配告警规则,elasticsearch 的query语句,支持 AND&OR等
filter:
- query:
    query_string:
      query: "status: [500 TO 599] OR status: 429 OR status: 404"

#只需要的字段 https://elastalert.readthedocs.io/en/latest/ruletypes.html#include
include: ["servername", "request_method", "request_uri", "remote_addr", "@timestamp", "status", "request_time", "ups_resp_time", "x_forwarded", "upstr_addr"]

#告警方式,钉钉 和 飞书 告警,可以只选择一种就行
alert:
- "elastalert_modules.dingtalk_alert.DingTalkAlerter"
- "elastalert_modules.feishu_alert.FeishuAlert"

# 钉钉机器人接口地址
dingtalk_webhook: "https://oapi.dingtalk.com/robot/send?access_token=xxx"
dingtalk_msgtype: "text"
alert_subject: "Nginx访问日志异常"
alert_text_type: alert_text_only
alert_text: |
 【告警主题】 Nginx访问日志异常
 【告警条件】 异常访问日志1分钟内大于10次
 【告警时间(UTC)】 {}
 【告警域名】 {}
 【状态码】 {}
 【请求URL】 {}
 【请求协议】 {}
 【客户端IP】 {}
 【响应时间】 {}
 【后端响应时间】 {}
 【后端请求主机】 {}
 【异常状态码数量】 {}
alert_text_args:
 - "@timestamp"
 - servername
 - status
 - request_uri
 - request_method
 - x_forwarded
 - request_time
 - ups_resp_time
 - upstr_addr
 - num_hits

# 飞书机器人接口地址
feishualert_url: "https://open.feishu.cn/open-apis/bot/v2/hook/"

# 飞书机器人id
feishualert_botid:
  "xxx"

# 告警标题
feishualert_title:
  "Nginx访问日志异常"

# 这个时间段内的匹配将不告警,适用于某些时间段请求低谷避免误报警
feishualert_skip:
  start: "00:00:00"
  end: "00:01:00"

# 告警内容
# 使用{}可匹配matches
feishualert_body:
  "
  【告警主题】:  {feishualert_title}\n
  【告警条件】:  异常访问日志1分钟内大于10次\n
  【告警时间】:  {feishualert_time}\n
  【告警域名】:  {servername}\n
  【状态码】:  {status}\n
  【请求URL】:  {request_uri}\n
  【请求协议】:  {request_method}\n
  【客户端IP】:  {x_forwarded}\n
  【响应时间】:  {request_time}\n
  【后端响应时间】:  {ups_resp_time}\n
  【后端请求主机】:  {upstr_addr}\n
  【异常状态码数量】:  {num_hits}
  "
- 4、创建 java 业务日志报警文件
$ vim rules/java.yaml

#rule name 必须是独一的,不然会报错,这个定义完成之后,会成为报警的标题
name: java-prod-alert

#配置的是frequency,需要两个条件满足,在相同 query_key条件下,timeframe 范围内有num_events个被过滤出来的异常
type: frequency

#指定index,支持正则匹配同时如果嫌麻烦直接* 也可
index: java-*-prod-%Y-%m-%d
use_strftime_index: true

#时间触发的次数
num_events: 10

#和num_events参数关联,也就是说1分钟内出现10次会报警
timeframe:
  minutes: 1

#同一规则的两次警报之间的最短时间。在此时间内发生的任何警报都将被丢弃。默认值为一分钟。
realert:
  minutes: 3

#防止同一条规则在一段时间内发出两次警报
#realert:
#  days: 1

# query_key 用来防止基于某个字段的重复项
realert:
  minutes: 15
query_key: applicationName

#用来拼配告警规则,elasticsearch 的query语句,支持 AND&OR等
filter:
- query:
    query_string:
      query: "level: ERROR"

#只需要的字段 https://elastalert.readthedocs.io/en/latest/ruletypes.html#include
include: ["applicationName", "level", "@timestamp", "_index"]

#告警方式,钉钉 和 飞书 告警,可以只选择一种就行
alert:
- "elastalert_modules.dingtalk_alert.DingTalkAlerter"
- "elastalert_modules.feishu_alert.FeishuAlert"

# 钉钉机器人接口地址
dingtalk_webhook: "https://oapi.dingtalk.com/robot/send?access_token=xxx"
dingtalk_msgtype: "text"
alert_subject: "java业务日志异常"
alert_text_type: alert_text_only
alert_text: |
 【告警主题】 java业务日志异常
 【告警条件】 异常业务日志1分钟内大于10次
 【告警时间(UTC)】 {}
 【告警业务名称】 {}
 【告警业务索引】 {}
 【告警日志级别】 {}
 【错误日志数量】 {}
alert_text_args:
 - "@timestamp"
 - applicationName
 - _index
 - level
 - num_hits


# 飞书机器人接口地址
feishualert_url: "https://open.feishu.cn/open-apis/bot/v2/hook/"

# 飞书机器人id
feishualert_botid:
  "xxx"

# 告警标题
feishualert_title:
  "toB业务日志异常"

# 这个时间段内的匹配将不告警,适用于某些时间段请求低谷避免误报警
feishualert_skip:
  start: "00:00:00"
  end: "00:01:00"

# 告警内容
# 使用{}可匹配matches
feishualert_body:
  "
  【告警主题】:  {feishualert_title}\n
  【告警条件】:  异常业务日志1分钟内大于10次\n
  【告警时间】:  {feishualert_time}\n
  【告警业务名称】:  {applicationName}\n
  【警业务索引】:  {_index}\n
  【告警日志级别】:  {level}\n
  【错误日志数量】:  {num_hits}
  "
- 5、创建 ElastAlert 镜像启动脚本
$ cd /data/elastalert
$ vim run.sh

docker run -d --restart always -p 3030:3030 -p 3333:3333 \
    --name elastalert \
    --hostname elastalert \
    -v /data/elastalert/config/elastalert.yaml:/opt/elastalert/config.yaml \
    -v /data/elastalert/config/elastalert-test.yaml:/opt/elastalert/config-test.yaml \
    -v /data/elastalert/config/config.json:/opt/elastalert-server/config/config.json \
    -v /data/elastalert/rules:/opt/elastalert/rules \
    -v /data/elastalert/rule_templates:/opt/elastalert/rule_templates \
    yangpeng2468/elastalert:v0.2.4

# 启动
$ sh run.sh
五、参考文档
---本文结束感谢您的阅读。微信扫描二维码,关注我的公众号---

Recommend
About Joyk
Aggregate valuable and interesting links.
Joyk means Joy of geeK