
0

五个有趣的Python脚本
source link: https://www.51cto.com/article/720383.html
Go to the source link to view the article. You can view the picture content, updated content and better typesetting reading experience. If the link is broken, please click the button below to view the snapshot at that time.

五个有趣的Python脚本
作者:佚名 2022-10-10 23:19:02
Python可以玩的方向有很多,比如爬虫、预测分析、GUI、自动化、图像处理、可视化等等,可能只需要十几行代码就能实现酷炫的功能。
Python可以玩的方向有很多,比如爬虫、预测分析、GUI、自动化、图像处理、可视化等等,可能只需要十几行代码就能实现酷炫的功能。
因为Python是动态脚本语言,所以代码逻辑比Java要简要很多,实现同样的功能少写很多代码。而且Python生态有众多的第三方工具库,把功能都封装在包里,只需要你调用接口,就能使用复杂的功能。
下面举几个简单好玩的脚本例子,初学者可以照着代码写写,能快速掌握python语法。
1、使用PIL、Matplotlib、Numpy对模糊老照片进行修复

import numpy as np
import matplotlib.pyplot as plt
from PIL import Image
import os.path

img_path = "E:\\test.jpg"
img = Image.open(img_path)


img = np.asarray(img)
flat = img.flatten()


def get_histogram(image, bins):

    histogram = np.zeros(bins)

    for pixel in image:
        histogram[pixel] += 1

    return histogram


hist = get_histogram(flat, 256)


cs = np.cumsum(hist)


nj = (cs - cs.min()) * 255
N = cs.max() - cs.min()


cs = nj / N


cs = cs.astype('uint8')


img_new = cs[flat]


img_new = np.reshape(img_new, img.shape)


fig = plt.figure()
fig.set_figheight(15)
fig.set_figwidth(15)


fig.add_subplot(1, 2, 1)
plt.imshow(img, cmap='gray')
plt.title("Image 'Before' Contrast Adjustment")


fig.add_subplot(1, 2, 2)
plt.imshow(img_new, cmap='gray')
plt.title("Image 'After' Contrast Adjustment")
filename = os.path.basename(img_path)


plt.show()
2、将文件批量压缩,使用zipfile库
import os
import zipfile
from random import randrange


def zip_dir(path, zip_handler):
    for root, dirs, files in os.walk(path):
        for file in files:
            zip_handler.write(os.path.join(root, file))


if __name__ == '__main__':
    to_zip = input("""
Enter the name of the folder you want to zip
(N.B.: The folder name should not contain blank spaces)
>
""")
    to_zip = to_zip.strip() + "/"
    zip_file_name = f'zip{randrange(0,10000)}.zip'
    zip_file = zipfile.ZipFile(zip_file_name, 'w', zipfile.ZIP_DEFLATED)
    zip_dir(to_zip, zip_file)
    zip_file.close()
    print(f'File Saved as {zip_file_name}')
3、使用tkinter制作计算器GUI
tkinter是python自带的GUI库,适合初学者练手创建小软件
import tkinter as tk
root = tk.Tk()
root.title("Standard Calculator")
root.resizable(0, 0)
e = tk.Entry(root,
width=35,
bg='#f0ffff',
fg='black',
borderwidth=5,
justify='right',
font='Calibri 15')
e.grid(row=0, column=0, columnspan=3, padx=12, pady=12)
def buttonClick(num):
temp = e.get(
)
e.delete(0, tk.END)
e.insert(0, temp + num)
def buttonClear():
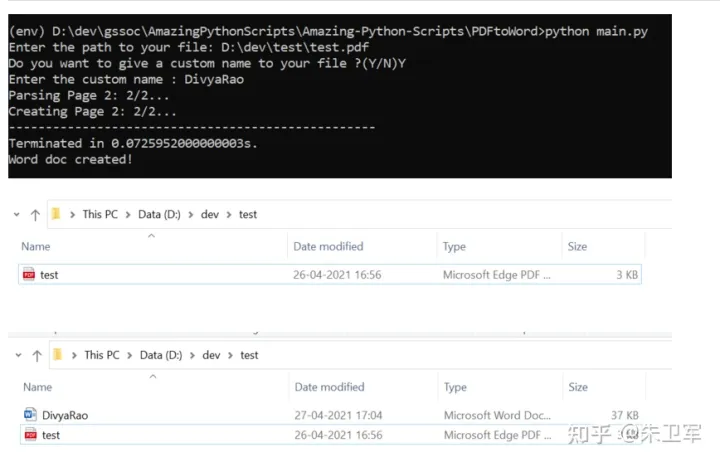
e.delete(0, tk.END)4、PDF转换为Word文件
使用pdf2docx库,可以将PDF文件转为Word格式
from pdf2docx import Converter
import os
import sys
pdf = input("Enter the path to your file: ")
assert os.path.exists(pdf), "File not found at, "+str(pdf)
f = open(pdf,'r+')
doc_name_choice = input("Do you want to give a custom name to your file ?(Y/N)")
if(doc_name_choice == 'Y' or doc_name_choice == 'y'):
doc_name = input("Enter the custom name : ")+".docx"
else:
pdf_name = os.path.basename(pdf)
doc_name = os.path.splitext(pdf_name)[0] + ".docx"
cv = Converter(pdf)
path = os.path.dirname(pdf)
cv.convert(os.path.join(path, "", doc_name) , start=0, end=None)
print("Word doc created!")
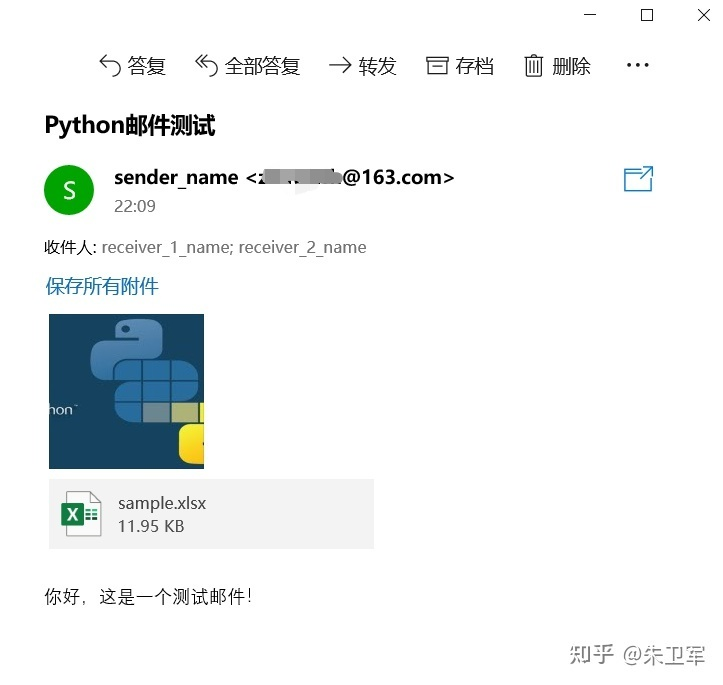
cv.close()5、Python自动发送邮件
使用smtplib和email库可以实现脚本发送邮件。
import smtplib
import email

from email.mime.text import MIMEText

from email.mime.image import MIMEImage

from email.mime.multipart import MIMEMultipart
from email.header import Header


mail_host = "smtp.163.com"

mail_sender = "******@163.com"

mail_license = "********"

mail_receivers = ["******@qq.com","******@outlook.com"]

mm = MIMEMultipart('related')


subject_content = """Python邮件测试"""

mm["From"] = "sender_name<******@163.com>"

mm["To"] = "receiver_1_name<******@qq.com>,receiver_2_name<******@outlook.com>"

mm["Subject"] = Header(subject_content,'utf-8')


body_content = """你好,这是一个测试邮件!"""

message_text = MIMEText(body_content,"plain","utf-8")

mm.attach(message_text)


image_data = open('a.jpg','rb')

message_image = MIMEImage(image_data.read())

image_data.close()

mm.attach(message_image)


atta = MIMEText(open('sample.xlsx', 'rb').read(), 'base64', 'utf-8')

atta["Content-Disposition"] = 'attachment; filename="sample.xlsx"'

mm.attach(atta)


stp = smtplib.SMTP()

stp.connect(mail_host, 25)

stp.set_debuglevel(1)

stp.login(mail_sender,mail_license)

stp.sendmail(mail_sender, mail_receivers, mm.as_string())
print("邮件发送成功")

stp.quit()
Python还有很多好玩的小脚本,你可以根据自己的场景来编写,也可以使用现成的第三方库。
责任编辑:华轩
来源:
Python大数据分析
Recommend
About Joyk
Aggregate valuable and interesting links.
Joyk means Joy of geeK