
6

Vue实现拖拽穿梭框功能四种方式 - 程序猿咬棒棒糖拽天下
source link: https://www.cnblogs.com/mochenxiya/p/16739918.html
Go to the source link to view the article. You can view the picture content, updated content and better typesetting reading experience. If the link is broken, please click the button below to view the snapshot at that time.

一、使用原生js实现拖拽
<html lang="en">
    <head>
      <meta charset="UTF-8" />
      <title>Lazyload</title>
      <style>
        .drag {
          background-color: skyblue;
          position: absolute;
          line-height: 100px;
          text-align: center;
          width: 100px;
          height: 100px;
        }
      </style>
    </head>
    <body>
      <!-- left和top要写在行内样式里面 -->
      <div class="drag" style="left: 0; top: 0">按住拖动</div>
      <script src="./jquery-3.6.0.min.js"></script>
      <script>
        // 获取DOM元素
        let dragDiv = document.getElementsByClassName('drag')[0]
        // 鼠标按下事件 处理程序
        let putDown = function (event) {
          dragDiv.style.cursor = 'pointer'
          let offsetX = parseInt(dragDiv.style.left) // 获取当前的x轴距离
          let offsetY = parseInt(dragDiv.style.top) // 获取当前的y轴距离
          let innerX = event.clientX - offsetX // 获取鼠标在方块内的x轴距
          let innerY = event.clientY - offsetY // 获取鼠标在方块内的y轴距
          // 按住鼠标时为div添加一个border
          dragDiv.style.borderStyle = 'solid'
          dragDiv.style.borderColor = 'red'
          dragDiv.style.borderWidth = '3px'
          // 鼠标移动的时候不停的修改div的left和top值
          document.onmousemove = function (event) {
            dragDiv.style.left = event.clientX - innerX + 'px'
            dragDiv.style.top = event.clientY - innerY + 'px'
            // 边界判断
            if (parseInt(dragDiv.style.left) <= 0) {
              dragDiv.style.left = '0px'
            }
            if (parseInt(dragDiv.style.top) <= 0) {
              dragDiv.style.top = '0px'
            }
            if (
              parseInt(dragDiv.style.left) >=
              window.innerWidth - parseInt(dragDiv.style.width)
            ) {
              dragDiv.style.left =
                window.innerWidth - parseInt(dragDiv.style.width) + 'px'
            }
            if (
              parseInt(dragDiv.style.top) >=
              window.innerHeight - parseInt(dragDiv.style.height)
            ) {
              dragDiv.style.top =
                window.innerHeight - parseInt(dragDiv.style.height) + 'px'
            }
          }
          // 鼠标抬起时,清除绑定在文档上的mousemove和mouseup事件
          // 否则鼠标抬起后还可以继续拖拽方块
          document.onmouseup = function () {
            document.onmousemove = null
            document.onmouseup = null
            // 清除border
            dragDiv.style.borderStyle = ''
            dragDiv.style.borderColor = ''
            dragDiv.style.borderWidth = ''
          }
        }
        // 绑定鼠标按下事件
        dragDiv.addEventListener('mousedown', putDown, false)
      </script>
    </body>
  </html>
二、VUe使用js实现拖拽穿梭框
<template>
<div>
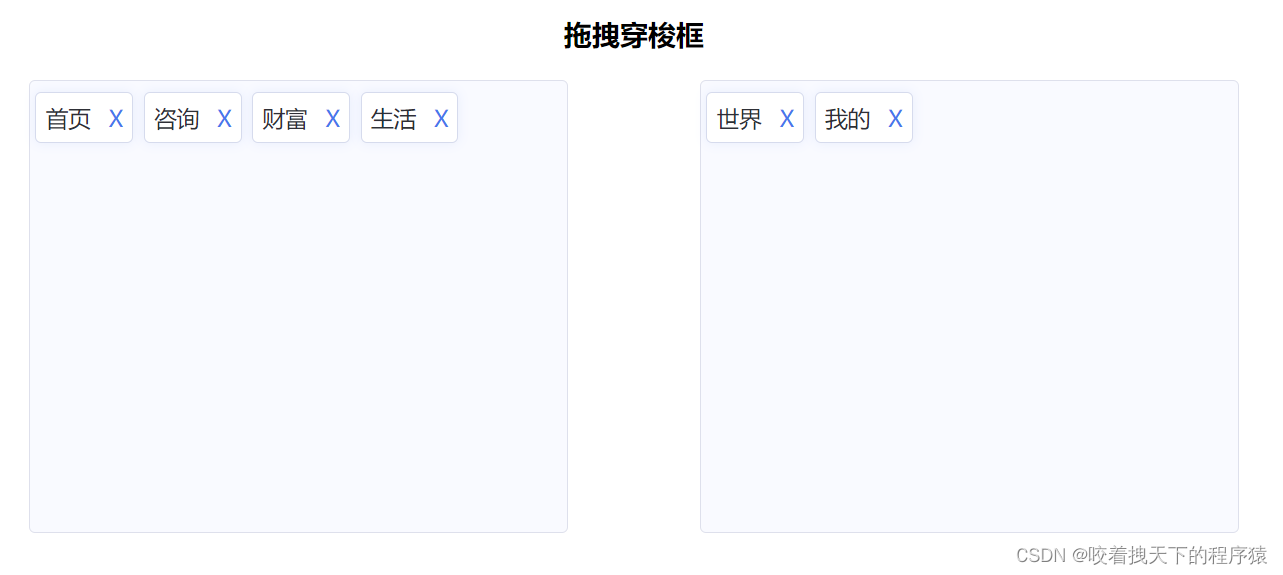
<h3 style="text-align: center">拖拽穿梭框</h3>
<div id="home" @mousemove="mousemove($event)">
<div class="tree-select-content">
<span
class="select-content"
:id="'mouse' + index"
v-for="(item, index) in leftData"
:key="item.id"
@mousedown="mousedown(index, 1)"
@mouseup="mouseup(item, 1, index)"
>
<span class="select-text">{{ item.label }}</span>
<span class="select-text-X" @click="handerClickX(item, index, 1)"
>X</span
>
</span>
</div>
<div class="tree-select-content">
<span
class="select-content"
:id="'deleteMouse' + index"
v-for="(item, index) in rightData"
:key="item.id"
@mousedown="mousedown(index, 2)"
@mouseup="mouseup(item, 2, index)"
>
<span class="select-text">{{ item.label }}</span>
<span class="select-text-X" @click="handerClickX(item, index, 2)"
>X</span
>
</span>
</div>
</div>
</div>
</template>
<script>
export default {
name: "home",
data() {
return {
leftData: [
{ label: "首页", id: 1 },
{ label: "咨询", id: 2 },
{ label: "生活", id: 3 },
{ label: "财富", id: 4 },
{ label: "我的", id: 5 },
],
rightData: [{ label: "世界", id: 6 }],
isMoveTrue: false,
isMove: false,
moveId: "",
};
},
mounted() {},
components: {},
methods: {
mousedown(index, val) {
this.isMoveTrue = true;
if (val == 1) {
this.moveId = "mouse" + index;
} else {
this.moveId = "deleteMouse" + index;
}
},
mousemove(event) {
if (this.isMoveTrue) {
this.isMove = true;
document.getElementById(this.moveId).style.position = "absolute";
document.getElementById(this.moveId).style.top = event.clientY + "px";
document.getElementById(this.moveId).style.left = event.clientX + "px";
document.getElementById(this.moveId).style.transform =
"translate(-50%,-50%)";
}
},
mouseup(item, val, index) {
if (!this.isMove) {
this.isMoveTrue = false;
this.moveId = "";
}
if (this.isMoveTrue && val == 2) {
this.$nextTick(() => {
this.rightData.splice(index, 1);
this.leftData.push(item);
});
} else if (this.isMoveTrue && val) {
this.leftData.splice(index, 1);
this.rightData.push(item);
}
document.getElementById(this.moveId).style.display = "none";
this.isMoveTrue = false;
this.isMove = false;
this.moveId = "";
},
handerClickX(item, index, val) {
if (val == 1) {
this.leftData.splice(index, 1);
this.rightData.push(item);
} else {
this.rightData.splice(index, 1);
this.leftData.push(item);
}
},
},
};
</script>
<style scoped>
#home {
display: flex;
justify-content: space-around;
}
.tree-select-content {
width: 40%;
height: 300px;
background: #f9faff;
border: 1px solid #dee0ec;
border-radius: 4px;
display: flex;
flex-wrap: wrap;
align-content: baseline;
}
.select-content {
width: max-content;
height: 20px;
padding: 1.6%;
border: 1px solid #d6dbed;
margin: 2% 1% 0;
background: #ffffff;
box-shadow: 0 0 8px 0 rgba(72, 119, 236, 0.1);
border-radius: 4px;
}
.select-content:hover span {
color: #4877ec;
}
.select-content:hover {
cursor: pointer;
background: #f8faff;
border: 1px solid #3e75f4;
}
.select-text {
font-size: 15px;
color: #2e2f36;
text-align: center;
font-weight: 400;
}
.select-text-X {
font-size: 15px;
color: #4877ec;
letter-spacing: 0;
font-weight: 400;
margin-left: 12px;
cursor: pointer;
}
</style>
效果图:
三、Vue 拖拽组件 vuedraggable
vuedraggable 是标准的组件式封装,并且将可拖动元素放进了 transition-group 上面,过渡动画都比较好。
使用方式:
yarn add vuedraggable

import vuedraggable from 'vuedraggable';
在使用的时候,可以通过 v-model 来双向绑定本地 data,如果需要更新或者是触发父组件监听的事件,可以在 updated() 中去 emit。
案例:
<template>
  <div>
    <div>{{ drag ? "拖拽中" : "拖拽停止" }}</div>
    <!--使用draggable组件-->
    <draggable
      v-model="myArray"
      chosenClass="chosen"
      forceFallback="true"
      group="people"
      animation="1000"
      @start="onStart"
      @end="onEnd"
    >
      <transition-group>
        <div class="item" v-for="element in myArray" :key="element.id">
          {{ element.name }}
        </div>
      </transition-group>
    </draggable>
    <div class="color-list">
      <div
        class="color-item"
        v-for="color in colors"
        v-dragging="{ item: color, list: colors, group: 'color' }"
        :key="color.text"
      >
        {{ color.text }}
      </div>
    </div>
  </div>
</template>
  <style scoped>
/*被拖拽对象的样式*/
.item {
  padding: 6px;
  background-color: #fdfdfd;
  border: solid 1px #eee;
  margin-bottom: 10px;
  cursor: move;
}
/*选中样式*/
.chosen {
  border: solid 1px #3089dc !important;
}
</style>
  <script>
//导入draggable组件
import draggable from "vuedraggable";
export default {
  //注册draggable组件
  components: {
    draggable,
  },
  data() {
    return {
      drag: false,
      //定义要被拖拽对象的数组
      myArray: [
        { people: "cn", id: 10, name: "www.itxst.com" },
        { people: "cn", id: 20, name: "www.baidu.com" },
        { people: "cn", id: 30, name: "www.taobao.com" },
        { people: "us", id: 40, name: "www.yahoo.com" },
      ],
      colors: [
        {
          text: "Aquamarine",
        },
        {
          text: "Hotpink",
        },
        {
          text: "Gold",
        },
        {
          text: "Crimson",
        },
        {
          text: "Blueviolet",
        },
        {
          text: "Lightblue",
        },
        {
          text: "Cornflowerblue",
        },
        {
          text: "Skyblue",
        },
        {
          text: "Burlywood",
        },
      ],
    };
  },
  methods: {
    //开始拖拽事件
    onStart() {
      this.drag = true;
    },
    //拖拽结束事件
    onEnd() {
      this.drag = false;
    },
  },
};
</script>
四、Awe-dnd指令封装
vue-dragging 的 npm 包的名字是 awe-dnd ,并不是 vue-dragging,这个库的特点是封装了 v-dragging 全局指令,然后通过全局指令去数据绑定等。
相比及 vuedraggable 来说, awe-dnd 是没有双向绑定(这里没有双向绑定并不是很严谨,准确的来说没有暴露双向绑定的方式),因此提供了事件,在拖拽结束的时候用来更新列表(不需要手动更新列表,其实内部是实现了双向绑定的)或者是去触发父组件监听的事件。
安装依赖:
npm install awe-dnd --save
yarn add awe-and
main.js
import VueDND from 'awe-dnd'

Vue.use(VueDND)
案例:
<template>
  <div>
    <div class="color-list">
      <div
        class="color-item"
        v-for="color in colors"
        v-dragging="{ item: color, list: colors, group: 'color' }"
        :key="color.text"
      >
        {{ color.text }}
      </div>
    </div>
  </div>
</template>
<style scoped>
/*被拖拽对象的样式*/
.item {
  padding: 6px;
  background-color: #fdfdfd;
  border: solid 1px #eee;
  margin-bottom: 10px;
  cursor: move;
}
/*选中样式*/
.chosen {
  border: solid 1px #3089dc !important;
}
</style>
<script>
export default {
  data() {
    return {
      drag: false,
      colors: [
        {
          text: "Aquamarine",
        },
        {
          text: "Hotpink",
        },
        {
          text: "Gold",
        },
        {
          text: "Crimson",
        },
        {
          text: "Blueviolet",
        },
        {
          text: "Lightblue",
        },
        {
          text: "Cornflowerblue",
        },
        {
          text: "Skyblue",
        },
        {
          text: "Burlywood",
        },
      ],
    };
  },
  methods: {},
};
</script>
Recommend
About Joyk
Aggregate valuable and interesting links.
Joyk means Joy of geeK