

DocC Tutorial for Swift : Getting Started [FREE]
source link: https://www.raywenderlich.com/34919511-docc-tutorial-for-swift-getting-started
Go to the source link to view the article. You can view the picture content, updated content and better typesetting reading experience. If the link is broken, please click the button below to view the snapshot at that time.
DocC Tutorial for Swift : Getting Started
Learn how to automatically create documentation for Swift using DocC.
Version

Before 2021, when Apple introduced DocC, you had two options for documenting your Swift package: You either wrote your documentation in your project’s readme file or used a third-party library like Jazzy to generate documentation from your code.
Jazzy was the simpler option, and the generated documentation would also match the look and feel of Apple’s official reference documentation. But what if there were an easier way to display your documentation right into the Xcode documentation window?
At WWDC 2021, Apple launched DocC, a documentation compiler that builds and views your documentation for Swift packages inside the Xcode documentation window. Apple expanded DocC’s functionality in WWDC 2022 so it can document Swift and Objective-C projects too.

DocC offers more advanced functionalities, such as publishing pre-built documentation to GitHub projects or adding catalog and extension files to app documentation.
In this tutorial, you’ll work on an app named Given With Love to learn about:
- Building Swift projects and Swift Packages documentation using DocC.
- Using symbols to connect items in your documentation.
- Adding a catalog to your documentation.
- Archiving and publishing the DocC documentation.
Getting Started
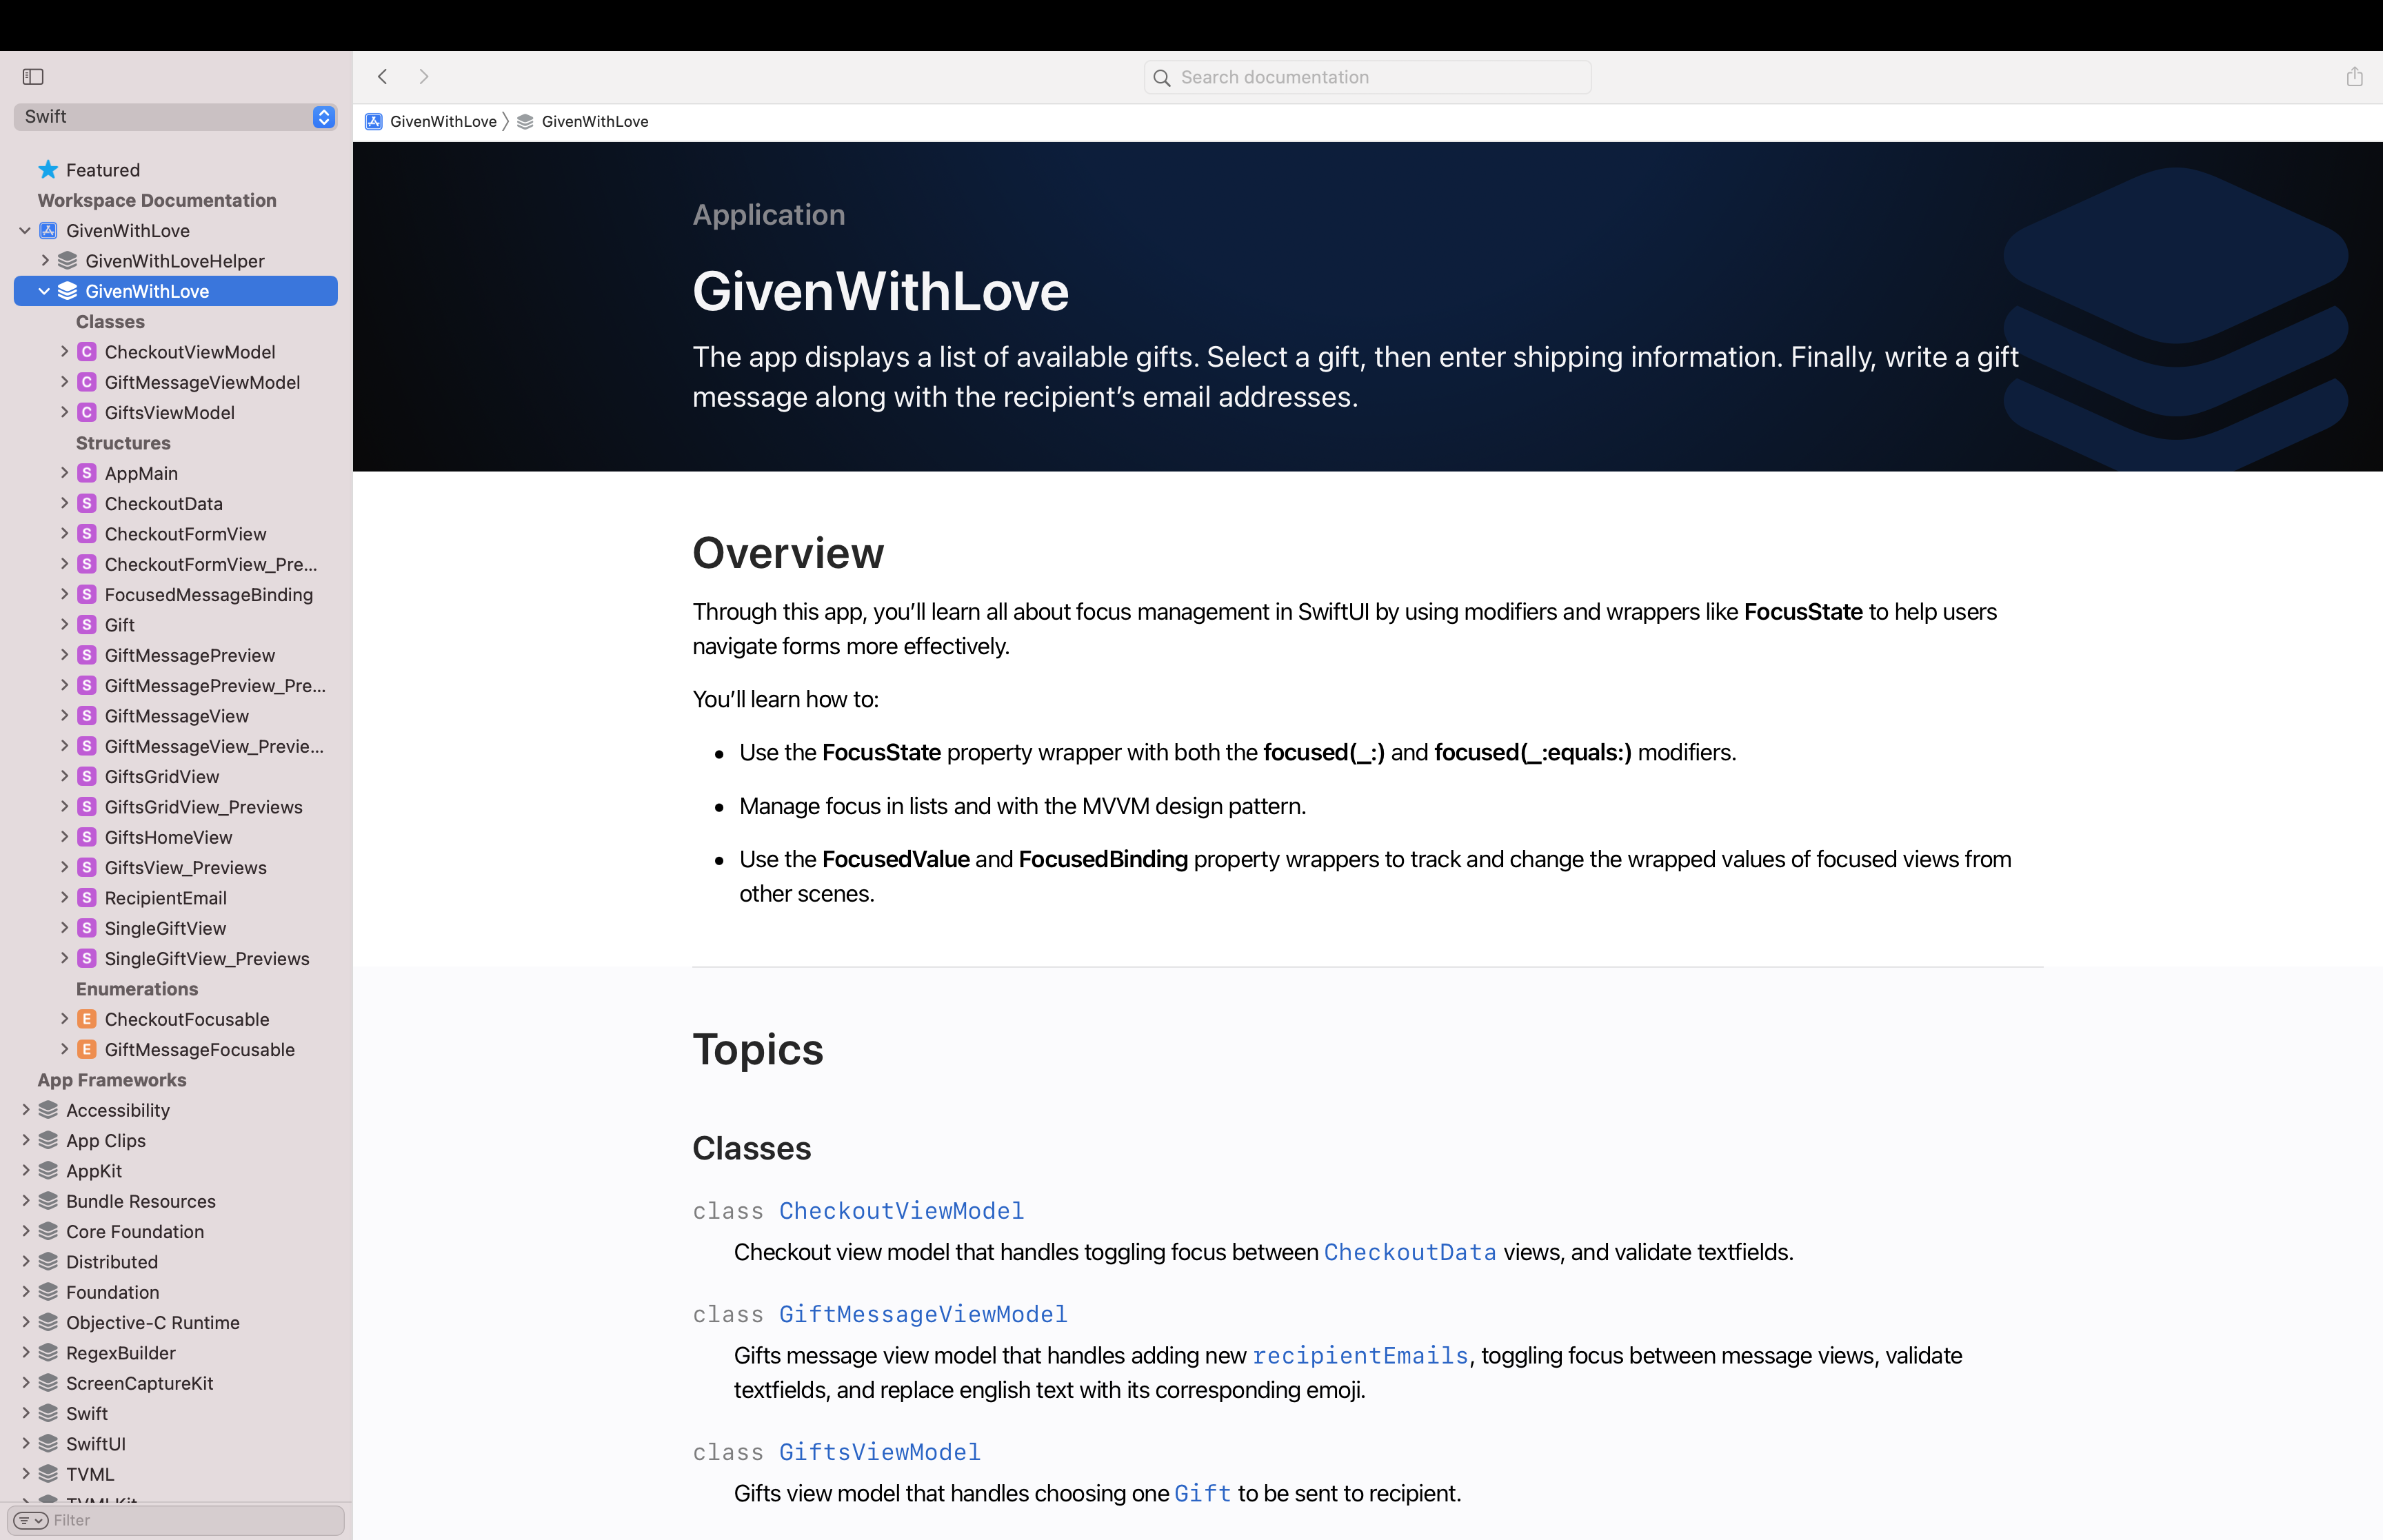
Click the Download Materials button at the top or bottom of this tutorial to download the starter project. Open GivenWithLove.xcworkspace in the starter directory in Xcode. Build and run on an iPhone simulator. You’ll see the following screen:

The app displays a list of available gifts. Select a gift, then enter shipping information. Finally, write a gift message along with the recipient’s email addresses.
In Xcode, look at the project navigator. It includes these two parts:
- GivenWithLove (Xcodeproj): The main project files which uses MVVM pattern.
- Given With Love Helper (Swift Package): A helper package for the project, such as extensions or custom views.
FocusState to help users navigate forms more effectively.To learn more about dealing with focus management in SwiftUI, check out Focus Management in SwiftUI: Getting Started.
Notice how some of these files include documentation, while others don’t. You’ll document the remaining files in this tutorial before using DocC to build and archive the documentation.
But first, you need to understand how DocC works under the hood.
How DocC Works
DocC is a documentation compiler that transforms Markdown language into rich documentation.
While the Xcode builds your framework, it performs the following steps for creating DocC documentation:
- Compiler saves details about any public APIs on your framework and generated code.
- Compiler supplies DocC all the information about your public APIs.
- DocC gathers the public API information and all other DocC’s option such as articles or tutorials available with your documentation catalog.
- DocC produces the final archive containing the compiled documentation.

In the next section, you’ll build your first DocC documentation in the GivenWithLove app.
If you’re new to Markdown, Markdown: Syntax has what you need.
Building DocC Documentation
Open GivenWithLove.xcworkspace. Open the Product menu, and select Build Documentation.
Xcode starts building the documentation for a few seconds, and then the Developer Documentation window opens.
The project’s documentation appears on the left Navigator. It contains two sections for both the project and the Swift package documentation.
Here are some more options for building your DocC documentation in Xcode:
- The Shift-Control-Command-D shortcut builds the documentation right away.
- Set the value of Build Documentation During ‘Build’ from the Build Settings window to Yes. This option will build documentation every time you compile.
- Use the
xcodebuild docbuildcommand in your CI pipeline or command-line. This performs the same function as setting Build Documentation During ‘Build’ in Build Settings to Yes.
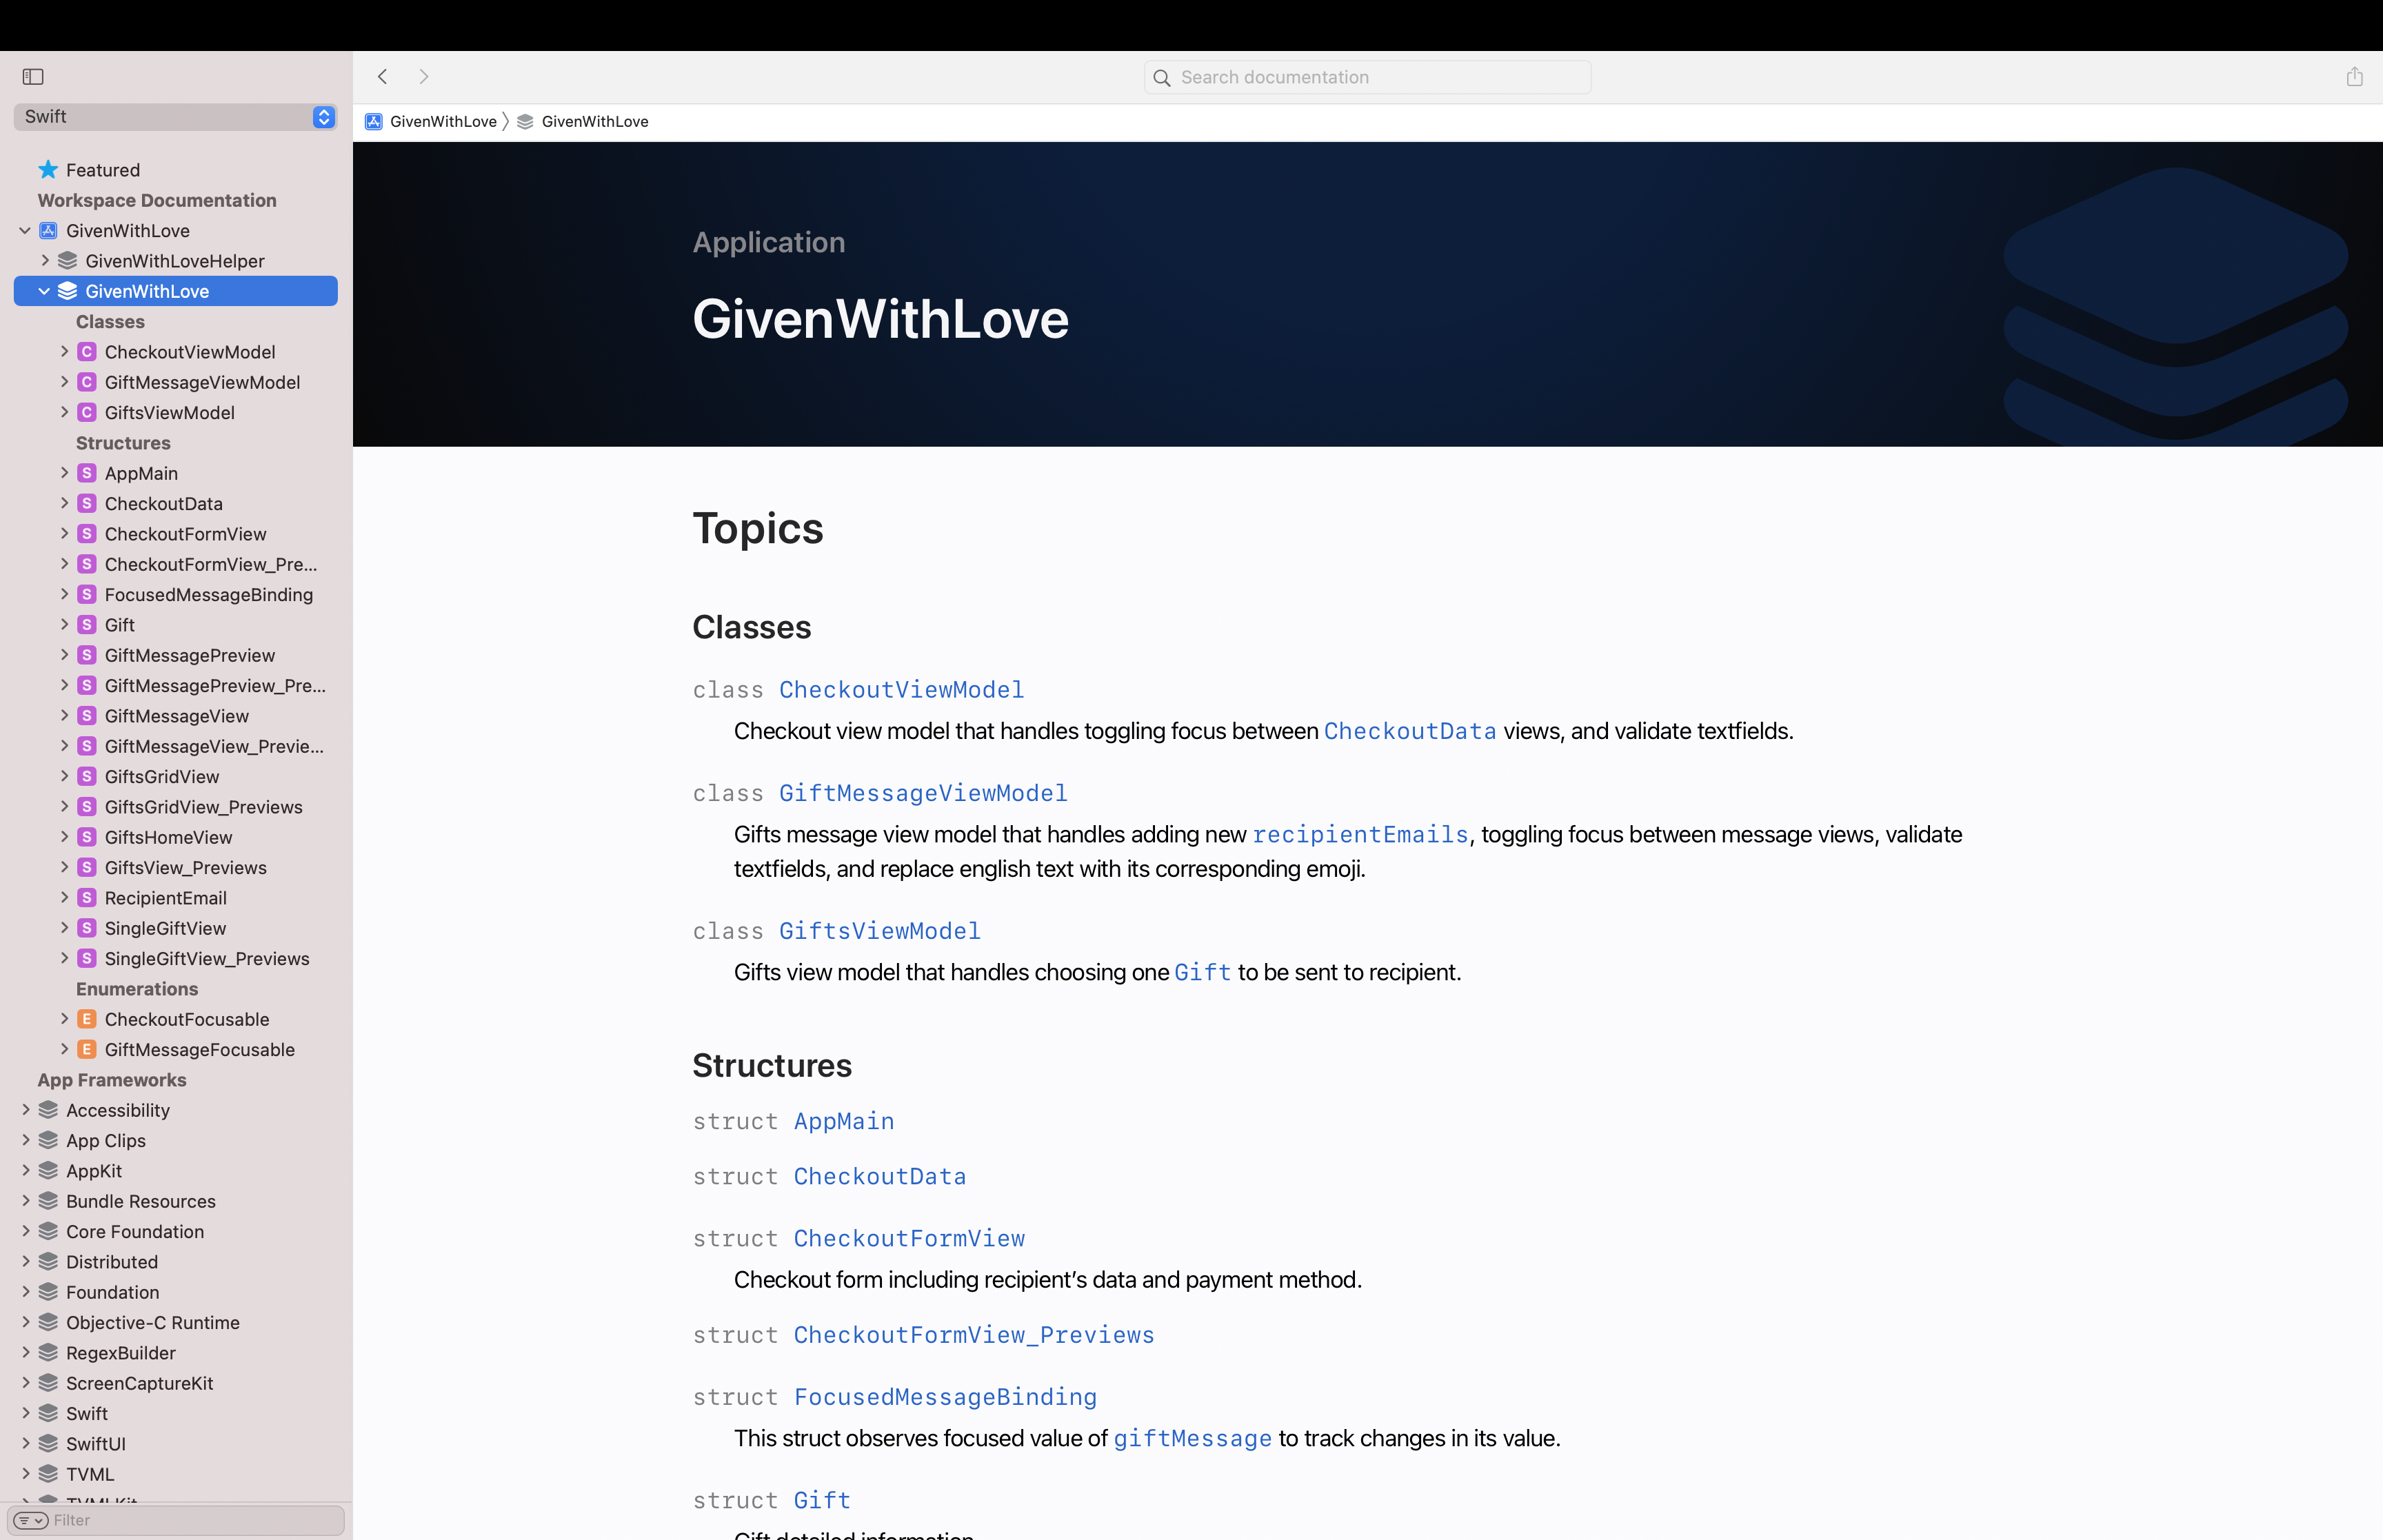
Open the documentation window and expand the GivenWithLove project to see its contents. DocC supports initial grouping for your code, showing classes, structures and enumerations.
Select the search field up top and type CheckoutViewModel, then select the first menu option. See how DocC displays the documentation inside it.

In the CheckoutViewModel description, click the CheckoutData link.

Notice how this struct doesn’t have any documentation yet. This struct will be the first file you document in this project.
Documenting a Swift File
Open GivenWithLove.xcworkspace and then CheckoutData.swift. Command-click CheckoutData to open the action menu. Next, click Add Documentation. The Description placeholder appears above the struct declaration after three backslashes. Now, you’re ready to write this struct’s documentation.

There’s also a keyboard shortcut for this. You can put the cursor over CheckoutData, and press Command+Option+/. Alternatively, you can type /// on the line above the struct.
Replace the Description placeholder with the code below:
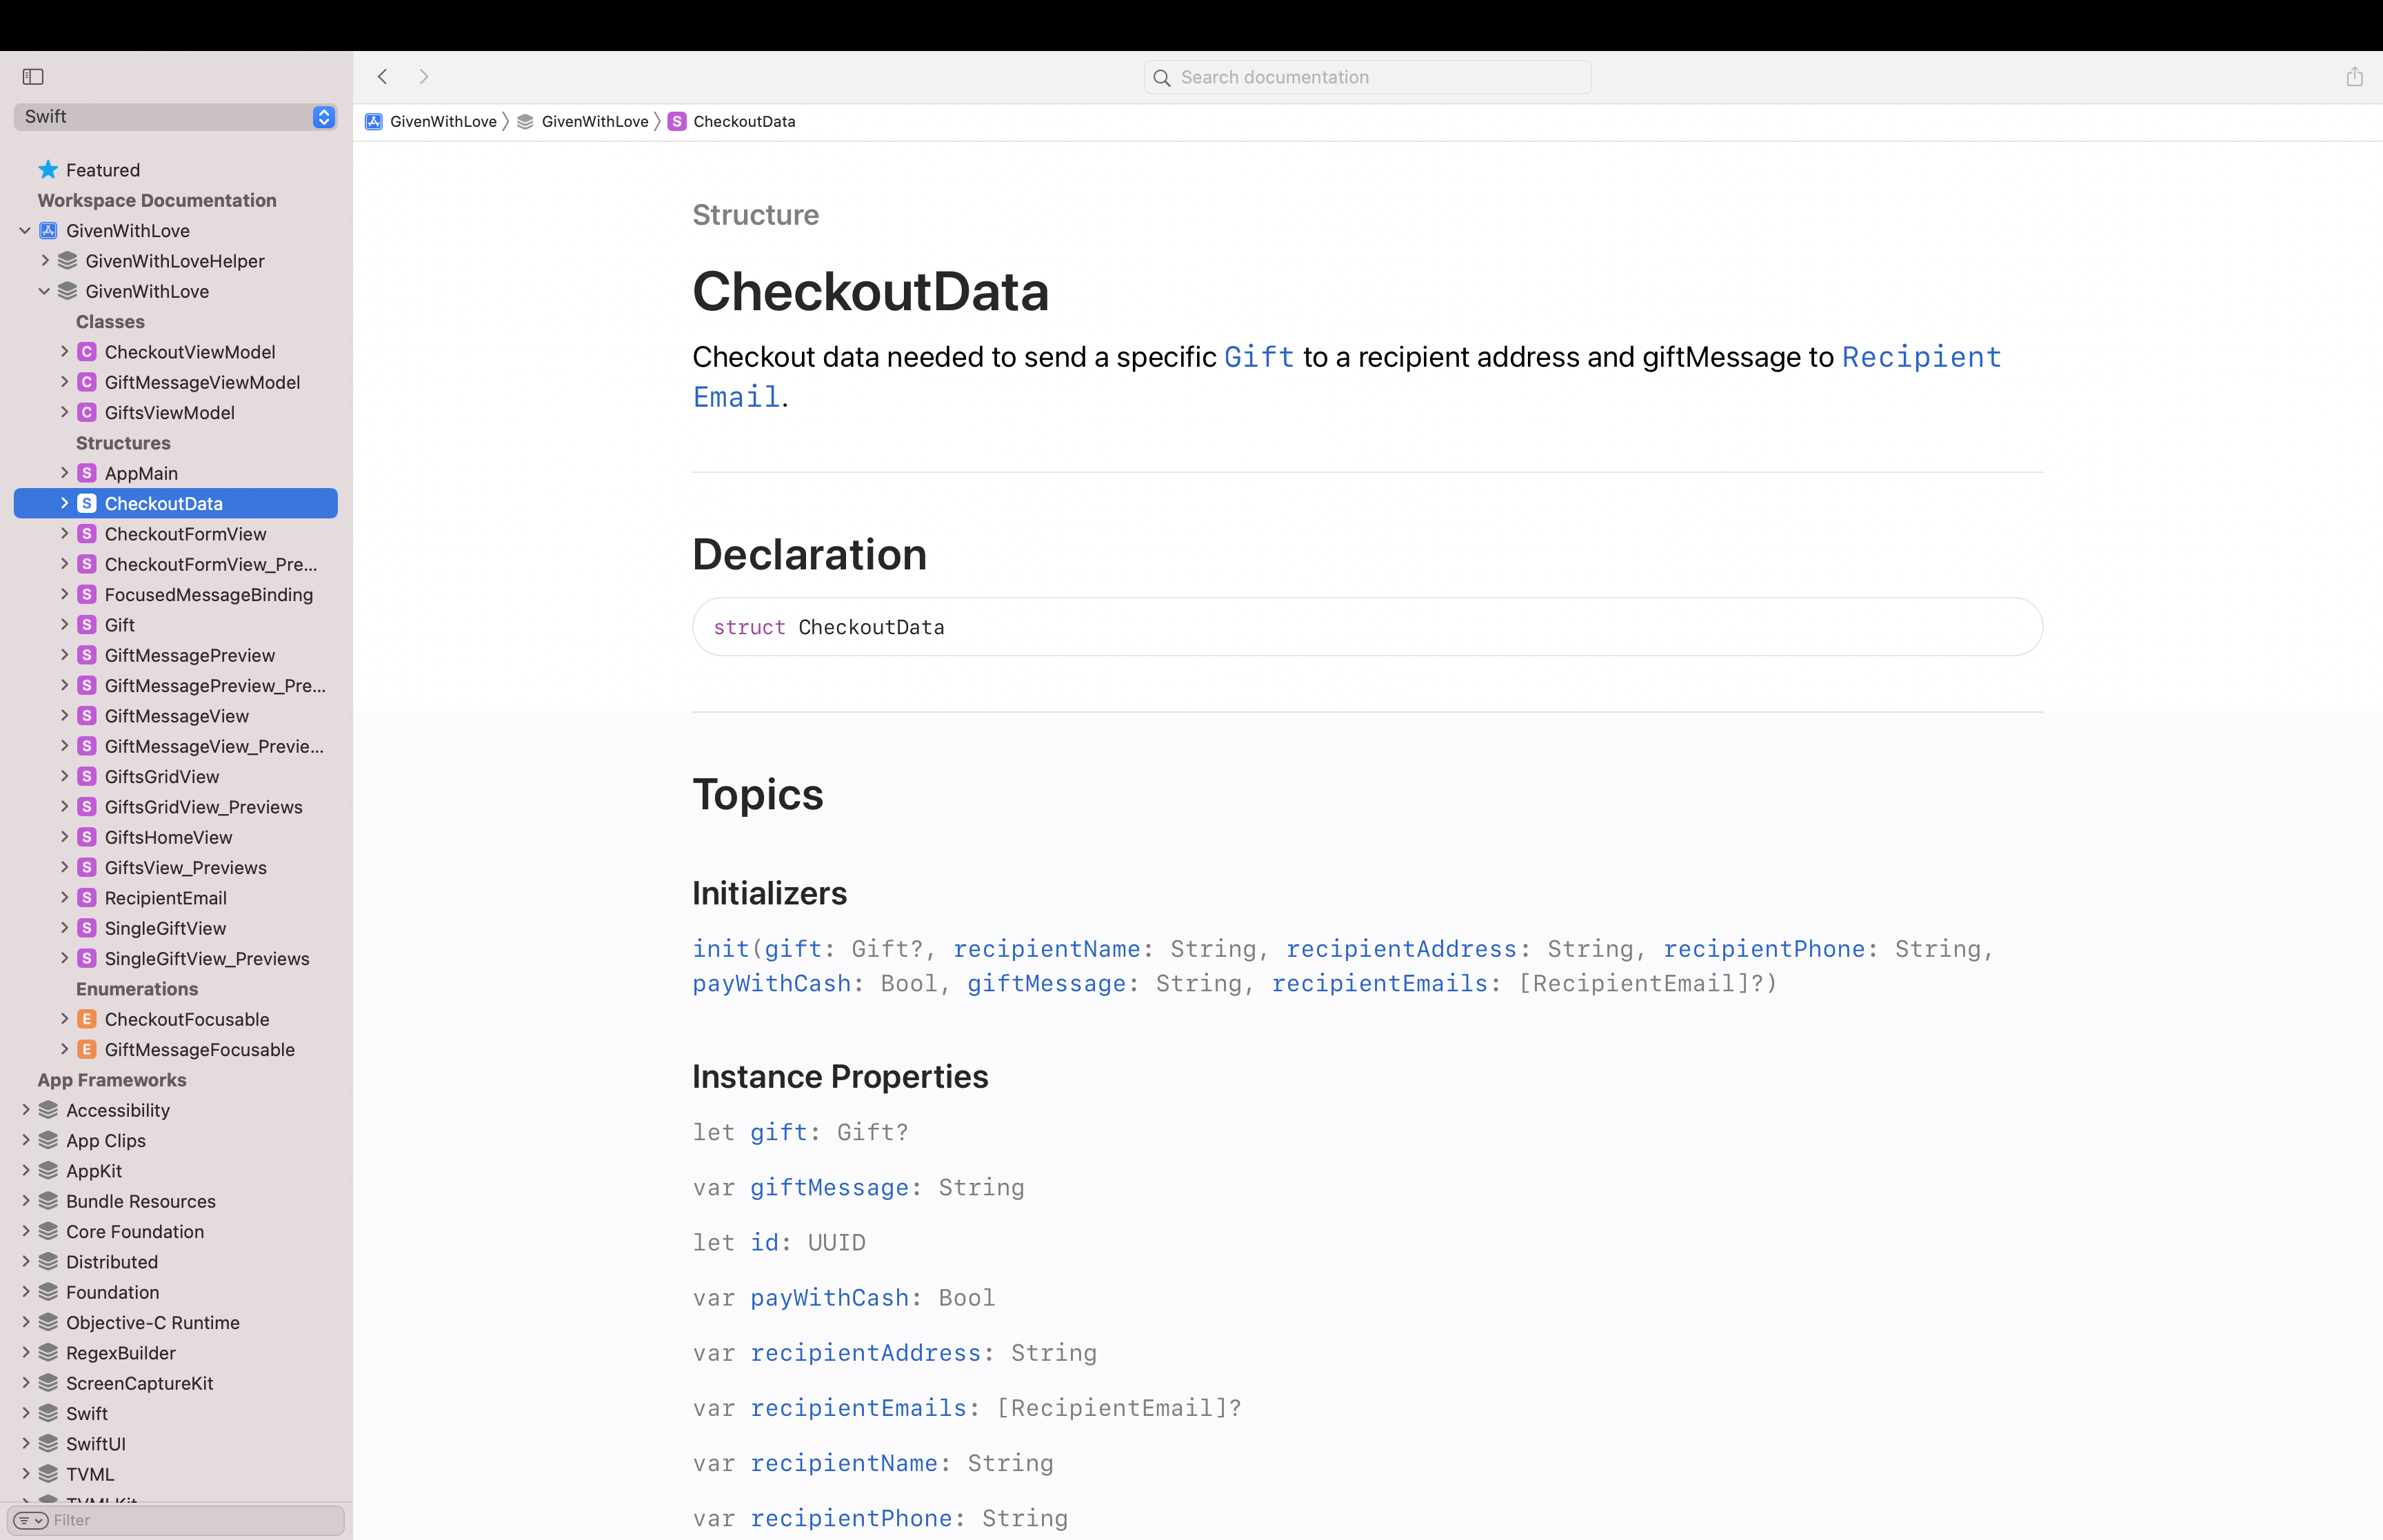
Checkout data needed to send a specific gift to a recipient's address and a gift message to the recipient's email.
This code produces the description that will appear below CheckoutData in the Documentation window.
Build the documentation. Select CheckoutData and you should see the description you just added.

Select the search field up top and type Validation, then select the option under the title Workspace Documentation.

The newly opened file is an enum inside the Given With Love Helper Swift package. Notice how all the methods inside this enum are documented except the first one. You’ll document it now.

Open Validation.swift inside the Given With Love Helper Swift package. Put the cursor on the first method, then press Command+Option+/. Xcode displays the available documentation placeholders for this enum, such as Description, Parameters and Returns.
Replace the placeholders with the code below:
/// Check if the input string is valid compared to the specified regex.
/// - Parameters:
///   - input: Input string under test.
///   - regex: The regex that compared to the input string.
/// - Returns: True if the input string is valid compared to the specified regex and false otherwise.
This code describes each detail of this method. It returns true when its input string matches against its input regex.
Build the documentation by changing the scheme to GivenWithLoveHelper and press Shift-Control-Command-D.
Expand GivenWithLoveHelper from the side navigator, then select the Validation enum. See how the above documentation appears under this enum’s first method.

Click isValid(input:with:) and see how it contains full details.

Now, you know how to create documentation using DocC. Next, you’ll learn to add a reference to a document that either belongs to your documentation or sits outside it.
Applying Symbol Links
Open GivenWithLove.xcworkspace, then open CheckoutData.swift. Replace the current documentation above CheckoutData with the code below:
/// Checkout data needed to send a specific ``Gift`` to a recipient address and giftMessage to ``RecipientEmail``.
The double backtick syntax creates a link for both the Gift and RecipientEmail structs. Apple calls these links symbol links.

Build the documentation. Select CheckoutData and check how the above description appears under it. The two symbols appear in documentation as links that open the documentation page for each.
Open GiftMessageView.swift, then add the following comment one line before GiftMessageView:
/// Gift message view including ``CheckoutData/giftMessage`` that user send to ``CheckoutData/recipientEmails``.
This comment adds documentation for the GiftMessageView.
Notice that you refer to a property of a different struct here, so you write it specifically with its struct’s name, like ``CheckoutData/giftMessage``. You can command-click on these links to navigate to the correct file.
Build the documentation. Select GiftMessageView from the side navigator and check how the above symbol appears in its documentation.

Now, you’re familiar with DocC‘s essentials. It’s time to move to the next level.
Enriching App Documentation
The DocC documentation offers many options to make it more interesting. Here are a few:
- Catalog: Add more content to your documentation or customize the organization of symbols.
- Articles: Show the big picture behind your framework to the users. You might use an illustration to show a landing page for your framework that provides a summary of your package using articles.
- Tutorials: Make interactive guides from scratch that introduce users to your framework. These guide the user into your framework step-by-step, deeper than reference documentation or articles.
- Extension Files: Use markup files that help you to arrange any symbol properties and methods or override comments in the source documentation.
It’s time to improve your documentation. In the next section, you’ll learn how to add a Catalog to your DocC documentation.
Documentation Catalog
Right-click the GivenWithLove folder, then select New File…. Choose Documentation Catalog for the template, and click Next. Name the catalog GivenWithLoveCatalog, then click Create. The GivenWithLoveCatalog documentation catalog appears inside the GivenWithLove project.
Select the inner file called GivenWithLoveCatalog.md and check the placeholders that appear in it. Replace the following inside the catalog down to Text placeholder with the code below:
# ``GivenWithLove``

The app displays a list of available gifts. Select a gift, then enter shipping information. Finally, write a gift message along with the recipient's email addresses.

## Overview

Through this app, you'll learn all about focus management in SwiftUI using modifiers and wrappers like **FocusState** to help users navigate forms more effectively.

You'll learn how to:
- Use the **FocusState** property wrapper with both the **focused(_:)** and **focused(_:equals:)** modifiers.
- Manage focus in lists and with the MVVM design pattern.
- Use the **FocusedValue** and **FocusedBinding** property wrappers to track and change the wrapped values of focused views from other scenes.
This code creates the GivenWithLove project’s summary and overview documentation inside the catalog.
Build the documentation and select GivenWithLove. Notice how the newly added catalog appears as more content under your project’s documentation title.
Open GivenWithLoveCatalog.md, and replace the text under Topics with the code below:
## Topics

### Model

- ``CheckoutData``
- ``Gift``
This code adds a group under Topics in your catalog to show Models with their symbols. Here, you use the catalog to customize the organization of your project’s symbols.
Build the documentation and select GivenWithLove again. Check the newly added group under Topics in the documentation window.

Now, it’s your chance to continue customizing this catalog as you see fit. You can also add another catalog inside the GivenWithLoveHelper Swift package to add content to its documentation.
Hooray! You’re done with documentation and ready to archive and publish your documentation.

Exporting and publishing documentation
First, move your mouse over to the documentation window’s side Navigator. A contextual menu icon appears when you hover over the GivenWithLove framework item. Click it, and then click Export. Save the archive to your desktop.

Now, you’re ready to send it off to your colleagues, and if they double-click the archive, it’ll open in Xcode’s documentation window.
Where to Go From Here?
Click the Download Materials button at the top or bottom of this article. Check the final version of the Given With Love app and compare it with your version.
Now that you know how to document using DocC, you can go even further and improve your documentation. Check out Improve the discoverability of your Swift-DocC content. This article will help you better organize your documentation, identify its main themes and give it clear, unique titles.
If you want to customize your documentation’s landing page or arrange nested symbols in extension files, check out Adding Structure to Your Documentation Pages.
Finally, to know more about configuring your web server to host generated DocC archives and learn how to automate documentation generation, don’t miss Host and automate your DocC documentation.
While using DocC to generate rich documentation, keep in mind the value of writing clean code. According to Steve McConnell “Good code is its own best documentation. As you’re about to add a comment, ask yourself, “How can I improve the code, so this comment isn’t needed?” Improve the code and then document it to make it even clearer.”
Join the discussion below to ask questions, offer suggestions or even share what you did to improve this project.
raywenderlich.com Weekly
The raywenderlich.com newsletter is the easiest way to stay up-to-date on everything you need to know as a mobile developer.
Recommend
About Joyk
Aggregate valuable and interesting links.
Joyk means Joy of geeK