
2

gem5(4)——利用gem5自定义系统配置在SE模式下进行模拟
source link: https://iamywang.github.io/2022/09/12/gem5-4/
Go to the source link to view the article. You can view the picture content, updated content and better typesetting reading experience. If the link is broken, please click the button below to view the snapshot at that time.

参考learning gem5的part I部分进行gem5的初步学习。
尽管bus.slave和bus.master等参数在新版本(v22)中仍然可用,但是仍然将他们替换成新版本(v22)推荐的cpu_side_ports和mem_side_ports。
自定义配置并运行
第一步,导入所需的依赖包以及初始化系统:
# 导入gem5的objects
import m5
from m5.objects import *

# 初始化系统
system = System()
第二步,配置系统时钟频率和内存大小:
# 设置系统的时钟频率为1GHz
system.clk_domain = SrcClockDomain()
system.clk_domain.clock = '1GHz'
system.clk_domain.voltage_domain = VoltageDomain()

# 设置系统的内存大小为2GB
system.mem_mode = 'timing'
system.mem_ranges = [AddrRange('2048MB')]
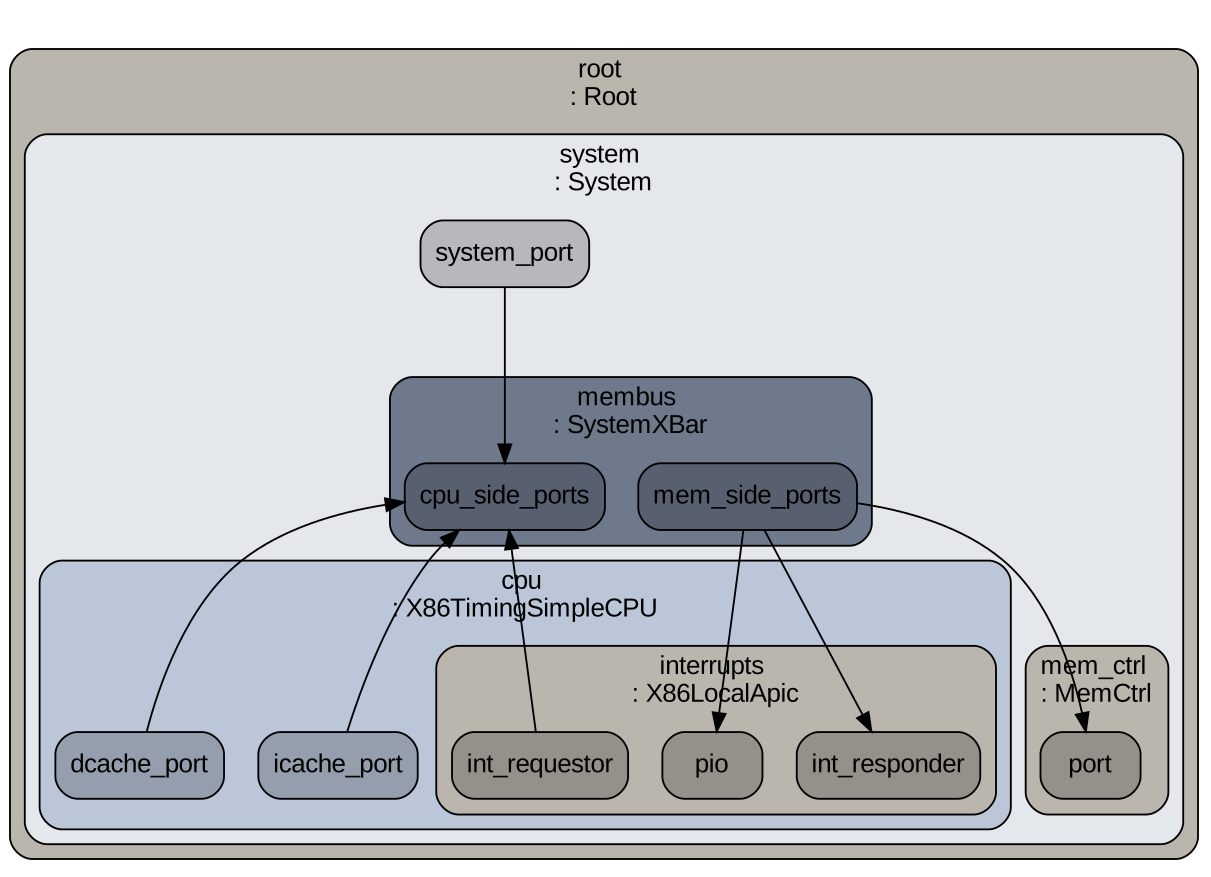
第三步,创建CPU、内存控制器、中断控制器等,并进行端口连接:
# 创建一个CPU
system.cpu = TimingSimpleCPU()

# 创建一个内存控制器
system.membus = SystemXBar()

# 将CPU的端口连接到内存控制器
system.cpu.icache_port = system.membus.cpu_side_ports
system.cpu.dcache_port = system.membus.cpu_side_ports

# 创建一个中断控制器
system.cpu.createInterruptController()
system.cpu.interrupts[0].pio = system.membus.mem_side_ports
system.cpu.interrupts[0].int_requestor = system.membus.cpu_side_ports
system.cpu.interrupts[0].int_responder = system.membus.mem_side_ports

system.system_port = system.membus.cpu_side_ports

# 创建一个内存控制器
system.mem_ctrl = MemCtrl()
system.mem_ctrl.dram = DDR3_1600_8x8()
system.mem_ctrl.dram.range = system.mem_ranges[0]
system.mem_ctrl.port = system.membus.mem_side_ports
第四步,创建进程并设置运行参数:
# 创建一个进程
process = Process()

# 设置进程的命令行参数
process.cmd = ['/home/jammy/gem5/tests/test-progs/hello/bin/x86/linux/hello']
system.workload = SEWorkload.init_compatible('/home/jammy/gem5/tests/test-progs/hello/bin/x86/linux/hello')
system.cpu.workload = process
system.cpu.createThreads()

# 创建一个根对象
root = Root(full_system = False, system = system)
第五步,初始化以及运行:
# 初始化gem5
m5.instantiate()

# 运行gem5
print("Beginning simulation!")
exit_event = m5.simulate()

# 打印运行结果
print('Exiting @ tick {} because {}'
        .format(m5.curTick(), exit_event.getCause()))
输出的配置结果如下:
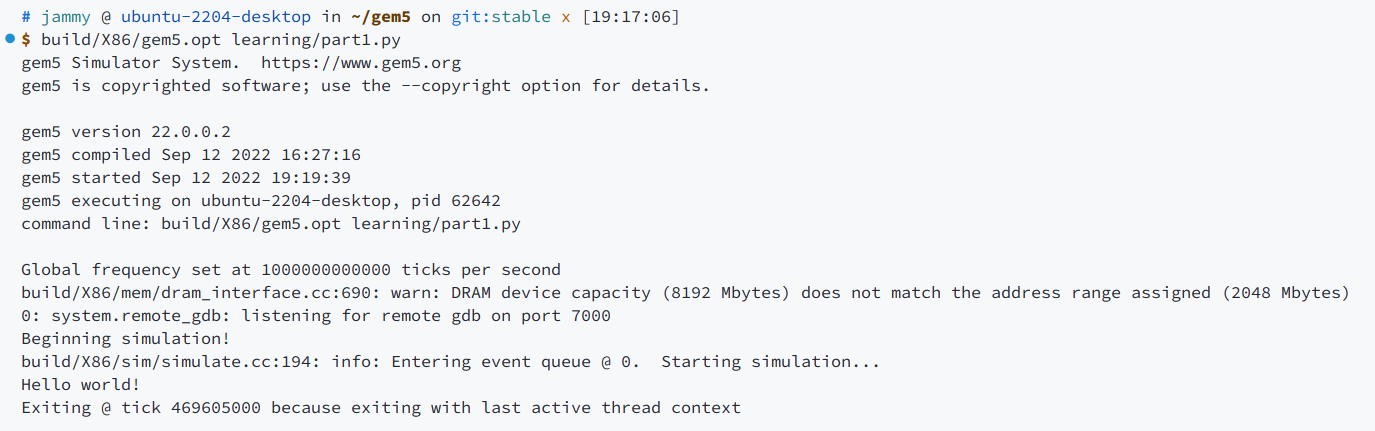
运行结果如下:
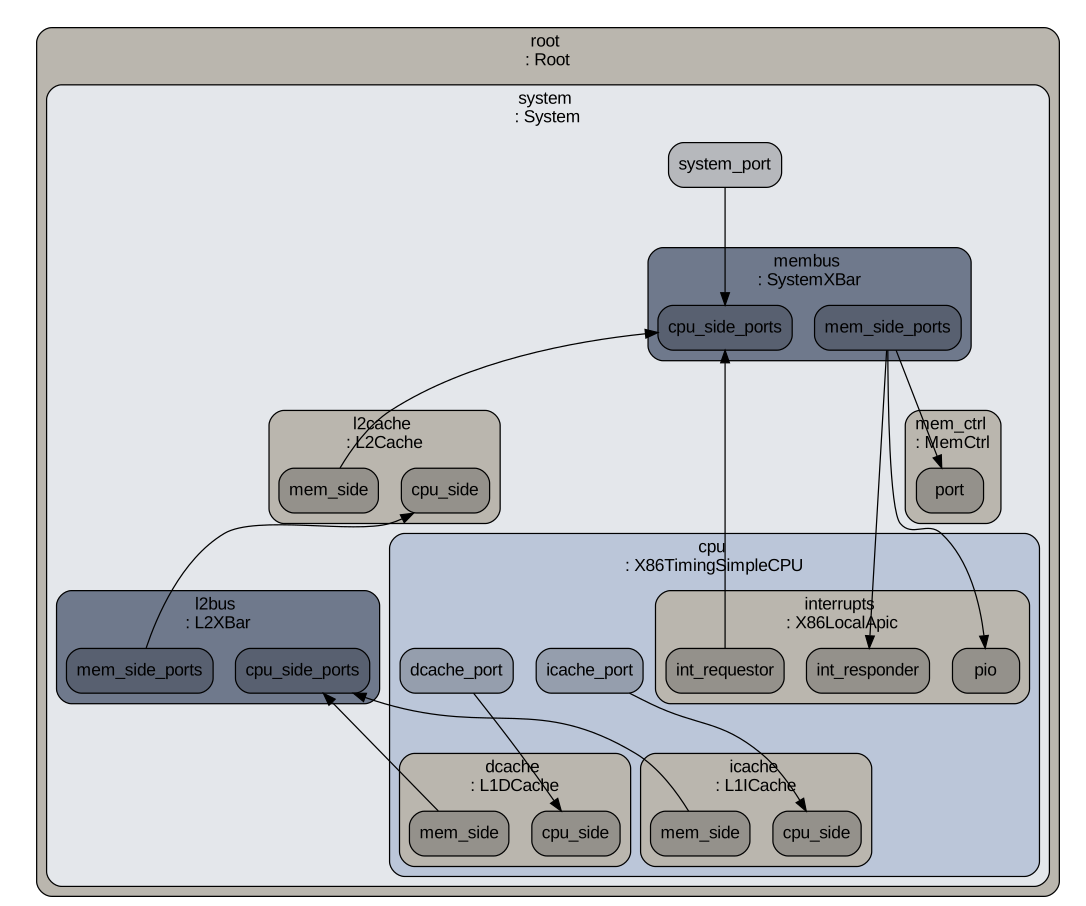
添加Cache并运行
添加L1 Cache
L1指令缓存类:
class L1ICache(L1Cache):
    size = '16kB'
    assoc = 2
    tag_latency = 2
    data_latency = 2
    response_latency = 2
    mshrs = 4
    tgts_per_mshr = 20

def connectCPU(self, cpu):
        self.cpu_side = cpu.icache_port
L1数据缓存类:
class L1DCache(L1Cache):
    size = '64kB'
    assoc = 2
    tag_latency = 2
    data_latency = 2
    response_latency = 2
    mshrs = 4
    tgts_per_mshr = 20

def connectCPU(self, cpu):
        self.cpu_side = cpu.dcache_port
创建L1 Cache并连接L2总线:
# 创建L1Cache
system.cpu.icache = L1ICache()
system.cpu.dcache = L1DCache()

# 将CPU连接到L1
system.cpu.icache.connectCPU(system.cpu)
system.cpu.dcache.connectCPU(system.cpu)

# 创建一个L2总线
system.l2bus = L2XBar()

# 将L1与L2总线连接
system.cpu.icache.connectBus(system.l2bus)
system.cpu.dcache.connectBus(system.l2bus)
添加L2 Cache
L2缓存类:
class L2Cache(Cache):
    size = '256kB'
    assoc = 8
    tag_latency = 20
    data_latency = 20
    response_latency = 20
    mshrs = 20
    tgts_per_mshr = 12

def connectCPUSideBus(self, bus):
        self.cpu_side = bus.mem_side_ports

def connectMemSideBus(self, bus):
        self.mem_side = bus.cpu_side_ports
创建L2 Cache并连接总线:
# 创建L2 Cache
system.l2cache = L2Cache()
system.l2cache.connectCPUSideBus(system.l2bus)

# 创建一个内存总线
system.membus = SystemXBar()

# 将L2 Cache与内存总线连接
system.l2cache.connectMemSideBus(system.membus)
输出的配置结果如下:
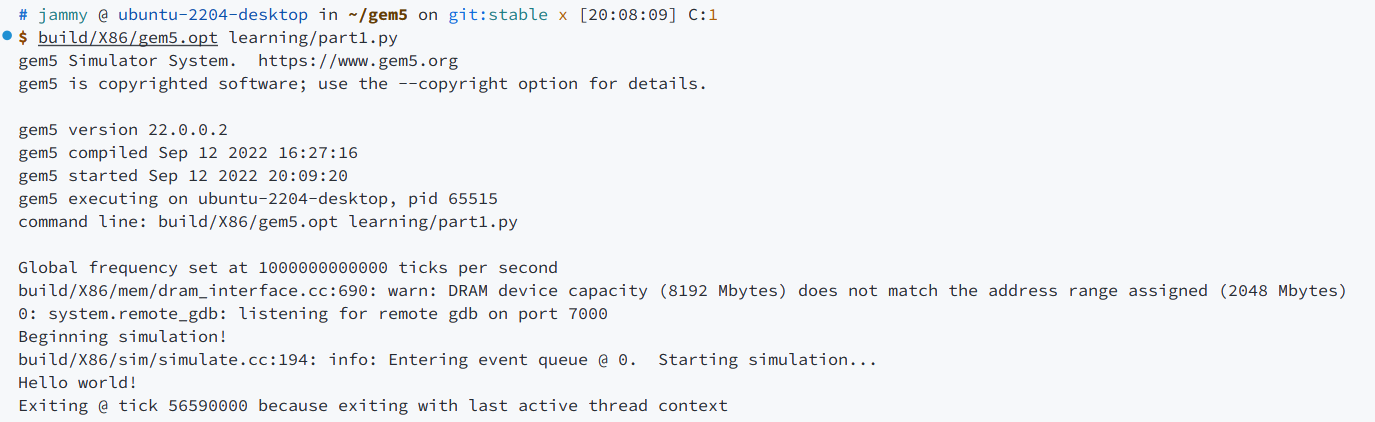
运行结果如下:
Recommend
About Joyk
Aggregate valuable and interesting links.
Joyk means Joy of geeK