

Best tips and Tricks to organize the Figma file browser | UX Planet
source link: https://uxplanet.org/organize-figma-files-7154e0126cf0
Go to the source link to view the article. You can view the picture content, updated content and better typesetting reading experience. If the link is broken, please click the button below to view the snapshot at that time.

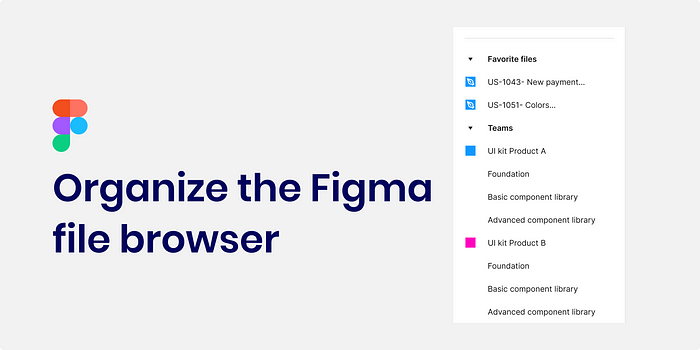
Tips and tricks to organize the Figma files browser
To find Figma design files faster, they should be organized well
I wrote last month about organizing information inside Figma files. This week I’m going to talk about how design teams can organize their design files inside the file browser.
Working in a design team requires an organized approach, so everyone can easily find what they are looking for. It’s not that difficult to do. With a little effort and agreement within the team, you can keep your Figma files browser tidy and easy to navigate.
Each team has a different approach since it depends on the team size and how many products they manage. Because it’s not magic and no one solution works for everyone, you’ve got to invest some time and effort to figure out what works for your team.
Why organizing the Figma files is important
When we work on a large team, we must build a clear and concise process that everyone can follow.
With a clear organization, the collaboration between the team members will be better, and the designers will be able to work more efficiently and effectively because all members can find what they need faster.
Imagine this case, One designer may be on vacation, and the product they work on needs an urgent update. If everything is organized well, another designer can open Figma, find the file, and design a solution. If the files aren’t organized, the designer can waste time looking for them.
In addition to that, the onboarding process for new designers will be easier too, and new hires will know better how to find information. Besides, it can show the new hire how professional the design team is.
Add cover Image (thumbnail)
Every Figma file should have an image cover, which makes it easy to understand what is in each file since it includes the project name, Jira ticket date, and other information. Therefore, every designer will see what’s in the file right away.
I recommend you use full background color because it makes it easier to read the information; you can take a look at the Figma community for inspiration.

A cover image with a full background makes it easier to read
Add an icon to each team
For each team, you can add an icon. Because the icon is small, it’s better to use fewer elements and maybe use full color. Another idea you can do is add the app icon. For example, if you design a mobile app, you may want to use the same icon.
A small but important point is that the icon should be at least 500x500px when you upload it.

Name your files clearly
Since the file browser can have many files, many people use the search field to find the file they’re searching for. Because of that, it’s so important to give each design file a clear name.
The name should include the project name and Jira ticket number. That way, designers, developers, QA testers, and product managers can easily find what they’re looking for.

Give a clear name to every Figma File
Give permission only to the people that need it
Please keep it simple and give permissions to a team only for people who need them. This way, their file browser will be a lot cleaner.
One more thing to consider is editing permission. Here, I think we should only give edit permission to designers who work on the project. For example, I don’t think giving edit permission to a product manager or developer from the product team is a smart idea. They’re unfamiliar with Figma, so giving them edit permission is like opening the door to problems. They can touch screens and move or edit information.

How to organize the left menu
I must mention that it can differ from company to company, I write what I think the menu should include, but you should think about what works best for your team.
I will divide this section into two parts: Teams that work on products and teams that work on design systems. It is because the design system has different needs.
Design system (UI kit)
The design system part should include all the libraries that are public to the designers and also files for testing and archiving. You can make a design system for a small product in a single file. Things get more complicated if your team is big and works on more than one product.
For small teams, you can divide it this way:
Design system (UI KIT)- One Figma file with the foundation and the basic components
For big teams, you can divide it this way:
Design system (UI KIT)Product A
- Foundation: (Colors, typography, icons)
- Basic components (buttons, check box, modal)
- Advanced component library (Optional for very complex products)Product B
- Foundation
- Basic component library
- Advanced component libraryProduct C
- Foundation
- Basic component library
- Advanced component library
Additionally, you can add
- A playground section where the design team can test new components.
- A tools section: a place where all the tools the designers use. For example, spacers.
- An Archive section for the not-used files.

Product teams
You can use the product name for the team. That way, all the information about the product is located in one place, and it is easy to find the information.
Below are some recommendations for the sections:
- To develop: Here are all the files that are ready to develop.
- Done: Here are all the files that were implemented to the product.
- Playground: Place to make testing and design; files are stored here during the design process.
- Bugs: A place to add and document all the bugs the designer found.
- Improvements: This section contains all the improvements and ideas that the designers have.
- Archive: Place for non-use files

An organization for product teams
More tips
Mark relevant files as favorites
Each designer works through about 3–4 files daily. These are most likely your main projects. To help you find them faster, you can mark these files as favorites, so they show up at the top of the tree, and you’ll find them easily.
You can also mark sections inside a team so they appear on the right menu for quick navigation.

Search it in the search box
If you’re looking for a file, it’s best to use the search input to find it much faster. For example, if you include the Jira ticket number in the file name, you can search for it by typing the number.
The breadcrumb path
Recently, Figma added breadcrumb navigation so that you can navigate much more efficiently.
Team names and section names can have emojis
It is always possible to add emojis to the team name or the team section name to make them more “Happy.”
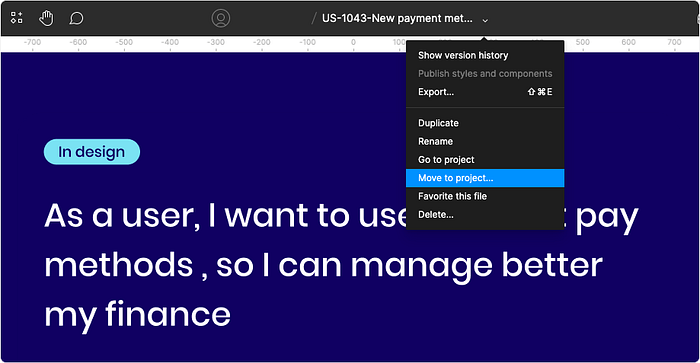
Moving files between teams and teams sections
You can move files between teams and sections by:
- Drag and drop them in the file browser.

Drag and drop Figma files
2. Enter the Figma file > click on the chevron near the name > Move to project. In the modal, only sections you have marked as favorites will appear.
Make sure everyone is on the same page
Talk to the team and get agreement on the file browser structure before building it. If you do that, everyone will see that you take their opinions into account, and you’ll also be able to see if it fits their needs. A good idea is to hold a workshop about that.
Educate the team about the structure
When the team has a clear structure for the file browser, it’s a good idea to announce it inside the design team, so all the designers know the structure well. Remember to explain the structure to each designer joining the team during the onboarding process, so they’ll understand it from the beginning.
Additionally, explain the structure to second users like product managers and developers so they can find what they’re looking for.
Do you want to learn how to organize the information inside the Figma files?
Here is a link to my previous article
To Conclude
As product designers, we should organize the Figma files inside the file browser so we can find the info we’re looking for much easier. The organization will assist UI, UX, and product designers during the design process. In addition, it will help developers from the development team in the design-to-development handoff.
Here are some of the tips I shared in the article.
- Add cover Image (thumbnail).
- Add an icon to each team.
- Name your files clearly.
- Give permission only to the people that need it.
- Educate the team about the structure.
Recommend
About Joyk
Aggregate valuable and interesting links.
Joyk means Joy of geeK