
8

Linux的NFS配置 - alittlemc
source link: https://www.cnblogs.com/alittlemc/p/16640455.html
Go to the source link to view the article. You can view the picture content, updated content and better typesetting reading experience. If the link is broken, please click the button below to view the snapshot at that time.

# nfs的Server配置文件和配置方法
echo '/newnfs 192.168.3.*(rw,sync,no_root_squash)' >> /etc/exports
# 根目录新建文件夹,权限777
mkdir /newnfs && chmod 777 /newnfs
# 重新启动rpcbind和nfs-server服务
systemctl restart rpcbind && systemctl restart nfs-server

# nfs的Client
# 查看Sever信息
showmount -e 192.168.2.197
# 挂载
mkdir /newnfs
mount -t nfs 192.168.2.197:/newnfs /newnfs
文件传输系列
传输文件的方法有很多,比如ssh自带的sftp,vsftp的ftp,samba提供的.
- openssh
- sftp:22/tcp
- sftp是基于ssh实现的,所以启动了sshd后自带sftp,不需要其他额外的配置就可以使用
- vsftp
- ftp:20,21/tpc
- ftp是最"传统"的文件传输协议了,不过报文不加密,抓包就直接可以看到在头部的账号密码,不安全
- samba
- smb:139/udp和445/tcp
- smb是微软创造的协议,目前基础在Windows系统和Linux系统之间传输文件使用
- webdav
- http:?/tcp
- webdav是我最喜欢的传输方式了,如果只需要下载文件,甚至不需要额外的下载软件客户端,只要在web上打开,同时也支持https
- nfs-utils
- nfs:2049/tcp和rpc:111/tcp
- 在多台Linux之间传输文件,nfs无非是最佳的选择,nfs可以将其他Linux主机的文件挂载在本Linux,就想管理本地文件一样的方便
- 今天来学习一下NFS
NFS概述
这里的概述引用了大佬文章:NFS服务详解
- NFS(Network File System)是一种基于TCP/IP传输的网络文件系统协议。通过使用NFS协议,客户机可以像访问本地目录一样访问远程服务器中的共享资源
- NAS存储: NFS服务的实现依赖于RPC (Remote Process Call,远端过程调用)机制,以完成远程到本地的映射过程。
- NFS需要两个程序包
- nfs-utils:负责文件传输的主程序
- rpcbind:可以将RPC程序号码和通用地址互相转换,负责信息传输的
- 二者互有分工,要先启动rpcbind后才可启动nfs.
NFS安装
# 可以先查询一下本机是否有安装了nfs
# rpm系列Linux
rpm -aq | grep nfs

# deb系列
dpkg -l | grep nfs

# 查询rpcbind也是同理

# 没有就安装一下啦
# rpm,当然用dnf命令也可以安装的
yum install nfs-utils rpcbind

# deb
apt install nfs-utils rpcbind
NFS_Server配置
NFS对应的配置文件为/etc/exports,初始化时文件是空的,#号备注也没有。
[root@client_149 ~]# cat /etc/exports
[root@client_149 ~]#
配置文件的格式
1共享目录的路径 2允许访问的NFS客户端ip(3共享权限参数)
- 1、第一项为目录的绝对路径
- 2、允许访问的ip,可以使用通配符,比如192.168.2.*代表192.168.2.0-255都可以访问
- 3、权限参数,有三对
|
参数
|
备注
|
|
文件读写权限相关
|
|
|
登录账号映射匿名
|
|
|
同步数据的方式
|
|
/root/newdir 192.168.2.149(rw,sync,root_squash)
注意后面的扣号之间不需要空格,这也是个个坑。
新建共享文件夹
先建立个新的文件夹,并且给足权限,777。
[root@server_197 ~]# mkdir /newnfs
[root@server_197 ~]# ll / | grep newnfs
drwxr-xr-x. 2 root root 6 Aug 30 19:57 newnfs
[root@server_197 ~]# chmod -R 777 /newnfs/
[root@server_197 ~]# ll / | grep newnfs
drwxrwxrwx. 2 root root 6 Aug 30 19:57 newnfs
[root@server_197 ~]# echo '/newnfs 192.168.2.*(rw,sync,no_root_squash)' >> /etc/exports
[root@server_197 ~]# cat /etc/exports /newnfs
192.168.2.(rw,sync,no_root_squash)
固定端口(可选)
如果你在使用ipstables,或者是有有其他网段端口的限制,可能需要固定一下端口。
- nfs使用到端口
- portmapper(rpc-bind提供)端口:111 udp/tcp
- nfs/nfs_acl(nfs提供)端口:2049 udp/tcp
- mountd 端口:32768-65535 udp/tcp
- nlockmgr 端口:32768-65535 udp/tcp
系统 RPC服务在 nfs服务启动时默认会给 mountd 和 nlockmgr 动态选取一个随机端口来进行通讯。
在/etc/sysconfig/nfs后追加以下内容,用于固定mountd和nlockmgr端口为4001-4004。
RQUOTAD_PORT=4001
LOCKD_TCPPORT=4002
LOCKD_UDPPORT=4002
MOUNTD_PORT=4003
STATD_PORT=4004
可以在这里固定好端口,修改后需要都要重新启动一次服务。
启动服务和开机启动
使用systemctl来启动rpcbind和nfs-server服务,要注意先启动rpcbind再启动nfs-server
[root@server_197 ~]# systemctl restart rpcbind
[root@server_197 ~]# systemctl enable rpcbind
[root@server_197 ~]# systemctl restart nfs-server
[root@server_197 ~]# systemctl enable nfs-server
Created symlink from /etc/systemd/system/multi-user.target.wants/nfs-server.service to /usr/lib/systemd/system/nfs-server.service.
用netstat看一下是不是有端口监听了,有就是启动成功了。
[root@server_197 ~]# netstat -tlpn | grep "2049\|111"
tcp 0 0 0.0.0.0:111 0.0.0.0:* LISTEN 1/systemd
tcp 0 0 0.0.0.0:2049 0.0.0.0:* LISTEN -
tcp6 0 0 :::111 :::* LISTEN 1/systemd
tcp6 0 0 :::2049 :::* LISTEN -
firewall和iptables
firewall放行对应的服务,nfs、rpc-bind、mountd。
如果可以建议只保留firewall就可以了。
systemctl stop iptables
systemctl disable iptables
[root@server_197 ~]# firewall-cmd --permanent --add-service=nfs
success
[root@server_197 ~]# firewall-cmd --permanent --add-service=rpc-bind
success
[root@server_197 ~]# firewall-cmd --permanent --add-service=mountd
success
[root@server_197 ~]# firewall-cmd --reload
success
iptables这个有点局限性,如果非要使用,先依据前面可选的先固定好mountd的端口。我一般情况都先关了iptables留firewall。不过还是这样写一下啦,万一用得上。
以之前设置的mountd固定端口,4001-4004,以及nfs:2049、rpc:111
iptables -A INPUT -p tcp -m tcp --dport 111 -j ACCEPT
iptables -A INPUT -p udp -m udp --dport 111 -j ACCEPT
iptables -A INPUT -p tcp -m tcp --dport 2049 -j ACCEPT
iptables -A INPUT -p udp -m udp --dport 2049 -j ACCEPT
iptables -A INPUT -p tcp -m tcp --dport 4001:4004 -j ACCEPT
iptables -A INPUT -p udp -m udp --dport 4001:4004 -j ACCEPT

# iptables -I : 新加一条规则链
# iptables -A :增加一条规则链
# ptables -I 添加的规则放在现有规则的最前面,iptables -A 放在现有规则的最后。
重新启动一下防火墙啦
NFS_Client配置
作为使用Client,相当于Sever分享了一块硬盘,我们可以直接挂载在Client本地。
mount挂载
先看一下Sever共享信息,也就是对应我们之前在Sever的/etc/exports的配置。
如果不在许可范围内会提示mount.nfs: access denied by server while mounting。
- showmount -[e|a|v] <ip>
- -e,查看共享信息(记住-e就可以了)
- -a,查看本机挂载的文件资源的情况NFS资源的情况
- -v,查看nfs版本
-
mount -t nfs 192.168.2.197:/newnfs /newnfs
- 将192.168.2.197:/newnfs挂载在本机的/newnfs,因为之前设置了权限这个文件夹是777
[root@client_149 ~]# showmount -e 192.168.2.197 #看一下先Sever共享信息
Export list for 192.168.2.197:
/newnfs 192.168.2.*
[root@client_149 ~]# mount -t nfs 192.168.2.197:/newnfs /newnfs
- 也可以从根目录全部挂载,不过因为没有权限,还是只可以看到设置777权限的/newnfs
# 新建个文件夹用于挂载Server的根目录
[root@client_149 ~]# mkdir /nfs_197
# 挂载
[root@client_149 ~]# mount -t nfs 192.168.2.197:/ /nfs_197
# 查看一下挂载好的目录内容
[root@client_149 ~]# ll /nfs_197
total 0
drwxrwxrwx. 2 root root 20 Aug 31 01:30 newnfs
fstab挂载
重新启动后就要重新挂载啦,我们可以编辑一下/etc/fstab设置一下自动挂载。
在最后面追加
echo '192.168.2.197:/newnfs /newnfs nfs 0 0' >> /etc/fstab
如果不生效,将自动挂载也设置为开机启动
systemctl start remote-fs.target
systemctl enable remote-fs.target
当然,也可以开机时候自动执行挂载的命令/etc/rc.local
# 把之前的mount命令追加到rc.local的末尾
[root@client_149 ~]# echo 'mount -t nfs 192.168.2.197:/newnfs /newnfs' >> /etc/rc.local
# 追加完成后看一下
[root@client_149 ~]# cat /etc/rc.local | grep -v "#"
touch /var/lock/subsys/local
mount -t nfs 192.168.2.197:/newnfs /newnfs
这里记得要这个/etc/rc.local可执行+x
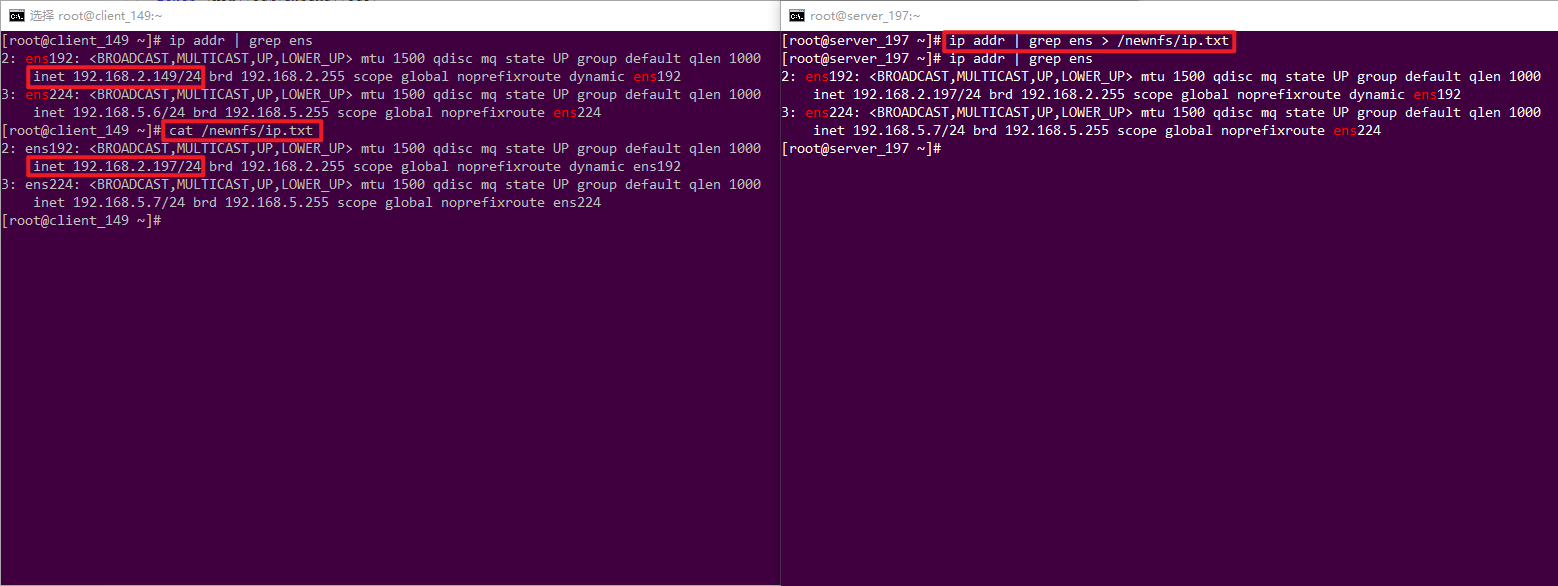
目前Server和Client都已经配置好,我们在Server、Client任意主机在共享、挂载的目录内新建个文件,再在另一主机上查看一下。
Recommend
About Joyk
Aggregate valuable and interesting links.
Joyk means Joy of geeK