

业务流程可视化-让你的流程图"Run"起来(7.运行状态持久化&轻量工作流支...
source link: https://www.cnblogs.com/nobuglady/p/16612398.html
Go to the source link to view the article. You can view the picture content, updated content and better typesetting reading experience. If the link is broken, please click the button below to view the snapshot at that time.
感谢大家阅读本项目系列文章和对项目的支持。
分享一下我对这个项目的新的改进。
之前项目做到了流程设计可视化和流程运行结果可视化。
本期发布的版本中实现了中间的运行过程的实时可视化,和流程状态持久化问题。
大家可以根据项目提供的接口自由扩展自己的工作流实现。
和大家分享一下:
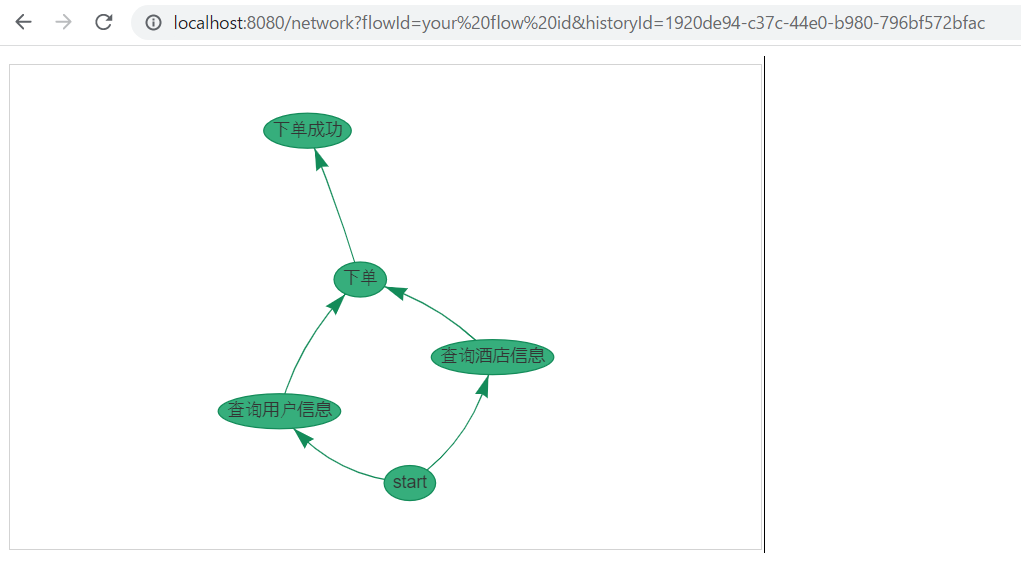
流程状态实时可视化
首先看效果:
1. 不需要交互的自动化流程
点击预定按钮,自动完成预定的流程。
2. 需要交互的向导式流程
每点击一个按钮,流程向前走一步。

工程基于SpringBoot实现,代码发布到下面的地址,大家可以自己酌情引用修改:
https://github.com/nobuglady/ladybugflow-ui
在ladybugFlow中,有一个接口,FlowUtil.dumpJson()
调用这个接口,可以实时的得到流程的状态的Json字符串,然后在页面上用得到Json来生成流程图即可。
对于【1. 不需要交互的自动化流程】,我们只需要启动流程后不停的拿到流程状态的Json即可完成实时可视化的效果。
流程启动代码:
@Service
public class Demo1Service {

	@Autowired
	private Demo1Flow demo1Flow;

	/**
	 * 启动流程
	 */
	public void bookingHotel(String username) {
		demo1Flow.startFlow(true, username);
	}
}
对于【2. 需要交互的向导式流程】,流程运行到等待节点即进入等待状态。
这是需要外部运行节点,并将节点运行结果传给等待的节点,来唤醒该等待节点。
流程启动&节点状态更新代码:
@Service
public class Demo2Service {

	@Autowired
	private Demo2Flow demo2Flow;

	/**
	 * 启动流程
	 */
	public String start(String username) {
		return demo2Flow.startFlow(false, username);
	}

	/**
	 * 根据流程ID,节点ID和启动实例ID更新节点状态(点击【查询用户信息】结束后调用)
	 */
	public void searchUser(String historyId) {
		FlowComponentFactory.getCompleteQueueSender().putCompleteNode(
				"FLOW_2",
				historyId,
				"a1a38c2e-0e05-4c68-bd49-f12aea070876", // 节点ID【查询用户信息】
				NodeStatusDetail.COMPLETE_SUCCESS,
				"0");
	}

	/**
	 * 根据流程ID,节点ID和启动实例ID更新节点状态(点击【查询酒店信息】结束后调用)
	 */
	public void searchHotel(String historyId) {
		FlowComponentFactory.getCompleteQueueSender().putCompleteNode(
				"FLOW_2",
				historyId,
				"1a90a997-4390-470a-ae7c-626a725438d2",// 节点ID【查询酒店信息】
				NodeStatusDetail.COMPLETE_SUCCESS,
				"0");
	}

	/**
	 * 根据流程ID,节点ID和启动实例ID更新节点状态(点击【下单】结束后调用)
	 */
	public void order(String historyId) {
		FlowComponentFactory.getCompleteQueueSender().putCompleteNode(
				"FLOW_2",
				historyId,
				"52289e99-363d-4453-8077-ca8bdc6d35bf",// 节点ID【下单】
				NodeStatusDetail.COMPLETE_SUCCESS,
				"0");
	}

	/**
	 * 根据流程ID,节点ID和启动实例ID更新节点状态(点击【下单成功】结束后调用)
	 */
	public void success(String historyId) {
		FlowComponentFactory.getCompleteQueueSender().putCompleteNode(
				"FLOW_2",
				historyId,
				"16422cbb-ccb0-4fe2-952b-e3ad5c3acbb2",// 节点ID【下单成功】
				NodeStatusDetail.COMPLETE_SUCCESS,
				"0");
	}
}
工作流的持久化方式设计
1. 工作流结构的持久化
ladybugflow用Json文件来做工作流结构的持久化。
工作流Json文件包括:流程信息,节点信息和边信息
ladybugflow提供了图形界面,可以用拖拽方式来完成工作流的设计和Json文件的生成。


2. 工作流状态的持久化
对于工作流状态的保存,我们默认提供了内存中保存的方式。
大家可以根据自己需要,选择数据库存储,文件存储,Redis,MogoDB存储等。
系统用三个实体来保存工作流的状态:
・流程历史实体・节点历史实体・边历史实体
和一个接口来描述对上述实体的操作:
io.github.nobuglady.network.fw.component.IFlowAccessor
大家只要实现上面的接口中的方法,即可以完成对工作流状态的保存。
比如存到数据库中,或者存到Redis中等。
对于自定义的持久化类,需要再ladybug.properties中做如下配置
flow.accessor = 你的持久化类全路径
下面我们以mysql为例,介绍数据操作接口的实现方式。
流程状态持久化实现(MySql)
接下来我们介绍mysql作为持久化的实现方式。
首先,需要做成实体对应的相关表,如下。
・流程历史表
・节点历史表
・边历史表
对应的SQL文件参考这里
https://github.com/nobuglady/ladybugflow-ui/blob/main/db/script.sql
然后,我们用sql的方式实现每个接口的方法。
我们针对每个表做一个Dao,实现针对表的操作
具体实现请参考这里:
最后我们将Dao集成到SpringBoot中,即完成了流程状态的持久化。
	private HistoryFlowDao historyFlowDao;
	private HistoryNodeDao historyNodeDao;
	private HistoryEdgeDao historyEdgeDao;

	public FlowAccessor() {
		historyFlowDao = SpringContextBridge.getInstance().getHistoryFlowDao();
		historyNodeDao = SpringContextBridge.getInstance().getHistoryNodeDao();
		historyEdgeDao = SpringContextBridge.getInstance().getHistoryEdgeDao();
	}
运行效果如下,可以看到系统已经通过发SQL的方式进行持久化查询与更新。
[I]2022/08/25 17:17:46.015 [your flow id][5bc43da8-7b11-4746-b886-31fd1c1bf754] pool-1-thread-2:execute node id:16422cbb-ccb0-4fe2-952b-e3ad5c3acbb2
[I]2022/08/25 17:17:46.015 [your flow id][5bc43da8-7b11-4746-b886-31fd1c1bf754] pool-1-thread-2:execute node name:下单成功
下单成功开始 (模拟业务等待3秒)
下单成功结束
2022/08/25 17:17:49 DEBUG [Thread-4] - ==>  Preparing: SELECT * FROM history_node WHERE flow_id = ? and node_id = ? and history_id = ?
2022/08/25 17:17:49 DEBUG [Thread-4] - ==> Parameters: your flow id(String), 16422cbb-ccb0-4fe2-952b-e3ad5c3acbb2(String), 5bc43da8-7b11-4746-b886-31fd1c1bf754(String)
2022/08/25 17:17:49 DEBUG [Thread-4] - <==      Total: 1
2022/08/25 17:17:49 DEBUG [Thread-4] - ==>  Preparing: update history_node set node_status = ?, node_status_detail = ?, update_user = ?, update_time = now() where flow_id = ? and history_id = ? and node_id = ?
2022/08/25 17:17:49 DEBUG [Thread-4] - ==> Parameters: 22(Integer), 1(Integer), testUser(String), your flow id(String), 5bc43da8-7b11-4746-b886-31fd1c1bf754(String), 16422cbb-ccb0-4fe2-952b-e3ad5c3acbb2(String)
2022/08/25 17:17:49 DEBUG [Thread-4] - <==    Updates: 1
2022/08/25 17:17:49 DEBUG [Thread-4] - ==>  Preparing: update history_node set node_status = ?, update_user = ?, update_time = now() where flow_id = ? and history_id = ? and node_id = ?
2022/08/25 17:17:49 DEBUG [Thread-4] - ==> Parameters: 100(Integer), testUser(String), your flow id(String), 5bc43da8-7b11-4746-b886-31fd1c1bf754(String), 16422cbb-ccb0-4fe2-952b-e3ad5c3acbb2(String)
2022/08/25 17:17:49 DEBUG [Thread-4] - <==    Updates: 1
2022/08/25 17:17:49 DEBUG [Thread-4] - ==>  Preparing: SELECT * FROM history_edge WHERE flow_id = ? and history_id = ?
2022/08/25 17:17:49 DEBUG [Thread-4] - ==> Parameters: your flow id(String), 5bc43da8-7b11-4746-b886-31fd1c1bf754(String)
2022/08/25 17:17:49 DEBUG [Thread-4] - <==      Total: 6
2022/08/25 17:17:49 DEBUG [Thread-4] - ==>  Preparing: SELECT * FROM history_node WHERE flow_id = ? and history_id = ?
2022/08/25 17:17:49 DEBUG [Thread-4] - ==> Parameters: your flow id(String), 5bc43da8-7b11-4746-b886-31fd1c1bf754(String)
2022/08/25 17:17:49 DEBUG [Thread-4] - <==      Total: 5
2022/08/25 17:17:49 DEBUG [Thread-4] - ==>  Preparing: SELECT * FROM history_flow WHERE flow_id = ? and history_id = ?
2022/08/25 17:17:49 DEBUG [Thread-4] - ==> Parameters: your flow id(String), 5bc43da8-7b11-4746-b886-31fd1c1bf754(String)
2022/08/25 17:17:49 DEBUG [Thread-4] - <==      Total: 1
大家可以根据自己的需要自由的扩展持久化的方式。
小型工作流的使用
对于工作流在业务系统中的使用,我们建议增加一个Flow层来处理工作流,如下:

Service层调用Flow层来实现工作流的启动,如下所示:
@Service
public class Demo1Service {

	@Autowired
	private Demo1Flow demo1Flow;

	public void bookingHotel(String username) {
		// 启动流程
		demo1Flow.startFlow(true, username);
	}
}
工作流的设计
首先需要在我们提供的工具中设计工作流。
然后点击【update json】按钮生成json文件。
然后将生成的Json文件放入Flow层中,并且建立一个同名的Java文件集成自FlowRunner,来提供工作流的启动。

工作流的监控
ladybugflow提供了一个监控工作流的例子,大家可以根据需要自己扩展。
浏览器打开 http://localhost:8080/list
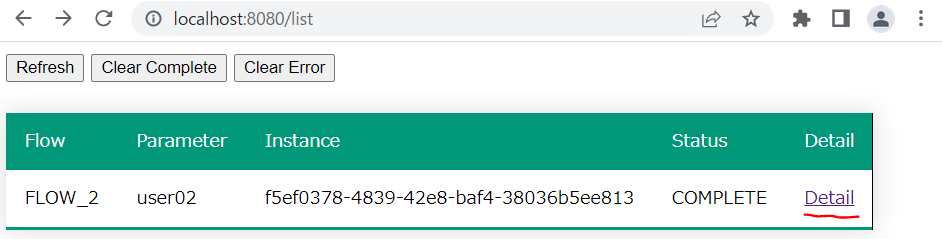
可以显示所有的工作流,点击【detail】链接,即可查看工作流的详细状态。
点击【clear complete】按钮,即可删除所有已经完成的工作流,
点击【clear error】按钮,即可删除所有的运行错误的工作流。
后续会加入权限控制等功能,欢迎大家持续关注本项目。
感谢您阅读到这里
Recommend
About Joyk
Aggregate valuable and interesting links.
Joyk means Joy of geeK