
2

Spring 01: Spring配置 + IOC控制反转 + Setter注入 - nefu_wangxun
source link: https://www.cnblogs.com/nefu-wangxun/p/16600655.html
Go to the source link to view the article. You can view the picture content, updated content and better typesetting reading experience. If the link is broken, please click the button below to view the snapshot at that time.
Spring 01: Spring配置 + IOC控制反转 + Setter注入
Spring框架是一个容器,是整合其他框架的框架
他的核心是IOC(控制反转)和AOP(面向切面编程),由20多个模块构成,在很多领域都提供了优秀的问题解决方案
-
轻量级:由20多个模块构成,每个jar包都很小,小于1M,核心包也就3M左右
-
代码污染小:Spring框架对程序员开发时的条条框框的约束较少,对代码的污染小
-
面向接口编程:灵活性好,项目的可扩展性和可维护性都较高
-
AOP:面向切面编程,将公共的,通用的,重复的代码单独开发,在需要时反织回去
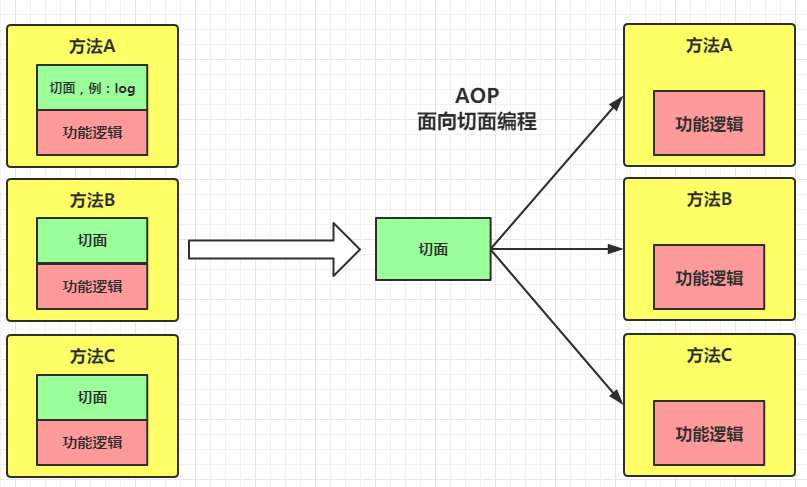
示例分析:在开发中普遍需要使用到日志输出功能,会将日志输出功能大量耦合到项目的不同位置,如上图左侧所示。
而日志输出功能与项目本身的核心业务逻辑无关,我们只是为了不时的查看程序的运行状态。则可以将日志功能单独提出去开发,在需要的地方将日志输出功能(所谓:切面)反织回去即可,如上图右侧所示。
- 整合其他框架:使其他框架也更加易用
- IOC(Inversion of Control):是一个概念,也是一种思想,由Spring容器进行对象的创建和依赖注入,程序员在使用时直接取用即可
//程序员创建对象
Student stu = new Student();
//程序员进行赋值
stu.setName("荷包蛋");
stu.setAge(20);
<!-- Spring容器负责对象的创建 -->
<bean id="stu" class="com.example.pojo.Student">
    <!-- Spring容器负责为属性赋值 -->
    <property name="name" value="荷包蛋" />
    <property name="age" value="20" />
</bean>
创建Spring项目
- 创建maven的java项目:模板类型 + 项目目录结构 + 修改pom.xml文件添加基本配置的操作不再赘述,可以参考mybatis博客集里对maven项目的配置
- 在pom.xml里添加Spring依赖
    <!-- 添加spring依赖-->
    <dependency>
      <groupId>org.springframework</groupId>
      <artifactId>spring-context</artifactId>
      <version>5.3.22</version>
    </dependency>
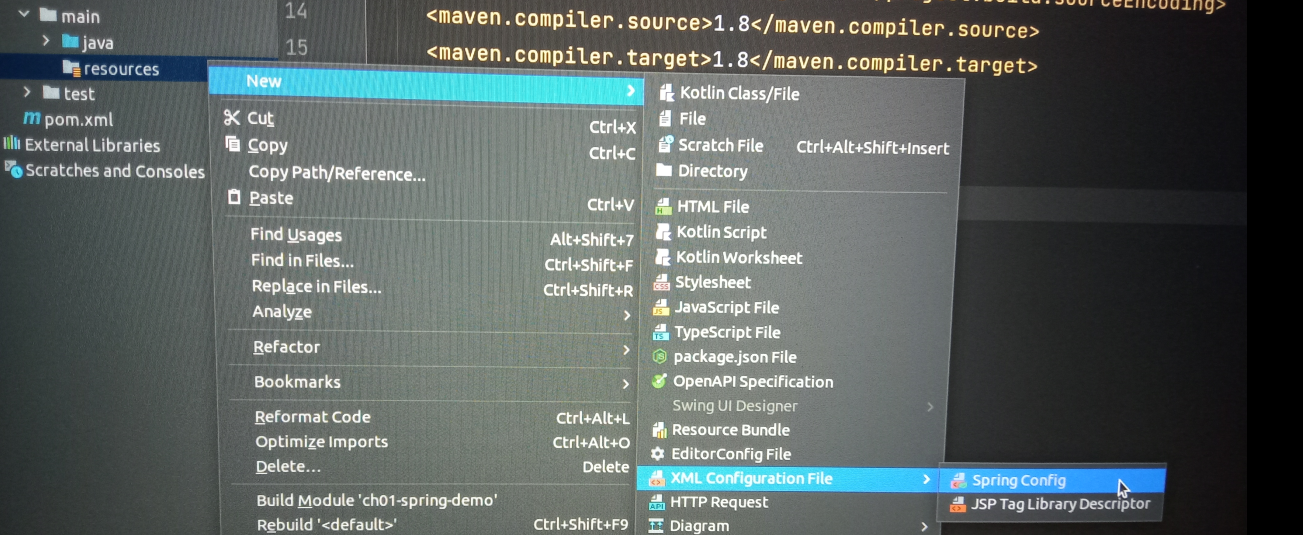
- 在src/main/resources目录下添加Spring配置文件:applicationContext.xml,正常情况下,文件头自动补全(在下图状态下,无法截图,手机拍摄,包涵包涵)

创建实例对象
- 容器创建实例对象和传统方式下手动创建实例对象的对比
//实体类
package com.example.pojo;

public class Student {
    private String name;
    private int age;

    public Student() {
        System.out.println("无参方法被调用,Student实例被创建.....");
    }

    @Override
    public String toString() {
        return "Student{" +
                "name='" + name + '\'' +
                ", age=" + age +
                '}';
    }
}
<!-- applicationContext.xml文件 -->

<?xml version="1.0" encoding="UTF-8"?>
<beans xmlns="http://www.springframework.org/schema/beans"
       xmlns:xsi="http://www.w3.org/2001/XMLSchema-instance"
       xsi:schemaLocation="http://www.springframework.org/schema/beans http://www.springframework.org/schema/beans/spring-beans.xsd">

    <!-- 定义实体类的实例对象 -->
    <bean id="stu" class="com.example.pojo.Student"/>
</beans>
//两种创建实例对象的对比

package com.example.test;

import com.example.pojo.Student;
import org.junit.Test;
import org.springframework.context.ApplicationContext;
import org.springframework.context.support.ClassPathXmlApplicationContext;

public class TestStudent {

    //测试程序员手动创建实例对象
    @Test
    public void testStudent(){
        Student stu = new Student();
        System.out.println(stu);
    }

    //测试Spring容器创建实例对象
    @Test
    public void testStudentSpring(){
        //创建Spring容器,并启动
        ApplicationContext applicationContext = new ClassPathXmlApplicationContext("applicationContext.xml");
        //从容器中获取对象
        Student stu = (Student) applicationContext.getBean("stu");
        System.out.println(stu);
    }
}
    //两次测试的输出结果均为

    无参方法被调用,Student实例被创建.....
    Student{name='null', age=0}

    Process finished with exit code 0
- 当Spring容器创建时,对应的应用域中注册的对象就会被创建
    @Test
    public void testStudentSpring(){
        //创建Spring容器
        ApplicationContext applicationContext = new ClassPathXmlApplicationContext("source01/applicationContext.xml");
    }
    //测试输出结果

    无参方法被调用,Student实例被创建.....

    Process finished with exit code 0
基于xml的IOC(控制反转)
setter注入
1. 简单类型(8 + 1)注入
- 使用value属性
    //添加两个属性的set方法
    public void setName(String name) {
        this.name = name;
    }

    public void setAge(int age) {
        this.age = age;
    }
    <bean id="stu" class="com.example.pojo.Student">
        <!-- 使用setter注入法为实例对象的属性赋值 -->
        <property name="name" value="荷包蛋"/>
        <property name="age" value="20"/>
    </bean>
    //测试Spring容器创建实例对象
    @Test
    public void testStudentSpring(){
        //创建Spring容器,并启动
        ApplicationContext applicationContext = new ClassPathXmlApplicationContext("source01/applicationContext.xml");
        //从容器中获取对象
        Student stu = (Student) applicationContext.getBean("stu");
        System.out.println(stu);
    }
    //测试输出:
    无参方法被调用,Student实例被创建.....
    Student{name='荷包蛋', age=20}

    Process finished with exit code 0
2. 引用类型注入
- 使用ref属性
    //School类
    private String name;
    private String address;

    public void setName(String name) {
        this.name = name;
    }

    public void setAddress(String address) {
        this.address = address;
    }

    public School() {
        System.out.println("School类的构造方法被执行,实体对象被创建.....");
    }

    @Override
    public String toString() {
        return "School{" +
                "name='" + name + '\'' +
                ", address='" + address + '\'' +
                '}';
    }
- 新增实体类:School
    //Student类
    private String name;
    private int age;
    private School school;

    public Student() {
        System.out.println("Student类的构造方法执行,实体对象被创建....");
    }

    public void setName(String name) {
        this.name = name;
    }

    public void setAge(int age) {
        this.age = age;
    }

    public void setSchool(School school) {
        this.school = school;
    }

    @Override
    public String toString() {
        return "Student{" +
                "name='" + name + '\'' +
                ", age=" + age +
                ", school=" + school +
                '}';
    }
- Student对象持有School对象的引用
    <!-- applicationContext.xml文件 -->

   <!-- 定义School实体类的实例对象-->
    <bean id="school" class="com.example.pojo02.School">
        <property name="name" value="nefu"/>
        <property name="address" value="哈尔滨"/>
    </bean>

    <!-- 定义Student实体类的实例对象 -->
    <bean id="stu" class="com.example.pojo02.Student">
        <property name="name" value="荷包蛋"/>
        <property name="age" value="20"/>
        <!-- 根据bean工厂中注册过的对象,进行依赖注入 -->
        <property name="school" ref="school"/>
    </bean>
- 对于Student对象持有的School对象的引用,根据bean工厂中注册过的对象(不分注册先后),进行依赖注入(待注入属性类型必须和已经注册过的对象的类型一致,才可进行依赖注入)
     //测试setter注入法的ref属性
     @Test
     public void testStudent(){
         //创建Spring容器,同时生成bean工厂中注册的对象
         ApplicationContext applicationContext = new ClassPathXmlApplicationContext("source02/applicationContext.xml");
         //获取对象
         Student stu = (Student) applicationContext.getBean("stu");
         System.out.println(stu);
     }
- 创建Spring容器并获取对象,打印输出
     //测试输出结果
     School类的构造方法被执行,实体对象被创建.....
     Student类的构造方法执行,实体对象被创建....
     Student{name='荷包蛋', age=20, school=School{name='nefu', address='哈尔滨'}}

     Process finished with exit code 0
- 进一步验证在创建容器时,注册过的对象就被创建,且普通类型的数据和引用类型的数据都可正确注入
- 使用setter注入法必须提供无参构造方法,必须提供待注入属性的setXXX()方法,简单分析如下:
- 无参构造方法用于创建实例对象,此时实例对象的属性是一张白纸,未被赋值和被其他数据污染
- 对应属性的set方法是为了在底层调用时给目标属性赋值用,框架再封装,底层的执行代码该有的还要有,框架也不知道你在set方法中都想干些什么(毕竟set方法应该被用来赋值,但是不仅仅只能做赋值用)
- 有了前两步,你便可以得到需要的对象,而且只有指定的属性被赋值,其他属性一尘不染
- 但是,如果提供了有参构造方法,或者没有set方法,setter注入将会遇到无限多的麻烦
- 无set方法,底层无法调用对应set方法完成属性赋值
- 有参构造方法的参数会扰乱我们对指定属性的赋值计划
- 例如,有参构造包括name和age两个属性,而set又要对name属性注入值,就会导致name属性被两次赋值,在创建对象时就这样做显然不合理
- 所以,我们要做的就是,先创建一个干净的对象(无参构造,先不涉及属性值的问题),再用对应属性的set方法给属性赋值,做到精准赋值,按需操作
Recommend
About Joyk
Aggregate valuable and interesting links.
Joyk means Joy of geeK