

【Azure 应用服务】PHP应用部署在App Service for Linux环境中,上传文件大于1MB时,...
source link: https://www.cnblogs.com/lulight/p/16522210.html
Go to the source link to view the article. You can view the picture content, updated content and better typesetting reading experience. If the link is broken, please click the button below to view the snapshot at that time.

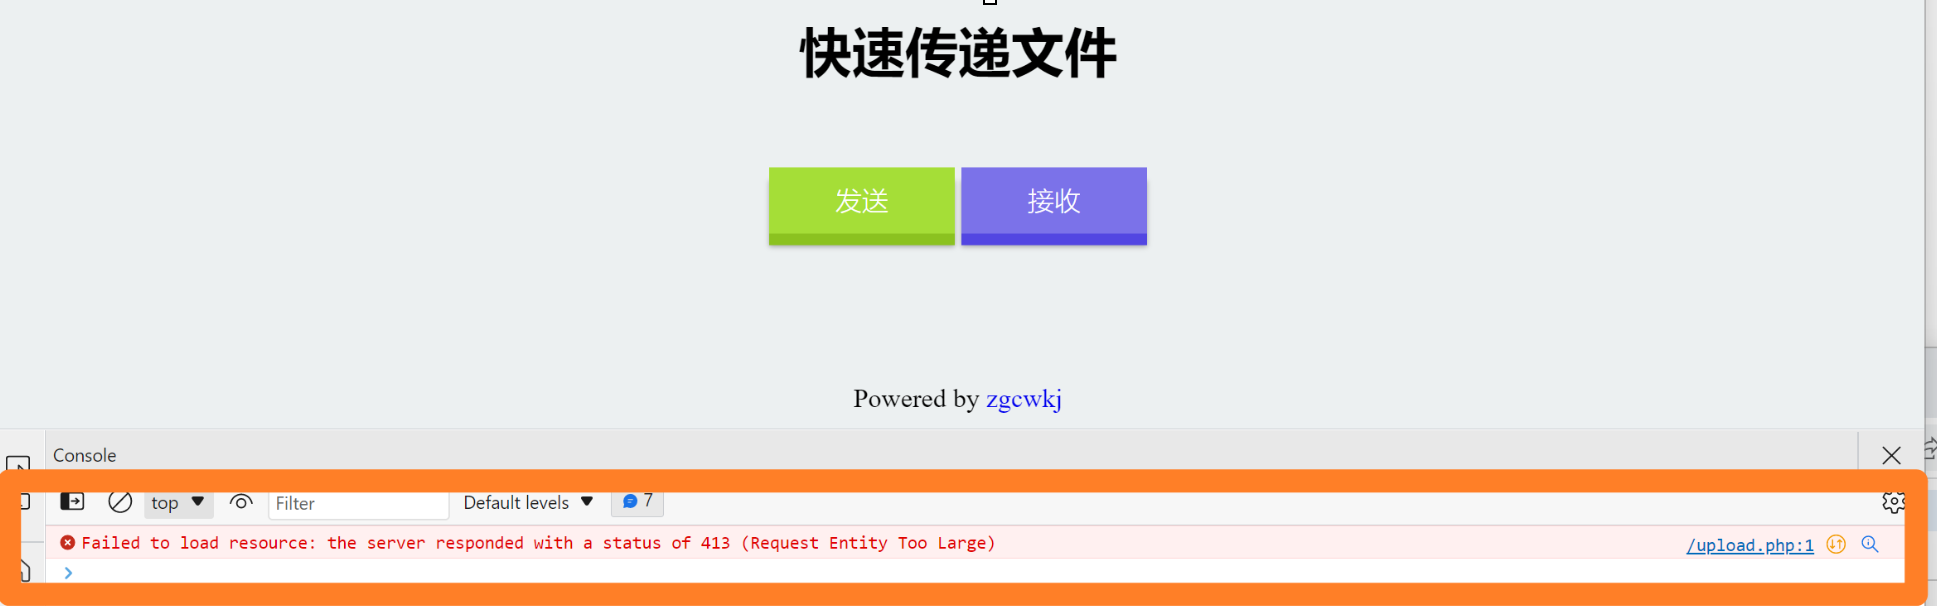
【Azure 应用服务】PHP应用部署在App Service for Linux环境中,上传文件大于1MB时,遇见了413 Request Entity Too Large 错误的解决方法
在PHP项目部署在App Service后,上传文件如果大于1MB就会遇见 413 Request Entity Too Large 的问题。
目前这个问题,首先需要分析应用所在的环境。 在App Service for Linux环境中,为PHP提供的运行时当前只有PHP 8.0, 并且 PHP 8.0 中使用的Nginx作为代理服务器。然后请求才会传递到PHP应用中。
基于以上分析,在PHP应用中,会收到Nginx 和PHP双重限制。所以传递文件的限制问题设计到两个方面:
一:Nginx 服务器对上传文件大小的限制。(默认限制为 1 MB,需通过 client_max_body_size 参数修改大小)
二:PHP 对上传文件文件大小的限制。(默认限制为 2MB,可以通过 upload_max_filesize 和 post_max_size 修改大小)
所以,本文主要介绍,如何在App Service For Linux环境中,修改Nginx对文件大小的限制和PHP文件大小的限制。
第一部分:修改 Nginx client_max_body_size
第一步:进入App Service SSH 页面,寻找Nginx的default文件,路径为( /etc/nginx/sites-available/default),通过CAT查看默认的内容。
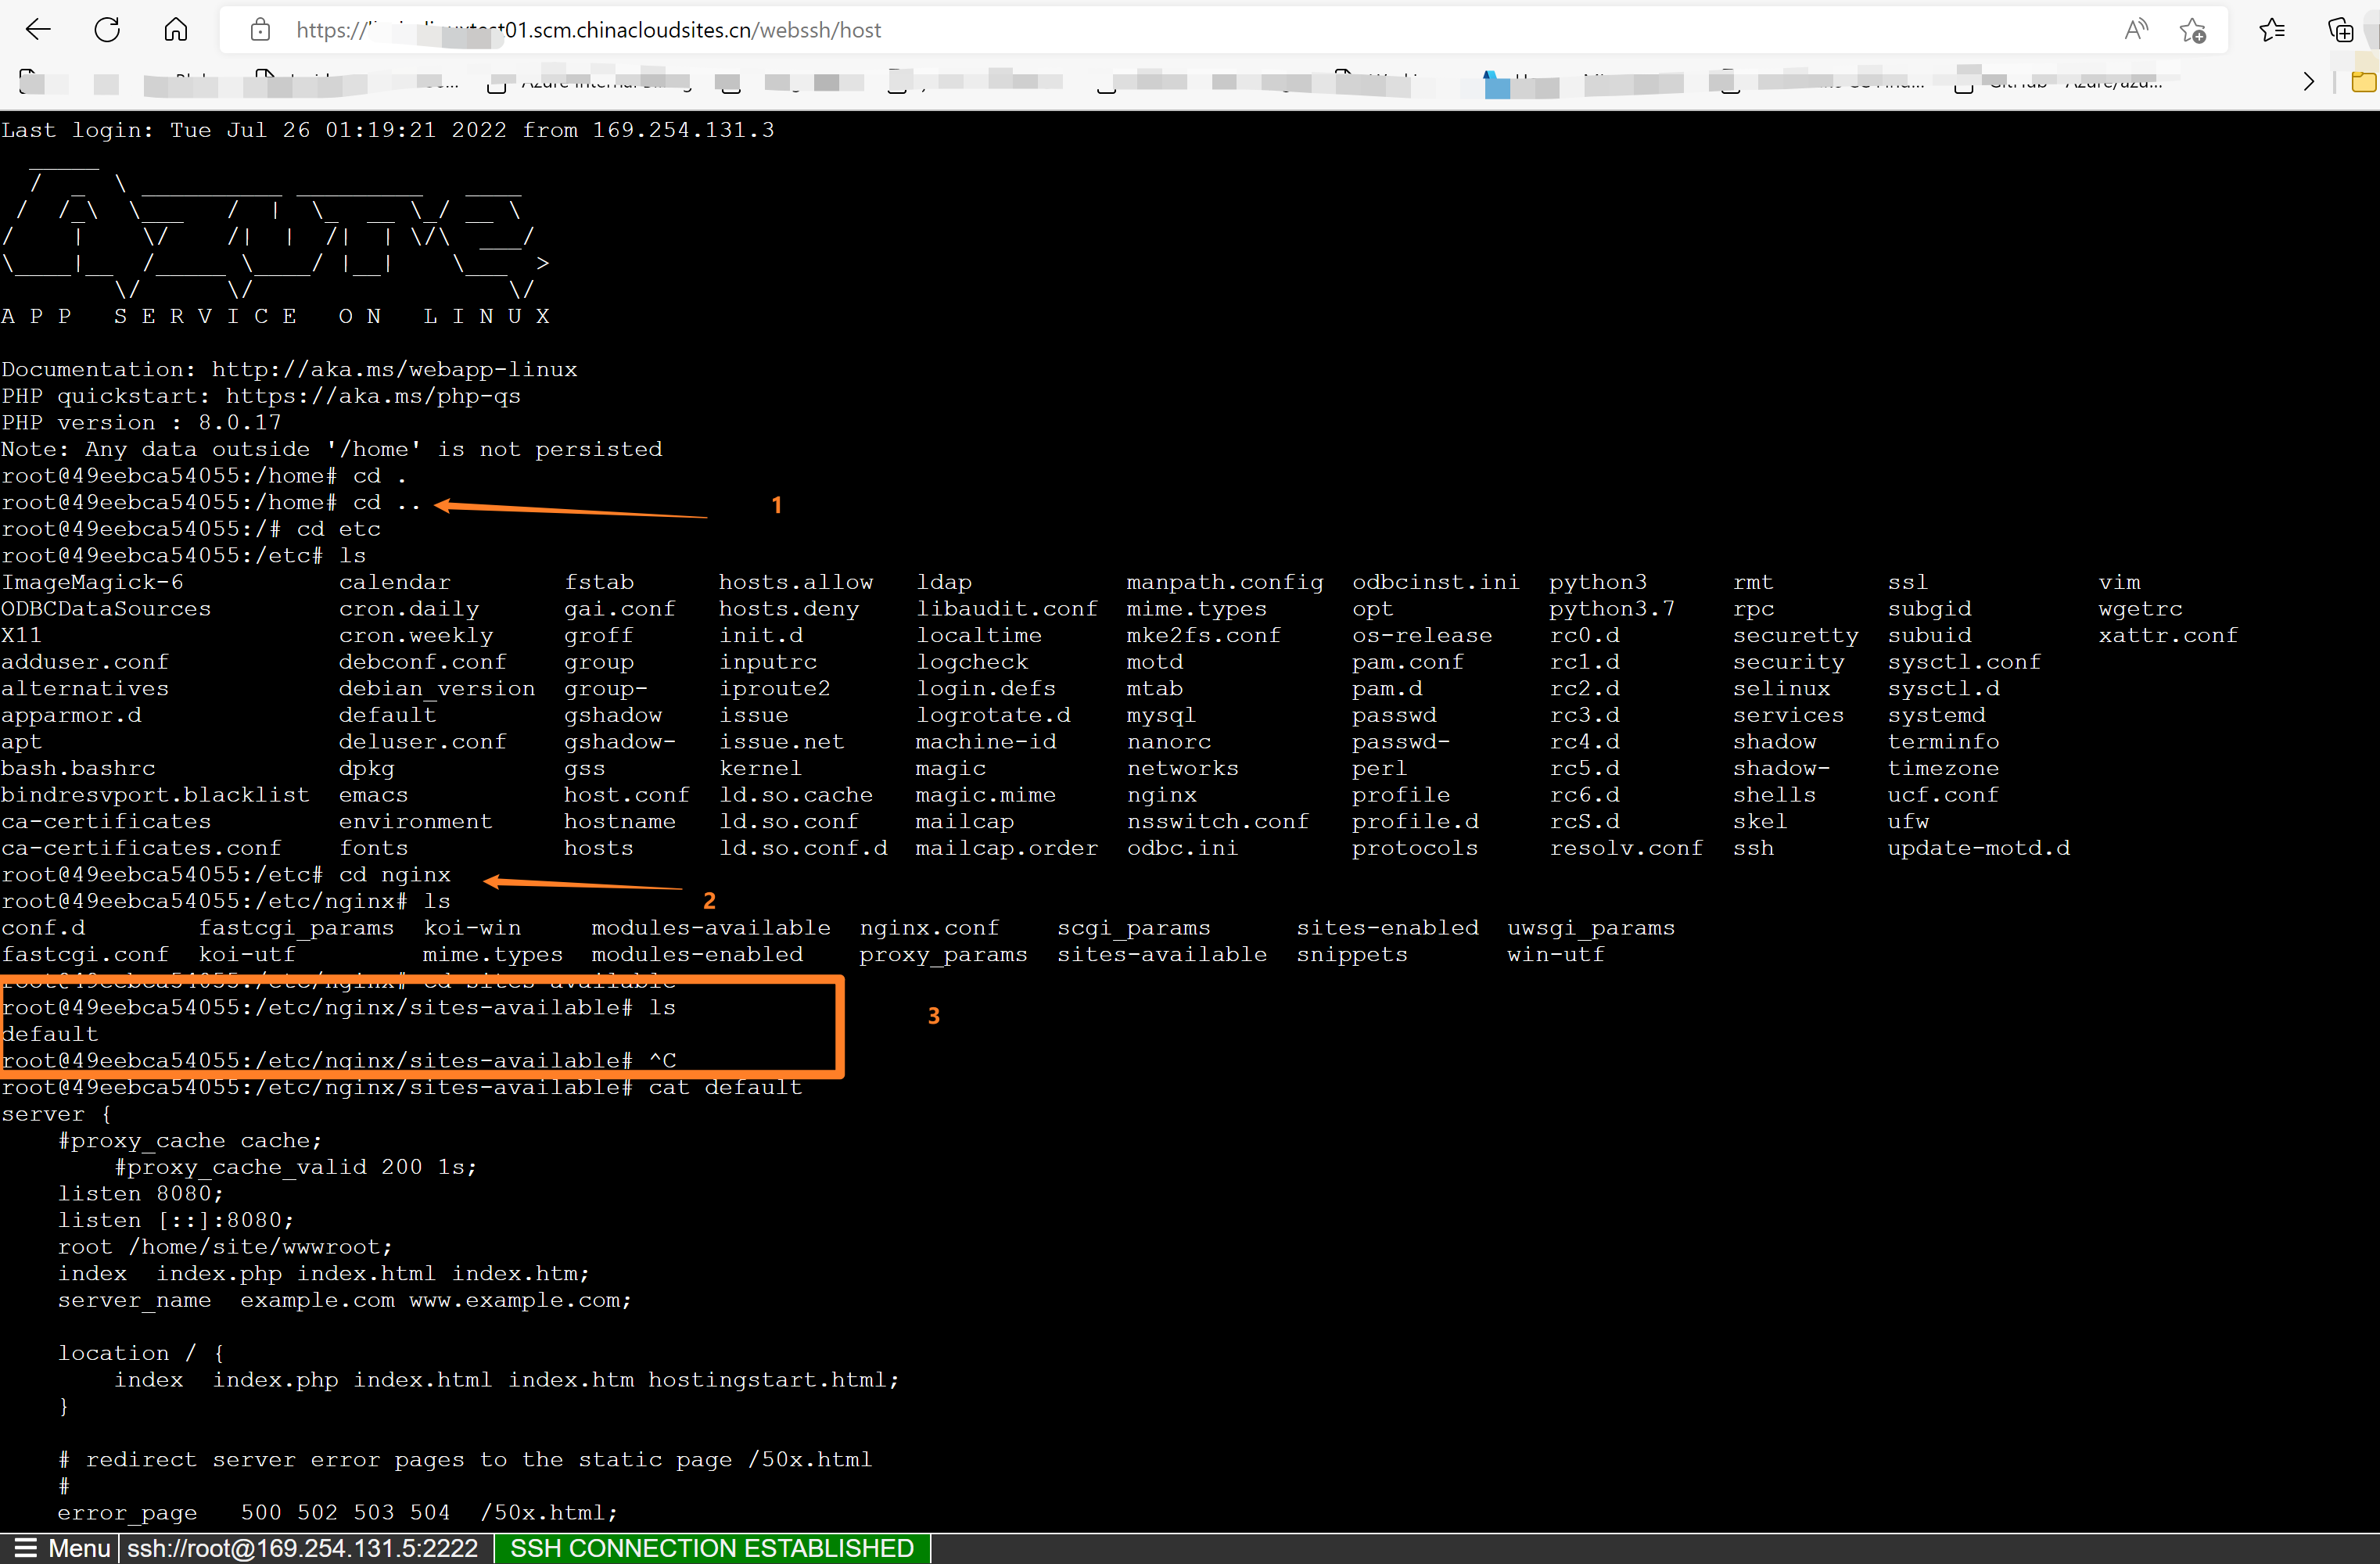
上图中执行的指令有:
cd ..

cd etc/nginx/sites-availabled

ls

cat default
第二步:复制default的内容到本地自己的PHP项目文件中,添加client_max_body_size后,随项目文件一起部署到 /home/site/wwwroot/目录下
(PS: 目录可以自定义修改,但必须注意,如果项目部署的根目录不在wwwroot中,必须同步修改 nginx 的 default配置文件,避免应用报错找不到源文件)
default的默认内容为
server {
    #proxy_cache cache;
        #proxy_cache_valid 200 1s;
    listen 8080;
    listen [::]:8080;
    root /home/site/wwwroot;
    index  index.php index.html index.htm;
    server_name  example.com www.example.com;

    location / {
        index  index.php index.html index.htm hostingstart.html;
    }

    # redirect server error pages to the static page /50x.html
    #
    error_page   500 502 503 504  /50x.html;
    location = /50x.html {
        root   /html/;
    }

    # Disable .git directory
    location ~ /\.git {
        deny all;
        access_log off;
        log_not_found off;
    }

    # Add locations of phpmyadmin here.
    location ~ [^/]\.php(/|$) {
        fastcgi_split_path_info ^(.+?\.php)(|/.*)$;
        fastcgi_pass 127.0.0.1:9000;
        include fastcgi_params;
        fastcgi_param HTTP_PROXY "";
        fastcgi_param SCRIPT_FILENAME $document_root$fastcgi_script_name;
        fastcgi_param PATH_INFO $fastcgi_path_info;
        fastcgi_param QUERY_STRING $query_string;
        fastcgi_intercept_errors on;
        fastcgi_connect_timeout         300;
        fastcgi_send_timeout           3600;
        fastcgi_read_timeout           3600;
        fastcgi_buffer_size 128k;
        fastcgi_buffers 4 256k;
        fastcgi_busy_buffers_size 256k;
        fastcgi_temp_file_write_size 256k;
    }
}
需要在其中添加 client_max_body_size , 比如这里设置为10m (不要写成 10MB,并且结尾要带上分号 ;)
server {
    #proxy_cache cache;
    #proxy_cache_valid 200 1s;
    listen 8080;
    listen [::]:8080;
    root /home/site/wwwroot;
    index  index.php index.html index.htm;
    server_name  lbphplinuxtest01.chinacloudsites.cn;
    client_max_body_size 10m;

   location / {
        try_files $uri $uri/ /index.php$is_args$query_string;
        index  index.php index.html index.htm hostingstart.html;
    }

   # redirect server error pages to the static page /50x.html
    #
    error_page   500 502 503 504  /50x.html;
    location = /50x.html {
        root   /html/;
    }

    # Disable .git directory
    location ~ /\.git {
        deny all;
        access_log off;
        log_not_found off;
    }

   # Add locations of phpmyadmin here.
    location ~ [^/]\.php(/|$) {
        fastcgi_split_path_info ^(.+?\.php)(|/.*)$;
        fastcgi_pass 127.0.0.1:9000;
        include fastcgi_params;
        fastcgi_param HTTP_PROXY "";
        fastcgi_param SCRIPT_FILENAME $document_root$fastcgi_script_name;
        fastcgi_param PATH_INFO $fastcgi_path_info;
        fastcgi_param QUERY_STRING $query_string;
        fastcgi_intercept_errors on;
        fastcgi_connect_timeout         300;
        fastcgi_send_timeout           3600;
        fastcgi_read_timeout           3600;
        fastcgi_buffer_size 128k;
        fastcgi_buffers 4 256k;
        fastcgi_busy_buffers_size 256k;
        fastcgi_temp_file_write_size 256k;
    }
}
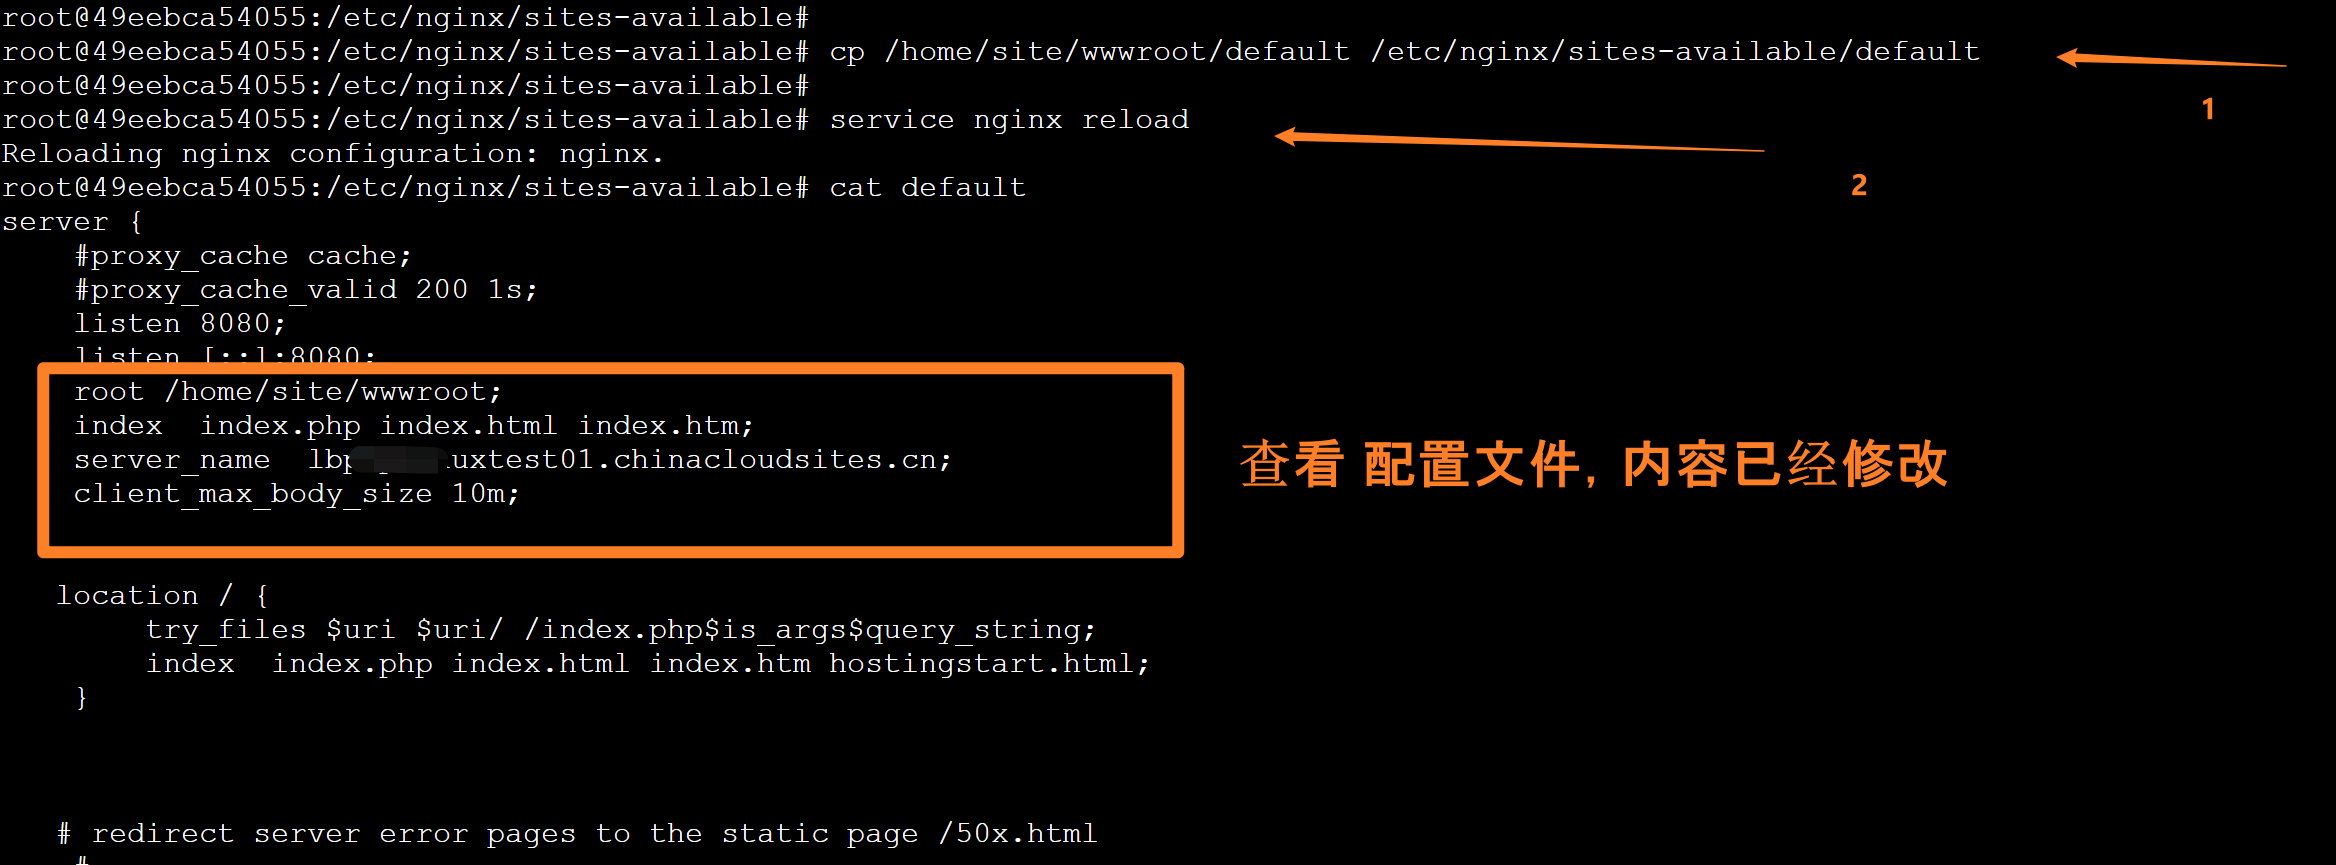
第三步:PHP应用文件部署后,可以也SSH中通过cp 命令把修改后的default文件复制到 nginx sites-available default目录下,并且重启Nginx服务(service nginx restart)。此步为临时性有效。
此步执行的命令为
##复制 default 到nginx sites-available目录中
cp /home/site/wwwroot/default /etc/nginx/sites-available/default

##重新加载 nginx 服务
service nginx reload
如果通过SSH直接在应用的容器中执行以上命令,当App Service站点重启,应用重新部署时,以上修改都会丢失,Nginx配置会恢复默认。所以需要下一步永久性操作。
PS: 修改完成后,可以通过 Nginx -T 来查看Nginx所使用的配置参数。以及可以在 /var/log/nginx中查看error.log日志


View Code
第四步:把第三步的 cp 命令和 restart命令设置在 App Service的启动命令中,以便长久有效。如果启动命令中内容过多,可以把全部内容写入到一个脚本文件中(如 startscript.sh),并随项目文件一起放置。然后把文件全路径填入启动命令中。
把第三步的两句命令用分号(;)连接在一起设置在Startup Command中,操作如下图:
cp /home/site/wwwroot/default /etc/nginx/sites-available/default; service nginx reload
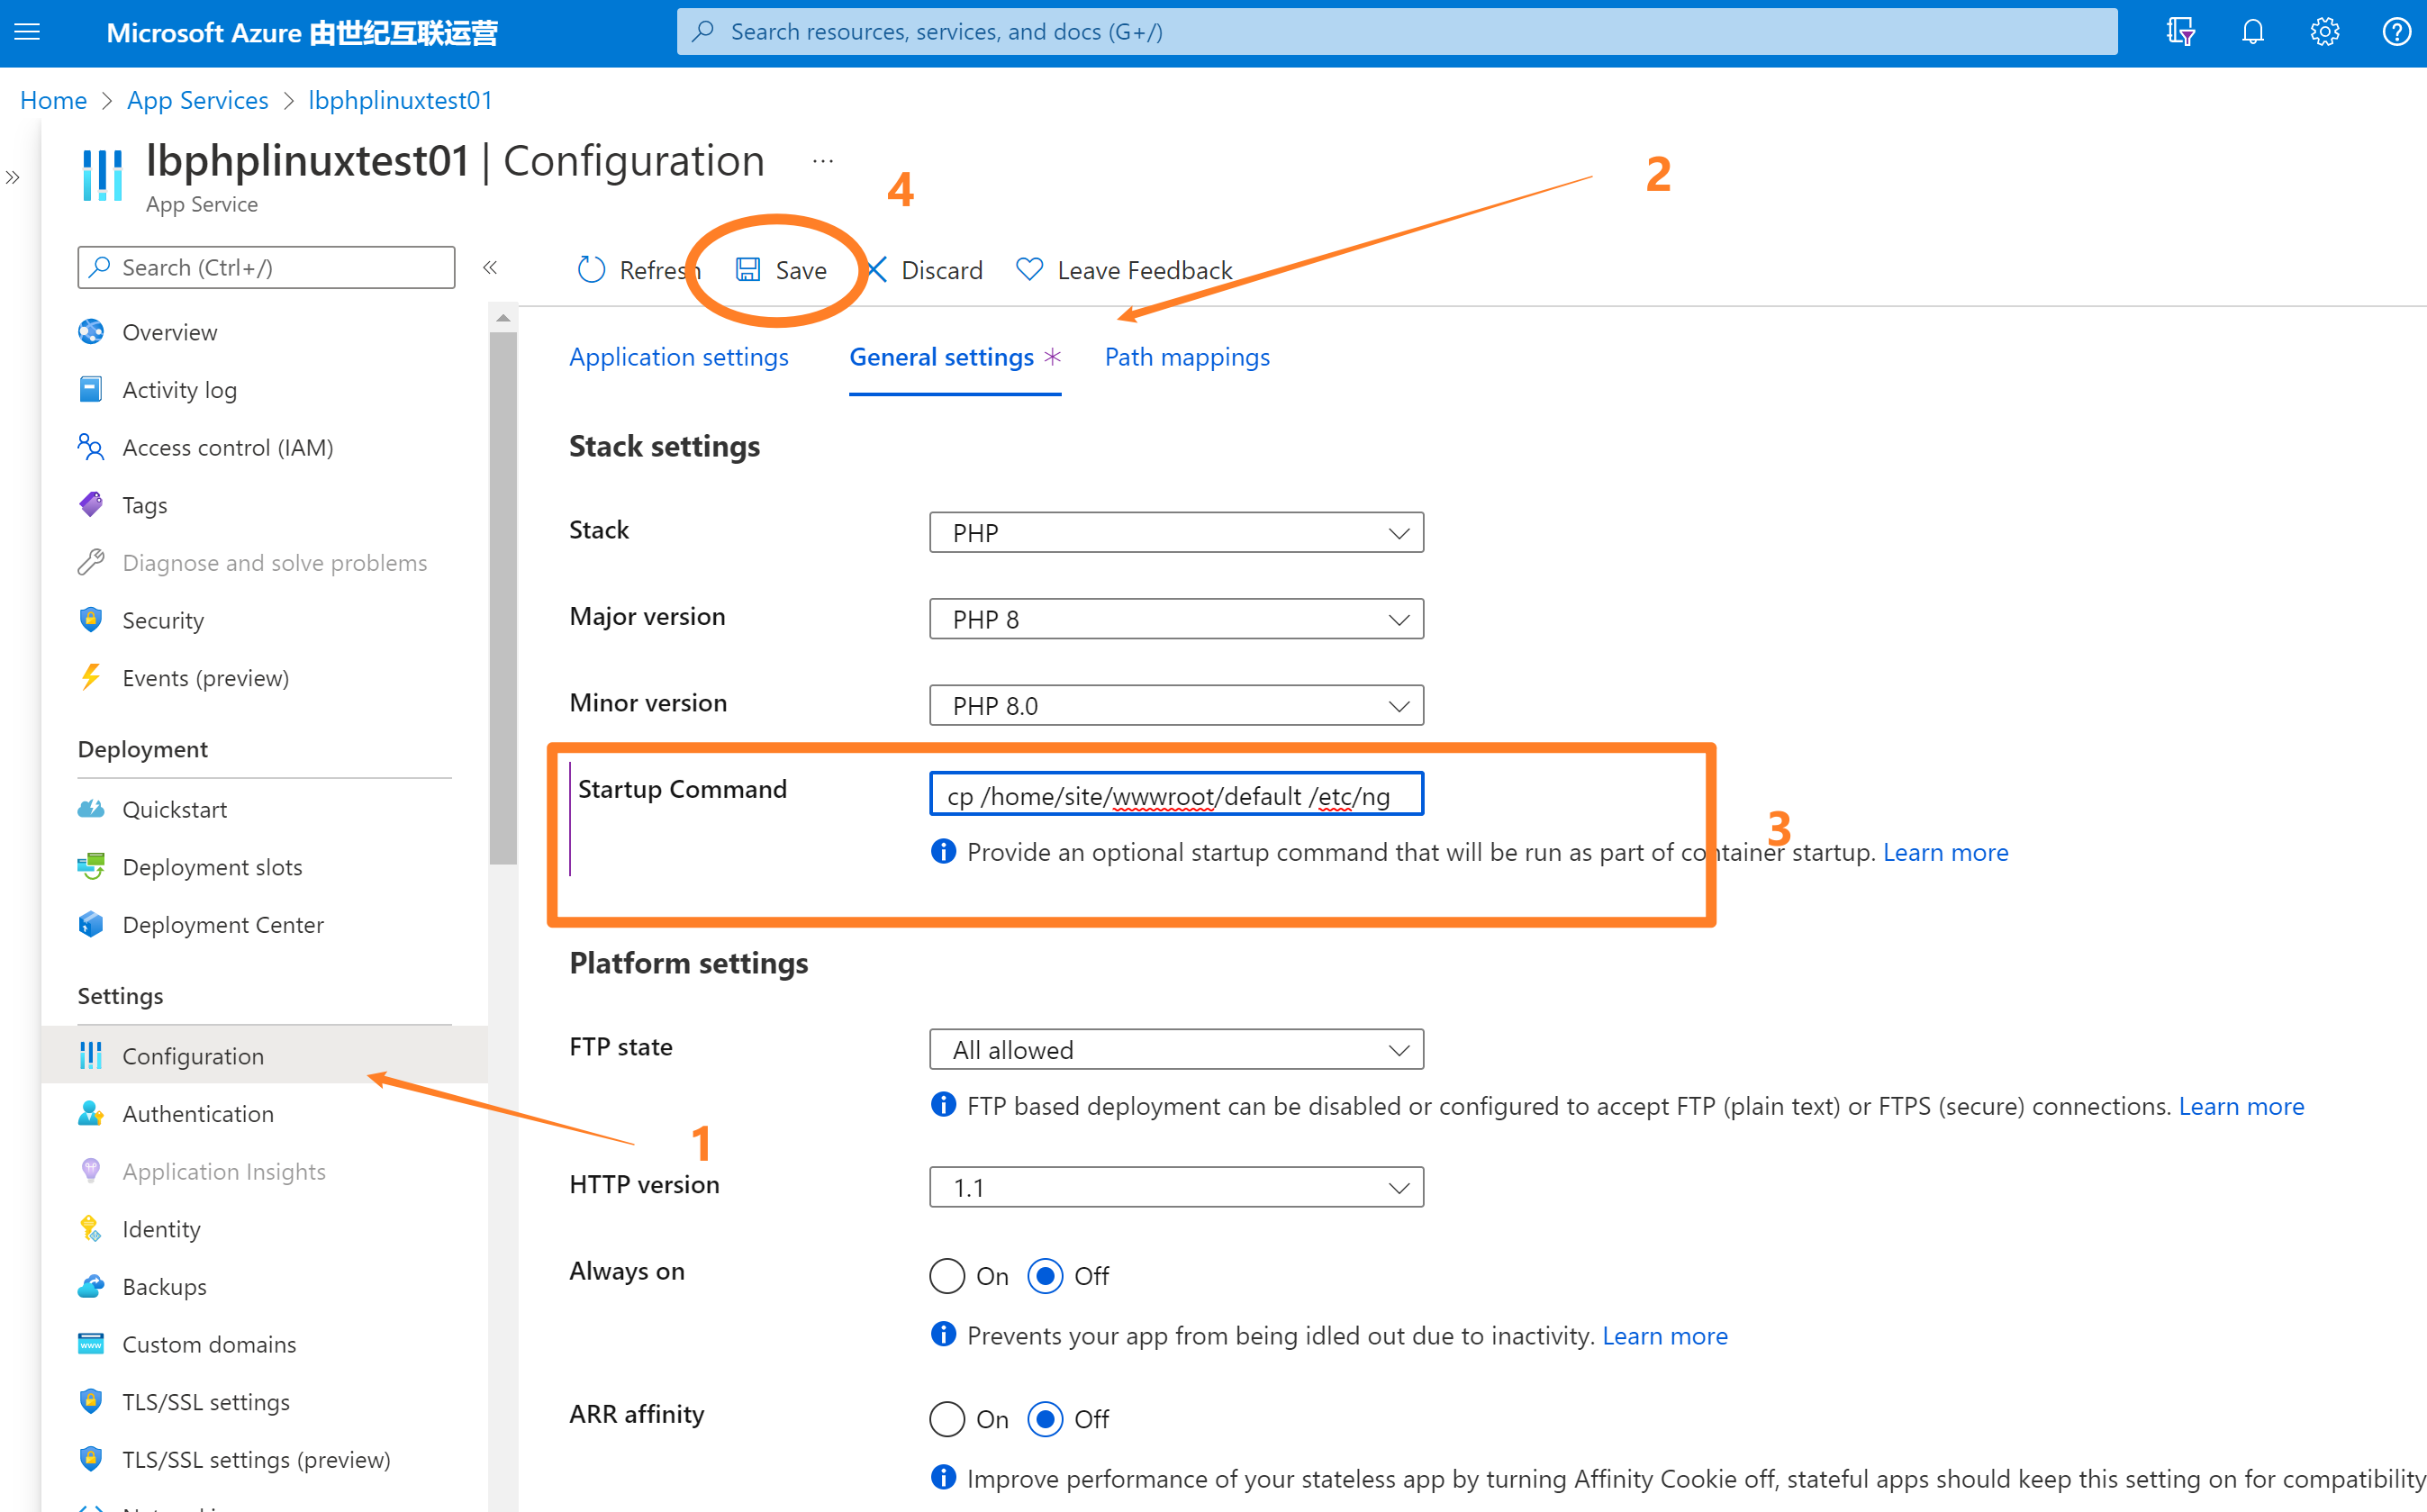
1)在App Service的目录页面中, 点击Configuration目录进入Configuration页面
2)选择General Settings选项卡
3)在Startup Command中添加 cp和restart命令
4)点击保存按钮。应用会自动重启并运行命令
注意:当以上操作完成后,Nginx上传文件默认1MB 的限制就变为了 10MB,但是因为PHP的限制还没有修改,所以当在应用中上传文件大于2MB时候,依旧会收到 413 或者 404 错误。只是,此时错误的根源为PHP限制。
第二部分:修改PHP upload_max_filesize 和 post_max_size
第一步:在项目文件根目录中创建 extensions.ini 的文件,并在其中设置 upload_max_filesize 和 post_max_size 值为50M。然后把修改后的文件一起部署到 wwwroot中
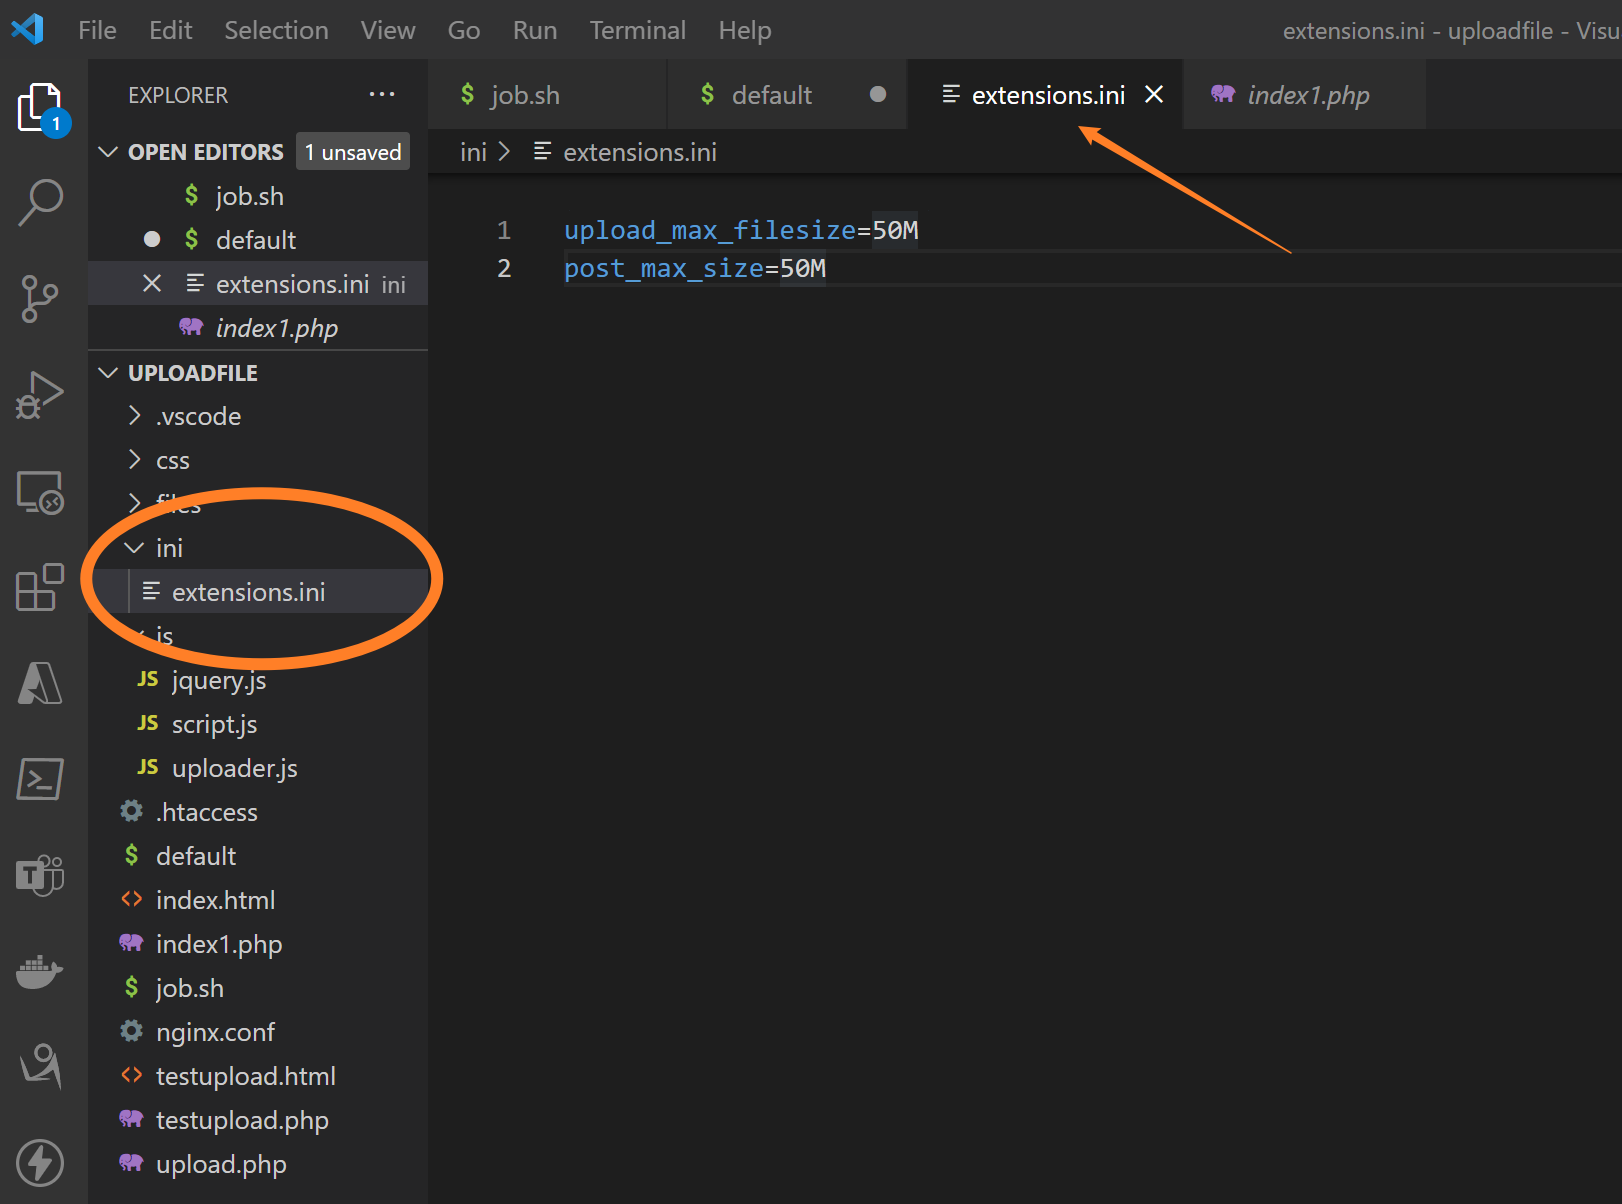
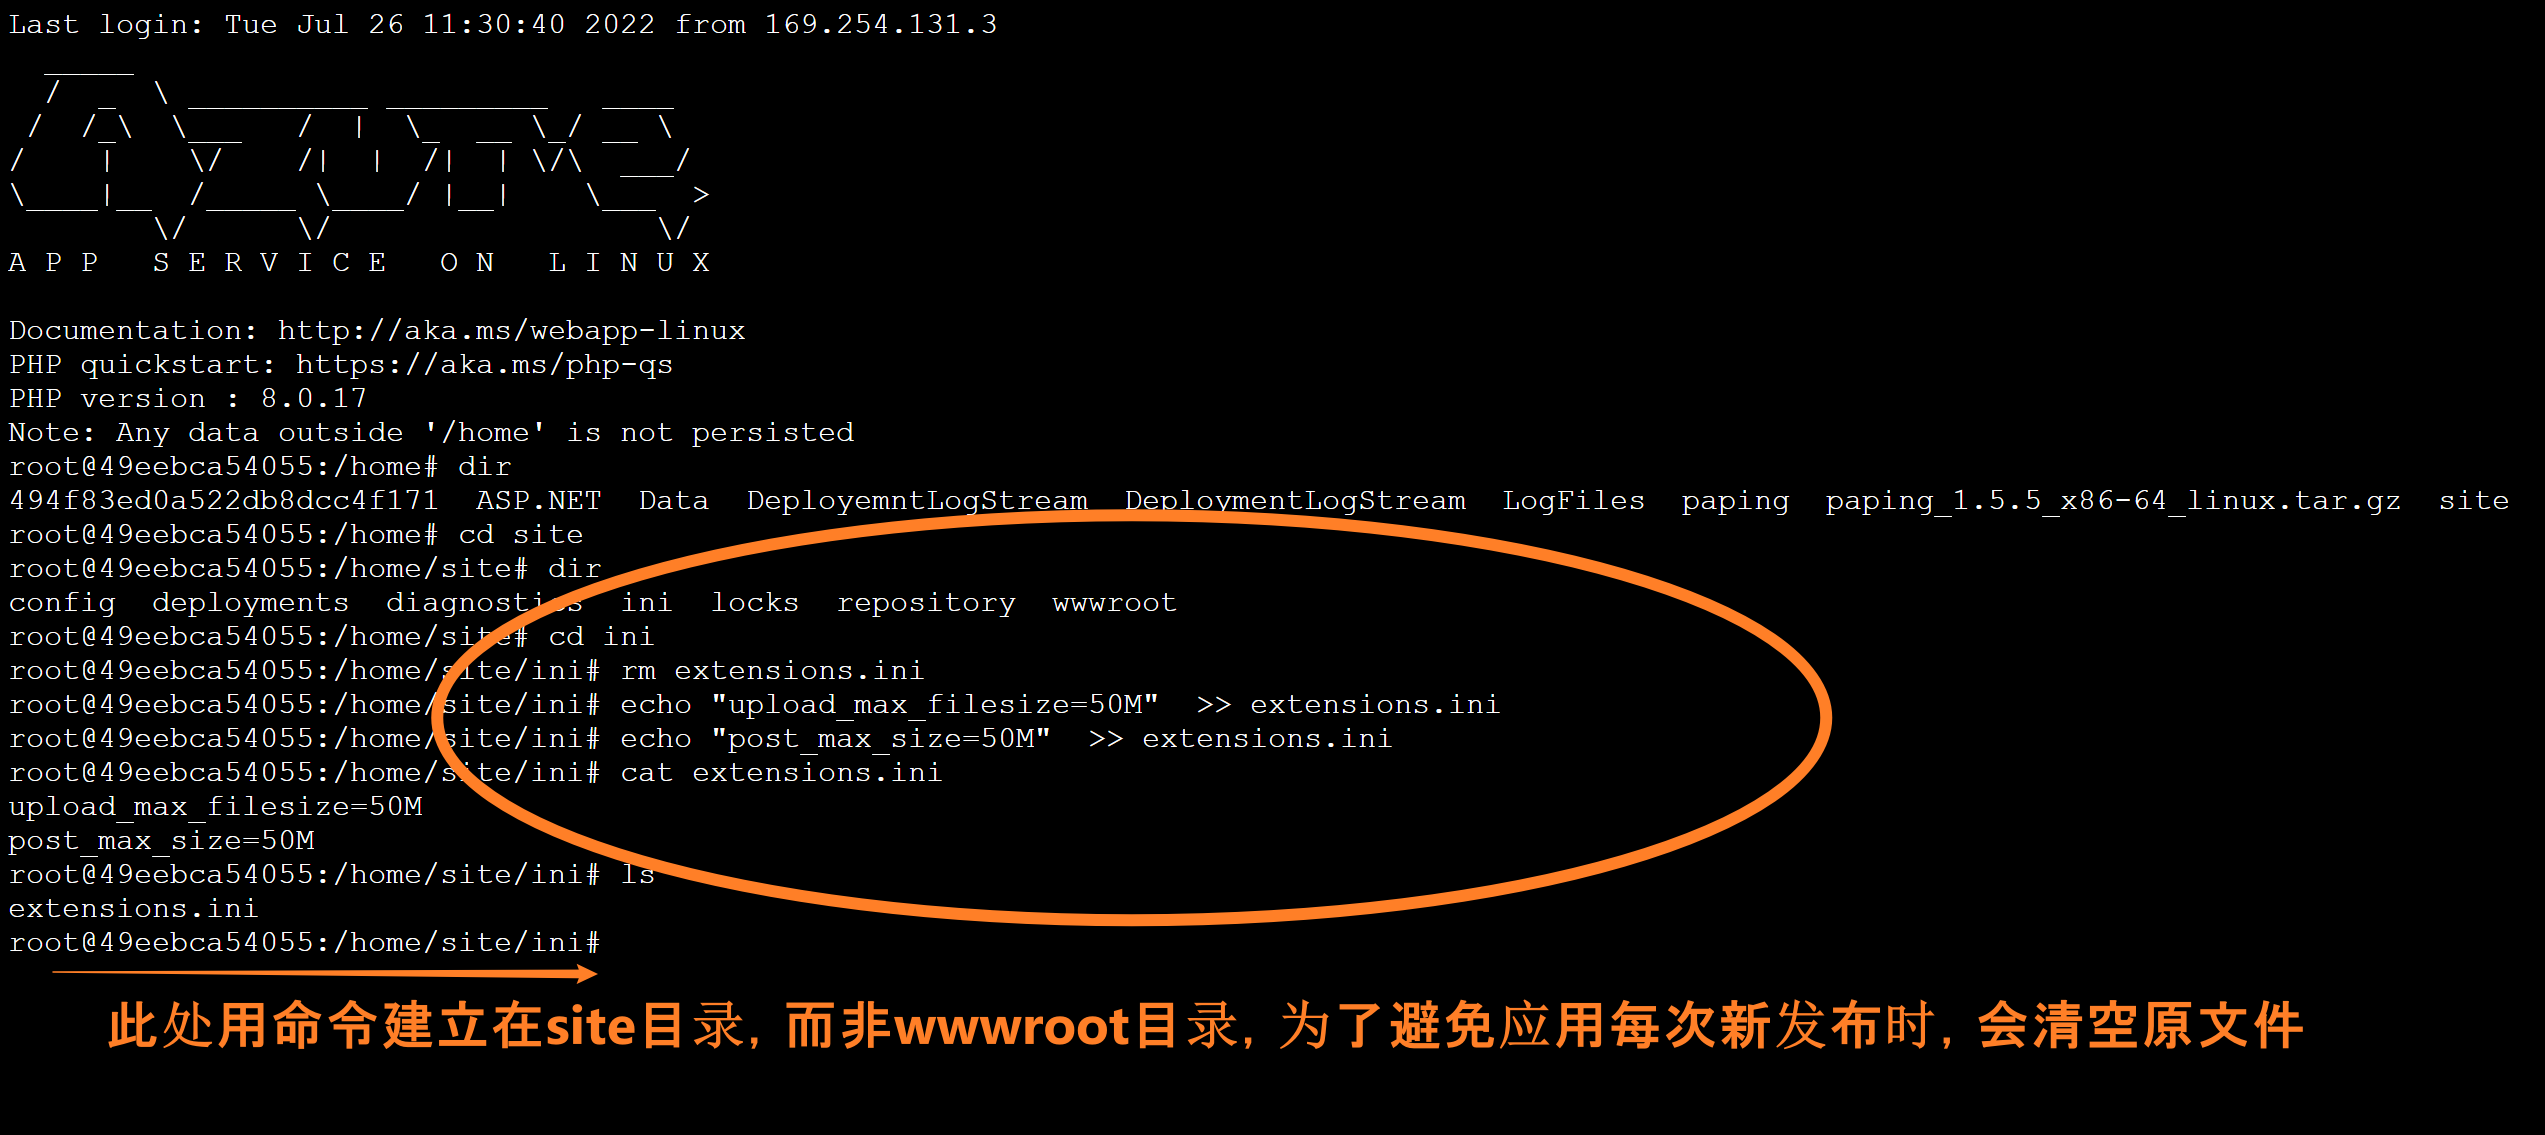
或者也可以直接在 SSH中通过命令创建 extensions.ini 文件和内容
cd site
mkdir ini
cd ini
echo "upload_max_filesize=50M"  >> extensions.ini
echo "post_max_size=50M"  >> extensions.ini
cat extensions.ini
ls
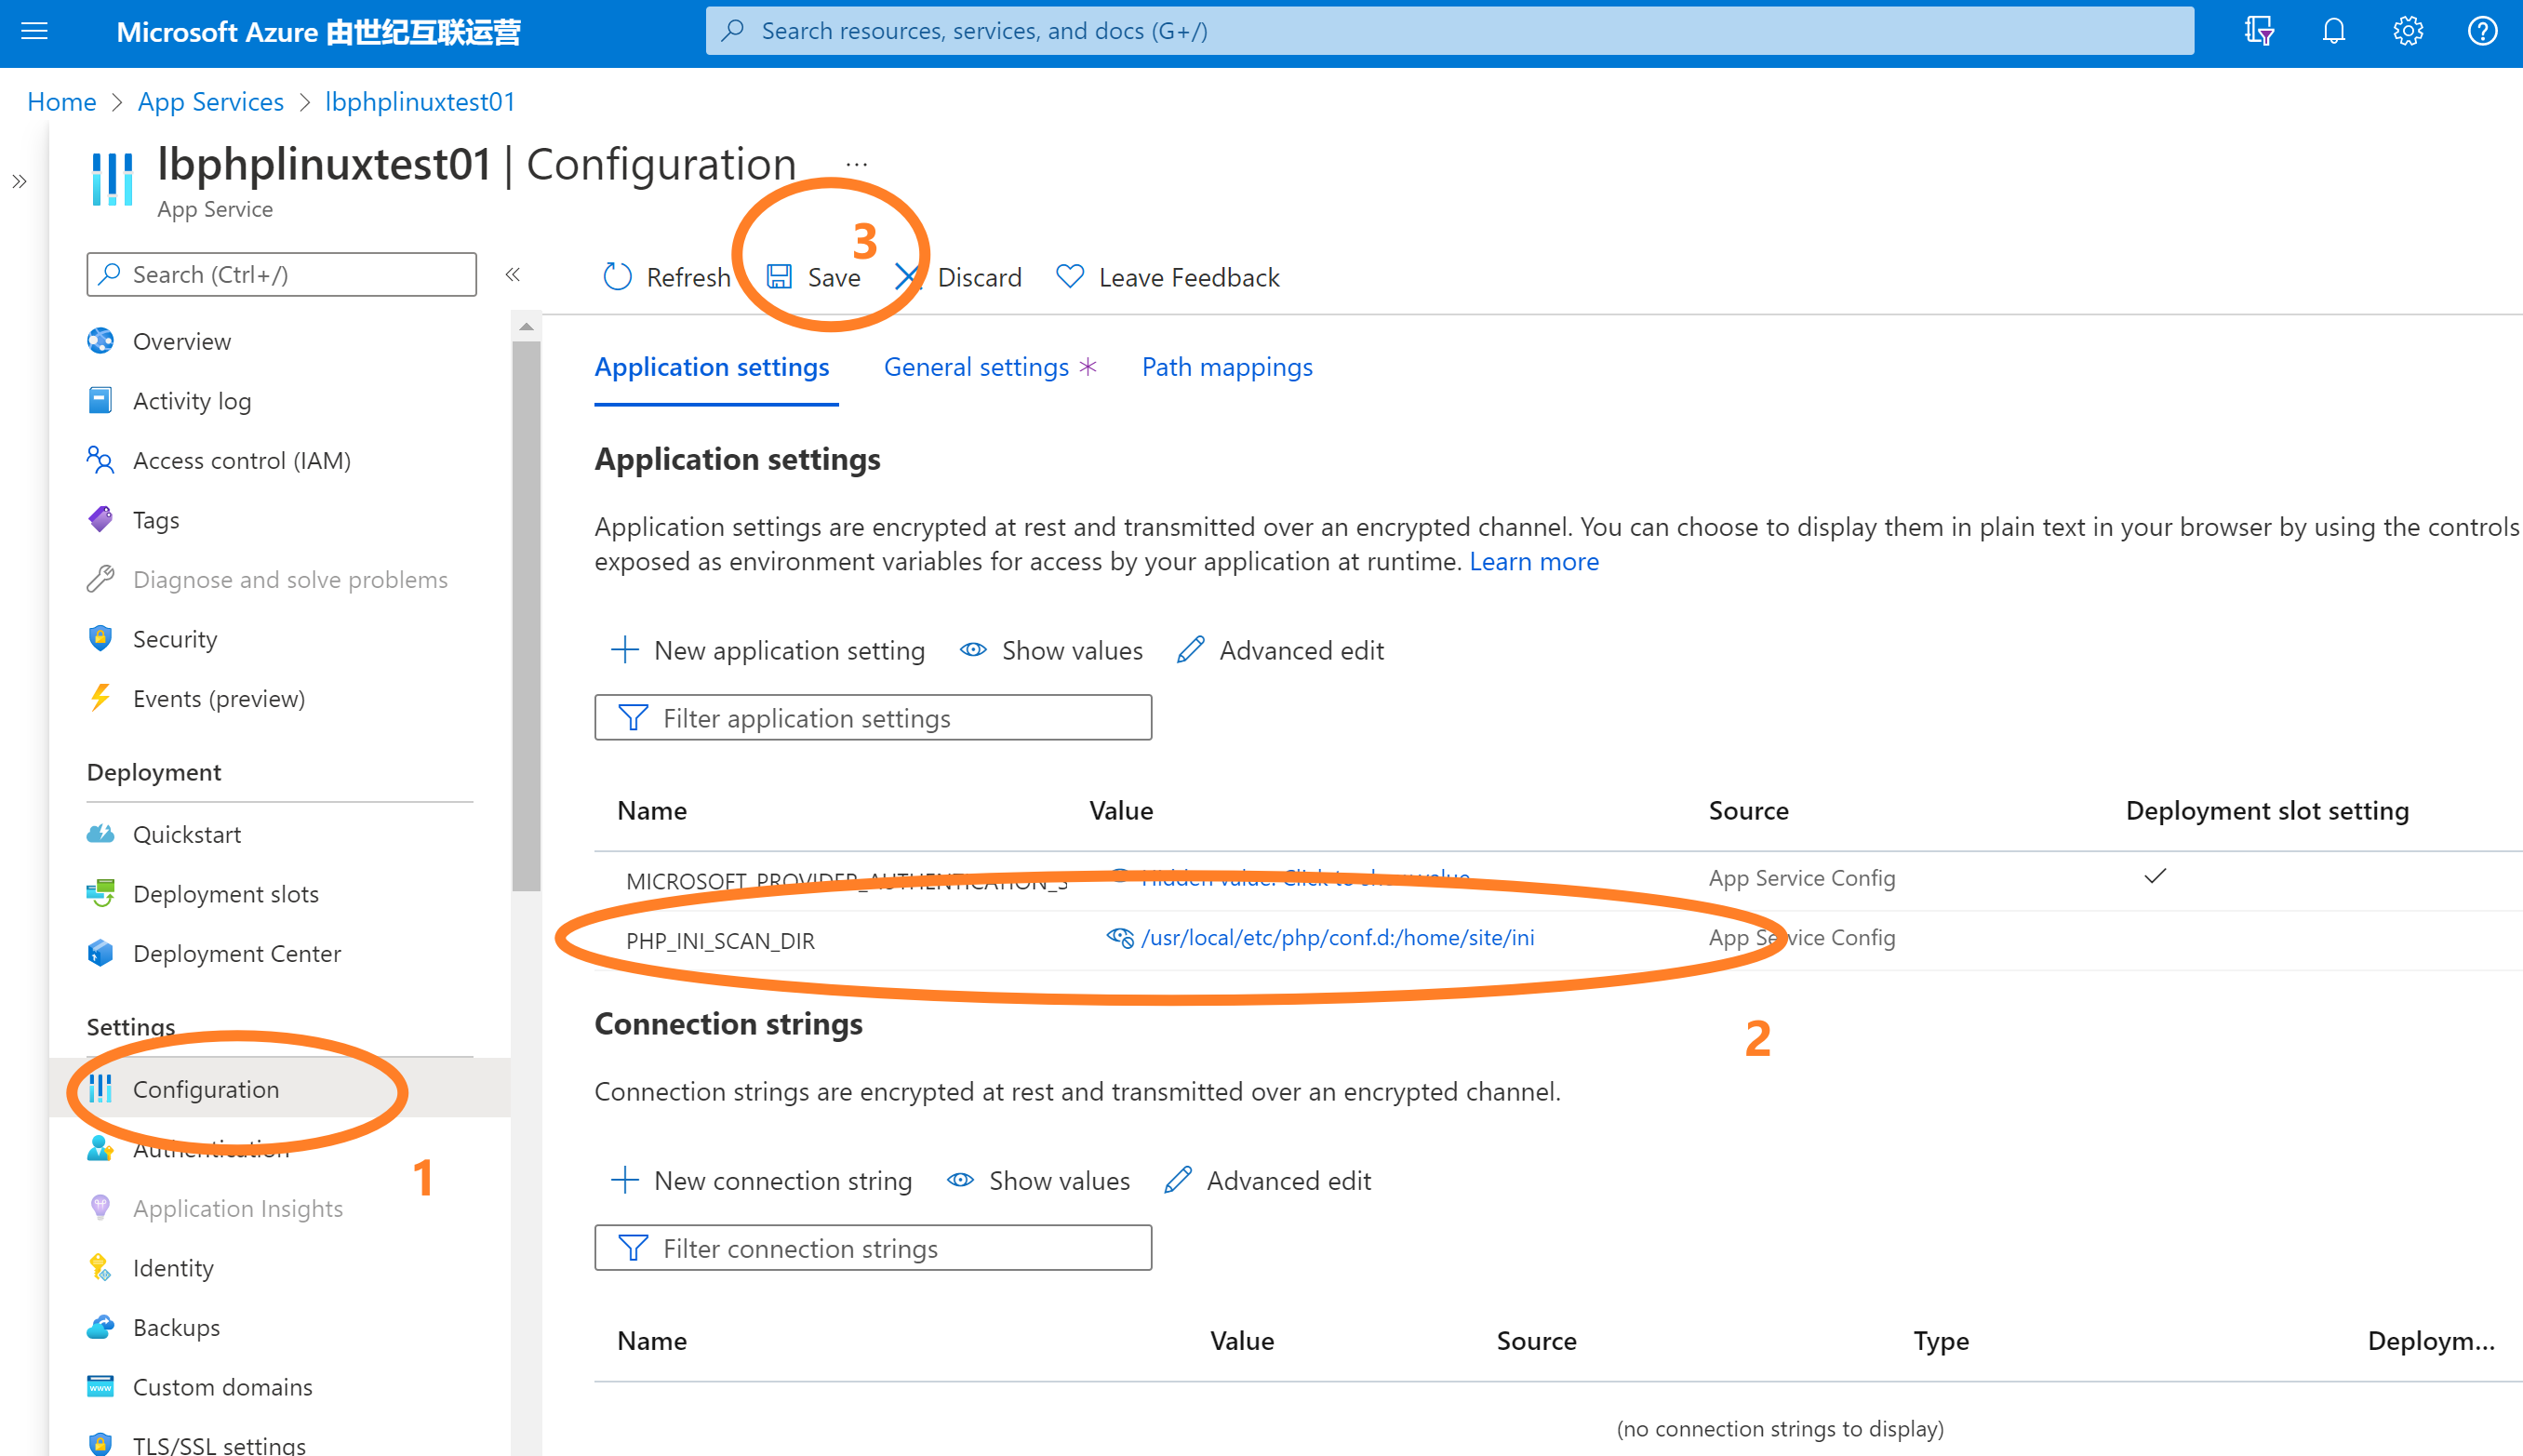
第二步:回到Azure App Service 门户页面,在Application Setting中添加 PHP_INI_SCAN_DIR 参数,指定它的值为 /usr/local/etc/php/conf.d:/home/site/ini 或者 /usr/local/etc/php/conf.d:/home/site/wwwroot/ini
PS: 前一段 /usr/local/etc/php/conf.d 路径固定,为PHP Runtime加载配置配置文件的路径,而一部分 /home/site/ini 则需要根据第一步extensions.ini文件的路径而改变
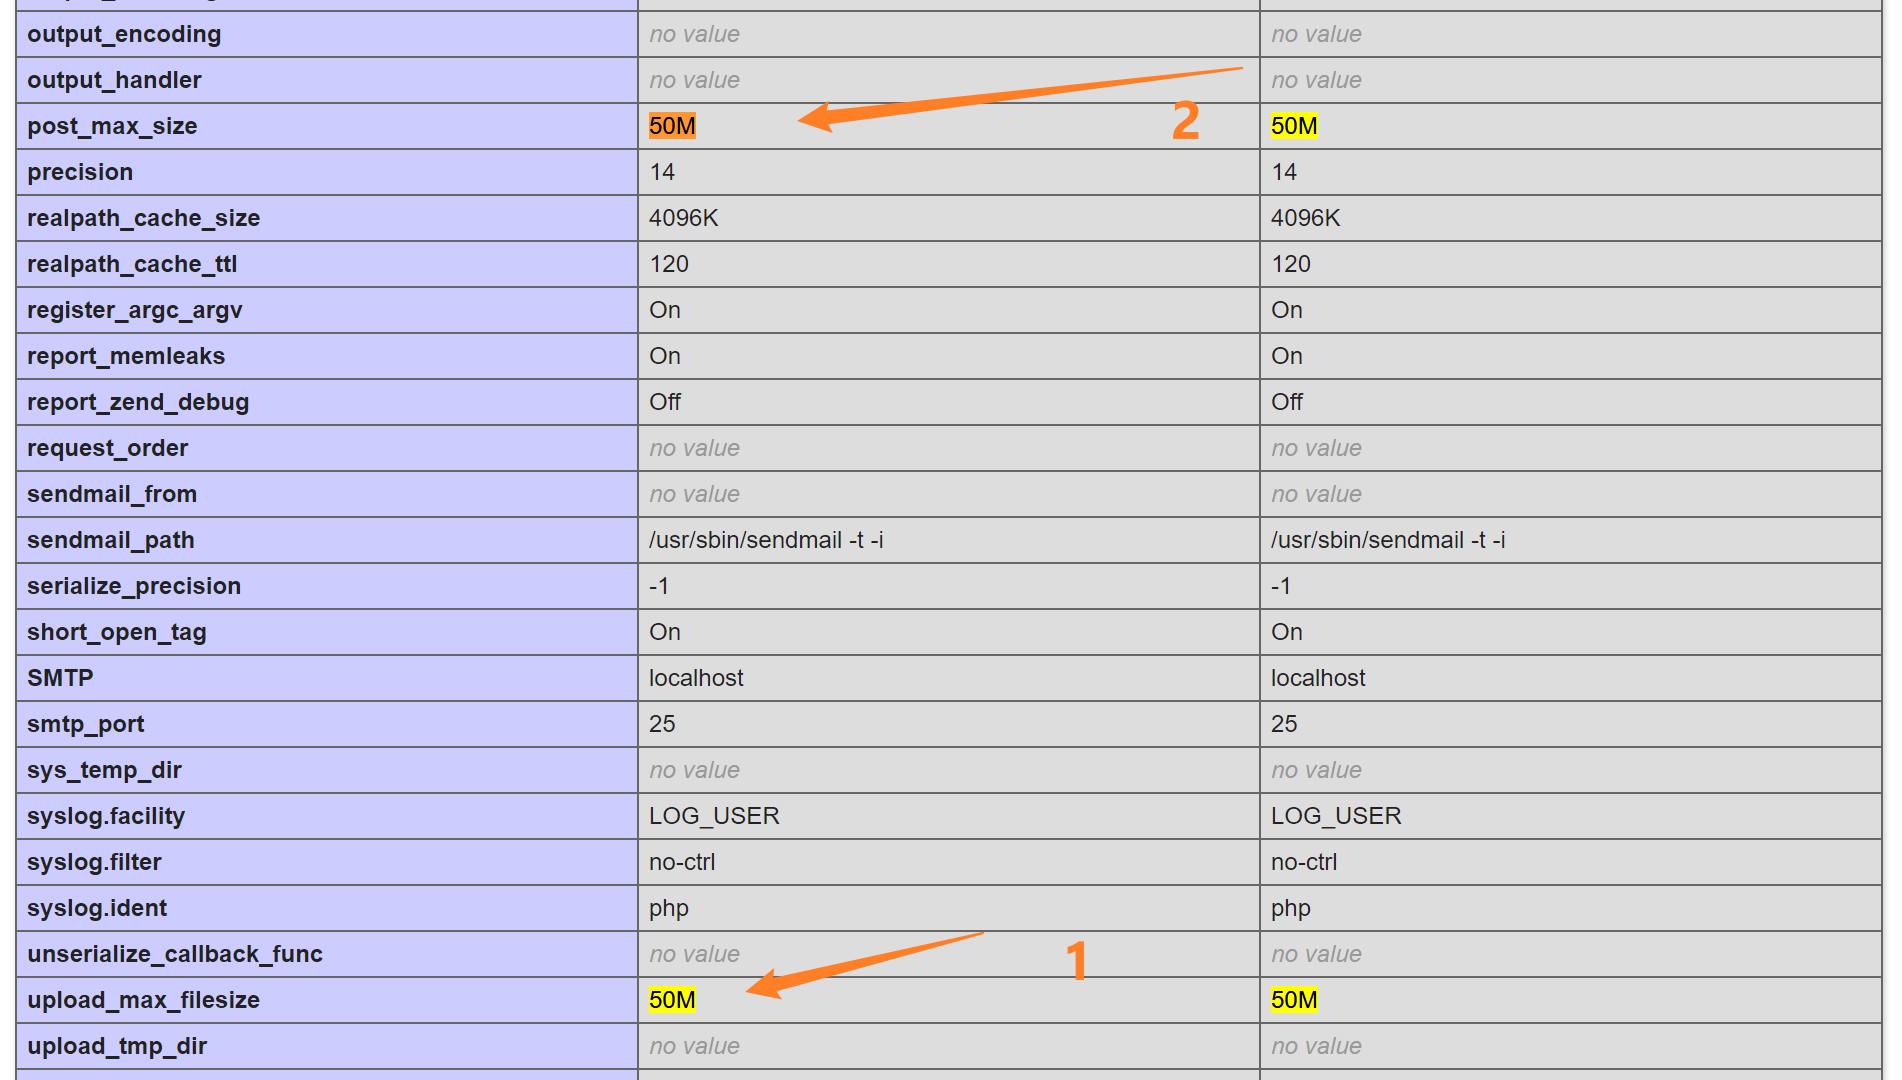
第三步: 通过phpinfo()函数验证修改后的参数
在info.php文件中写入 <?php phpinfo(); ,然后通过url访问 https://<sitename>.chinacloudsites.cn/info.php
echo "<?php phpinfo();" >> info.php
附录:PHP上传文件的可用代码
W3School PHP File Upload : https://www.w3schools.com/php/php_file_upload.asp
NGINX Rewrite Rules for Azure App Service Linux PHP 8.x:https://azureossd.github.io/2021/09/02/php-8-rewrite-rule/index.html
Azure App Service Linux - Update PHP Settings:https://azureossd.github.io/2019/01/29/azure-app-service-linux-update-php-settings/
[END]
Recommend
About Joyk
Aggregate valuable and interesting links.
Joyk means Joy of geeK