
0

Java开发学习(十七)----AOP案例之测量业务层接口执行效率 - |旧市拾荒|
source link: https://www.cnblogs.com/xiaoyh/p/16412319.html
Go to the source link to view the article. You can view the picture content, updated content and better typesetting reading experience. If the link is broken, please click the button below to view the snapshot at that time.

Java开发学习(十七)----AOP案例之测量业务层接口执行效率
一、需求分析
这个需求比较简单
-
需求:任意业务层接口执行均可显示其执行效率(执行时长)
这个的目的是查看每个业务层执行的时间,这样就可以监控出哪个业务比较耗时,将其查找出来方便优化。
具体实现的思路:
(1) 开始执行方法之前记录一个时间
(2) 执行方法
(3) 执行完方法之后记录一个时间
(4) 用后一个时间减去前一个时间的差值,就是我们需要的结果。
所以要在方法执行的前后添加业务,经过分析我们将采用环绕通知。
说明:原始方法如果只执行一次,时间太快,两个时间差可能为0,所以我们要执行万次来计算时间差。
二、环境准备
-
创建一个Maven项目
-
pom.xml添加Spring依赖
<dependencies> <dependency> <groupId>org.springframework</groupId> <artifactId>spring-context</artifactId> <version>5.2.10.RELEASE</version> </dependency> <dependency> <groupId>org.springframework</groupId> <artifactId>spring-jdbc</artifactId> <version>5.2.10.RELEASE</version> </dependency> <dependency> <groupId>org.springframework</groupId> <artifactId>spring-test</artifactId> <version>5.2.10.RELEASE</version> </dependency> <dependency> <groupId>org.aspectj</groupId> <artifactId>aspectjweaver</artifactId> <version>1.9.4</version> </dependency> <dependency> <groupId>mysql</groupId> <artifactId>mysql-connector-java</artifactId> <version>5.1.47</version> </dependency> <dependency> <groupId>com.alibaba</groupId> <artifactId>druid</artifactId> <version>1.1.16</version> </dependency> <dependency> <groupId>org.mybatis</groupId> <artifactId>mybatis</artifactId> <version>3.5.6</version> </dependency> <dependency> <groupId>org.mybatis</groupId> <artifactId>mybatis-spring</artifactId> <version>1.3.0</version> </dependency> <dependency> <groupId>junit</groupId> <artifactId>junit</artifactId> <version>4.12</version> <scope>test</scope> </dependency> </dependencies> -
添加AccountService、AccountServiceImpl、AccountDao与Account类
public interface AccountService { void save(Account account); void delete(Integer id); void update(Account account); List<Account> findAll(); Account findById(Integer id); } @Service public class AccountServiceImpl implements AccountService { @Autowired private AccountDao accountDao; public void save(Account account) { accountDao.save(account); } public void update(Account account){ accountDao.update(account); } public void delete(Integer id) { accountDao.delete(id); } public Account findById(Integer id) { return accountDao.findById(id); } public List<Account> findAll() { return accountDao.findAll(); } } public interface AccountDao { @Insert("insert into tbl_account(name,money)values(#{name},#{money})") void save(Account account); @Delete("delete from tbl_account where id = #{id} ") void delete(Integer id); @Update("update tbl_account set name = #{name} , money = #{money} where id = #{id} ") void update(Account account); @Select("select * from tbl_account") List<Account> findAll(); @Select("select * from tbl_account where id = #{id} ") Account findById(Integer id); } public class Account implements Serializable { private Integer id; private String name; private Double money; //setter..getter..toString方法省略 } -
resources下提供一个jdbc.properties,并有如下数据
jdbc.driver=com.mysql.jdbc.Driver
jdbc.url=jdbc:mysql://localhost:3306/spring_db?useSSL=false
jdbc.username=root
jdbc.password=root
-
创建相关配置类
//Spring配置类:SpringConfig @Configuration @ComponentScan("com.itheima") @PropertySource("classpath:jdbc.properties") @Import({JdbcConfig.class,MybatisConfig.class}) public class SpringConfig { } //JdbcConfig配置类 public class JdbcConfig { @Value("${jdbc.driver}") private String driver; @Value("${jdbc.url}") private String url; @Value("${jdbc.username}") private String userName; @Value("${jdbc.password}") private String password; @Bean public DataSource dataSource(){ DruidDataSource ds = new DruidDataSource(); ds.setDriverClassName(driver); ds.setUrl(url); ds.setUsername(userName); ds.setPassword(password); return ds; } } //MybatisConfig配置类 public class MybatisConfig { @Bean public SqlSessionFactoryBean sqlSessionFactory(DataSource dataSource){ SqlSessionFactoryBean ssfb = new SqlSessionFactoryBean(); ssfb.setTypeAliasesPackage("com.itheima.domain"); ssfb.setDataSource(dataSource); return ssfb; } @Bean public MapperScannerConfigurer mapperScannerConfigurer(){ MapperScannerConfigurer msc = new MapperScannerConfigurer(); msc.setBasePackage("com.itheima.dao"); return msc; } } -
编写Spring整合Junit的测试类
@RunWith(SpringJUnit4ClassRunner.class) @ContextConfiguration(classes = SpringConfig.class) public class AccountServiceTestCase { @Autowired private AccountService accountService; @Test public void testFindById(){ Account ac = accountService.findById(2); } @Test public void testFindAll(){ List<Account> all = accountService.findAll(); } }
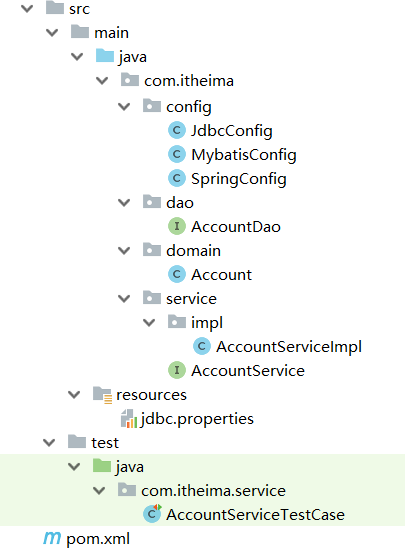
最终创建好的项目结构如下:
三、功能开发
步骤1:开启SpringAOP的注解功能
在Spring的主配置文件SpringConfig类中添加注解
@EnableAspectJAutoProxy步骤2:创建AOP的通知类
-
该类要被Spring管理,需要添加@Component
-
要标识该类是一个AOP的切面类,需要添加@Aspect
-
配置切入点表达式,需要添加一个方法,并添加@Pointcut
@Component
@Aspect
public class ProjectAdvice {
    //配置业务层的所有方法
    @Pointcut("execution(* com.itheima.service.*Service.*(..))")
    private void servicePt(){}

    public void runSpeed(){

    }
}
步骤3:添加环绕通知
在runSpeed()方法上添加@Around
@Component
@Aspect
public class ProjectAdvice {
    //配置业务层的所有方法
    @Pointcut("execution(* com.itheima.service.*Service.*(..))")
    private void servicePt(){}
    //@Around("ProjectAdvice.servicePt()") 可以简写为下面的方式
    @Around("servicePt()")
    public Object runSpeed(ProceedingJoinPoint pjp){
        Object ret = pjp.proceed();
        return ret;
    }
}注意:目前并没有做任何增强
步骤4:完成核心业务,记录万次执行的时间
@Component
@Aspect
public class ProjectAdvice {
    //配置业务层的所有方法
    @Pointcut("execution(* com.itheima.service.*Service.*(..))")
    private void servicePt(){}
    //@Around("ProjectAdvice.servicePt()") 可以简写为下面的方式
    @Around("servicePt()")
    public void runSpeed(ProceedingJoinPoint pjp){

        long start = System.currentTimeMillis();
        for (int i = 0; i < 10000; i++) {
           pjp.proceed();
        }
        long end = System.currentTimeMillis();
        System.out.println("业务层接口万次执行时间: "+(end-start)+"ms");
    }
}
步骤5:运行单元测试类
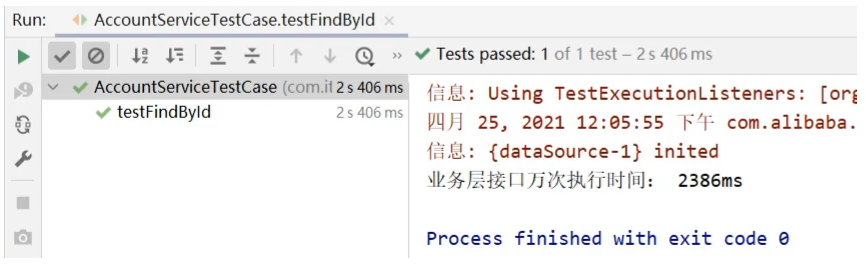
注意:因为程序每次执行的时长是不一样的,所以运行多次最终的结果是不一样的。
步骤6:程序优化
目前程序所面临的问题是,多个方法一起执行测试的时候,控制台都打印的是:
业务层接口万次执行时间:xxxms
我们没有办法区分到底是哪个接口的哪个方法执行的具体时间,具体如何优化?
@Component
@Aspect
public class ProjectAdvice {
//配置业务层的所有方法
@Pointcut("execution(* com.itheima.service.*Service.*(..))")
private void servicePt(){}
//@Around("ProjectAdvice.servicePt()") 可以简写为下面的方式
@Around("servicePt()")
public void runSpeed(ProceedingJoinPoint pjp){
//获取执行签名信息
Signature signature = pjp.getSignature();
//通过签名获取执行操作名称(接口名)
String className = signature.getDeclaringTypeName();
//通过签名获取执行操作名称(方法名)
String methodName = signature.getName();
long start = System.currentTimeMillis();
for (int i = 0; i < 10000; i++) {
pjp.proceed();
}
long end = System.currentTimeMillis();
System.out.println("万次执行:"+ className+"."+methodName+"---->" +(end-start) + "ms");
}
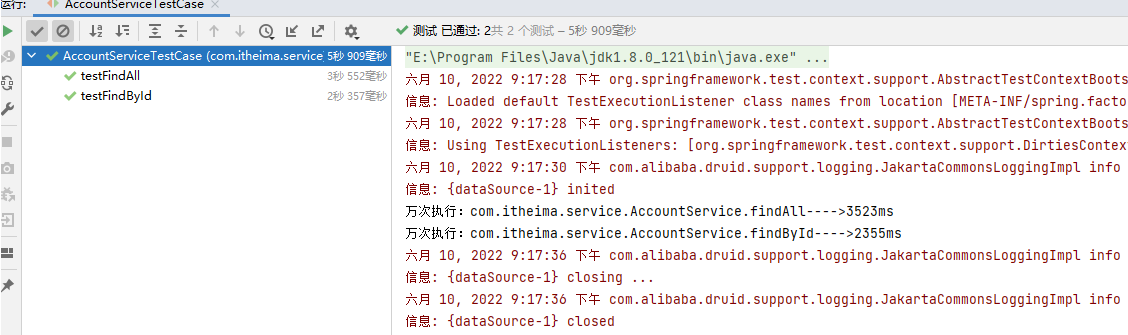
}步骤7:运行单元测试类
如果您觉得阅读本文对您有帮助,请点一下“推荐”按钮,您的“推荐”将是我最大的写作动力!欢迎各位转载,但是未经作者本人同意,转载文章之后必须在文章页面明显位置给出作者和原文连接,否则保留追究法律责任的权利。
Recommend
About Joyk
Aggregate valuable and interesting links.
Joyk means Joy of geeK