

9 ways to make your iPhone less addictive
source link: https://www.cultofmac.com/777340/make-iphone-less-addictive/
Go to the source link to view the article. You can view the picture content, updated content and better typesetting reading experience. If the link is broken, please click the button below to view the snapshot at that time.

I would not say I have an addiction to my iPhone. I’m a computer nerd; I have an addiction to my Mac. It’s mostly the same, except I can pretend it’s productive.
Many clearly suffer from smartphone addiction, though. If you feel the impulse to unlock your iPhone at every empty moment, or scroll through an app when you feel like you should be getting to bed, here are my tips for making your phone a bit more boring.
How to make your iPhone less addictive
I’m not going to give any empty platitudes like “just be in the moment” or “just talk to your friends!” Those don’t actually solve the desire to be on your phone. They just shame you for it. Advice like that always comes across as elitist and insecure to me.
What follows are several actionable changes that will make your phone less addictive. They will make your iPhone less interesting, and thus make it harder for it to pull you in.
Remove algorithmic, bottomless apps
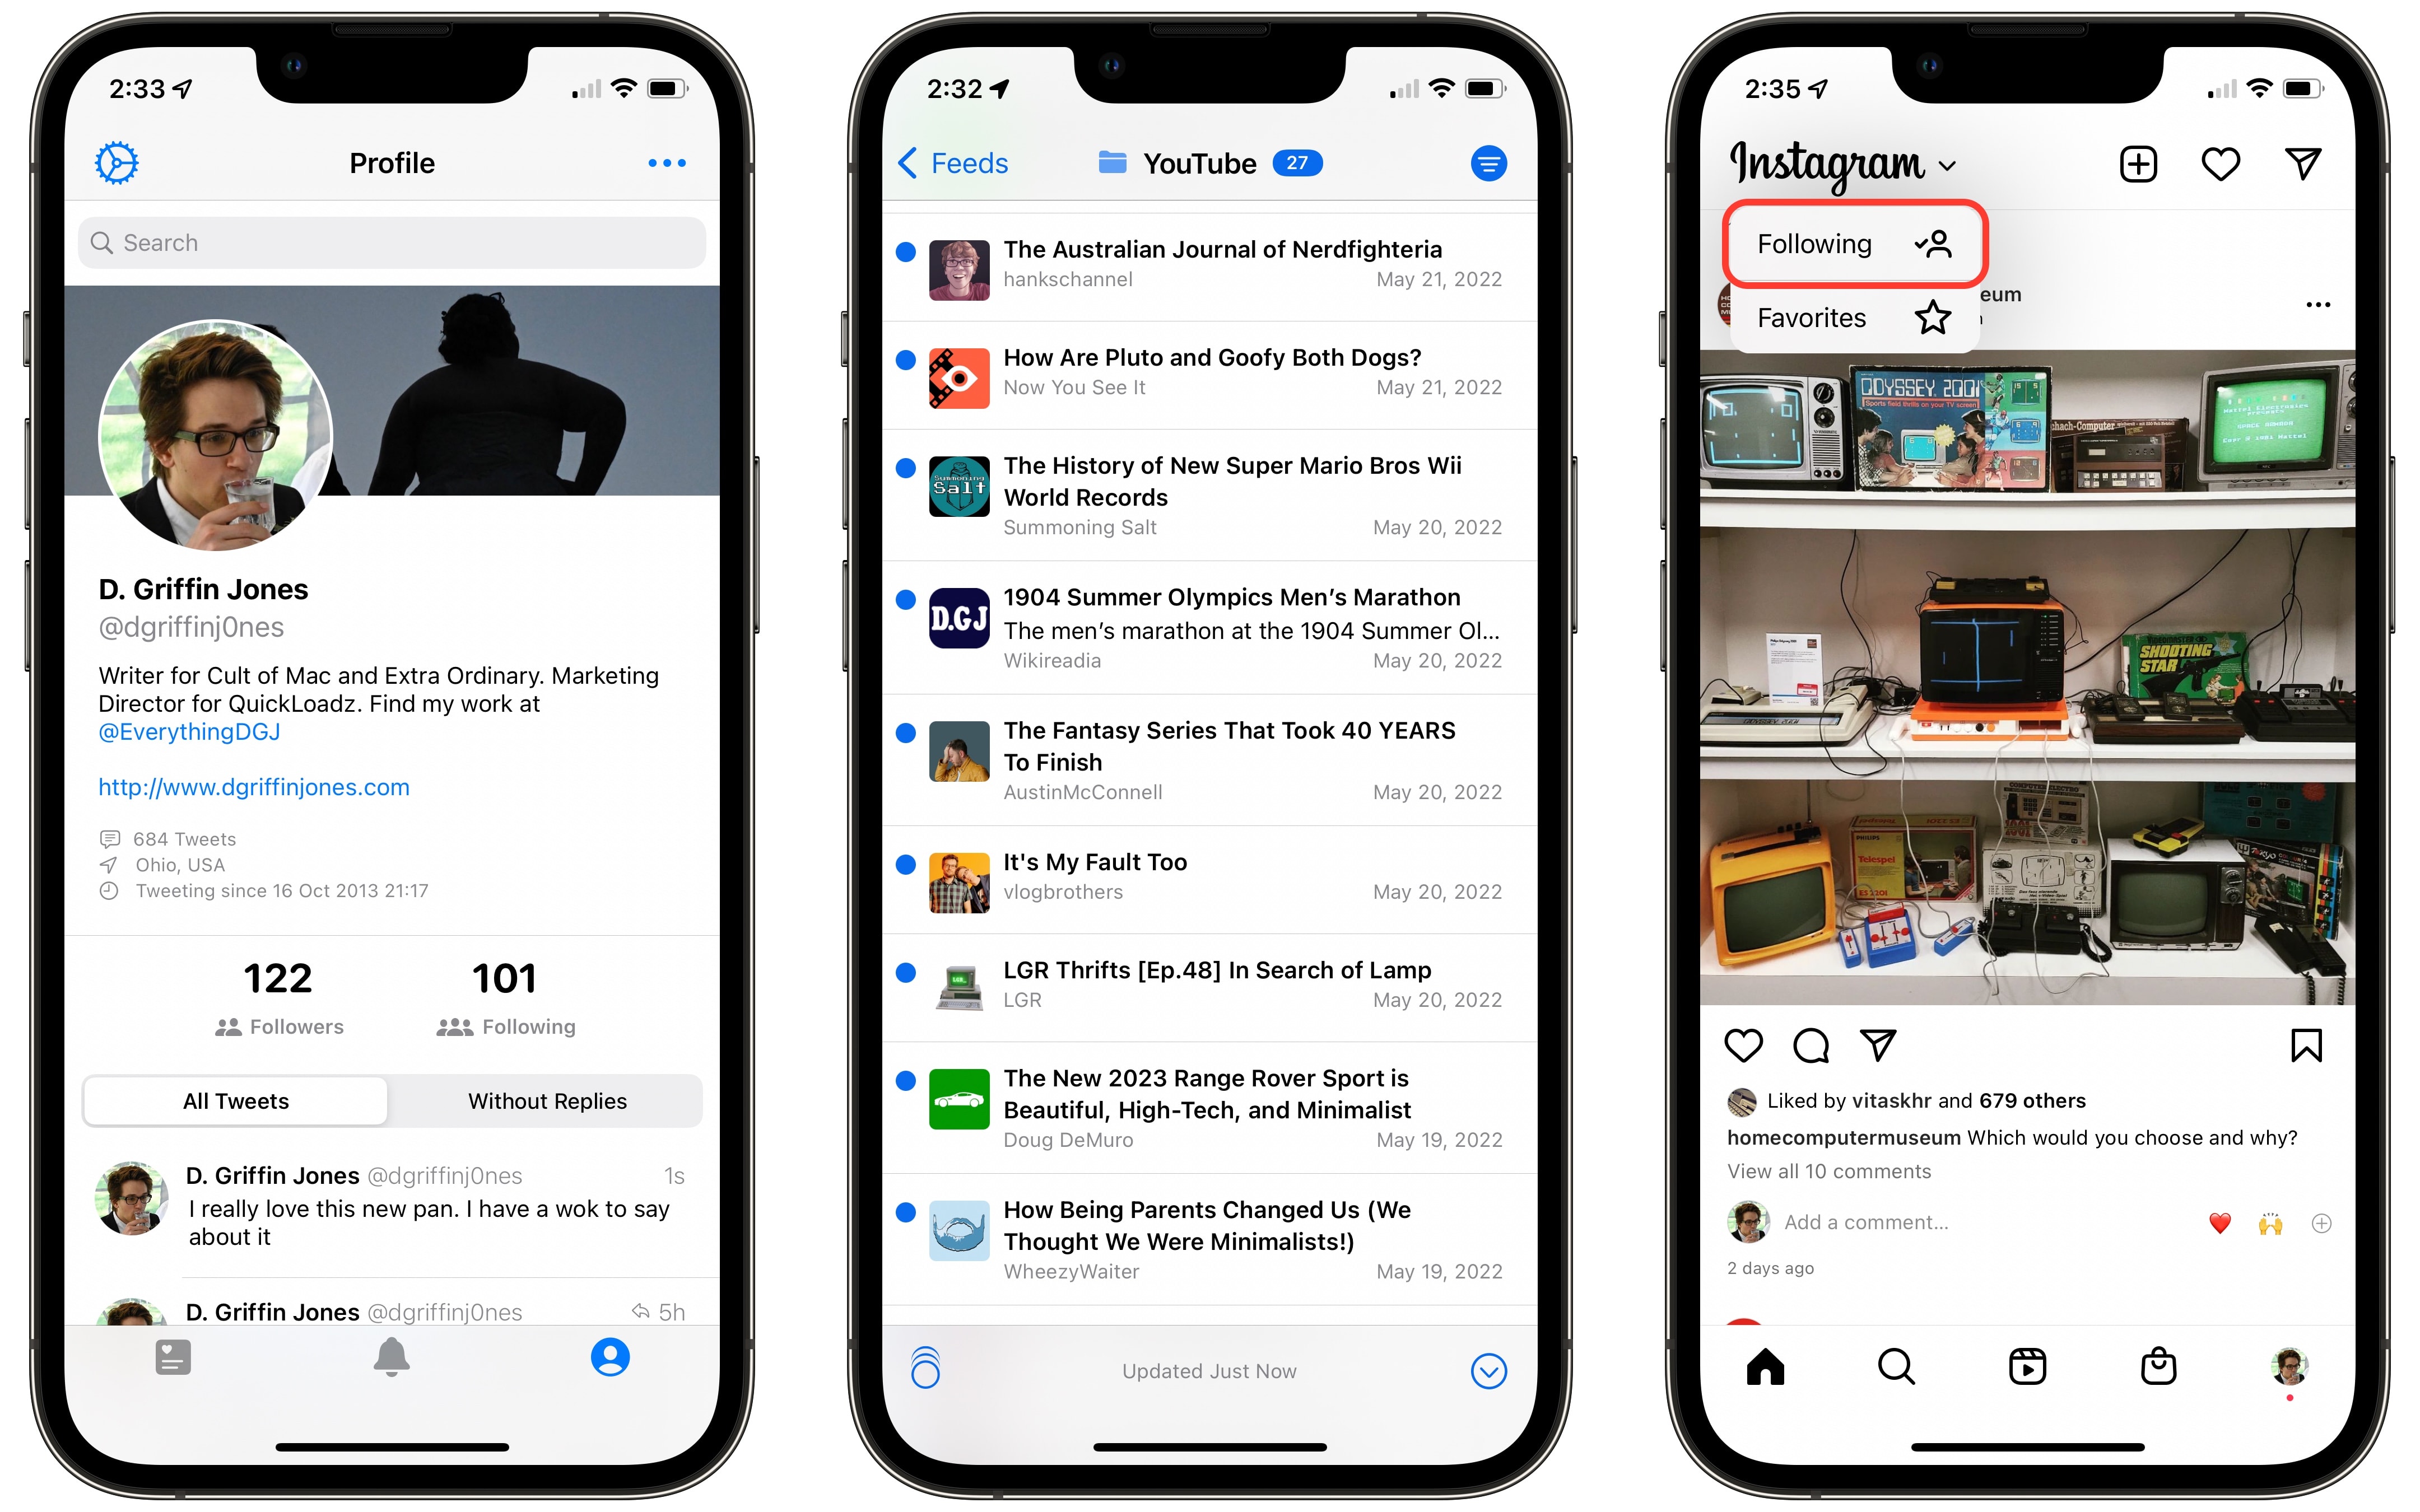
I did this a few years ago, and it’s the hardest, because you need to take the time to rework the apps you use and who you follow.
Algorithmically driven apps like TikTok, Instagram, Facebook and YouTube keep you engaged because there’s always something else to see.
I use Aviary instead of Twitter, NetNewsWire instead of YouTube and the Following feed on Instagram.
Screenshot: D. Griffin Jones/Cult of Mac
Turn off retweets: If you want to use Twitter, turn off retweets for most of the people you follow and use a different Twitter client. We recommend Twitterrific as the best Twitter client. You can get more details on making Twitter manageable in my article, “How to make Twitter fun again.”
Use RSS for YouTube: Save your YouTube subscriptions as a list in an RSS app. That way, you’ll see the videos from the creators you follow as soon as they’re out, without any algorithmic recommendations. Go to this Subscription Manager page, scroll down to Export Subscriptions and import this file into NetNewsWire (or any other RSS reader).
Use chronological Instagram feed: Use the chronological Instagram feed by tapping the Instagram logo and selecting “Following.”
Avoid Facebook and TikTok: Don’t use Facebook or TikTok. Neither of these offer an option for a strict, follower-based feed.
Avoid Reddit too: Replace Reddit discussions with people who know what they’re talking about. As a passionate nerd who follows Apple, Doctor Who and Star Trek, a decade ago I couldn’t imagine going without Reddit, because where else would I get news and hear people talk about the things I like? Then, I discovered blogs and podcasts written and hosted by actual experts. I read Cult of Mac (of course), Daring Fireball, Six Colors, 512 Pixels and more through NetNewsWire and listen to their podcasts. I feel better informed than I ever did reading comments on Reddit. But while you’re at it, use Apollo in place of the official Reddit client.
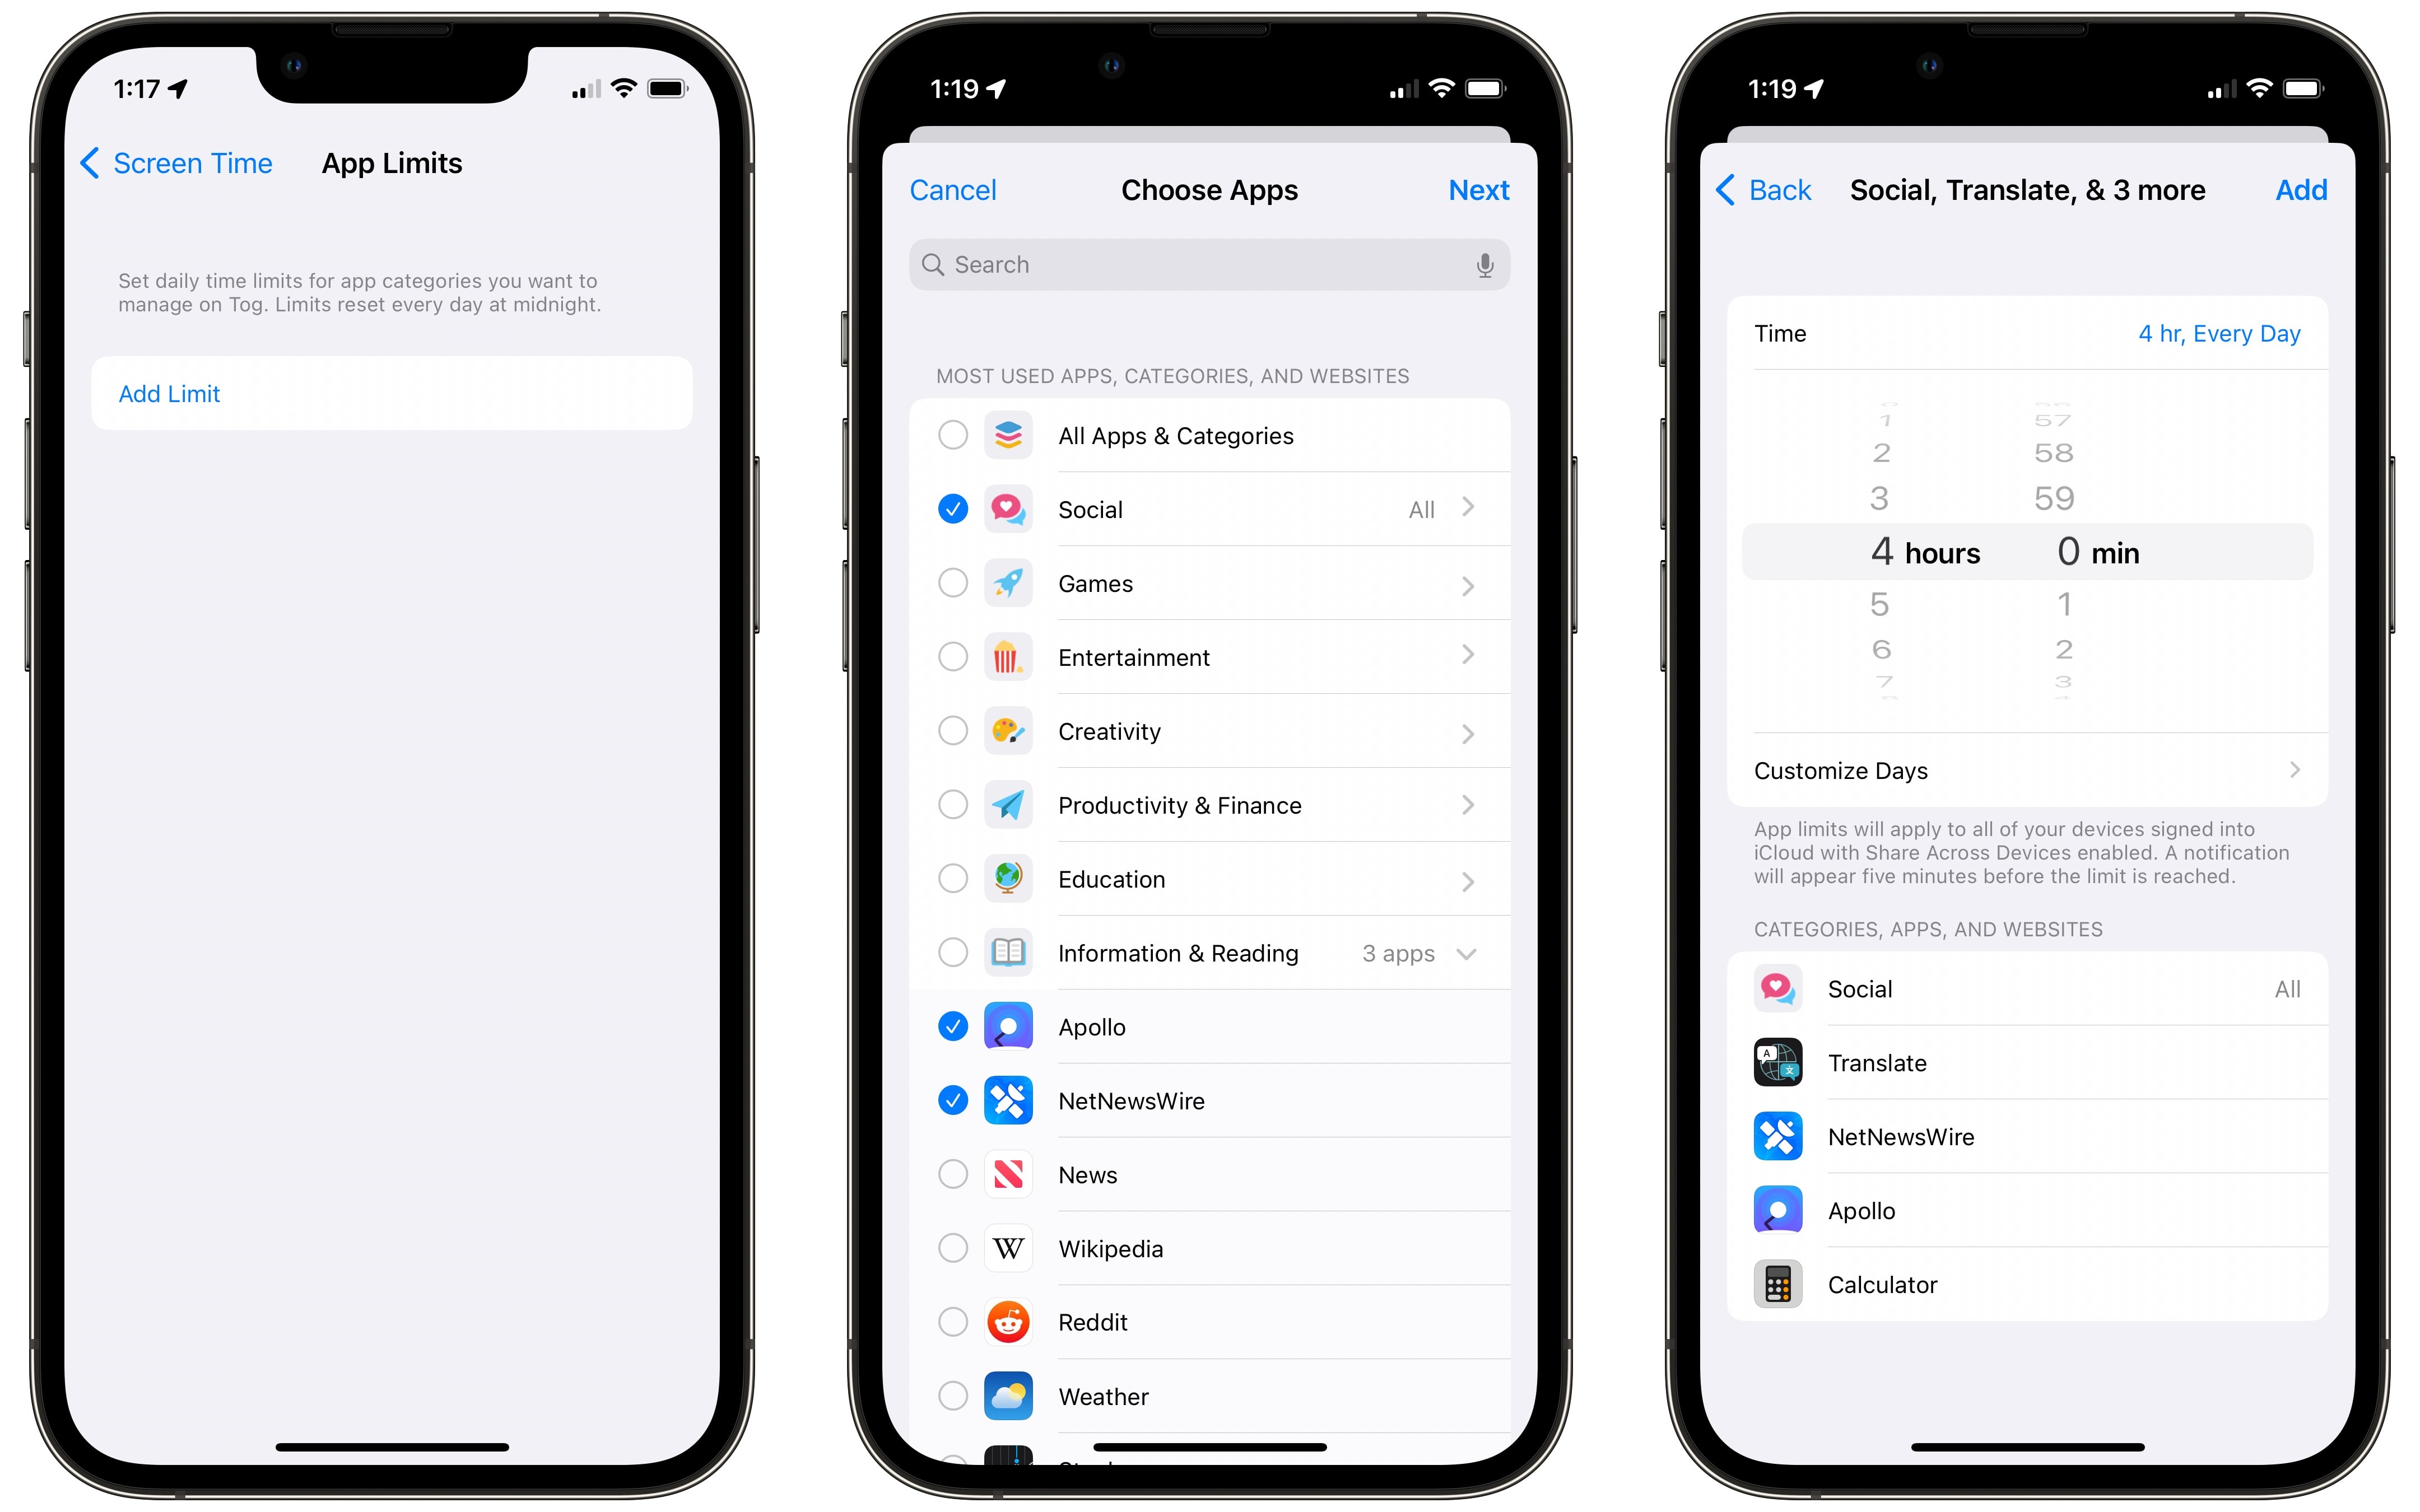
Set app Limits in Screen Time
Another step you can take is to limit the amount of time you can spend in each app. When you’ve reached your time limit, you’ll be shut out. You’ll have to tap through a menu to get more time. Adding an app limit is really easy.
Finally, I can break free of my addiction to Calculator and Translate.
Screenshot: D. Griffin Jones/Cult of Mac
Go to Settings > Screen Time > App Limits and tap Add Limit. Tap the checkbox to limit every app in the category, like Social. Tap the arrow to select specific apps inside the category; in the Information & Reading category, I might want to Apollo and Reddit, but still allow News and Wikipedia.
Tap Next and you can then select a time limit. Customize Days will let you pick specific days of the week — you may want to limit social media apps during the work week and allow them unrestricted on the weekends. Tap Add and you’re all done.
You can tap Add Limit again to add more limits with different rules. With several different limits, you can create stricter rules for apps you’re more heavily addicted to.
Apple is a little smart about this — if you set a limit on the Facebook app, you can’t just go to facebook.com. It works across apps and their websites.
Scheduled some Downtime
If this isn’t enough, you can go one step further. Rather than set time limits on apps, you can schedule times where your entire phone is locked except for a few apps.
Downtime limits apps to just a select few. You can put it on an automatic schedule.
Screenshot: D. Griffin Jones/Cult of Mac
Go back to Settings > Screen Time > Downtime. You can turn it on right away by tapping Turn On Downtime Until Schedule.
Turn on Scheduled and it will turn on and off automatically. Set a time of day and pick whether you want it on every day or set days of the week.
To add an app to the allowed list, like any apps you may use for work or study, go back to Screen Time > Always Allowed. Tap the green + or the red − to add or remove apps.
You can also pick contacts. Tap Allowed Communication and tap Specific Contacts to limit contacts to only those you select.
If some of this process sounds familiar, that’s because it’s a very similar setup to Focus Modes. Setting up a Focus is a very similar process — you pick apps and people you either want to silence or let through. But you can have many different Focus modes for different settings: work, reading, watching TV, driving and more. Here’s how to set up and use Focus modes.
Remove apps from your Home Screen
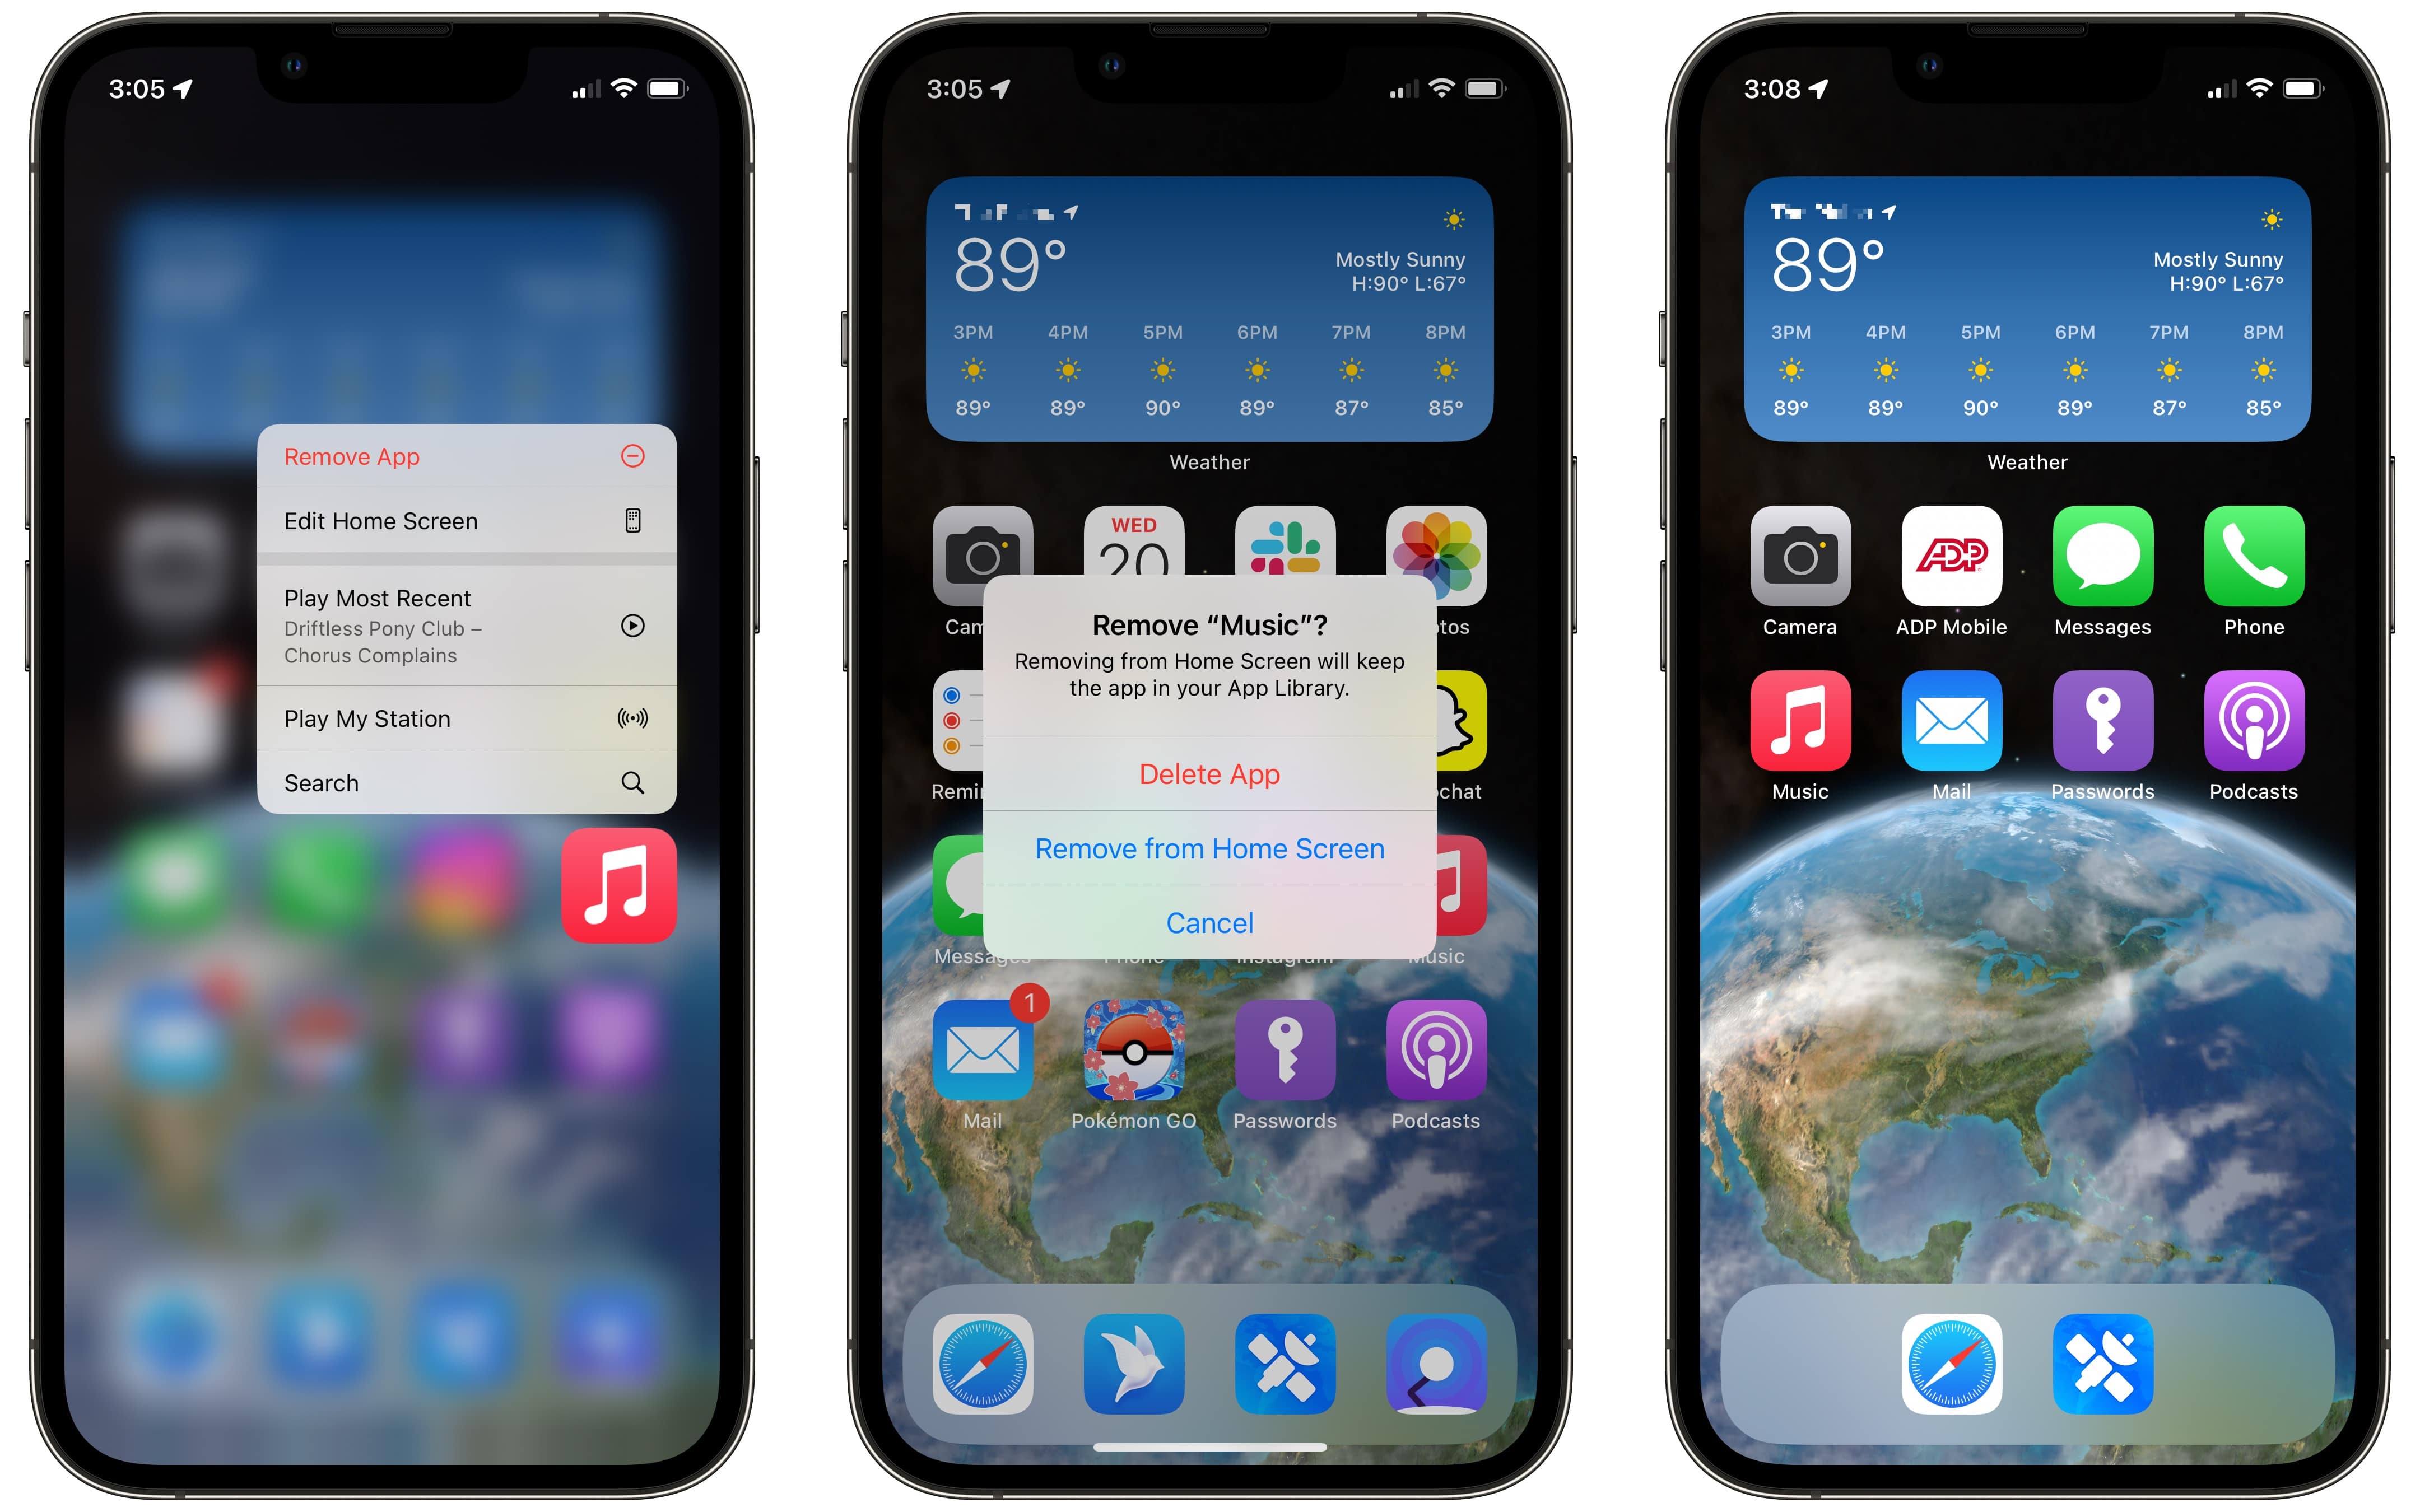
Clean up your Home Screen to remove distractions.
Screenshot: D. Griffin Jones/Cult of Mac
Out of sight, out of mind. You can remove an app icon from your Home Screen, but leave it installed if you ever need to use it later. Tap and hold on an app and select Remove App, then tap Remove from Home Screen. To remove a bunch at once, tap and hold to enter “jiggle mode” and tap the − button.
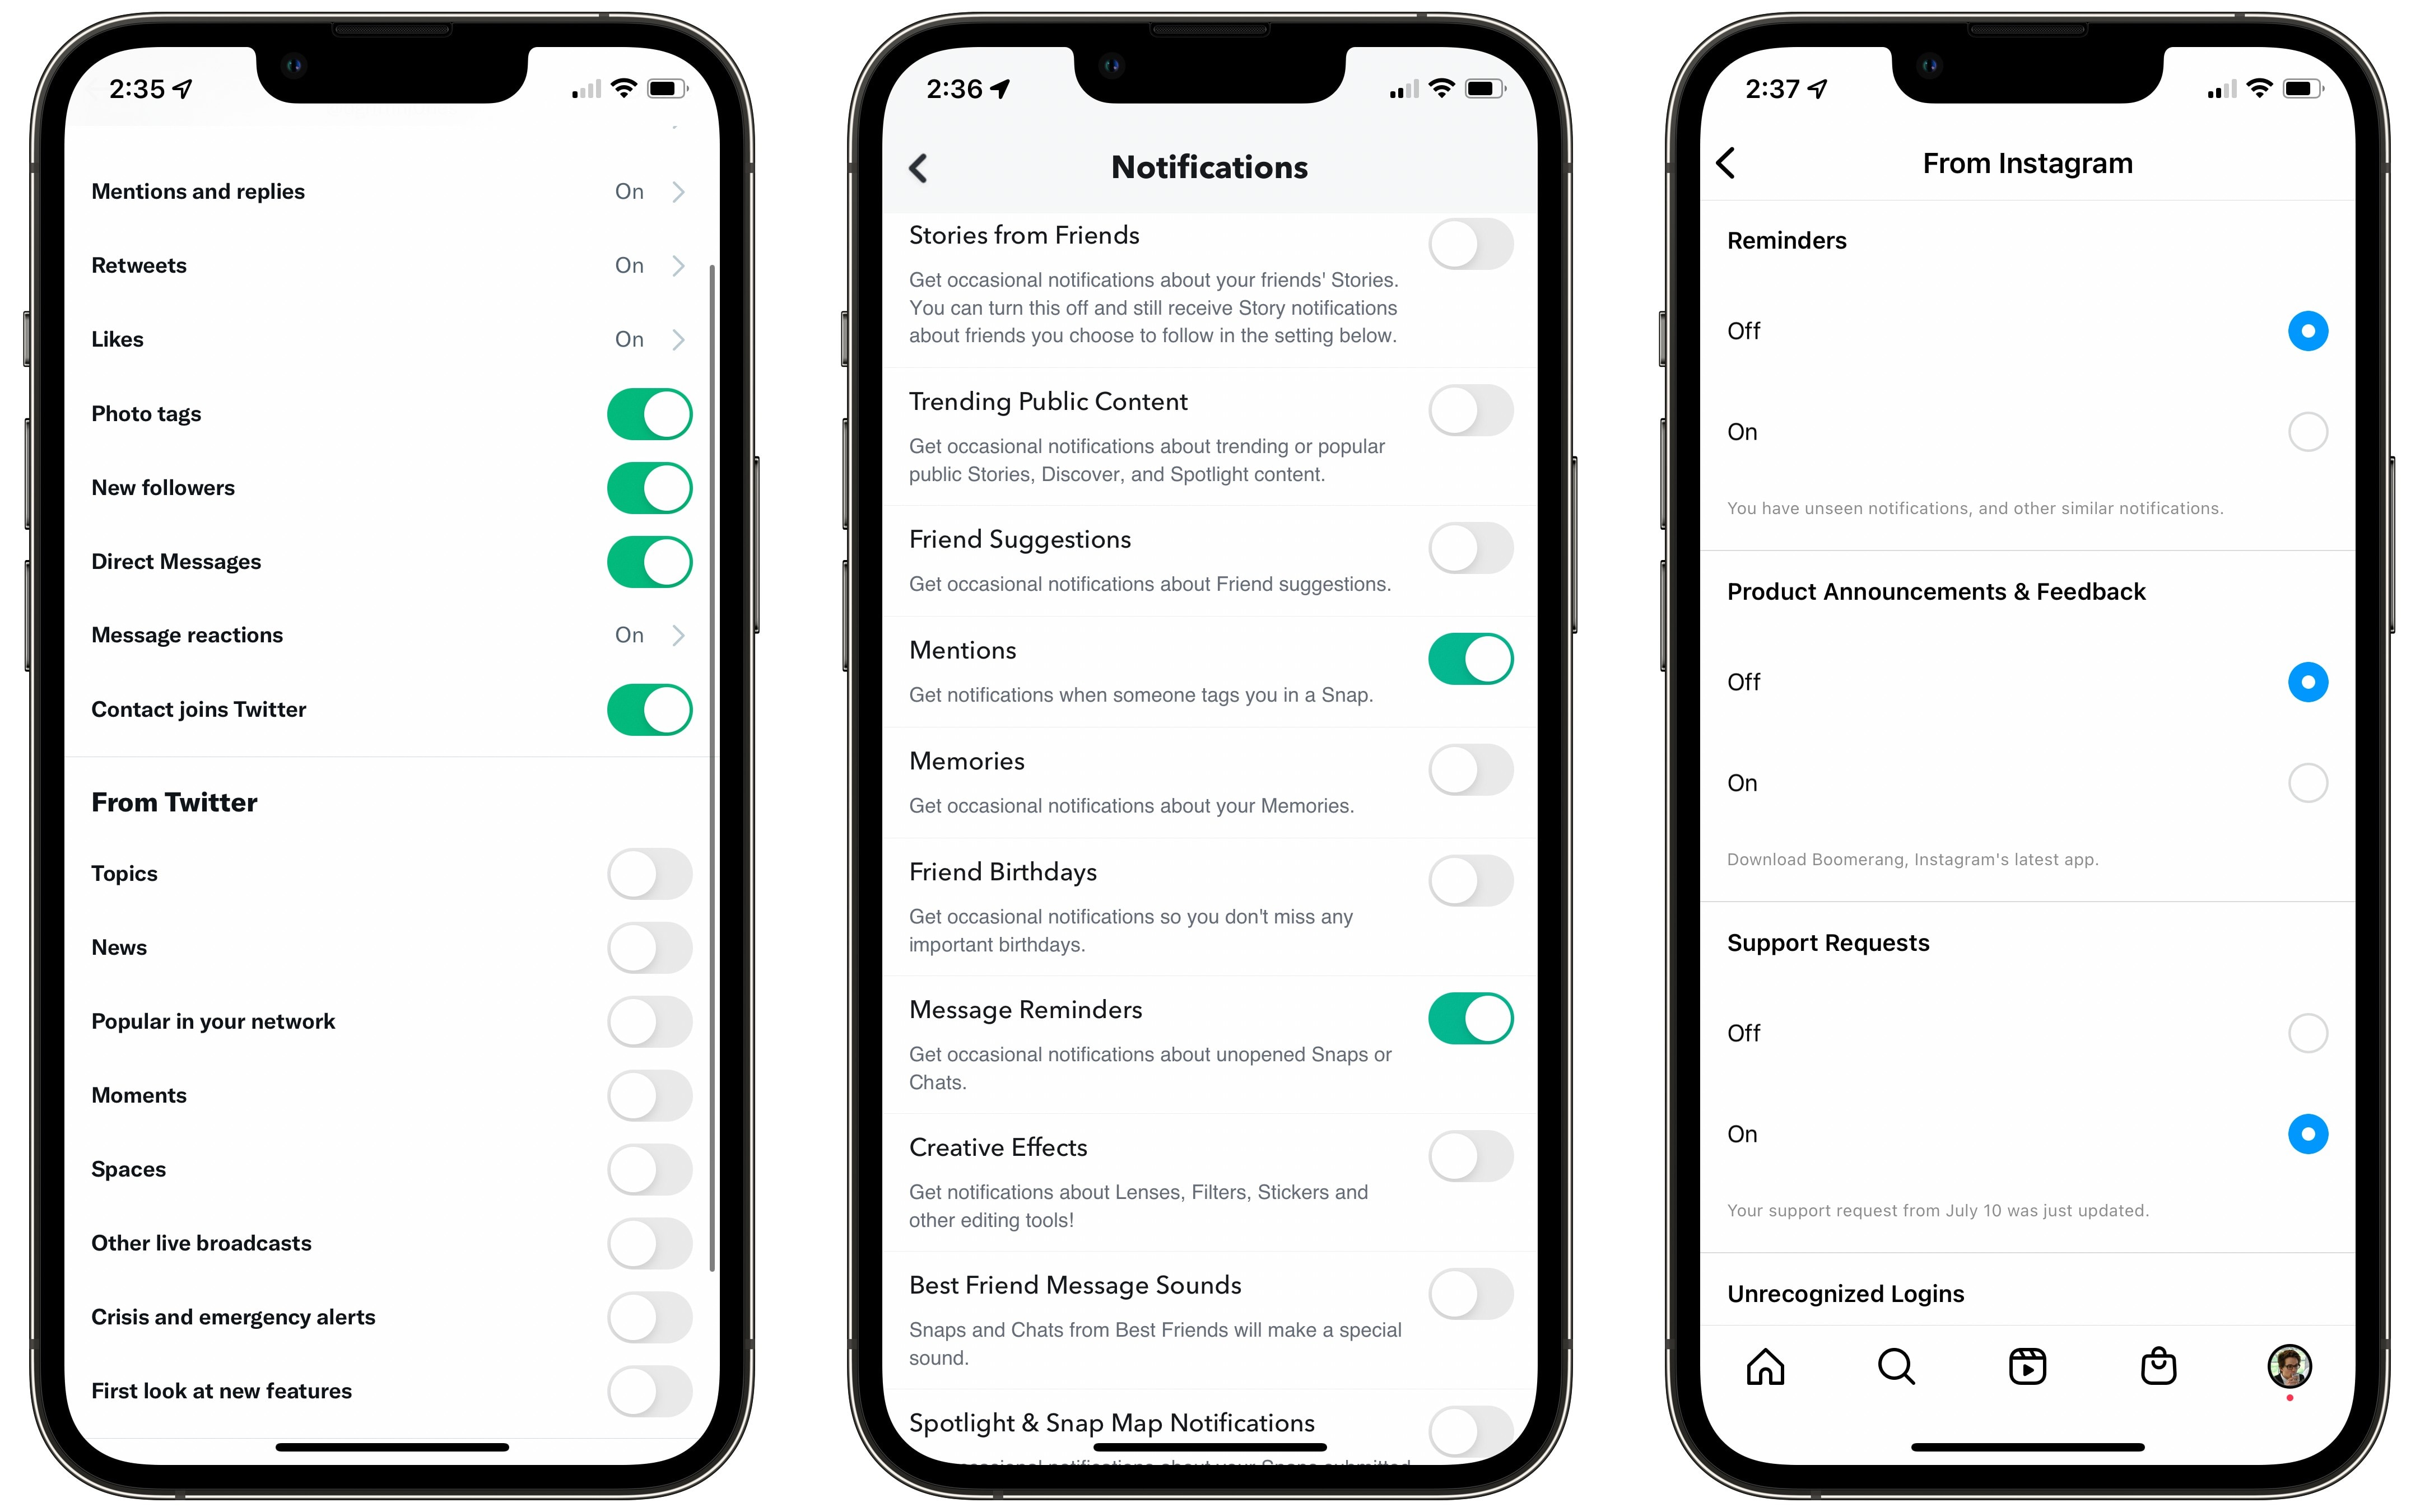
Turn off notification bait
When you start using apps less, they will try to bring you back in.
Notification bait is when Twitter, Instagram or Snapchat send you a notification — not because someone retweeted you, not because you got a comment on a post — just to tell you about a recommended post, show you something someone else posted, or push you promoted content.
These can be turned off in every app. You just need to know where to look.
Turn off suggested and trending notifications that do nothing but pull you back into the app.
Screenshot: D. Griffin Jones/Cult of Mac
Twitter: Go to the Notifications tab > Settings gear > Preferences > Push notifications and turn off everything in the “From Twitter” section.
Snapchat: Your icon in the top-left > Settings gear > Notifications. Turn off Stories from Friends, Trending Public Content, Friend Suggestions, Memories, Friend Birthdays, Creative Effects, Spotlight & Snap Map Notifications.
Instagram: Profile tab on the right > Menu icon > Settings > Notifications. Turn off Following and Followers > Account Suggestions. Turn off From Instagram > Reminders and Product Announcements & Feedback. Turn off Shopping > Suggested for You.
YouTube: Icon in top-right > Settings > Notifications. Turn off Recommended Videos, Product updates and Watch on TV.
TikTok: Profile > Menu > Settings and privacy > Push notifications. Turn off all options in the ‘Video Suggestions,’ ‘LIVE’ and ‘Other’ sections.
Facebook: Menu > Settings gear in top-right > Notifications. Turn off Updates From Friends, People You May Know, Events > Suggestions, Pages You Follow, Marketplace and Other Notifications.
You will need to do these for every account you’re signed in to, if you have multiple Twitter accounts or multiple Instagram accounts. Also, while you’re at it, turn off all emails.
Turn off all notifications
If the above trick doesn’t work, you can go further and turn off all push notifications for an app. This step doesn’t involve digging around for precise settings in every app; it’s fast and easy in your iPhone’s Settings app.
Turning off notifications means you have more control and intentionality when you choose to open an app. It’s no longer pulling you in. You are choosing to see what’s new on your own time.
Go to Settings > Notifications and pick any app, like Snapchat.
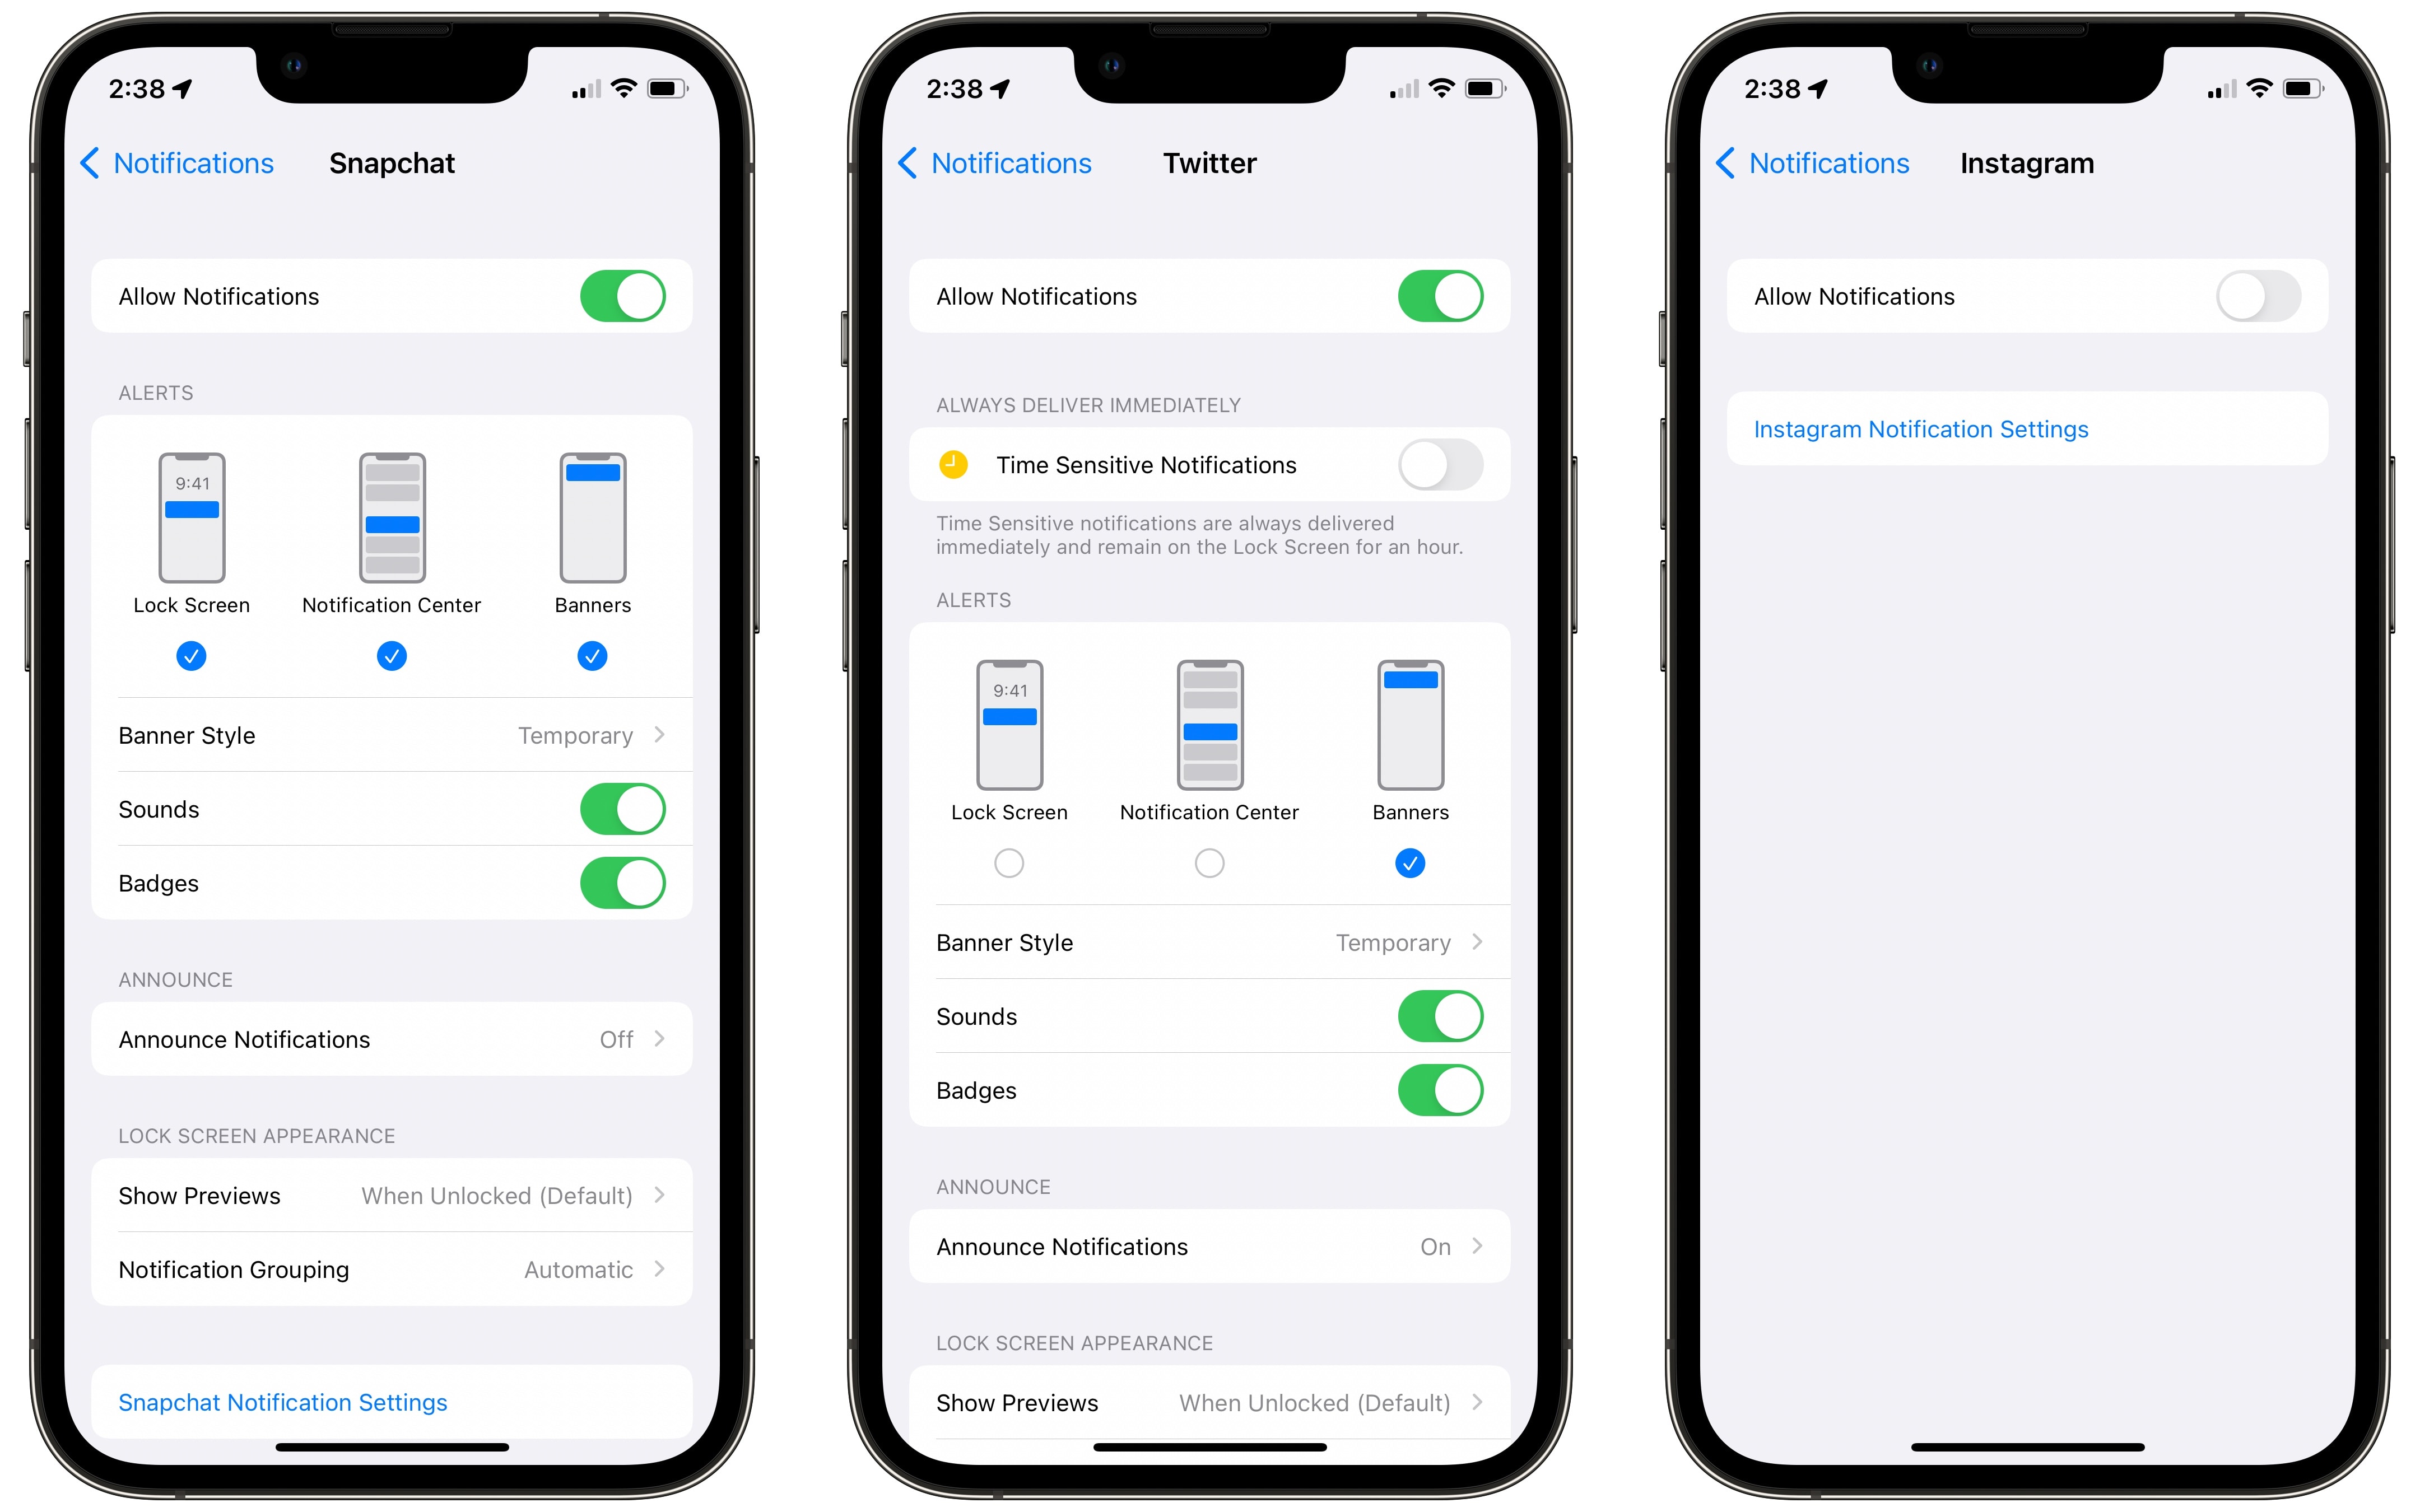
This is how I configured notification settings for Snapchat (all), Twitter (none on the Lock Screen) and Instagram (none).
Screenshot: D. Griffin Jones/Cult of Mac
Turn off Allow Notifications and you won’t see or hear anything from the app until you open it.
Turn off Lock Screen and the app will never buzz you when it’s locked and in your pocket; notifications will go straight to Notification Center.
Turn off Notification Center and you won’t see anything from that app build up in your iPhone’s Notification Center.
Turn off Banners and the app won’t show an alert at the top of the screen while you’re using your phone.
Turn off Badges and the app icon won’t show a red badge when there’s something new to check.
To start, I recommend turning off Lock Screen and Notification Center, but keep Banners and Badges enabled. That way, your phone won’t pull you in. But when you’re using it, you can still see if someone is trying to reach you.
Make your phone less interesting to look at
If these first few lines of defense aren’t enough and you still find yourself opening Instagram Reels or spending hours on YouTube, there are still more tricks you can pull to use your phone less.
Switch to grayscale
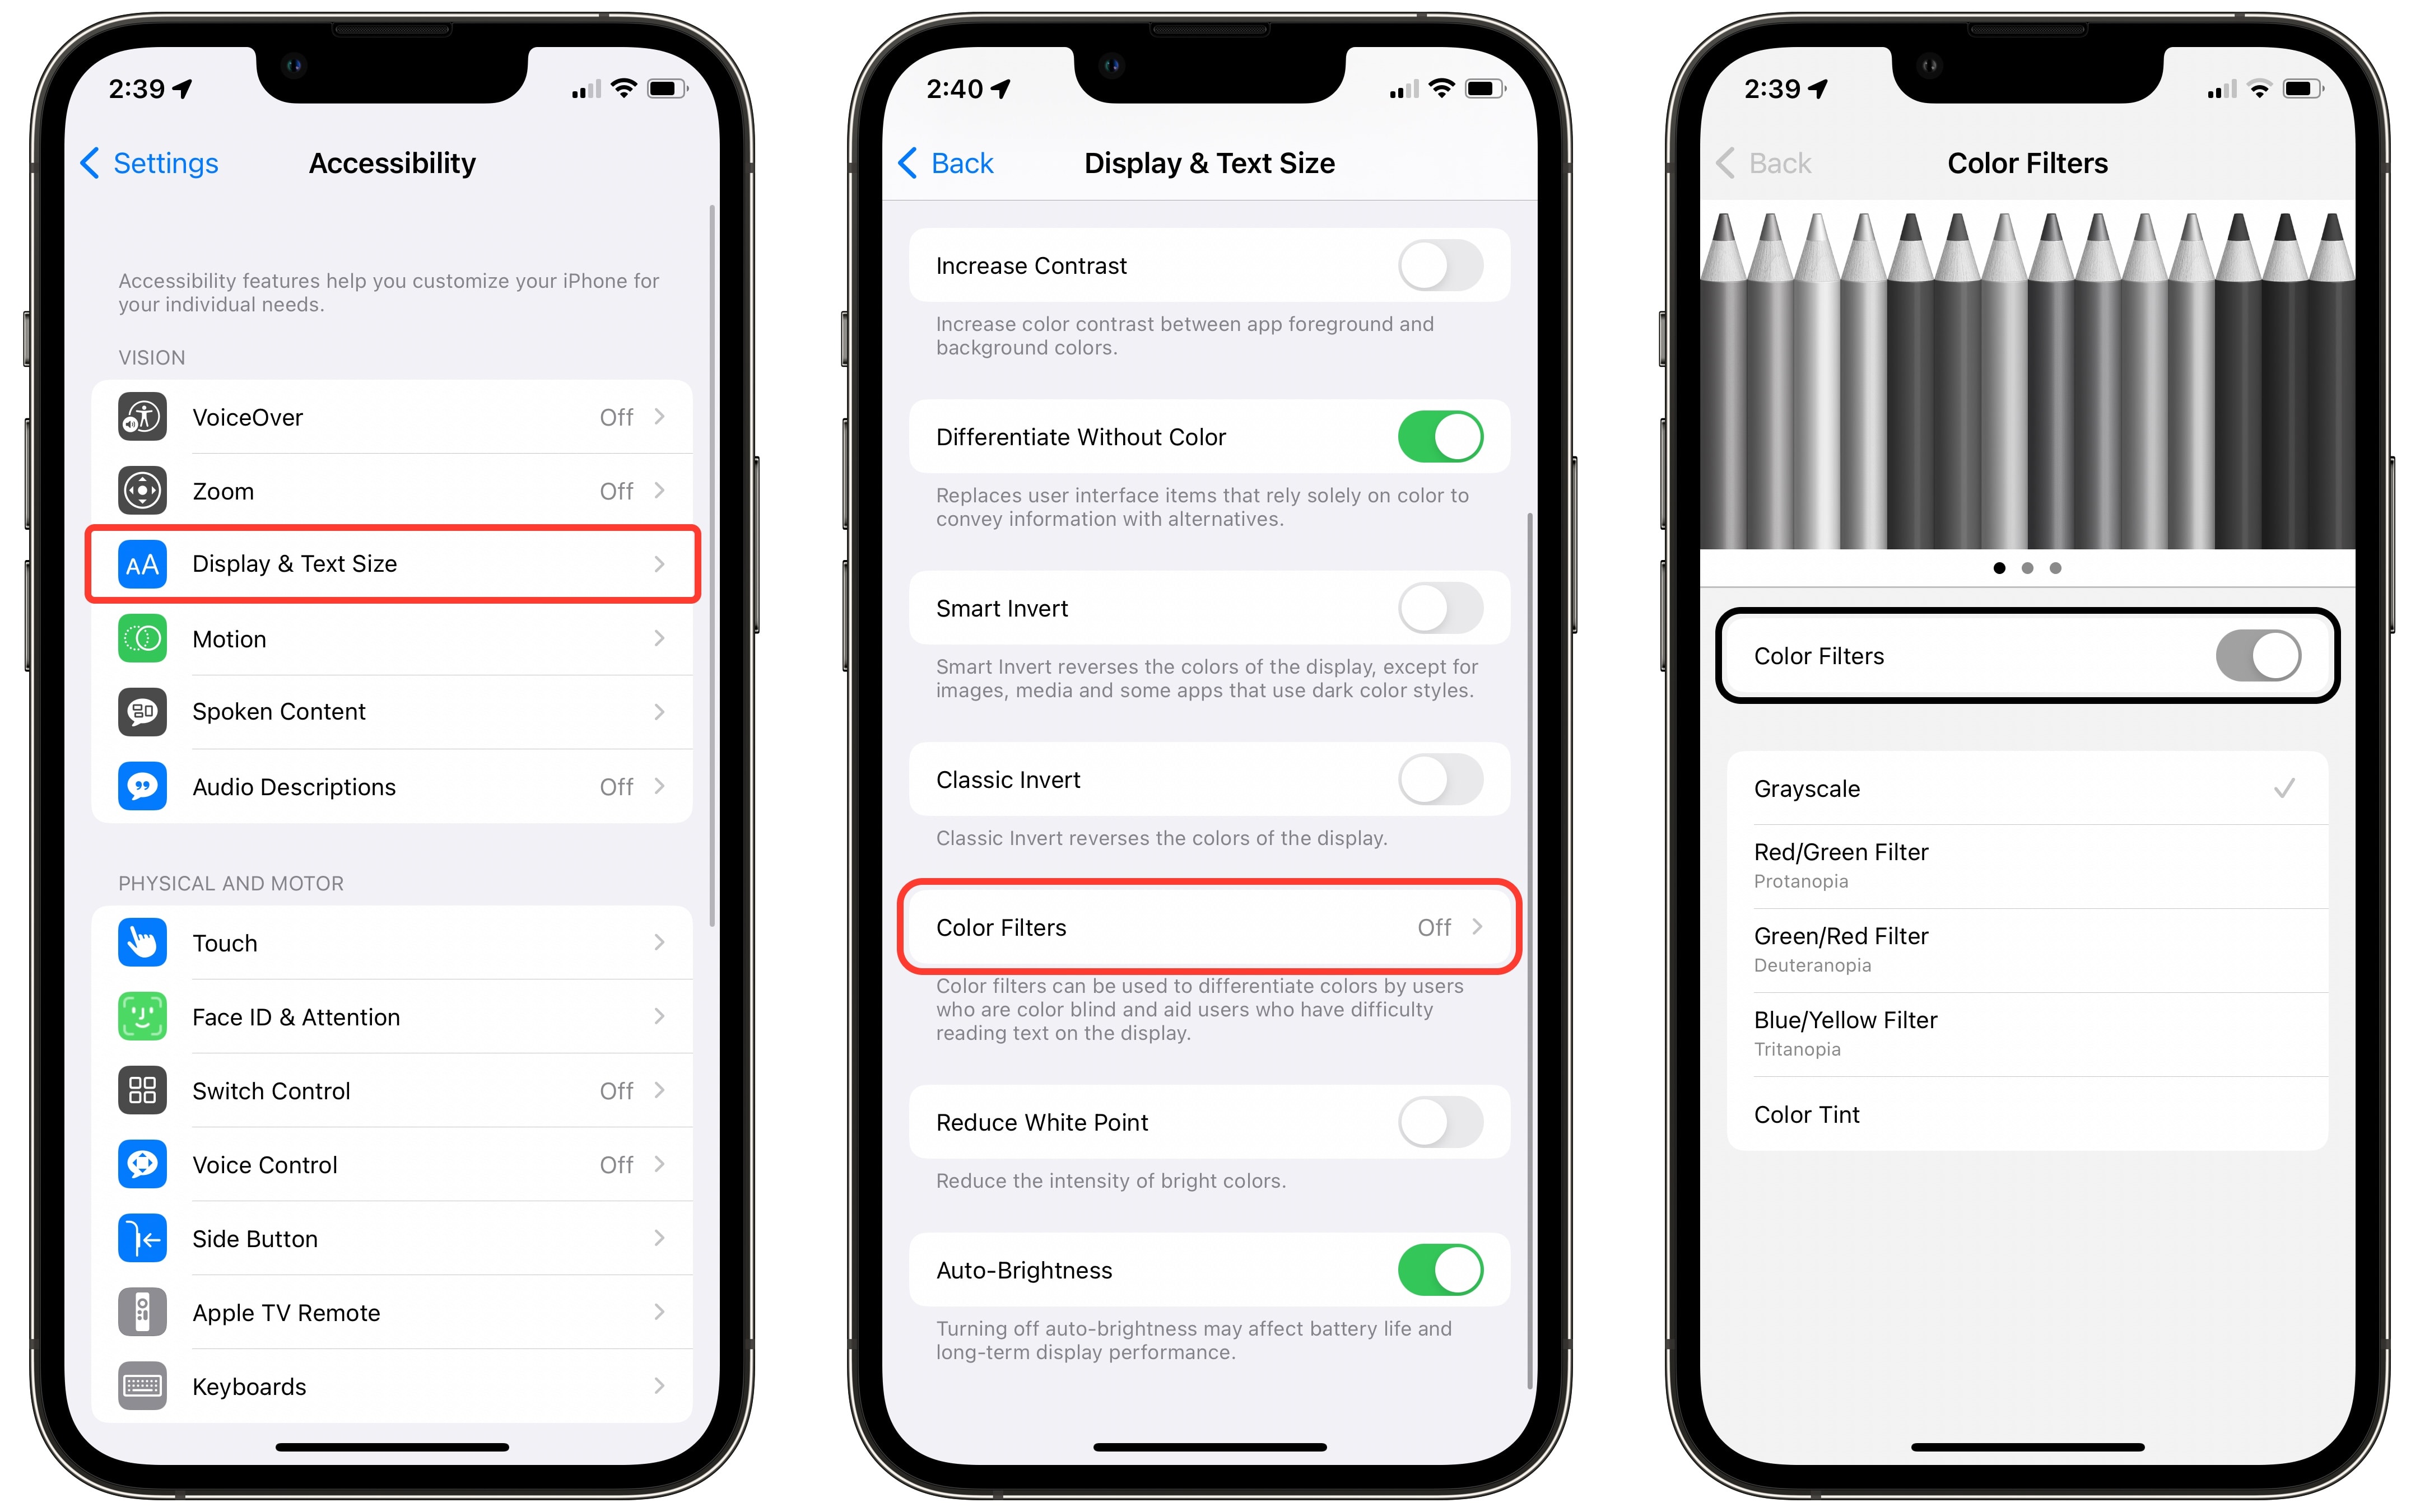
Turn your phone into grayscale in Accessibility Settings.
Screenshot: D. Griffin Jones/Cult of Mac
With your phone in grayscale, it won’t be as engaging. This is a simple switch you can flip in Accessibility settings.
Go to Settings > Accessibility > Display & Text Size > Color Filters, enable Color Filters, and select Grayscale. I also recommend going back to Display & Text Size and enabling Differentiate Without Color so that you don’t lose any functionality.
Turn down brightness, reduce white point
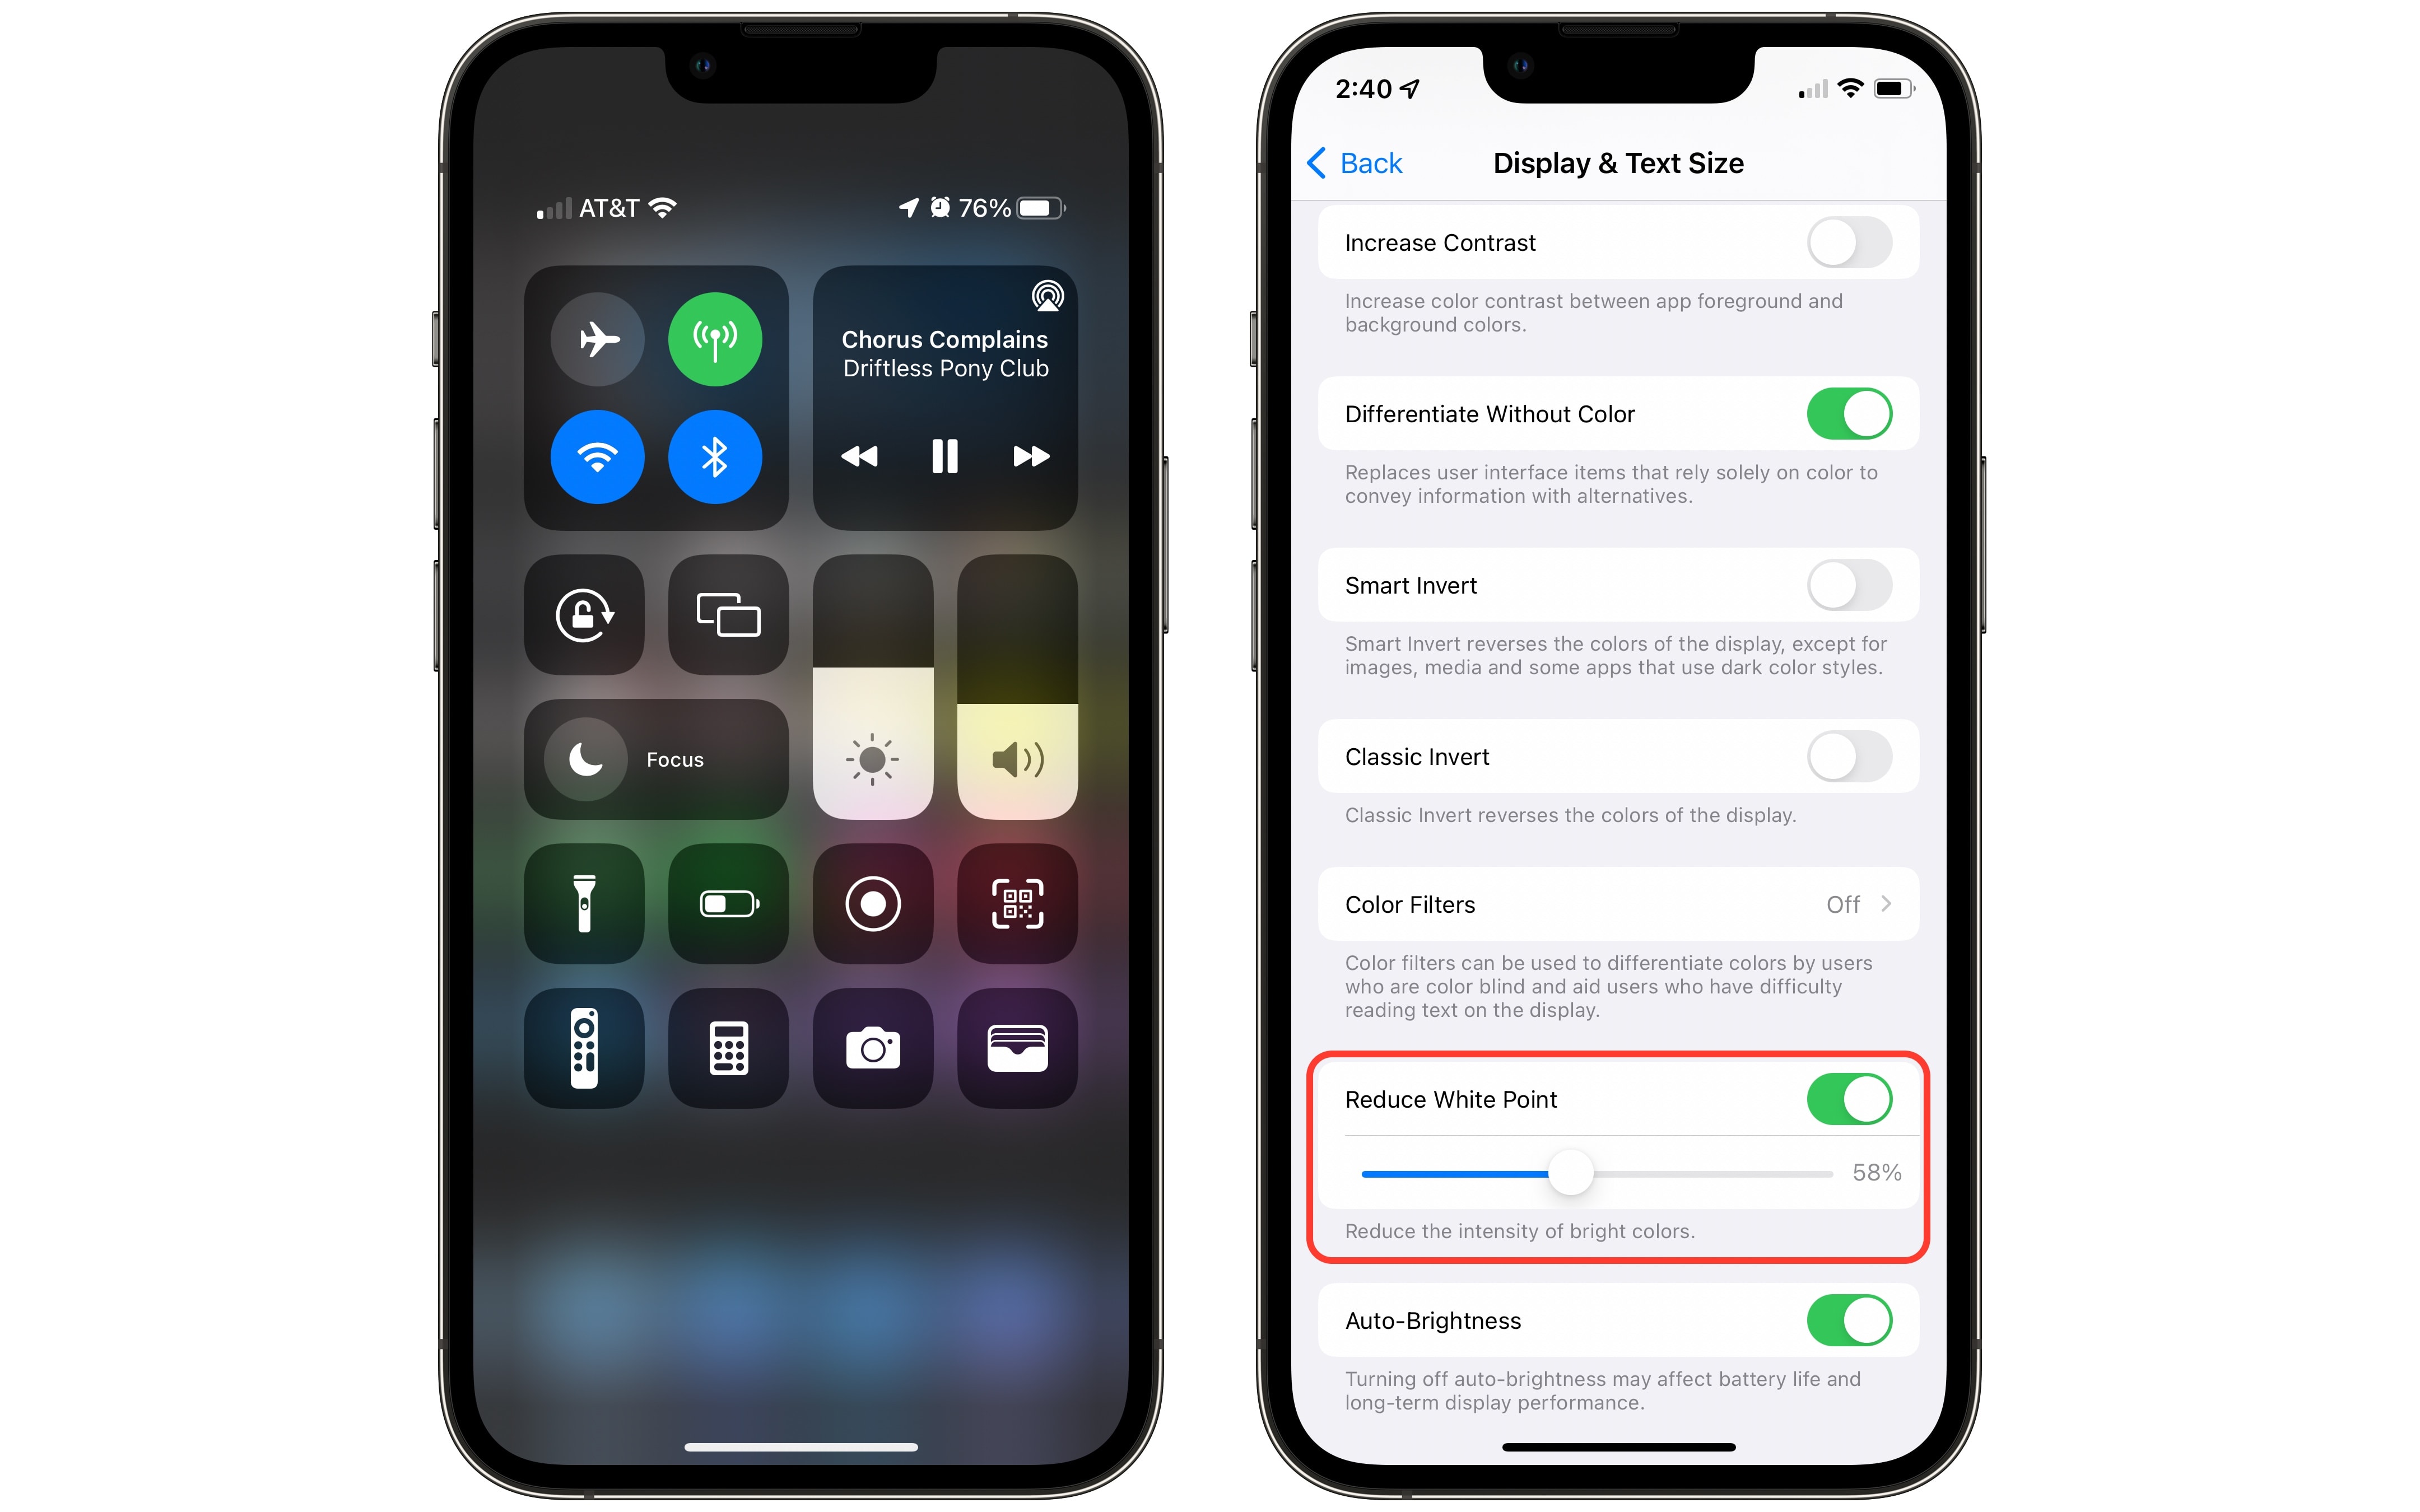
Turn down brightness in Control Center and enable Reduce White Point.
Screenshot: D. Griffin Jones/Cult of Mac
If that’s too extreme, you can always try turning down your brightness and white point. To turn down your iPhone’s brightness, open Control Center (swipe down from the top-right) and drag down the brightness level.
You can reduce the white point in Settings > Accessibility > Display & Text Size > Reduce White Point to dim your iPhone screen even further.
Turn off Face ID or Touch ID
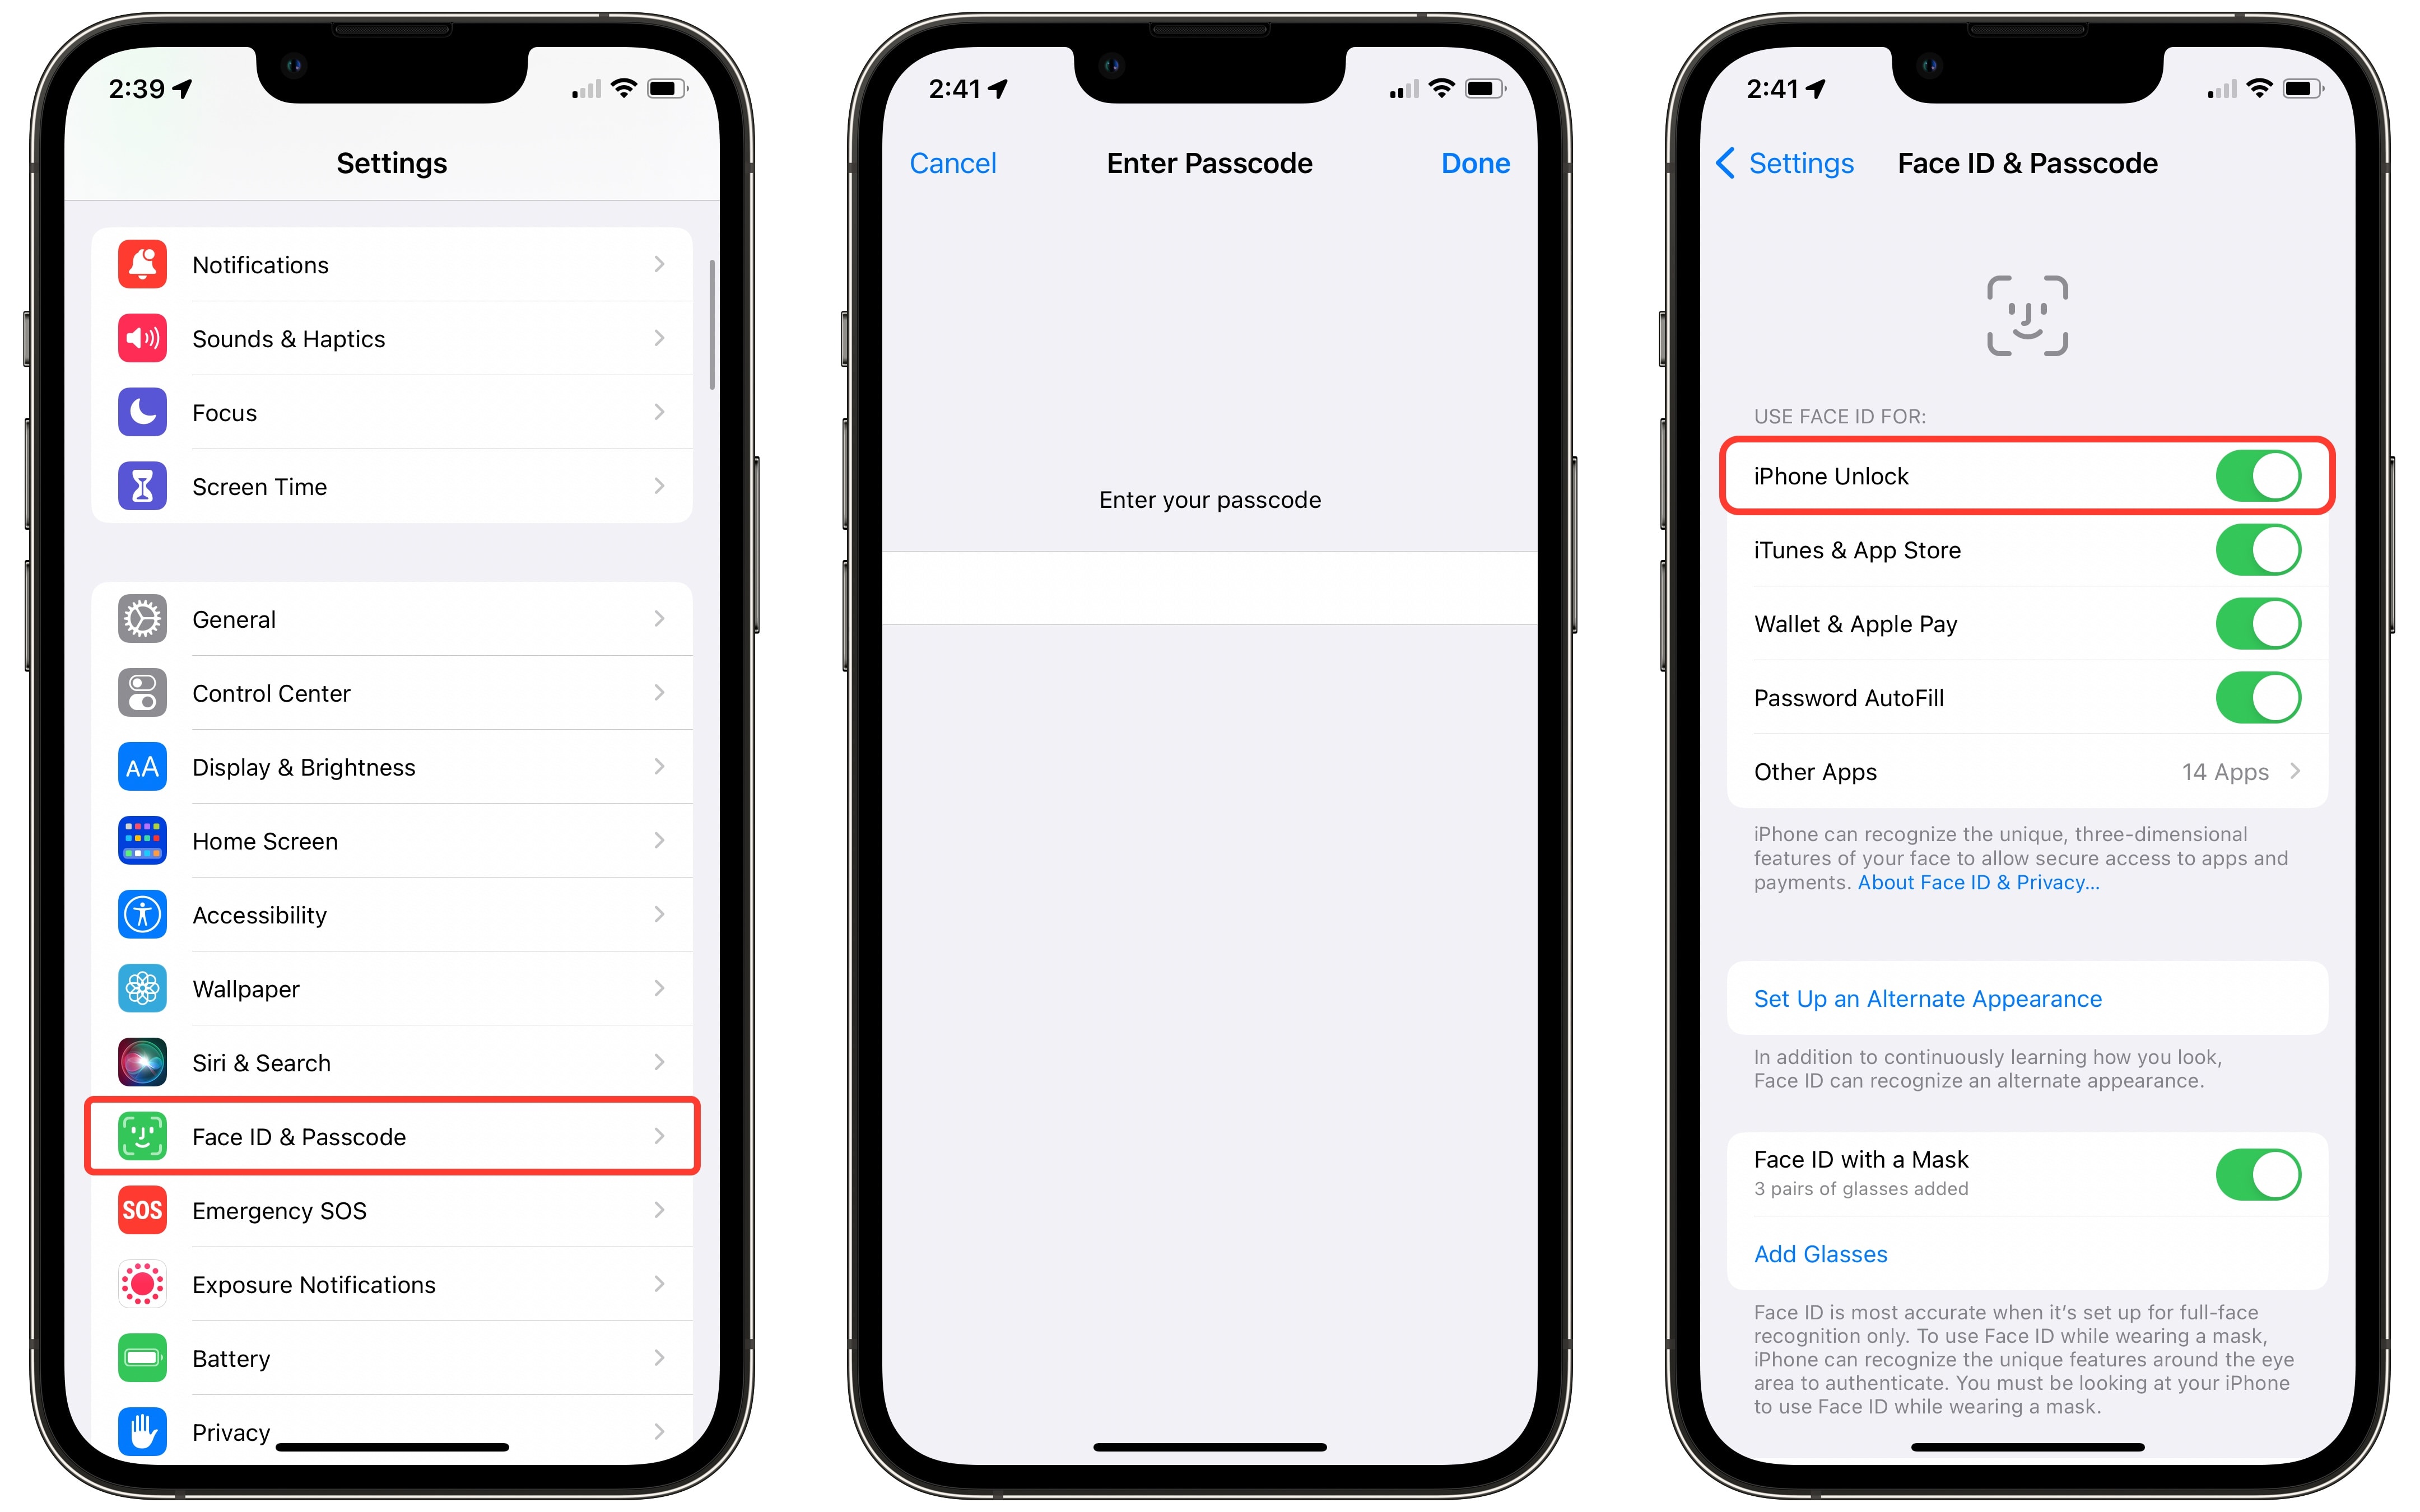
Turn off Face ID to make your phone slightly harder to use. That way, you can’t impulsively unlock it.
Screenshot: D. Griffin Jones/Cult of Mac
Another last-ditch effort you can take is to disable Face ID (or Touch ID). The added friction of entering in your passcode every time you try to unlock your iPhone will slow you down before you impulsively open an app to fill time.
Go to Settings > Face ID & Passcode (or Touch ID) and enter your passcode. Turn off iPhone Unlock.
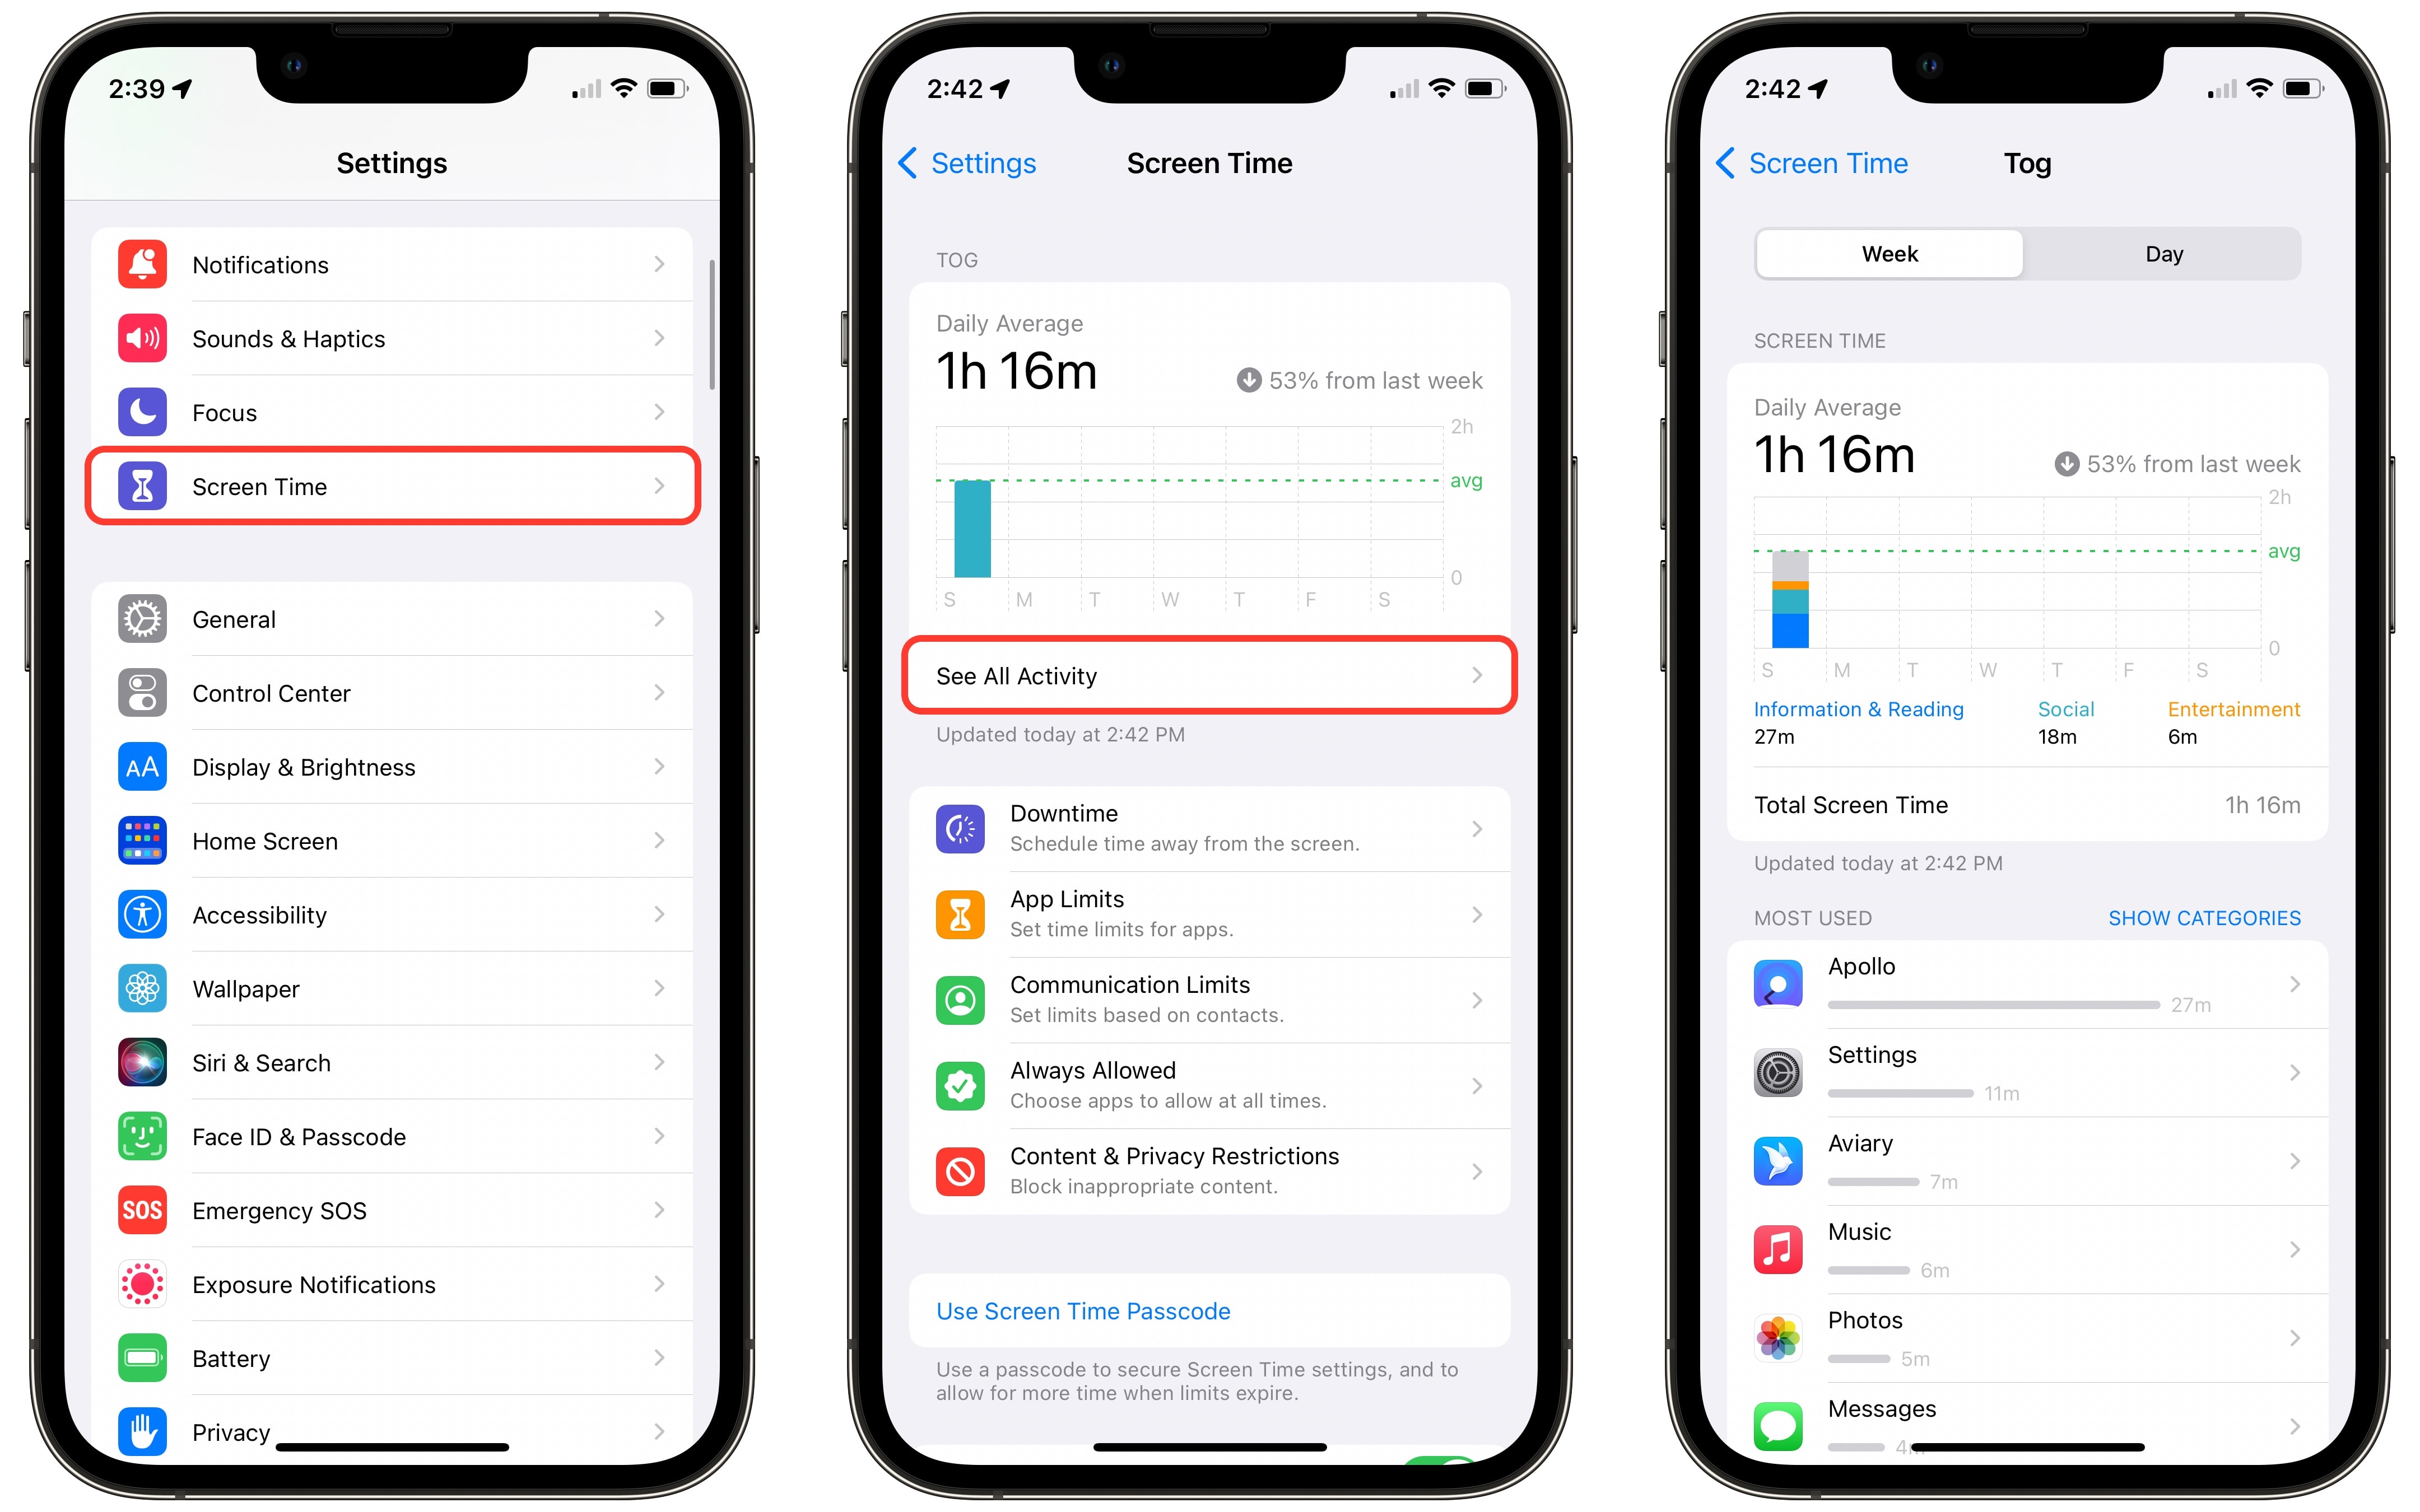
Track how well you’re doing in Screen Time
After you make some or all of these modifications, you can use Apple’s Screen Time feature to see how well you’re doing. It gives you real-time reports on exactly how much time you are spending on your iPhone. It also lets you set time limits for various apps, in case you need help weaning yourself off any of them.
Track your phone usage in Screen Time.
Screenshot: D. Griffin Jones/Cult of Mac
Go to Settings > Screen Time > See All Activity to compare how your screen time changes week by week. You can see which apps you spend the most time in, how many times you pick up your phone and which apps send you the most notifications. Tap the left and right arrows to compare up to four weeks back to see if you’re improving or not.
As you can see, writing this article early on a Sunday morning, I need to work on my addiction to the Settings app.
Recommend
About Joyk
Aggregate valuable and interesting links.
Joyk means Joy of geeK