

Docker 与 K8S学习笔记(二十三)—— Kubernetes集群搭建 - 阿拉懒神灯
source link: https://www.cnblogs.com/alalazy/p/16315879.html
Go to the source link to view the article. You can view the picture content, updated content and better typesetting reading experience. If the link is broken, please click the button below to view the snapshot at that time.

Docker 与 K8S学习笔记(二十三)—— Kubernetes集群搭建
小伙伴们,好久不见,这几个月实在太忙,所以一直没有更新,今天刚好有空,咱们继续k8s的学习,由于我们后面需要深入学习Pod的调度,所以我们原先使用MiniKube搭建的实验环境就不能满足我们的需求了,我们这一节将使用kubeadm搭建Kubernets集群。
一、虚拟机创建
我们的集群包含三个节点kubevm1、kubevm2、kubevm3,其中kubevm1作为Master
我们首先需要使用Virtualbox创建一个虚拟机,步骤如下:
1、新建虚拟机
我们设置内存2G,硬盘20G,CPU 2核,在光驱设置中选择已经下好的Centos镜像。
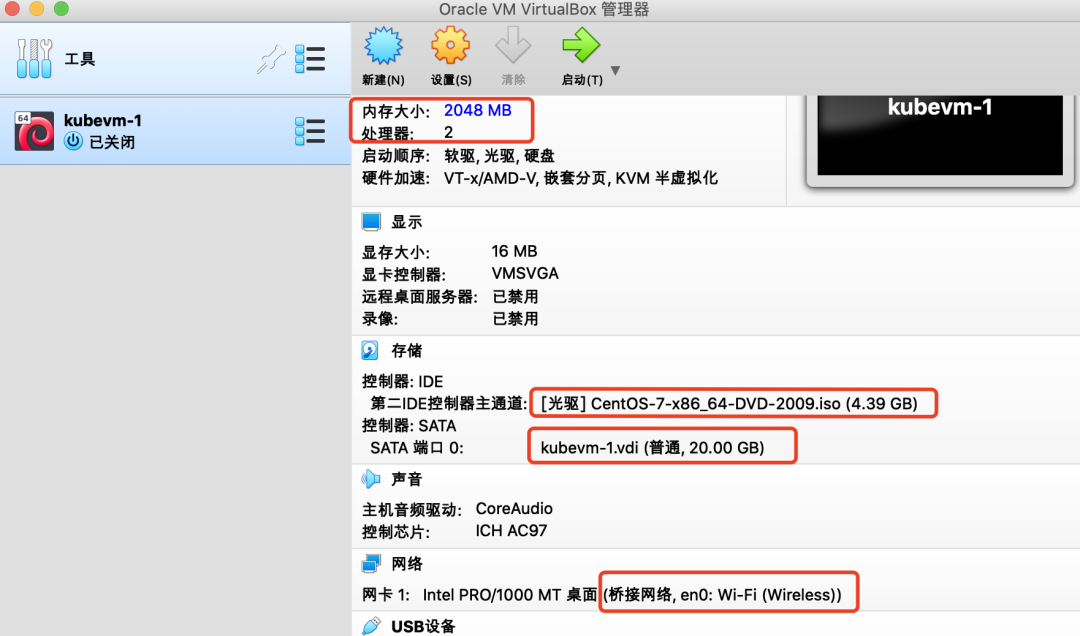
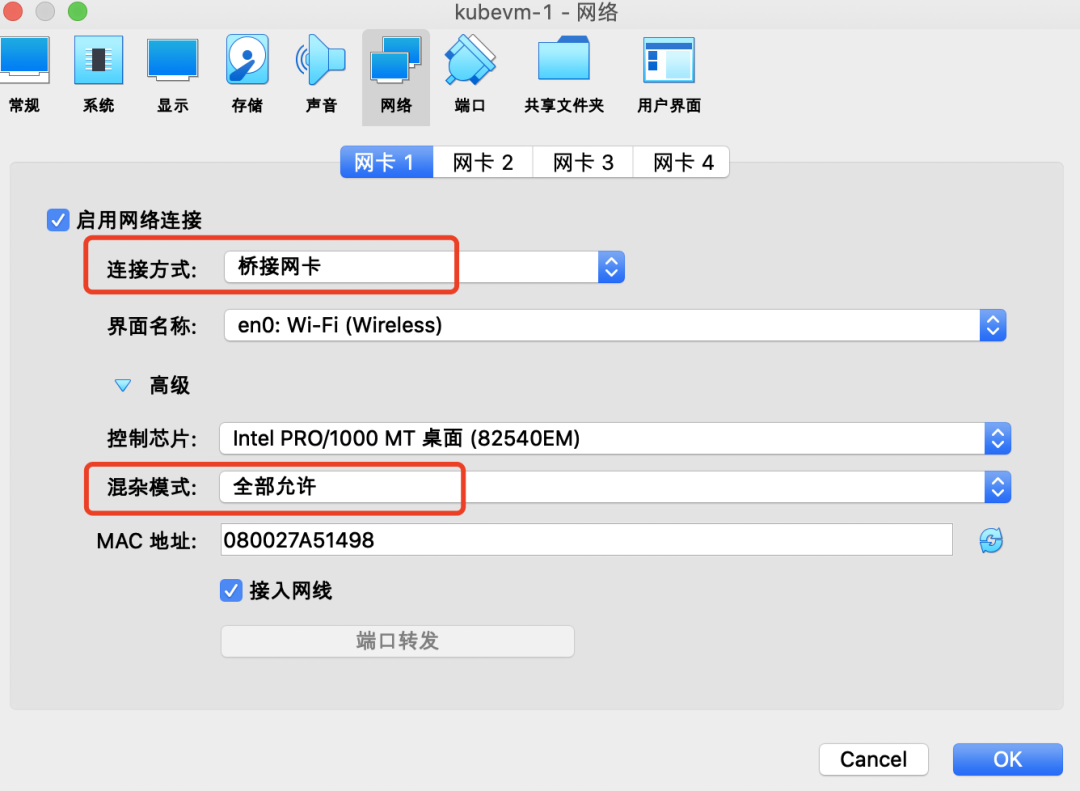
设置网络为【桥接网卡】
2、安装系统
启动虚拟机,进入安装界面,根据安装向导:
-
设置时区;
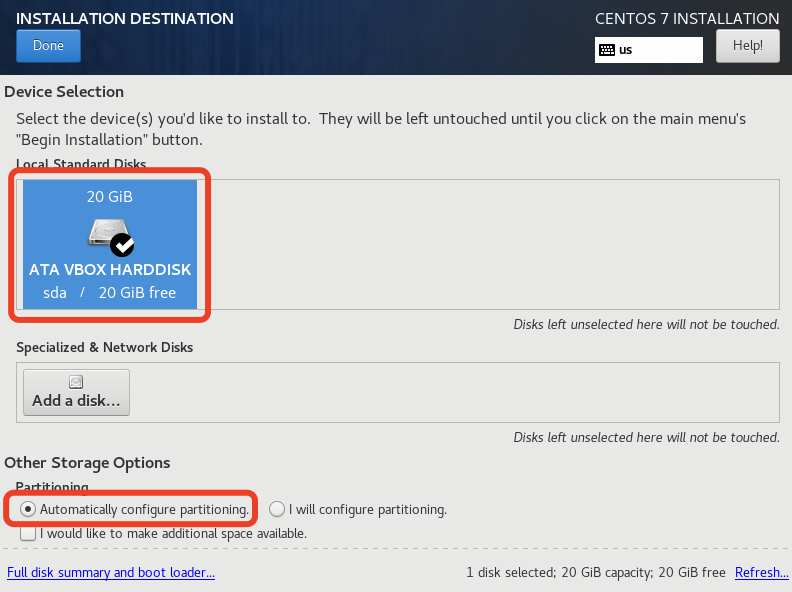
- 选择安装磁盘并分区(直接自动分区即可);
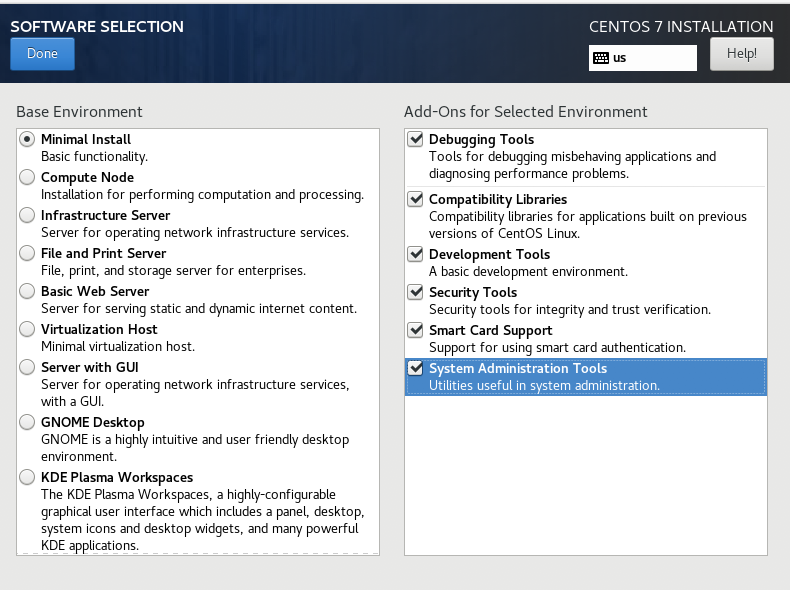
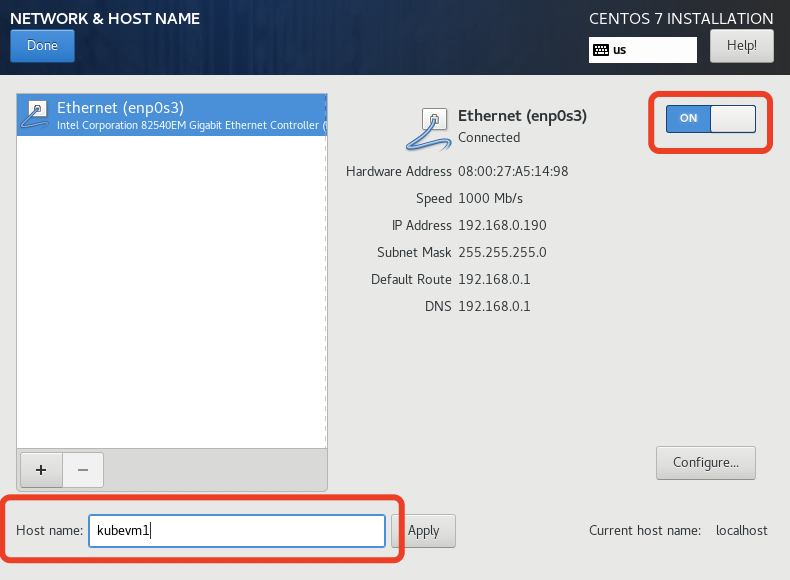
- 安装模式选【Minimal Install】,附加软件全选;
- "NETWORK & HOST NAME"中打开OnBoot,主机名如果不在这里设置,在安装完系统后可以通过“hostnamectl”命令设置;
- 安装过程中可以设置root用户密码或者添加新用户,我们这里图省事就直接用root账户了。
等待系统安装完毕后,重起虚拟机,为了操作方便,我们使用宿主机的终端ssh到虚拟机。
PS:由于是最小化安装,是没有ifconfig命令的,所以我们可以通过ip addr获取到虚拟机IP,然后再通过ssh登陆。
3、系统设置
1)禁用SELinux
-
临时关闭:命令行执行 setenforce 0
-
永久关闭:修改/etc/selinux/config文件,将SELINUX=enforcing改为SELINUX=disabled
2)关闭防火墙
systemctl disable firewalld && systemctl stop firewalld
3)关闭交换分区
swapoff -a && sed -i '/ swap / s/^/#/' /etc/fstab
4)更改iptables设置
echo 1 > /proc/sys/net/bridge/bridge-nf-call-iptables
PS:如果提示找不到bridge-nf-call-iptables,可执行一下命令:
modprobe br_netfilter
二、安装Docker
yum install docker -y
三、安装Kubernetes
1、设置yum源
cat > /etc/yum.repos.d/kubernetes.repo << EOF
[kubernetes]
name=Kubernetes
baseurl=https://mirrors.aliyun.com/kubernetes/yum/repos/kubernetes-el7-x86_64
enabled=1
gpgcheck=0
repo_gpgcheck=0
gpgkey=https://mirrors.aliyun.com/kubernetes/yum/doc/yum-key.gpg https://mirrors.aliyun.com/kubernetes/yum/doc/rpm-package-key.gpg
EOF
2、添加docker镜像
vim /etc/docker/daemon.json
添加如下内容:
"registry-mirrors": ["https://registry.docker-cn.co"]
3、安装kubectl、kubeadm、kubelet
yum install -y kubelet-1.19.16 kubeadm-1.19.16 kubectl-1.19.16
4、启动docker和kubelet
systemctl enable docker && systemctl start docker
systemctl enable kubelet && systemctl start kubelet
四、Kubernetes集群安装与配置
1、复制虚拟机并配置hosts
我们首先复制出两个虚拟机,并分别修改其hostname为kubevm2和kubevm3。
hostnamectl set-hostnam xxx
将三台虚拟机的地址写入到宿主机和每一台虚拟机的hosts文件中:
vim /etc/hosts

192.168.0.187   kubevm1
192.168.0.185   kubevm2
192.168.0.184   kubevm3
2、初始化master(kubevm1)
在kubevm1上执行kubeadm init
[root@kubevm1 ~]# kubeadm init --apiserver-advertise-address=192.168.56.120 --image-repository=registry.aliyuncs.com/google_containers --kubernetes-version=v1.19.16 --service-cidr=10.1.0.0/16 --pod-network-cidr=10.244.0.0/16
W0518 23:27:14.470037    2551 configset.go:348] WARNING: kubeadm cannot validate component configs for API groups [kubelet.config.k8s.io kubeproxy.config.k8s.io]
[init] Using Kubernetes version: v1.19.16
[preflight] Running pre-flight checks
[preflight] Pulling images required for setting up a Kubernetes cluster
[preflight] This might take a minute or two, depending on the speed of your internet connection
[preflight] You can also perform this action in beforehand using 'kubeadm config images pull'
[certs] Using certificateDir folder "/etc/kubernetes/pki"
[certs] Generating "ca" certificate and key
[certs] Generating "apiserver" certificate and key
[certs] apiserver serving cert is signed for DNS names [kubernetes kubernetes.default kubernetes.default.svc kubernetes.default.svc.cluster.local kubevm1] and IPs [10.1.0.1 192.168.56.120]
[certs] Generating "apiserver-kubelet-client" certificate and key
[certs] Generating "front-proxy-ca" certificate and key
[certs] Generating "front-proxy-client" certificate and key
[certs] Generating "etcd/ca" certificate and key
[certs] Generating "etcd/server" certificate and key
[certs] etcd/server serving cert is signed for DNS names [kubevm1 localhost] and IPs [192.168.56.120 127.0.0.1 ::1]
[certs] Generating "etcd/peer" certificate and key
[certs] etcd/peer serving cert is signed for DNS names [kubevm1 localhost] and IPs [192.168.56.120 127.0.0.1 ::1]
[certs] Generating "etcd/healthcheck-client" certificate and key
[certs] Generating "apiserver-etcd-client" certificate and key
[certs] Generating "sa" key and public key
[kubeconfig] Using kubeconfig folder "/etc/kubernetes"
[kubeconfig] Writing "admin.conf" kubeconfig file
[kubeconfig] Writing "kubelet.conf" kubeconfig file
[kubeconfig] Writing "controller-manager.conf" kubeconfig file
[kubeconfig] Writing "scheduler.conf" kubeconfig file
[kubelet-start] Writing kubelet environment file with flags to file "/var/lib/kubelet/kubeadm-flags.env"
[kubelet-start] Writing kubelet configuration to file "/var/lib/kubelet/config.yaml"
[kubelet-start] Starting the kubelet
[control-plane] Using manifest folder "/etc/kubernetes/manifests"
[control-plane] Creating static Pod manifest for "kube-apiserver"
[control-plane] Creating static Pod manifest for "kube-controller-manager"
[control-plane] Creating static Pod manifest for "kube-scheduler"
[etcd] Creating static Pod manifest for local etcd in "/etc/kubernetes/manifests"
[wait-control-plane] Waiting for the kubelet to boot up the control plane as static Pods from directory "/etc/kubernetes/manifests". This can take up to 4m0s
[kubelet-check] Initial timeout of 40s passed.
[apiclient] All control plane components are healthy after 43.002951 seconds
[upload-config] Storing the configuration used in ConfigMap "kubeadm-config" in the "kube-system" Namespace
[kubelet] Creating a ConfigMap "kubelet-config-1.19" in namespace kube-system with the configuration for the kubelets in the cluster
[upload-certs] Skipping phase. Please see --upload-certs
[mark-control-plane] Marking the node kubevm1 as control-plane by adding the label "node-role.kubernetes.io/master=''"
[mark-control-plane] Marking the node kubevm1 as control-plane by adding the taints [node-role.kubernetes.io/master:NoSchedule]
[bootstrap-token] Using token: wribbh.31c6e1tnddpnpwn9
[bootstrap-token] Configuring bootstrap tokens, cluster-info ConfigMap, RBAC Roles
[bootstrap-token] configured RBAC rules to allow Node Bootstrap tokens to get nodes
[bootstrap-token] configured RBAC rules to allow Node Bootstrap tokens to post CSRs in order for nodes to get long term certificate credentials
[bootstrap-token] configured RBAC rules to allow the csrapprover controller automatically approve CSRs from a Node Bootstrap Token
[bootstrap-token] configured RBAC rules to allow certificate rotation for all node client certificates in the cluster
[bootstrap-token] Creating the "cluster-info" ConfigMap in the "kube-public" namespace
[kubelet-finalize] Updating "/etc/kubernetes/kubelet.conf" to point to a rotatable kubelet client certificate and key
[addons] Applied essential addon: CoreDNS
[addons] Applied essential addon: kube-proxy

Your Kubernetes control-plane has initialized successfully!

To start using your cluster, you need to run the following as a regular user:

  mkdir -p $HOME/.kube
  sudo cp -i /etc/kubernetes/admin.conf $HOME/.kube/config
  sudo chown $(id -u):$(id -g) $HOME/.kube/config

You should now deploy a pod network to the cluster.
Run "kubectl apply -f [podnetwork].yaml" with one of the options listed at:
  https://kubernetes.io/docs/concepts/cluster-administration/addons/

Then you can join any number of worker nodes by running the following on each as root:

kubeadm join 192.168.56.120:6443 --token wribbh.31c6e1tnddpnpwn9 \
    --discovery-token-ca-cert-hash sha256:1804e7ee43d7469839b3f5fdbf2c57f5d53eee1da6bc40c59a1b04fce6edddd5
接下来我们执行以下命令,这样我们就可以使用kubectl管理集群了:
mkdir -p $HOME/.kube
sudo cp -i /etc/kubernetes/admin.conf $HOME/.kube/config
sudo chown $(id -u):$(id -g) $HOME/.kube/config
我们先查看下当前集群各个组件状态:
[root@kubevm1 ~]# kubectl get pods,svc -n kube-system
NAME                                  READY   STATUS    RESTARTS   AGE
pod/coredns-6d56c8448f-jf9gg          0/1     Pending   0          2m4s
pod/coredns-6d56c8448f-m2cdp          0/1     Pending   0          2m3s
pod/etcd-kubevm1                      1/1     Running   0          2m17s
pod/kube-apiserver-kubevm1            1/1     Running   0          2m17s
pod/kube-controller-manager-kubevm1   1/1     Running   0          2m17s
pod/kube-proxy-rv7g4                  1/1     Running   0          2m4s
pod/kube-scheduler-kubevm1            1/1     Running   0          2m17s

NAME               TYPE        CLUSTER-IP   EXTERNAL-IP   PORT(S)                  AGE
service/kube-dns   ClusterIP   10.1.0.10    <none>        53/UDP,53/TCP,9153/TCP   2m19s
我们发现coredns都处于NotReady状态,这是因为我们还没有安装网络组件。
3、安装网络插件
下载fannel的yaml配置文件:
wget https://raw.githubusercontent.com/coreos/flannel/master/Documentation/kube-flannel.yml
这里确认下yaml中Network是否与前面执行kubeadm init时--pod-network-cidr参数的值一致。
kubectl apply -f kube-flannel.yml
等待一会儿,我们可以看到集群中网络服务对应的Pod都ok了:
[root@kubevm1 ~]# kubectl get pods,svc -n kube-system
NAME                                  READY   STATUS    RESTARTS   AGE
pod/coredns-6d56c8448f-jf9gg          1/1     Running   0          28m
pod/coredns-6d56c8448f-m2cdp          1/1     Running   0          28m
pod/etcd-kubevm1                      1/1     Running   0          28m
pod/kube-apiserver-kubevm1            1/1     Running   0          28m
pod/kube-controller-manager-kubevm1   1/1     Running   0          28m
pod/kube-flannel-ds-td89l             1/1     Running   0          13m
pod/kube-proxy-rv7g4                  1/1     Running   0          28m
pod/kube-scheduler-kubevm1            1/1     Running   0          28m

NAME               TYPE        CLUSTER-IP   EXTERNAL-IP   PORT(S)                  AGE
service/kube-dns   ClusterIP   10.1.0.10    <none>        53/UDP,53/TCP,9153/TCP   28m
4、注册Node
在kubevm2、kubevm3中执行以下命令,注册到master:
kubeadm join 192.168.56.120:6443 --token wribbh.31c6e1tnddpnpwn9 \
    --discovery-token-ca-cert-hash sha256:1804e7ee43d7469839b3f5fdbf2c57f5d53eee1da6bc40c59a1b04fce6edddd5
注册后我们使用kubectl get node查看一下:
[root@kubevm1 ~]# kubectl get nodes
NAME      STATUS   ROLES    AGE   VERSION
kubevm1   Ready    master   46m   v1.19.16
kubevm2   Ready    <none>   15m   v1.19.16
kubevm3   Ready    <none>   14m   v1.19.16
ok,至此整个集群搭建完成。
Recommend
About Joyk
Aggregate valuable and interesting links.
Joyk means Joy of geeK