

3 Methods How To Connect To Exchange Online PowerShell
source link: https://www.nakivo.com/blog/how-to-connect-office-365-exchange-online-powershell/
Go to the source link to view the article. You can view the picture content, updated content and better typesetting reading experience. If the link is broken, please click the button below to view the snapshot at that time.

NAKIVO Blog > Office 365 Administration and Deployment > How to Connect Office 365 Exchange Online Services to PowerShell
How to Connect Office 365 Exchange Online Services to PowerShell

The default method for managing Microsoft Office 365 with all included applications is by using a web browser and connecting to the web interface of Office 365 Admin Center and Exchange Admin Center. This standard method has an intuitive graphical interface, but sometimes the capabilities of the graphical user interface are not enough. For example, when you need to perform similar actions with tens or hundreds of user accounts, it is better to use the CLI (command line interface) rather than the GUI (graphical user interface). Moreover, some actions that can be done with Exchange Online cmdlets are not available in the Admin Center.
Microsoft provides PowerShell to manage the products in the command line interface. Many administrators have the habit of managing Microsoft Exchange Server via PowerShell. However, standard commands of the Exchange PowerShell module that work in the local environment with a standalone instance of Microsoft Exchange Server installed on a physical server or a virtual machine cannot be used with Exchange 365 running in the cloud. This is because standard PowerShell commands cannot connect to cloud services such as Azure and Office 365 backup, including Exchange Online. For this reason, you will need to install special PowerShell modules that allow you to connect to Office 365. The details of this process are covered in today’s blog post that explains multiple methods of how to connect to Exchange Online PowerShell and consists of the following parts:
- Requirements
- The Working Principle
- Manual Configuration
- Automated Configuration
- The Alternative Method
NAKIVO Backup & Replication offers improved backup capabilities by adding Microsoft Office 365 backup to its feature set. Start the Free Trial of our product, discover how NAKIVO Backup & Replication works in your environment, and receive an Amazon eGift card for your feedback.
Requirements
There are some requirements that must be met to connect to Exchange Online PowerShell.
- You should use PowerShell on Windows 7 SP1, or newer desktop Windows versions and Windows Server 2008 R2 SP1, or newer server Windows versions. Be aware that you need to install .NET Framework 4.5 or later in addition to installing an updated version of Windows Management Framework 3.0, 4.0, or 5.1.
- An internet connection is required. TCP port 80 must be opened to connect from your local machine to the destination host.
- Access to Exchange Online PowerShell must be enabled for the current user (by default such access is enabled for administrators).
You can manually enable access to connect to Exchange Online PowerShell for the particular user with the command:
Set-User -Identity [email protected] -RemotePowerShellEnabled $true
Working Principle
You can connect to Exchange Online PowerShell, but this process is more complicated than using PowerShell for managing a local Exchange Server. However, you can use the built-in PowerShell console to manage remote cloud infrastructures. In this case, the console is called remote PowerShell or PowerShell Remoting. The process of initiating a remote PowerShell session for Office 365 and Exchange Online is slightly different. You should download and install special components before you can open a remote Office 365 session. Fortunately, the cmdlets required to initiate a remote Exchange Online PowerShell are downloaded automatically when you create a remote PowerShell session. Different sets of PowerShell cmdlets are used to manage Microsoft Office 365 and Microsoft Exchange Online.
The main reasoning behind connecting to Microsoft Exchange Online in PowerShell entails the following:
- Creating a remote session to Exchange Online in PowerShell opened on your local machine.
- Providing connection settings, passing authentication.
- Importing PowerShell cmdlets that are needed to manage Exchange Online remotely.
In today’s blog post, we will run PowerShell cmdlets on Windows 10.
Manual Configuration
Let’s review the manual method first, to understand the configuration principle better.
- Open Windows PowerShell. You can do this with at least two methods.
- Click Start, type cmd, right click the Command Prompt item and select Run as Administrator in the context menu.
- Go to Start > Windows PowerShell. Right click Windows PowerShell, and hit Run as Administrator to make sure that you can run PowerShell commands without restrictions.
- Enable running scripts (it is better to run this command in the beginning of preparing PowerShell to manage Exchange Online and Office 365), otherwise you will get the error in future when running the Import-PSSession command:
Import-PSSession : Files cannot be loaded since running scripts has been disabled on this system. Provide a valid certificate with which to sign the files. - In order to execute scripts, the execution policy must be set to RemoteSigned.
Set-ExecutionPolicy RemoteSigned - Press Y to confirm changing the policy if prompted. You can also use the Set-ExecutionPolicy Unrestricted command to use the Unrestricted policy. By default, the execution policy mode is Restricted.
- Run the command in PowerShell to get credentials and enter your administrator login/password in the popup window to access Exchange Online. The user must have global administrative permissions in Office 365.
$Credential=Get-CredentialThe entered credentials will be saved in the variable and used in the next command as $Credential. - You have to create a remote PowerShell session with the New-PSSession cmdlet and running the following command:
$Session = New-PSSession -ConfigurationName Microsoft.Exchange -ConnectionUri https://outlook.office365.com/powershell-liveid/ -Credential $Credential -Authentication Basic -AllowRedirectionNotice that in this command, the target URL of the Exchange Online server running in the cloud that must accept the request is set. After running the command, Microsoft Office 365 cloud servers will provide you access to the appropriate Exchange Online virtual server associated with your account.
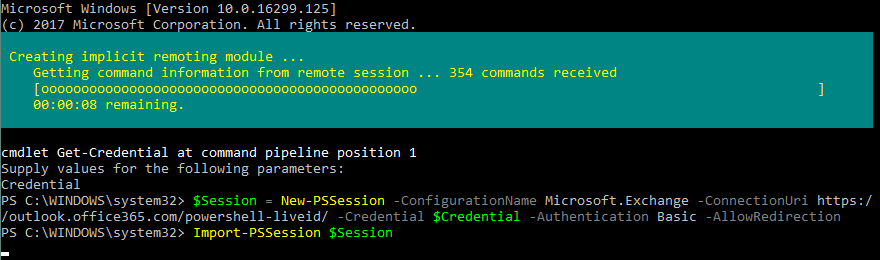
- Exchange Online PowerShell cmdlets must be imported to the current session with the command:
Import-PSSession $Session - You can see the progress bar while receiving the commands.
- After successfully running the command, you will see the following message.Note: If you use the MFA for your account, the standard cmdlets explained above will not work. If you want to connect Exchange Online in PowerShell using MFA, run the following command:
Connect-EXOPSSession -UserPrincipalName YOUR_UPN
Where YOUR_UPN (user principle name) is the name of the Office 365 account you are using.You may need to install Microsoft’s Exchange Online Remote PowerShell Module. Be aware that when using this module, the session ends after one hour, which may be inconvenient for running long scripts. Consider using Trusted IP addresses (i.e. the IP addresses of your organization) to bypass MFA when connecting from the network of your company to Exchange Online PowerShell.
MFA (Multi-Factor-Authentication) is the advanced method of authentication that adds a second layer of security. After entering a password, the confirmation code is sent to the user’s cell phone and the user must enter the confirmation code to verify the account to get access to Office 365 cloud services.
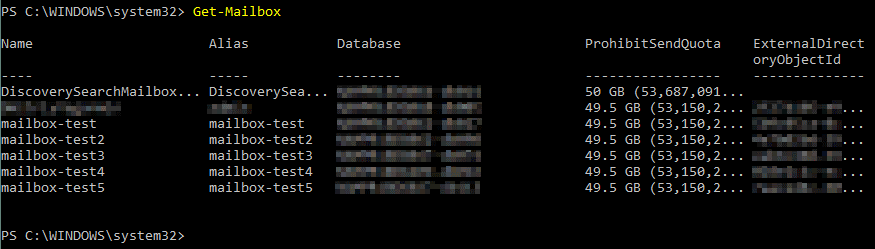
- Once you have connected to Office 365 and Exchange Online, you can manage your Office 365 cloud environment. Let’s verify that we have connected to Exchange Online correctly and list the mailboxes of users, for example.
Get-MailboxYou can list all cmdlets available for Exchange Online PowerShell with the following command:
Get-Command -Module tmp*
The names of Exchange Online PowerShell cmdlets are not converted. - When you end your work with Exchange 365, disconnect the session. This is the recommended practice.
Remove-PSSession $SessionUnfortunately, no messages are displayed after executing this command. You can check whether the session is disconnected by running the Get-MailBox command. If the session is disconnected, you will get the error explaining that you cannot run Exchange Online cmdlets after disconnecting.
Why should you disconnect the session? Well, simply because the number of active concurrent sessions that can be opened simultaneously is limited to three. If you open three Exchange Online PowerShell sessions at once and don’t disconnect any of them when not in use, you will need to wait until one of these sessions expires before you can connect to Exchange Online PowerShell again from a new PowerShell console.
Automated Configuration
Now that you know the principle of how to connect to Exchange Online PowerShell manually, you can use the automated method. The advantage of this method is the lower number of commands you should enter.
- Download the script from the Microsoft’s web site. The name of the script file is ConnectExchangeOnlinePowerShell.ps1 in this case.
- Go to the directory where the script is located; in our example, the script is saved to C:\temp_win\.
- Before running the script, edit the script execution policy (similarly to what is shown in the first method), otherwise you will get the error:
The file C:\temp_win\ConnectExchangeOnlinePowerShell.ps1 is not digitally signed. You cannot run this script on the current system.
You can apply the Bypass execution policy to avoid this issue:
Set-ExecutionPolicy -Scope Process -ExecutionPolicy Bypass - Type Y to confirm the execution policy change.
- After that, you can run the script. If you don’t use MFA, run the script without additional arguments:
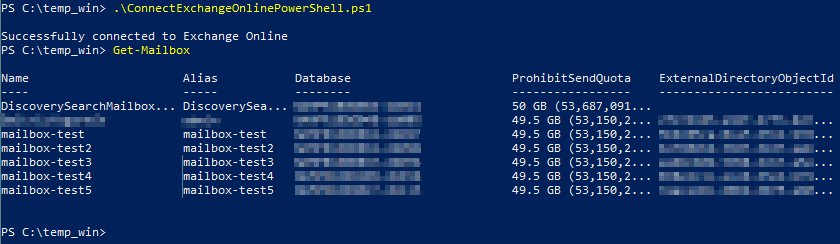
.\ConnectExchangeOnlinePowerShell.ps1
If MFA (Multi-Factor Authentication) is used in your Office 365 environment, try the command:
.\ConnectExchangeOnlinePowerShell.ps1 -MFA - Now that you have successfully connected to Exchange Online, you can manage your user accounts, their mailboxes, etc. For example, you can list the mailboxes of your users:
Get-Mailbox
This script can be used to schedule and automate tasks. For example, you can connect to Exchange Online without entering credentials in the interactive window as shown above. You can enter your login and password in the command line as command options when executing the script:
./ConnectExchangeOnlinePowerShell.ps1 -UserName admin@your_domain.com -Password your_password
Keep in mind that entering passwords as plain text in the command line may be not secure. - When you finish to work with Exchange Online in PowerShell, don’t forget to end the session:
./ConnectExchangeOnlinePowerShell.ps1 -Disconnect
Alternative Method
Let’s consider one more method that can be used to connect to Exchange Online PowerShell. This method can be considered as a modification of the first method.
1. Create a new profile for PowerShell with the function:
New-item -type file -force $profile
2. Edit the profile configuration file in the text editor to add the function titled Connect-EXOnline:
notepad $profile
3. Add the following content to the PowerShell profile configuration file and change [email protected] to your account name, then save the text file.
Function Connect-EXOnline
{
$credentials = Get-Credential -Credential [email protected]
Write-Output "Getting the Exchange Online cmdlets"
$Session = New-PSSession -ConnectionUri https://outlook.office365.com/powershell-liveid/ `
-ConfigurationName Microsoft.Exchange -Credential $credentials `
-Authentication Basic -AllowRedirection
Import-PSSession $Session
}
4. Close the current PowerShell window and open a new PowerShell window as Administrator. Run the command to connect to Exchange Online PowerShell:
Connect-ExOnline
Enter your password in the popup window.
5. When you have finished working with Exchange Online PowerShell, end the session with the command:
Get-PSSession | Remove-PSSession
Conclusion
Exchange Online PowerShell is a nice alternative to the Exchange Admin Center web interface. With Office 365 PowerShell and Exchange Online PowerShell, you can perform bulk operations and actions with multiple objects by using a single command or script. Today’s blog post has covered how to connect to Exchange Online PowerShell by using three methods, one of which is automated. The working principle of each method is similar and consists of three main steps: create a remote PowerShell session, authenticate, and import Exchange Online PowerShell cmdlets.
An important recommendation is that you disconnect the remote PowerShell session when you finish working with Exchange Online PowerShell to avoid a situation when all sessions are busy and opening a new remote Exchange Online PowerShell session is not possible. Having Exchange Server in the cloud is a reliable solution, but even in this case, it is recommended that you make a backup of your Exchange server to protect your data against incidental deletion and other disasters. Read the blog post about the 3-2-1 backup rule and other blog posts about data protection options that NAKIVO Backup & Replication has to offer to learn more.
Recommend
About Joyk
Aggregate valuable and interesting links.
Joyk means Joy of geeK