

Splash Screen Tutorial for Android [FREE]
source link: https://www.raywenderlich.com/32555180-splash-screen-tutorial-for-android
Go to the source link to view the article. You can view the picture content, updated content and better typesetting reading experience. If the link is broken, please click the button below to view the snapshot at that time.

Splash Screen Tutorial for Android
Learn how to implement splash screen in new and existing Android apps, using the SplashScreen API introduced in Android 12.
Version

Open any app from the launcher on your Android device and you’re likely to see a splash screen — a simple full-screen layout, usually displaying the app logo on a plain background. The display ends soon after the app has loaded.
Android 12 introduced splash screens as default behavior along with the SplashScreen API for developers to customize as needed. Splash screens aren’t a new concept — many apps had their own splash implementation. This tutorial will help you handle the splash screen in legacy and new projects.
In this tutorial, you’ll learn:
- The purpose of the splash screen.
- How to migrate legacy splash screen implementations.
- How to customize the default splash screen in Android 12.
Getting Started
Start by downloading the starter project, using the Download Materials button at the top or bottom of this tutorial.
Open the project in Android Studio Bumblebee or later and get familiar with the files. The app – ColorSplash contains one screen showcasing Material Design-recommended color palettes. This tutorial covers adding your first splash screen and migrating a legacy implementation.
If you’re not interested in migrating an old implementation of a splash screen, ignore the TODO comments labeled: // TODO: (Legacy Migration) and the file LegacySplashActivity.kt.
Choosing the Target SDK Version
Android 12 introduced the SplashScreen API. The targetSdkVersion must be set to at least 31 in build.gradle. However, even if you start a project from scratch, it is always recommended to provide back support for a few previous versions when picking your app’s minimum SDK version. You should base this on the number of users running each Android version in your target demographic. You want to enable as many users as possible. Luckily, the AndroidX SplashScreen compat library supports backward compatibility. For this sample project, the minSdkVersion is set to 29 (Android 10).
Setting Up the Emulators
Regardless of whether you choose to use and implement the SplashScreen API, the default behavior changed with Android 12. To comprehend the changes, run the sample project across two versions of Android to see each version’s behavior. Don’t worry, you don’t need to buy a second phone! Instead, set up two emulators, each running a different API version.
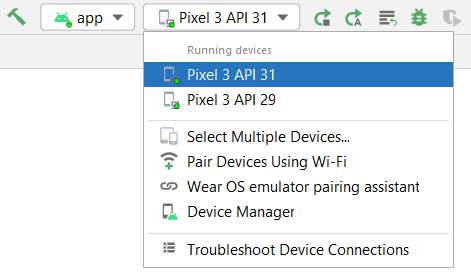
Set up two emulators from which to test the splash screen behavior. For example, set up two Pixel 3 emulators running API 29 (Android 10) and API 31 (Android 12). It doesn’t matter which devices you choose as long as you have Android versions 10 and 12 covered.
Testing the Default Behavior
It’s time to see the splash in action! Use the drop-down at the top of the screen to select the emulator you launch the app on.
Pre-Android 12 Splash Behavior
First, build and run on API 29, force close, and reopen from the launcher.
Android 10 doesn’t have a default splash implementation. A blank screen shows when the app starts. Improving users’ experience and reducing the feeling of delay is one of the reasons developers added their splash screen implementation.
Default Android 12 Splash Behavior
In Android Studio, change your target emulator to API 31. Build and run the app, force close and reopen from the launcher. As the app starts, you’ll see the default splash screen: the app logo centered on a screen colored to match windowBackground from your app theme.
If you don’t have any legacy code and you don’t need further customization, you don’t need to do anything else. Users will see the default splash from Android 12 onward automatically. However, even without additional customization, implementing the SplashScreen compat library can help improve the experience for users on older versions. Read on to find out why splash screens are important.

Splash Screens
App Startup States
To understand why splash screens are essential, you need to understand the various app startup states. Users launch Apps in many ways: first-time open from a fresh install, quickly switching between Recents or from the main launcher for the first time in days. Your app needs to handle all these scenarios.
Your app will launch from one of the following states:
- Cold start: Any time your app is freshly launched, including the first launch after installation or device restart, it’s considered a cold start. The system also kills apps in the background to free memory. If your app hasn’t been used for a while or the device is low on memory, then even if your app has previously been open, the system might still treat it as a cold start. Launching from that state takes the longest because the system has to create the app process and load in the app. This is a perfect use case for showing a splash screen that gives the impression of a shorter delay while giving you the opportunity to get creative with your branding.
- Warm start: Your app can be in various states of retainment as the system starts to release memory. That creates a warm start: The system does not need to initialize everything but has lost some information and needs to reload it. For example, the app process might still be running, but the activity requires re-creation to display. That doesn’t take as long as a cold start, but it’s often long enough to warrant a splash screen.
- Hot start: If the system has the app process and layout information in memory, it doesn’t need to re-initialize anything and can bring the app back to the foreground. This is a hot start and it’s quick, leaving no time for a splash screen.
Splash Screens Over the Years
Splash screens were once viewed as an anti-pattern. They were often misused as a heavy-handed approach to embedding branding into apps, intentionally delaying users from reaching the content for a few seconds. But as Android evolved and app requirements grew, the time taken to launch apps began to increase. The Material Design guidelines started recommending a launch screen instead of the blank loading screen. Developers had a couple of ways to add the splash, but neither requirements nor libraries existed to aid with consistency across codebases.
Fast forward to Android 12, which added the SplashScreen API. From Android 12 onward, all apps show a default splash screen, and developers can customize it according to their requirements.
Creating a Simple Splash Screen
The SplashScreen API makes it easier to update existing splash implementations. Before you migrate, learn how the new splash screen is built.
Adding the Dependency
Add the SplashScreen API as a dependency to your project, using the compat library that wraps the API and provides back support for older versions of Android.
In the starter project, open build.gradle file present in the app module. In the dependencies block, replace the TODO with:
implementation 'androidx.core:core-splashscreen:1.0.0-beta01'
Changing build.gradle requires a project sync. Press the Sync Now button in the banner at the top of the file.

Customizable Elements
Splash screens have an icon and background you can customize. Android 12 takes those from the app icon. Even if you’re happy with the default behavior, defining it explicitly means it can be backported to older versions.

Adding the Adaptive Icon
The icon can be any vector drawable, but should be recognizable and distinct to your app. This is an opportunity to strengthen your brand connection with users. The icon needs to follow the same rules as the Adaptive Icon (introduced in Android 8) and fit within a circle, otherwise you risk the corners of your icon being cropped.
In the starter project, open styles.xml. Replace the TODO with:
<style name="Theme.App.Starting" parent="Theme.SplashScreen">
</style>
This creates a style that will define your splash screen. It needs to have the parent Theme.SplashScreen to inherit the common splash screen attributes from the library.
Inside your new style block, add:
<item name="windowSplashScreenAnimatedIcon">@drawable/ic_launcher_foreground</item>
<item name="postSplashScreenTheme">@style/AppTheme</item>
Here, you define the icon attribute as the app icon. Despite the name, windowSplashScreenAnimatedIcon replaces the icon in the center of the screen and doesn’t need to be animated. Android 12 supports animated icons, which will be covered later in this tutorial.
The attribute postSplashScreenTheme sets the theme that applies after the splash screen has dismissed. This is also the theme set in the launcher activity in AndroidManifest.xml.
Changing the Background
The splash screen is full screen with a single color background. Inside your style block, add:
<item name="windowSplashScreenBackground">@color/ic_launcher_background</item>
Here you set the background color from your app icon, but this can be any color you want. Your styles.xml should look like this:

Setting the Style
Now you have created the style for your splash screen, you need to tell your app to use it. Open AndroidManifest.xml to where MainActivity is declared. Inside the declaration, add:
android:theme="@style/Theme.App.Starting"
It should look like this:
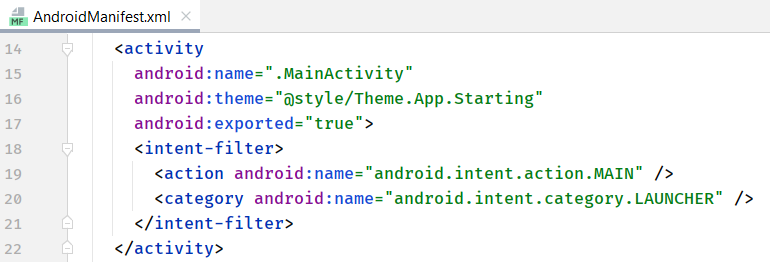
This sets your splash screen theme as the theme for the MainActivity, which is the launching activity for this app.
Installing the Splash Screen
Install the splash screen in the launching activity. Open MainActivity.kt and add the import:
import androidx.core.splashscreen.SplashScreen.Companion.installSplashScreen
In onCreate(), replace TODO: Install Splash Screen with:
val splashScreen = installSplashScreen()
This calls the installSplashScreen(), imported from the SplashScreen compat library. It handles the splash screen transition and returns an instance of the splash screen. This is assigned to a val to use later for added customization. It’s important you call this function before calling super.onCreate(savedInstanceState).
Your file should look like this:

Build and run the app, first on API 29 then on API 31. Force close then relaunch the app from the launcher. You’ll see the splash screen is now shown consistently on both pre-Android 12 and Android 12.

Adding More Customization
So far, you’ve created a simple splash screen for your app and used the SplashScreen compat library to backport it to earlier versions of Android. However, you can customize the screen in many more ways.
Adding an Icon Background
You can add a background color to the icon. This displays a circle of solid color behind the icon, extending slightly beyond it. This step can increase contrast between the background and icon, or add extra brand colors.
To enable the icon background, your splash theme needs a different parent. Open styles.xml where you declared your splash theme. Replace the parent with:
Theme.SplashScreen.IconBackground
Add the background color as an item in the style:
<item name="windowSplashScreenIconBackgroundColor">@color/yellow6</item>
This adds a yellow circle behind the icon. Use any color here. Build, run and relaunch the app on either emulator. The icon now has a background on the splash screen.

Creating a New Style for Android 12
Android 12 or higher is required for some features of the SplashScreen API. Create a new resource directory with the API 31 qualifier, which tells the system those values apply only when the device runs a valid version of Android.
In Android Studio, right click on the res folder then choose New -> Android Resource Directory.

That move opens the New Resource Directory window. Select version from the list of Available qualifiers and enter 31 as the Platform API level.

Press OK to confirm. You’ll see a new directory appear in the Project panel called values-v31. Any values you want to have accessible on devices running Android 12 or higher only should go in this folder. Right-click the new folder and select New -> Values Resource File to create a styles file.

Call the file styles.xml.

This creates an empty resources file: values-v31/styles.xml. Add a copy of the theme you declared for your splash screen.
<!-- Splash Screen Theme (Android 12+) -->
<style name="Theme.App.Starting" parent="Theme.SplashScreen.IconBackground">
 <item name="windowSplashScreenBackground">@color/ic_launcher_background</item>
 <item name="windowSplashScreenAnimatedIcon">@drawable/ic_launcher_foreground</item>
 <item name="windowSplashScreenIconBackgroundColor">@color/yellow6</item>
 <item name="postSplashScreenTheme">@style/AppTheme</item>
</style>
Two styles called Theme.App.Starting are declared in your codebase. One in values/styles.xml, and the other in values-v31/styles.xml. You have previously set this theme for the MainActivity in the AndroidManifest.xml. When the app is launched, the system will first check which version of Android the device is running, and take the style from values-v31/styles.xml if it applies, before falling back to values/styles.xml if it does not. This is why it’s important that both files use the same name to declare the splash screen theme.
Adding an Animated Icon
Now that you have defined a place for your Android 12 splash screen theme to be set up, let’s customize! The attribute windowSplashScreenAnimatedIcon will show an animated icon on the splash screen, if you supply an animated vector drawable.
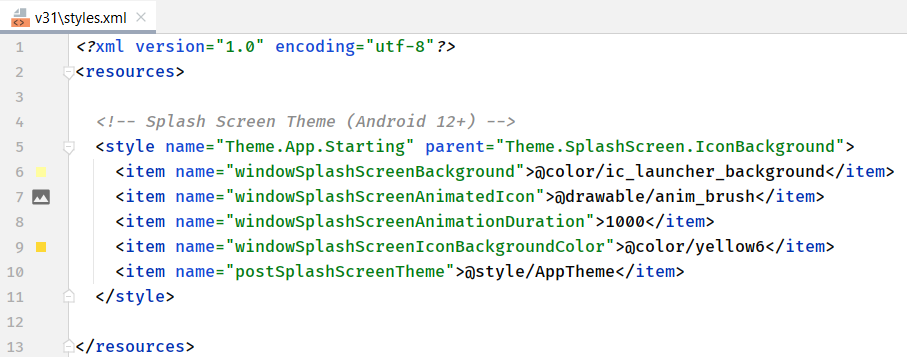
In values-v31/styles.xml, remove the previously declared icon and add:
<item name="windowSplashScreenAnimatedIcon">@drawable/anim_brush</item>
<item name="windowSplashScreenAnimationDuration">1000</item>
This sets the icon to the anim_brush.xml animated vector drawable, an animated color-changing app icon.
When using an animated icon, you need to define its duration. It’s recommended the animation duration shouldn’t be longer than 1,000 milliseconds and should loop if the app startup time exceeds that. You can access the duration for customizations of the exit animation, but that value doesn’t affect how long the splash screen is shown. Your animation might be cut short when the app has loaded. You can prevent that by forcing the splash screen to persist for a set time. Though discouraged, this is possible if required – see how in a minute.
Your values-v31/styles.xml should look like this:
Build and run the app on API 31, force close and relaunch from the launcher. The icon is now animating through colors on the splash screen.
Adding a Branding Image
The official Android documentation recommends against using a branding image. However, the SplashScreen API provides the ability to add a small branding image at the bottom of the screen. This should be a vector drawable centered in a layer-list. If done otherwise, the dimensions appear incorrectly on the screen.
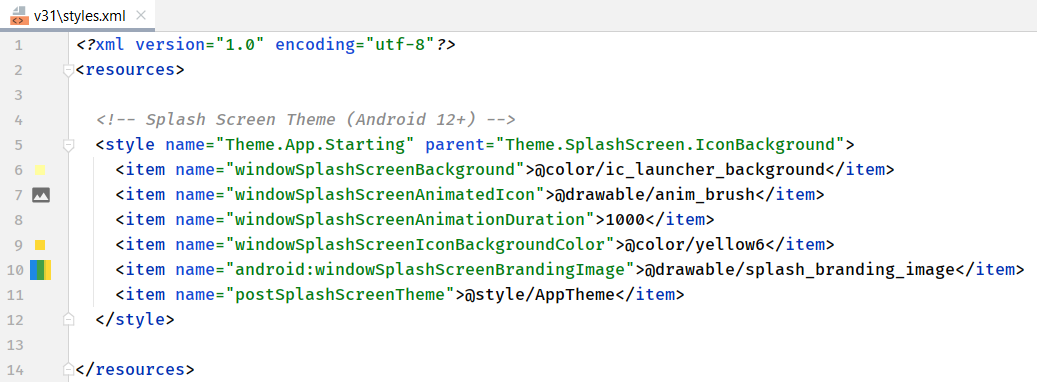
In values-v31/styles.xml, add the following to the splash theme:
<item name="android:windowSplashScreenBrandingImage">@drawable/splash_branding_image</item>
This sets the branding image drawable, which in this case is a color swatch but could be your company logo or similar branding. Your values-v31/styles.xml should look like this:
Build and run the app on API 31, force close, and relaunch from the launcher to see the branding image on the splash screen.

Extending the Duration
Though discouraged, you’ll occasionally want to hold the user on the splash screen before letting them into the app. For example, if you are loading settings or a small amount of data from an initial setup network call, you might need that in place before the user enters the app. To do that, you can delay the app from drawing its first frame, thus delaying the splash screen dismissal.
Open MainActivity.kt. At the top of the file, add the imports:
import androidx.core.splashscreen.SplashScreen
import android.view.View
import android.view.ViewTreeObserver
Uncomment setupSplashScreen() and replace the first TODO with:
val content: View = findViewById(android.R.id.content)
content.viewTreeObserver.addOnPreDrawListener(
   object : ViewTreeObserver.OnPreDrawListener {
     override fun onPreDraw(): Boolean {
       return if (contentHasLoaded) {
         content.viewTreeObserver.removeOnPreDrawListener(this)
         true
       } else false
     }
   }
)
This adds an OnPreDrawListener to the root view. When triggered, if contentHasLoaded is true, it removes itself as a listener and returns true, allowing the app to start drawing its views. If contentHasLoaded is false, the content is not ready so it delays the app from drawing. Here, contentHasLoaded is a local variable set in startLoadingContent() after a three-second delay, representing a network call response.
At the bottom of onCreate(), replace the TODO with:
setupSplashScreen(splashScreen)
This calls setupSplashScreen(), which adds the OnPreDrawListener and supplies splashScreen for the exit animation to use later. Your MainActivity.kt should look like this:

On API 31, build, run, and relaunch the app. Now the app waits for three seconds before dismissing the splash screen after the content has loaded.

Changing the Exit Animation
You can’t change the launch animation, but you can get into the exit animation through the SplashScreen API and customize it.
In MainActivity.kt, add these imports to the top of the file:
import android.animation.ObjectAnimator
import android.view.animation.DecelerateInterpolator
import androidx.core.animation.doOnEnd
doOnEnd is a core animation extension function and is just one of many useful extension functions from Android Jetpack KTX.
Replace the TODO in setupSplashScreen() with:
splashScreen.setOnExitAnimationListener { splashScreenView ->
 val slideBack = ObjectAnimator.ofFloat(
     splashScreenView.view,
     View.TRANSLATION_X,
     0f,
     -splashScreenView.view.width.toFloat()
 ).apply {
   interpolator = DecelerateInterpolator()
   duration = 800L
   doOnEnd { splashScreenView.remove() }
 }

 slideBack.start()
}
That action sets an OnExitAnimationListener on the splash screen instance. Here, the screen will slide off to the left. The DecelerateInterpolator means the animation will start quickly before slowimg down. The duration is 800 milliseconds. The KTX extension function doOnEnd() handles the removal of the splash screen after the animation finishes. Finally, start() starts the animation.
On API 31, build, run and relaunch the app. The splash screen now slides back off the screen.

If you use an animated icon and need it to finish animating before dismissing the splash screen, ensure the exit animation isn’t triggered too early. Within the OnExitAnimationListener you can access the splashScreenView.iconAnimationDuration and splashScreenView.iconAnimationStart values and use them to determine whether enough time has passed since the icon animation has started to allow it to finish. If you don’t check, the splash screen will dismiss when your app is ready, and that might occur before your animation has finished.
Migrating Your Project
Before library support, developers had two main ways to implement splash screens.
The first was to override android:windowBackground in a custom theme. The second was to provide a dedicated activity.

Legacy Method: Overriding android:windowBackground
The most straightforward way to create a simple splash screen was to create a dedicated theme overriding android:windowBackground with a drawable containing branding colors or a bitmap of a logo. The theme was set as an attribute of the launcher activity in AndroidManifest.xml. Then, in the first line of the launcher activity’s onCreate(), the theme would be set back to the main app theme.
It was effective and works as expected on devices running older versions of Android. However, with changes introduced in Android 12, users will be shown the default splash screen on Android 12 and above. Any customization you added previously is ignored and users won’t see it.
To test it, update the starter project. Navigate to styles.xml. You will see the LegacySplashTheme style which overrides android:windowBackground.
Open AndroidManifest.xml and replace the MainActivity theme with:
android:theme="@style/LegacySplashTheme"
This sets the theme of the MainActivity as LegacySplashTheme, which will apply when the app launches. Open MainActivity.kt. In onCreate() comment out:
// val splashScreen = installSplashScreen()
...
// setupSplashScreen(splashScreen)
This comments out the SplashScreen API functions, so you can see the legacy behavior. Uncomment the line at the top of onCreate():
setTheme(R.style.AppTheme)
This sets the theme of the activity to the main AppTheme. This step was needed to set the main theme attributes after the splash screen dismissed.
Now your code has the legacy setup. Build, run and relaunch the app on both emulators to compare them. You’ll see Android 10 displays the old custom splash screen as expected, but Android 12 uses the default icon. The app doesn’t provide a consistent experience across versions, and the more modern devices might be losing additional brand information.

Migrating Away From Overriding android:windowBackground
The steps to update this method are straightforward — by this point in the tutorial, you have already learnt everything you need to know! Recreate your original splash screen in a new theme using the steps described earlier in the tutorial. The SplashScreen API is a little more restrictive in its design, but you can still make major improvements in your app experience by customizing away from the default screen.
In AndroidManifest.xml, set the MainActivity theme back to the new splash style you created earlier:
android:theme="@style/Theme.App.Starting"
Navigate to MainActivity.kt. In onCreate(), uncomment the functions:
val splashScreen = installSplashScreen()
...
setupSplashScreen(splashScreen)
This adds back the plumbing for the SplashScreen API as implemented earlier. Finally, in onCreate(), remove:
// TODO: (Legacy Migration) Remove old app theme
setTheme(R.style.AppTheme)
With the SplashScreen API, the activity no longer needs to manually reset the theme after the splash screen dismisses. This is handled by the postSplashScreenTheme attribute in the new style.
And that’s all there is to it. Now your app displays the customized splash screen on all versions of Android!
Legacy Method: Dedicated Splash Activity
The other common way to add a custom splash screen was to use a dedicated activity. This was often used when the app needed to execute some logic before allowing entry to the app, such as loading settings or processing navigation logic.
If you previously implemented this method, your app probably now has two splash screens on Android 12, as the default splash screen shows before your custom activity. This can look jarring, and it isn’t a good user experience.
Try to migrate from using a separate activity. But, if your app requires it, you can prevent the activity from being shown and hold the user on the default splash until the app is ready.
Before you start, update the starter project. Open AndroidManifest.xml. Find the TODO in the LegacySplashActivity block, and uncomment:
<intent-filter>
 <action android:name="android.intent.action.MAIN" />
 <category android:name="android.intent.category.LAUNCHER" />
</intent-filter>
Find the same intent-filter block in the MainActivity and remove it. These changes mean the LegacySplashActivity is now the launching activity.
On both emulators, build, run and relaunch the app. You’ll see Android 10 shows the legacy splash screen until the app is ready. Android 12, however, shows the new default splash screen before the legacy screen, resulting in two splash screens.

Adapting the Dedicated Splash Activity
You can keep your dedicated activity and avoid having two splash screens by implementing the SplashScreen API. In LegacySplashActivity.kt, add the following to the top of onCreate():
val splashScreen = installSplashScreen()
Then replace the remaining TODO:
splashScreen.setKeepOnScreenCondition { true }
This installs the splash screen, then uses setKeepOnScreenCondition to prevent it from dismissing. The launching activity never renders on the screen, and the splash displays until the next activity is ready, providing a smooth transition into the app.
Your LegacySplashActivity.kt should look like this:

Build and run on API 31 and relaunch. This time, only the default splash is shown. It overrides the legacy theme because the LegacySplashTheme doesn’t have the SplashScreen API parent. Updating your customized splash theme to use the SplashScreen API parent will allow it to show.
onCreate() of the Application class, which on the contrary, in case of dedicated splash screen activity, gets rendered after the execution of Application’s onCreate(), during the Activity’s onCreate().
Where to Go From Here?
Download the final project by clicking Download Materials at the top or bottom of this tutorial.

You’ve learned splash screen is a critical aspect of the user experience on modern devices and how to use the SplashScreen API to provide a smooth experience for users. Test your existing projects to ensure they’re compatible with Android 12. You can follow the migration steps above to add support in older projects.
Once your splash screen works across all Android versions, experiment further with extra customizations. Try various exit animations or adding sparkle to your icon.
Interested in more Android 12 updates? Check out the RenderEffect API.
If you have any comments or questions, join the forum discussion below.
raywenderlich.com Weekly
The raywenderlich.com newsletter is the easiest way to stay up-to-date on everything you need to know as a mobile developer.
Get a weekly digest of our tutorials and courses, and receive a free in-depth email course as a bonus!
Recommend
About Joyk
Aggregate valuable and interesting links.
Joyk means Joy of geeK