

测试开发【Mock平台】04实战:前后端项目初始化与登录鉴权实现 - MrZ大奇
source link: https://www.cnblogs.com/mrzcode/p/16109594.html
Go to the source link to view the article. You can view the picture content, updated content and better typesetting reading experience. If the link is broken, please click the button below to view the snapshot at that time.


【Mock平台】为系列测试开发教程,从0到1编码带你一步步使用Spring Boot 和 Antd React
框架完成搭建一个测试工具平台,希望作为一个实战项目能为你的测试开发学习有帮助。
一、后端SpringBoot
参考之前《Mock平台2-Java Spring Boot框架基础知识》分享来创建后端的服务,实际上QMock服务会涉及到两个服务,一个是供前端页面用的API服务,另一个是mock请求响应服务即可叫其网关,为了统一管理代码又不都耦合到一块,本项目通过IDE先创建一个普通的JAVA项目叫 QMockService,然后再其项目中创建两个**Module Springboot **项目,服务名分别为:
- qmock-service-api
- qmock-servcie-gateway
由于第二个代理网关服务暂时用不到,所以你也可以只单独创建一个service-api项目用于实践学习。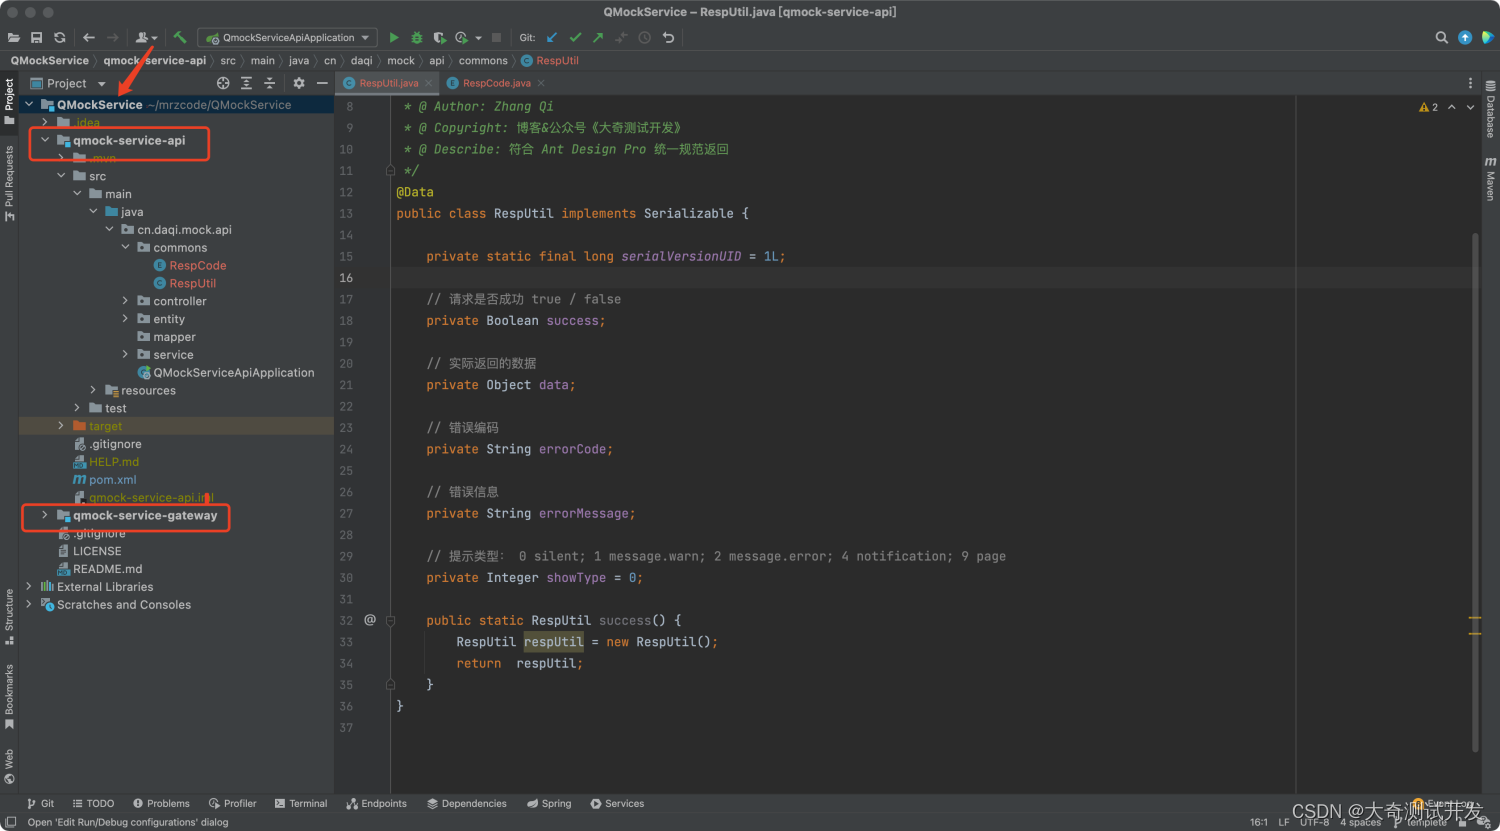
API服务架构
通常一个项目都会有约定俗成的模式来规范开发,由于对于JAVA的模式太多,我这里只提供基于MVC模式扩展的我常用结构供参考, 详见qmock-service-api左侧在 main.java包下子目录。
java
|- cn.daqi.mock.api  # 代码包
   |- commmons       # 通用或工具类
   |- controller     # 接口请求入口
   |- entity         # 数据表实体类
      |- request     # 接口请求实体
   |- mapper         # 数据操作接口类
   |- service        # 服务接口类
      |- impl        # 服务接口实现类
resources
|- mapper            # Mybatis XML方式数据操作文件
|- application.yml   # 项目配置采用yml方式
由于笔者的职业不是后端开发,对于代码架构和模式等,没有过度的实战经验,如果想对各种模式有更多的了解推荐阅读之前转载过美团技术的一篇文章,如果想更深入的了解建议买本架构、代码之道之类的书进行系统学习。
Spring项目之前讲过有很多插件帮助其快速的开发,QMock项目本篇实现还依赖依赖以下几个项目,请在**pom.xml** 进行添加并刷新安装依赖,具体的使用和对比后在后边具体功能实现中逐渐讲解。
<!-- mysql链接驱动 -->
<dependency>
  <groupId>mysql</groupId>
  <artifactId>mysql-connector-java</artifactId>
</dependency>

<!-- MyBatis 一款优秀的数据库持久层操作框架 -->
<dependency>
  <groupId>org.mybatis.spring.boot</groupId>
  <artifactId>mybatis-spring-boot-starter</artifactId>
  <version>2.2.0</version>
</dependency>

<!-- 帮助简化Bean getter/setter等实现的插件 -->
<dependency>
  <groupId>org.projectlombok</groupId>
  <artifactId>lombok</artifactId>
  <optional>true</optional>
</dependency>

<!-- JSON操作类库 -->
<dependency>
  <groupId>com.alibaba</groupId>
  <artifactId>fastjson</artifactId>
  <version>1.2.79</version>
</dependency>
Api服务一般都会有公司或项目内部约定好的模版统一返回方便联调开发,QMock项目就直接参考Antd pro一个官方建议来实现,省得做一些额外的自定义配置转换。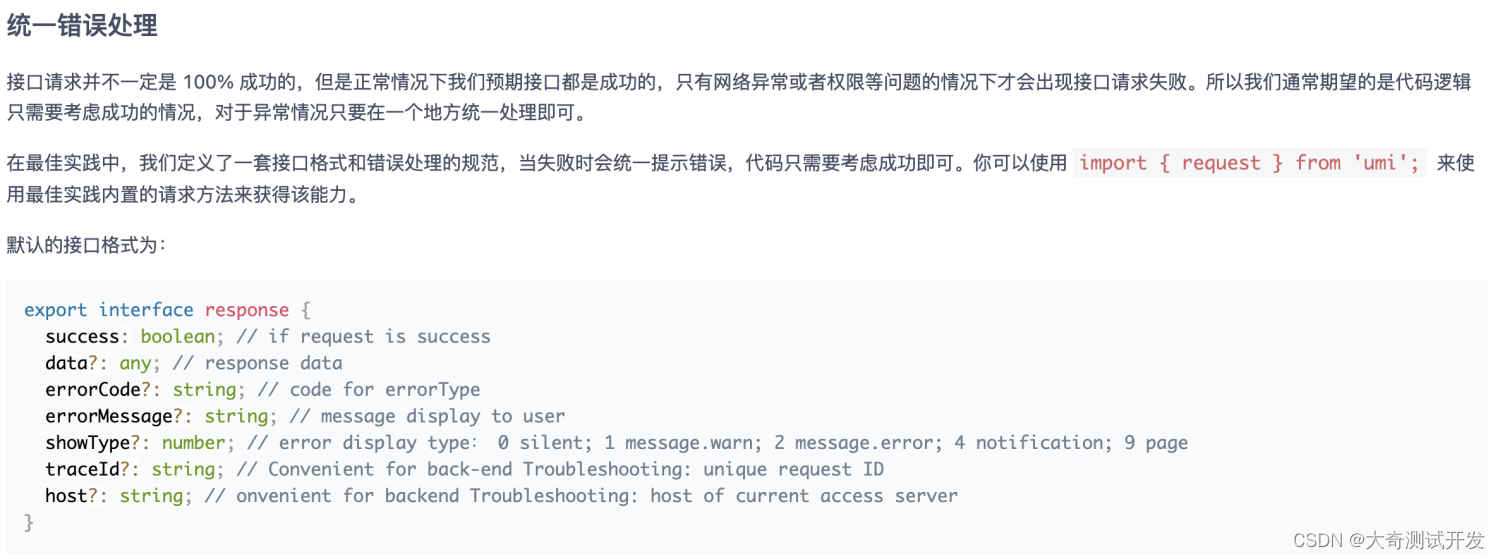
所以在commons下创建了统一返回类和一个枚举类,实现上述统一返回。
1.enum RespCode
public enum RespCode {

    /**
     * 默认成功和系统状态
     * 提示类型: 0 静默silent; 1 警告message.warn; 2 错误message.error; 4 消息notification; 9 跳转page
     * */
    SUCCESS(true, 2000, "成功", 0),
    SYSTEM_ERROR(false, 5000, "系统繁忙,请稍后重试", 2),

    /* 参数错误 1001~1999 */
    PARAMS_WARNING(false, 1001, "参数缺失或为空", 2),

    /* 用户错误 2001~2999 */
    USER_AUTHORITY_FAILURE(false, 2001, "用户名或密码错误", 2);

    /* 其他错误 3001~3999 */

    private Boolean success;
    private Integer errorCode;
    private String errorMessage;
    private Integer showType;

    RespCode (Boolean success, Integer errorCode, String errorMessage, Integer showType) {
        this.success = success;
        this.errorCode = errorCode;
        this.errorMessage = errorMessage;
        this.showType = showType;
    }

    public Boolean success() {
        return this.success;
    }

    public Integer errorCode() {
        return this.errorCode;
    }

    public String errorMessage() {
        return this.errorMessage;
    }

    public Integer showType() {
        return this.showType;
    }
}
2.class RespResult
@Data
public class RespResult implements Serializable {

    private static final long serialVersionUID = 1L;

    // 请求是否成功 true / false
    private Boolean success;

    // 实际返回的数据
    private Object data;

    // 错误编码
    private Integer errorCode;

    // 错误信息
    private String errorMessage;

    // 提示类型: 0 silent; 1 message.warn; 2 message.error; 4 notification; 9 page
    private Integer showType = 0;

    // 枚举通用赋值方法
    public void setResultCode(RespCode respCode){
        this.success = respCode.success();
        this.errorCode = respCode.errorCode();
        this.errorMessage = respCode.errorMessage();
        this.showType = respCode.showType();
    }

    // 默认响应成功
    public static RespResult success() {
        RespResult respResult = new RespResult();
        respResult.setResultCode(RespCode.SUCCESS);
        return respResult;
    }

    // 带返回data响应成功
    public static RespResult success(Object data) {
        RespResult respResult = new RespResult();
        respResult.setResultCode(RespCode.SUCCESS);
        respResult.setData(data);
        return respResult;
    }

    // 根据RespCode枚举失败返回
    public static RespResult failure(RespCode respCode){
        RespResult respResult = new RespResult();
        respResult.setResultCode(respCode);
        return respResult;
    }
}
这小结最后简单画个流转图了解下后端SpringBoot实现API服务过程,具体例子将在最后登录功能中实践。
二、前端Antd pro
使用 uim 创建 ant-desgin-pro 脚手架,具体的模版已经在《Mock平台3-初识Antd React 开箱即用中台前端框架》讲过不再赘述。
这里直接给出我的QMockWeb项目创建过程,其中如果你TypeScript比较熟悉,从体验的各方面还是比较推荐的,由于笔者不熟也为了降低门槛本Mock项目继续采用JavaScript,另外源代码项目已上传到了GitHub上,也可直接Fork使用。
Tips:不要忘记执行命令 npm run start 电脑上运行看下项目是否正常运行。
虽然用的是simple模版,但有些内容对于项目可能是用不到的,以及一些基础信息需变更,才能打造一个属于自己的项目,对于Mock平台包含但不限于如下变更。
国际化多语言
默认的脚手架中有八种多语言,Mock项目只需要保留简体中文zh-CN和英文en-US作为后续的多语言使用演示使用,多余的去除方法很简单直接删除位于** src/locales/* 下对应的文件夹和js即可。另外一点是可以在config/config.js** 中配置默认语言,如果想删除 pro 自带的全球化,可以通过 npm run i18n-remove 命令彻底移除。
页头尾和加载
项目中还涉及到默认ICON、标题以及一些声明需要改造,这些可以通过 Find in Files 进行关键词进行更改,这里我直接罗列给出,自行按需进行修改。
标题和Logo
在脚手架项目中实际中通过 config\defaultSettings.ts 来控制标题和 Logo,本项暂时没logo所以直接赋值为False不显示。
const Settings = {
  ...
  colorWeak: false,
-  // title: 'Ant Design Pro',
+  title: 'QMock',
  pwa: false,
  // logo: 'https://gw.alipayobjects.com/zos/rmsportal/KDpgvguMpGfqaHPjicRK.svg',
-  logo: false,
+  iconfontUrl: '',
};
export default Settings;
项目中还有一个在 js 还没加载成功,但是 html 已经加载成功的 landing 页面。这个页面的配置存在于 src\pages\document.ejs 文件。其中涉及到的项目图表引用位于**/public/***目录下,其他文案、在线静态资源可根据项目情况配置,QMock修改的效果可通过源码运行查看。
页面布局底角会有个声明之类的,项目中也需要改下此文件位于 src/components/Footer/index.jsx 公共组件中,因为上边保留了国际化功能,所以还需要在en-US.js和zh-CN.js修改 app.copyright.produced 的值。
登录页和菜单
页面登录窗口也涉及到如手机登录Tab、更多登录、标题、副标题等暂时不需要,这些更改的地方位于src/pages/user/Login/index.jsx 和国际化各语言文件夹下 pages.js ,这部分暂时注释掉为了方便后边实现统一登录的例子时候再用到。
最后精简优化的部分就是菜单了,对应动态菜单需要修改 config/rotues.js 具体配置后边在新增页面的时候再单独讲解,另外还有菜单底部还有内部链接,其实是集成了一个文档工具(https://d.umijs.org/zh-CN),在开发环境下会展示,主要方便使用文档相关的记录,相当于一个内部Wiki,个人觉得还比较有用,QMock后边的一些相关说明信息也打算放在这里。
经过精简优化后看下最终效果
三、登录功能实现
上边说了很多基础配置相关的,接下来个实战打通前后端服务,实现登录功能。
说明:以下实现主要照着做即可,不用勉强看懂每个实现,后续的分享具体应用到会逐一的讲,如果太过在意会打击学习的积极性,当然如果后边没有讲到或者不够清晰也欢迎加互相探讨。
用户表创建
数据库使用的是Mysql5.7+版本,本项目创建名为qmock的数据库,并创建一个users的用户表,同时添加两条数据,SQL语句如下:
SET NAMES utf8mb4;
SET FOREIGN_KEY_CHECKS = 0;

-- ----------------------------
-- Table structure for users
-- ----------------------------
DROP TABLE IF EXISTS `users`;
CREATE TABLE `users` (
  `id` int NOT NULL AUTO_INCREMENT,
  `name` varchar(32) DEFAULT '',
  `password` varchar(50) DEFAULT '',
  `access` varchar(20) DEFAULT 'gust',
  PRIMARY KEY (`id`)
) ENGINE=InnoDB AUTO_INCREMENT=3 DEFAULT CHARSET=utf8mb4 COLLATE=utf8mb4_0900_ai_ci;

-- ----------------------------
-- Records of users
-- ----------------------------
BEGIN;
INSERT INTO `users` VALUES (1, 'admin', 'admin', 'admin');
INSERT INTO `users` VALUES (2, 'user', 'user', 'user');
COMMIT;

SET FOREIGN_KEY_CHECKS = 1;
还记得一开始我们添加一些依赖吗?如果要实现Mybtis的数据库操作还需要在application.yml 增加一些配置。
server:
port: 8081 # 服务启动端口

# 数据库链接信息
spring:
datasource:
url: jdbc:mysql://127.0.0.1:3306/qmock
username: mrzcode
password: mrzcode
driver-class-name: com.mysql.jdbc.Driver

# Mybatis基本配置
mybatis:
type-aliases-package: cn.daqi.mock.api.entity # 指定实体类所在包
mapper-locations: classpath:mapper/*.xml # 指定mapper xml 所在位置
configuration:
    map-underscore-to-camel-case: true  # 数据库表字段自动转驼峰命名 如:user_name -> userName
抓取 Antd pro登录时候请求mock接口的路径和参数
curl 'http://localhost:8000/api/login/account' \
  --data-raw '{"username":"admin","password":"admin","autoLogin":true,"type":"account"}'
根据此文开头给出的API请求流程图实现每一个对应的类,这里从里层往外层逐步给出代码
(一)根据用户名和密码匹配查询 注解为 @Mapper
package cn.daqi.mock.api.mapper;

import org.apache.ibatis.annotations.*;

@Mapper
public interface LoginMapper {

    @Select("SELECT count(*) FROM users WHERE name=#{name} and `password`=#{password}")
    Integer userLogin(@Param("name") String name, @Param("password") String password);
}
(二)定义请求参数 LoginRequest.java 请求参数类 lombok @Data 注解,其中SQL只判断是否查询到用户,所以暂时用不到 LoginEntity.java 这里便不罗列了。
package cn.daqi.mock.api.entity.requests;

import lombok.Data;

@Data
public class LoginRequest {
    private String username;
    private String password;
}
(三)登录服务Interface和class实现类
package cn.daqi.mock.api.service;
// ...省略import,自动添加或详细看源代码
public interface LoginService {
    RespResult accountLogin(LoginRequest req);
}
注解@Service 放在实现类上
package cn.daqi.mock.api.service.impl;
// ...省略import,自动添加或详细看源代码
@Service
public class LoginImpl implements LoginService {

    @Autowired
    LoginMapper loginMapper;

    @Override
    public RespResult accountLogin(LoginRequest req) {
        Integer count= loginMapper.userLogin(req.getUsername(), req.getPassword());
        if (count > 0) {
            return RespResult.success();
        } else {
            return RespResult.failure(RespCode.USER_AUTHORITY_FAILURE);
        }
    }
}
(四)登录API实现类 注解说明
- @RestController 声明为控制器(= @Controller + @ResponseBody)
- @RequestMapping 定义跟路径
- @PostMapping 定义POST请求方法和子路径
package cn.daqi.mock.api.controller;

import cn.daqi.mock.api.commons.RespResult;
import cn.daqi.mock.api.entity.requests.LoginRequest;
import cn.daqi.mock.api.service.LoginService;
import org.springframework.beans.factory.annotation.Autowired;
import org.springframework.web.bind.annotation.PostMapping;
import org.springframework.web.bind.annotation.RequestBody;
import org.springframework.web.bind.annotation.RequestMapping;
import org.springframework.web.bind.annotation.RestController;

/**
 * @ Author: Zhang Qi
 * @ Copyright: 博客&公众号《大奇测试开发》
 * @ Describe: 登录接口API
 */
@RestController
@RequestMapping(value = "/api/login")
public class LoginController {

    @Autowired
    LoginService loginService;

    /**
     * 登录验证接口
     * @param req Post请求body参数体
     * @return JSON统一格式体
     */
    @PostMapping(value = "/account")
    public RespResult login(@RequestBody LoginRequest req){
        return loginService.accountLogin(req);
    }
}
(五)接口测试
运行服务分别用存在和不匹配用户密码进行下接口请求测试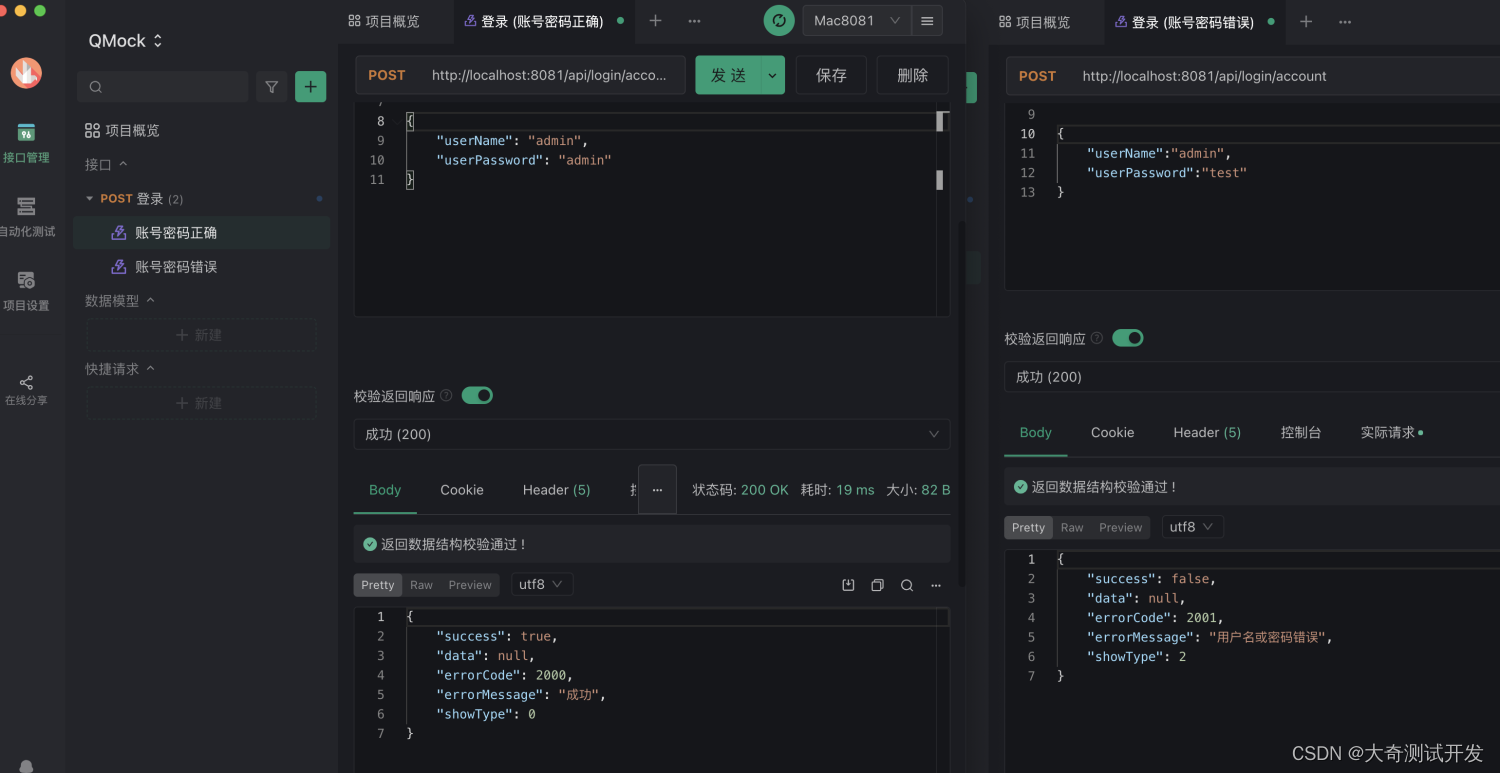
完成了后端的用户鉴权接口,现在来改造下前端的登录,使其此接口从mock请求切换到真正的后端请求,涉及以下几个处。
(一) 代理转发 同上个vue系列一样,前后端的分离项目为了解决跨域的问题都需要配置下proxy,项目使其转发指向本地的qmock-service-api后端服务,修改的文件为 config/proxy.js
dev: {
    // localhost:8000/api/** -> https://preview.pro.ant.design/api/**
    '/api/': {
      // 要代理的地址
+      target: 'http://localhost:8081',
-     // target: 'https://preview.pro.ant.design',
      // 配置了这个可以从 http 代理到 https
      // 依赖 origin 的功能可能需要这个,比如 cookie
      changeOrigin: true,
    },
  },
(二)去掉前端Mock登录配置 位于mock/user.js 注释或者删除掉整块mock接口定义
'POST /api/login/account': async (req, res) => {
  // ...省略内部代码
}
由于我们只是替换了一个登录接口,其他如用户信息等没有实现,依然走的是mock,所以antd这里会坑需要同步注意修改!
GET /api/currentUser 这个Mock方法需要注释或删除掉 if (!getAccess()) { ...省略... }
部分代码,否则会验证鉴权失败,大家可以打开debug对比试试。
(三)修改/account 请求 默认登录接口和后端的统一接口格式不一样,这里需要稍微修改前端对其接口的逻辑判断,登录页面文件位于 src/pages/user/Login/index.jsx
const handleSubmit = async (values) => {
    try {
      // 登录
      const msg = await login({ ...values, type });

+      if (msg.success) {
-      // if (msg.stutus) {
        const defaultLoginSuccessMessage = intl.formatMessage({
          id: 'pages.login.success',
          defaultMessage: '登录成功!',
        });
        message.success(defaultLoginSuccessMessage);
        await fetchUserInfo();
        /** 此方法会跳转到 redirect 参数所在的位置 */

        if (!history) return;
        const { query } = history.location;
        const { redirect } = query;
        history.push(redirect || '/');
        return;
      }

      console.log(msg); // 如果失败去设置用户错误信息

+      setUserLoginState({ status: 'error', type:'account' });
-     // setUserLoginState(msg)
    } catch (error) {
      const defaultLoginFailureMessage = intl.formatMessage({
        id: 'pages.login.failure',
        defaultMessage: '登录失败,请重试!',
      });
      message.error(defaultLoginFailureMessage);
    }
  };
以上如果全部顺利弄完,重新启动前后端服务来联调看下效果吧,如图登录的接口正确请求了真实的接口。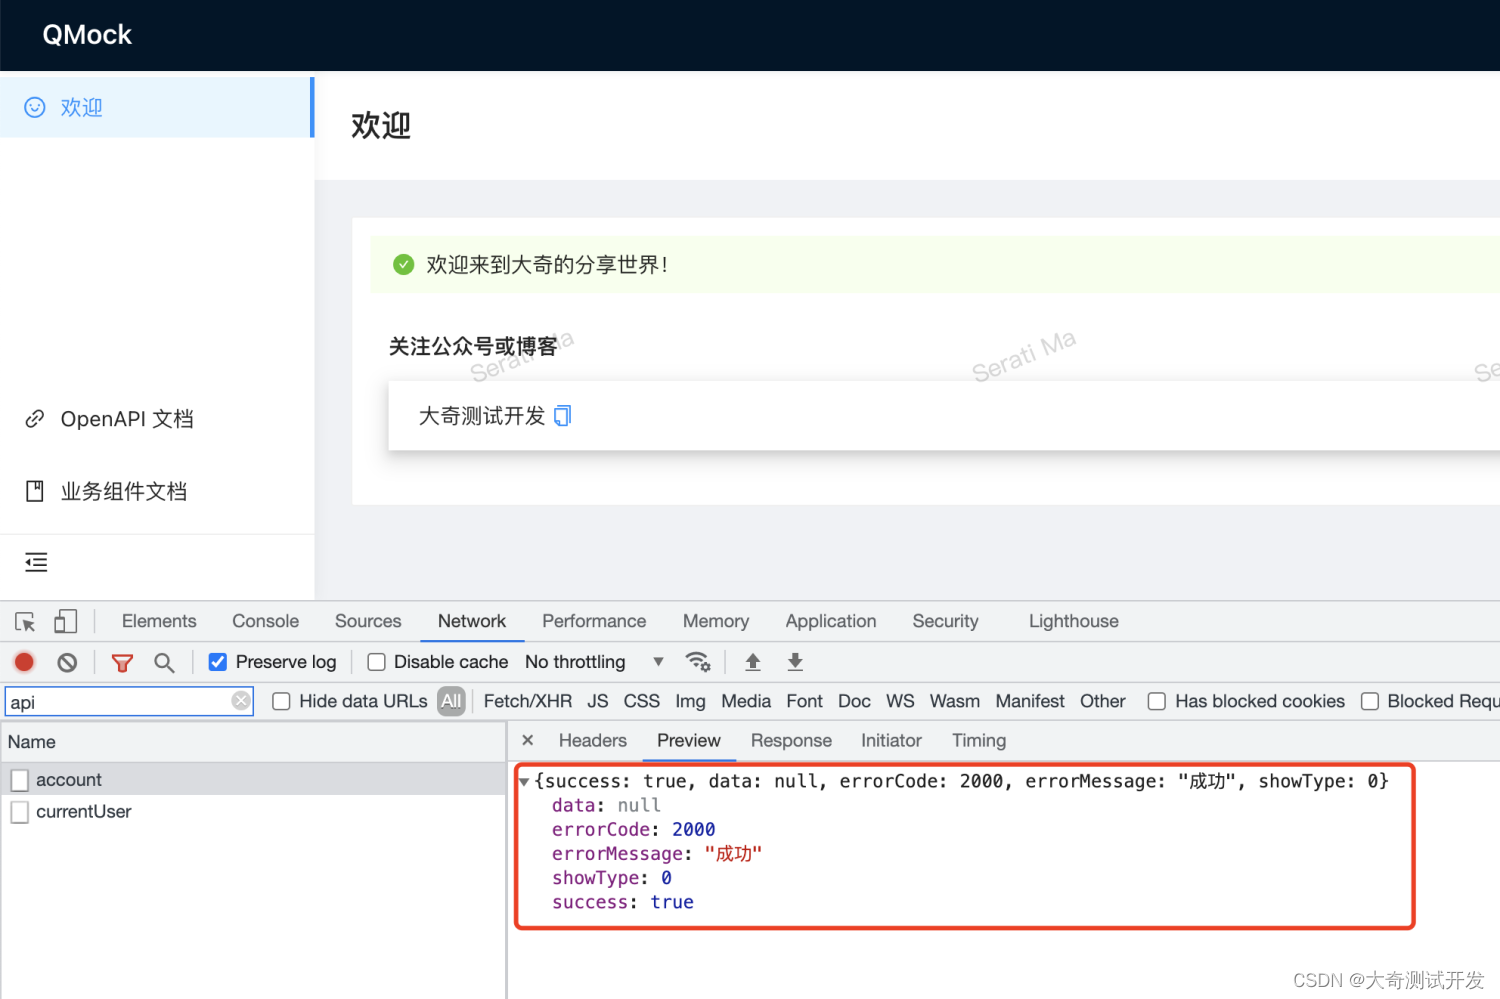
本次分享内容稍微有点多,时间也拖的有点久,主要是一些内容笔者在给大家实战中也有学习成本和各种问题,好在功夫不负有心人,希望通过的我的前期天坑能让大家在学习少一些弯路。
最后笔者在学习Antd中有一点体会是,React确实比Vue入门使用要复杂些,但花了两天时间看了下官方文档后更加觉得React和Antdpro在支持平台全栈开发更能有好多表现。后边也打算随着我自己掌握技能的深入,然后出一个从测试开发角度理解的React基础教程,这样对于用好Antd更事半功倍。
本次代码已同步更新到GitHub上,有需要关注并回复 “mock平台”获取,同时本次内容作为一个模版单独打了temple分支,方便大家参考或直接使用,但后续的功能实现都会正常以master分支提交。
Recommend
About Joyk
Aggregate valuable and interesting links.
Joyk means Joy of geeK