

Building an Enterprise CDC Solution
source link: https://dzone.com/articles/howto_building-an-enterprise-cdc-solution
Go to the source link to view the article. You can view the picture content, updated content and better typesetting reading experience. If the link is broken, please click the button below to view the snapshot at that time.

Introduction
This article is a follow-up to the Data Platform: Building an Enterprise CDC Solution, where Miguel García and I described:
- Several change data capture (CDC) use cases and common scenarios in an enterprise platform
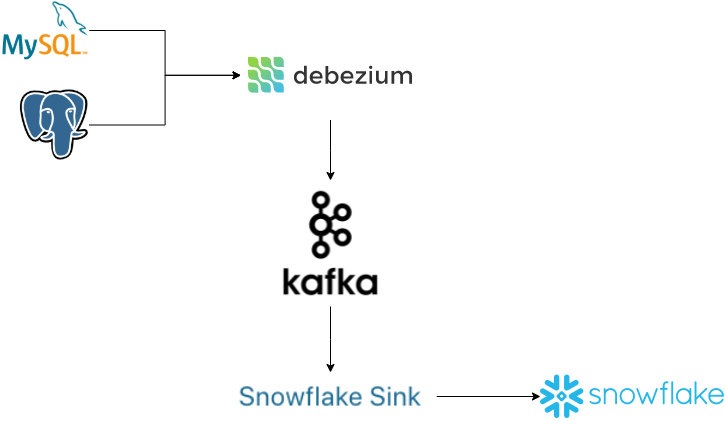
- A proposal using Debezium (as log-based CDC) to capture data from the relational databases, and Kafka as a channel that enables several consumers to propagate data changes for different use cases
One of the common scenarios for this solution consists of data replication from OLTP Database to OLAP Database (from the operational database to the data warehouse).
In this article, I'm going to provide a "how-to" to deploy a sample of a CDC process to replicate data from two different relational databases to Snowflake:
- Manage the data changes in a common format.
- Set up a Debezium in Kafka Connect to get data changes and push into Kafka topics.
- Set up Snowflake Sink in Kafka Connect to get data changes from Kafka topics and push the data to Snowflake.
- Apply a specific replication logic to consolidate the data change events in Snowflake, avoiding the use of the JDBC connector for better cost-effectiveness.
Step-by-Step
The GitHub repository includes a detailed description as well as several scripts that you will need in this "how-to":
git clone https://github.com/dariocazas/howto-debezium-to-snowflake.gitNote: every folder in this repository has a README file with more info about the process.
The steps are:
- Pre-requirements
- Local environment
- Snowflake database
- Snowflake authentication
- How to capture data changes from databases to a Kafka topic
- Start local services
- Prepare the databases
- Start Debezium
- Check data capture
- How to push data changes from a Kafka topic into Snowflake
- Start local sink process
- Check data capture into CDC tables
- Apply replication logic
- Check data replication
1. Prerequisites
1.1. Local environment
- docker-compose and docker engine 1.10.0 or later
- jq as a JSON parser used in scripts
1.2. Snowflake Database
You need a Snowflake Account. To create a trial follow the Snowflake Trial Accounts doc
Access to your Snowflake Account, create a database, and run the next steps in it:
USE ROLE ACCOUNTADMIN;
CREATE DATABASE HOWTO_DB;
Note: in a production environment, it is not recommended to use the role ACCOUNTADMIN for all the tasks like I describe in this howto.
1.3. Snowflake Authentication
In this howto, we use a key-pair authentication. The detailed process is documented here. You can use the key-pair provided by the repository:
- Encrypted private key:
snowflake/keys/snowflake_rsa_key.p8 - Private passphrase to decrypt:
mypassphrase - Public key:
snowflake/keys/snowflake_rsa_key.pub
As the next step, in the Snowflake Worksheet, we need to register the public key (replace in this script the key with your snowflake/keys/snowflake_rsa_key.pub without header and footer)
USE ROLE ACCOUNTADMIN;
ALTER USER dariocazas SET rsa_public_key='MIIBIjANBgkqhkiG9w0BAQEFAAOCAQ8AMIIBCgKCAQEAwBwYbPtbEUXueQ6u3KDw
zlKu4IhAkGdcUBVbdTdUVBLNVsZX+eiKOedN3EnMtDeVzRlaT8JAwHX0LVXkgXtn
KzMBp6TpS4j+2kKvbZc5p0KfZHjn42G+C/DXI4ZNQZEBQ/Q4UY6OkTZepFaOX3ev
2icxB6LnnVYI3WHkSnq3vTthhYhTuUOQ4YRudadOtoT4By09hxbsaanVl42FXIZP
AXX1jwawzKe52V1+FB5/UMv+JMUFfczlO+acn/EaZvKbR55Vk/+OVrUP4KIKvdWn
s/n4ASYqxiw9xjrizGCoUyl+b+Ch6A02fTU02HrT9jOOj+dVAeFD2QGOqaze0eCD
dwIDAQAB';
2. How to Capture Data Changes From Databases to a Kafka Topic
In this step, we start two different database engines and enable a CDC process. As a result, you have two Kafka topics with Debezium events that you can consume.
2.1. Start Local Services
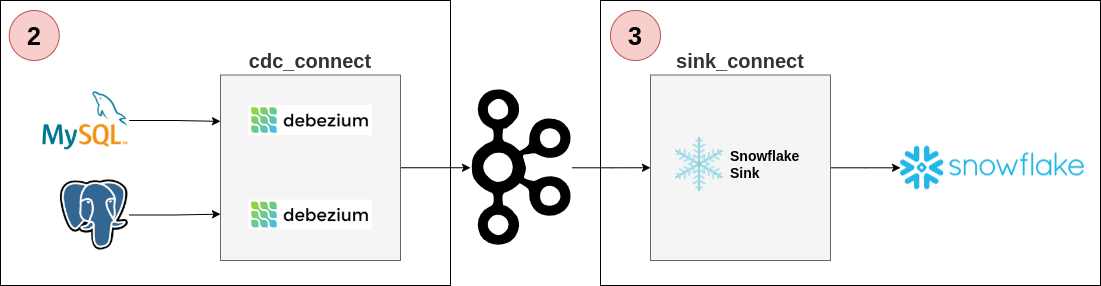
The repository contains a docker-compose to run several services in your local environment:
- Two database engines: MySQL and PostgreSQL
- One Kafka broker (and its zookeeper)
- Two Kafka connect services: one to run CDC Debezium tasks and another to send the events to Snowflake
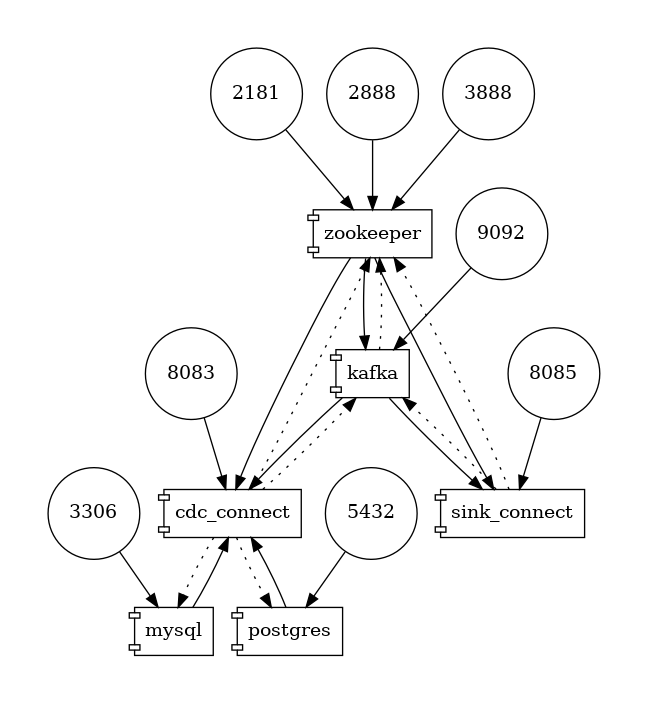
In a terminal run:
cd services
docker-compose up
It can take several minutes to download and start the services. Keep this terminal open to be able to see the log of services. When the tutorial is finished, you can stop all using Ctrl+C.
2.2. Prepare the Databases
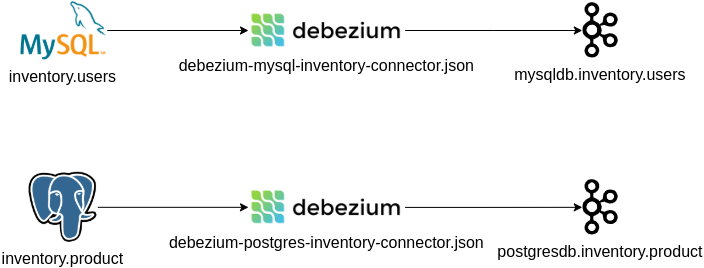
There are two SQL initialization scripts:
database/sql/00_mysql_init.sql: create tableusersdatabase/sql/00_postgres_init.sql: create tableproduct
To apply these SQL scripts it in dockerized services, and populate data, run the following lines in a terminal:
cd database
# create tables
./init_db.sh
# Populate data
./mysql_crud.sh
./postgres_crud.sh
In the output, you can see several CRUD operations in the tables, and the last state after operations. You can close this terminal.
2.3. Start Debezium
The docker service cdc_connect has the necessary dependencies to run Debezium over MySQL and Postgres. The configuration is available in:
debezium/connect/debezium-mysql-inventory-connector.jsondebezium/connect/debezium-postgres-inventory-connector.json
Open a terminal and init the capture of the tables:
cd debezium
./init_cdc.sh
In the docker-compose terminal, you can see how the connectors start. When the log stabilizes, you can check the status of the Debezium connectors in the previous terminal using:
# I assume you are in the debezium folder
./status_cdc.sh
You can close this terminal.
2.4. Check Data Capture
You can test if the capture is working with this strategy:
- Open a terminal with live consumer events
- Do CRUD operations in the database
First for MySQL, open a terminal and run:
cd services
docker-compose exec kafka /kafka/bin/kafka-console-consumer.sh \
--bootstrap-server kafka:9092 --from-beginning \
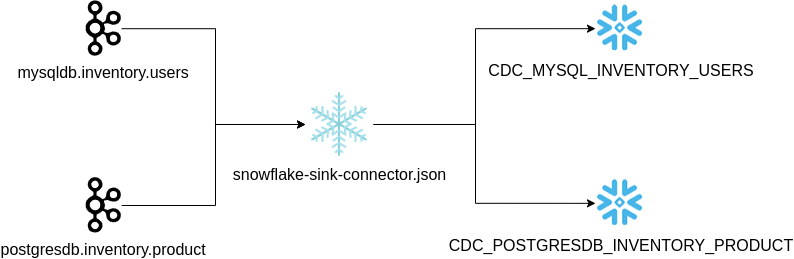
--topic mysqldb.inventory.users \
--property print.key=true --property print.timestamp=trueThe terminal will populate every new event pushed from Debezium to Kafka, sending every insert/update/delete done in inventory.users in MySQL
Open now a terminal in PostgreSQL and do the same:
cd services
docker-compose exec kafka /kafka/bin/kafka-console-consumer.sh \
    --bootstrap-server kafka:9092 --from-beginning \
    --topic postgresdb.inventory.product \
    --property print.key=true --property print.timestamp=true
To generate new events, open a terminal and run:
cd database
./mysql_crud.sh
./postgres_crud.sh
You should see new data change events in the consumer terminals.
3. How to Push Data Changes From a Kafka Topic Into Snowflake
In this step, you send the Kafka events to Snowflake and generate a replica of the source tables.
3.1. Start Local Sink Process
The docker service sink_connect has the necessary dependencies to run the Snowflake Sink connector to push new Kafka events into the Snowflake table. The configuration is available in snowflake/connect/snowflake-sink-connector.json and you need to update:
- The Snowflake URL with yours in field
snowflake.url.name - The authentication fields if you generate your key-pair in the previous step:
snowflake.private.keyandsnowflake.private.key.passphrase
Open a terminal and init the upload of the Kafka topics:
cd snowflake
./init_sink.sh
In the docker-compose terminal, you can see how the connector starts. When the log stabilizes, you can check the status of the Snowflake connector in the previous terminal using:
# From the snowflake folder
./status_sink.sh
3.2. Check Data Capture Into CDC Tables
When the sink connector uploads the events from the Kafka topics, it creates these tables:
CDC_MYSQL_INVENTORY_USERSCDC_POSTGRESDB_INVENTORY_PRODUCT
The upload to Snowflake will be done in batches, so it may take some time until the data is available in Snowflake (in the order of 30-60 seconds).
From your Snowflake Worksheet, validate that your events are populated in the new tables:
USE ROLE ACCOUNTADMIN;
USE SCHEMA HOWTO_DB.PUBLIC;
SELECT * FROM CDC_MYSQL_INVENTORY_USERS;
SELECT * FROM CDC_POSTGRESDB_INVENTORY_PRODUCT;
Adding new changes in your dockerized databases produces new rows in your tables.
- In the Snowflake Worksheet:
SELECT 'Events MySQL', COUNT(1) FROM CDC_MYSQL_INVENTORY_USERS UNION ALL SELECT 'Events PostgreSQL', COUNT(1) FROM CDC_POSTGRESDB_INVENTORY_PRODUCT; - From a terminal, apply changes in your databases:
Shell
cd database ./mysql_crud.sh ./postgres_crud.sh - Wait until the events are sent to Snowflake (you can see the log in docker-compose terminal)
- Repeat the query in the Snowflake Worksheet
3.3. Apply Replication Logic
In the repository there are two scripts with the SQL logic to generate the replica of the source tables:
snowflake/sql/01-cdc-to-replica-mysql.sqlsnowflake/sql/01-cdc-to-replica-postgres.sql
From your Snowflake Worksheet, execute these two scripts. As a result, you have two views with the same structure of the source databases:
MYSQL_INVENTORY_USERSPOSTGRESDB_INVENTORY_PRODUCT
These scripts follow the same logic, creating a scheduled task that processes the new events that arrive and updates the replica table.

Note: one part of these SQL scripts (the MERGE sentence) depends on the source database engine. The Debezium events have the metadata about the source engine and are used to know which is the last event for an entity. Take into account if you replicate this logic in your production systems.
3.4. Check Data Replication
The end-to-end is running now. You can check the data available in your local databases and validate it against the Snowflake view:
- In a terminal, get the actual state of MySQL users table:
Shell
cd services echo "SELECT * FROM users ORDER BY id" | docker-compose \ exec -T mysql \ bash -c 'mysql -u $MYSQL_USER -p$MYSQL_PASSWORD inventory' - Go to the Snowflake Worksheet and validate the result with:
USE ROLE ACCOUNTADMIN; USE SCHEMA HOWTO_DB.PUBLIC; SELECT * FROM MYSQL_INVENTORY_USERS; - In a terminal, get the actual state of the PostgreSQL product table:
Shell
# I assume you are in the services folder echo "SELECT * FROM product ORDER BY id" | docker-compose \ exec -T postgres \ env PGOPTIONS="--search_path=inventory" \ bash -c 'psql -U $POSTGRES_USER postgres' - And validate in the Snowflake Worksheet.
USE ROLE ACCOUNTADMIN; USE SCHEMA HOWTO_DB.PUBLIC; SELECT * FROM POSTGRESDB_INVENTORY_PRODUCT; - Generate new insert-delete-update operations from a terminal:
Shell
cd database ./mysql_crud.sh ./postgres_crud.sh - Wait until the events are sent to Snowflake (review docker-compose terminal log).
- Wait until the scheduled task is triggered in Snowflake:
USE ROLE ACCOUNTADMIN; select name, state, error_code, error_message,scheduled_time, next_scheduled_time from table(HOWTO_DB.information_schema.task_history()) order by scheduled_time desc; - Validate again the content of the tables in Snowflake
Conclusions
Debezium provides an easy way to capture changes from databases and populate change events in a Kafka service, that you can consume in several ways.
To populate these changes to another database you can use the simplest way, but this is not always the best option in the context of the new generation of data warehouses, and probably you need to take into account another kind of strategy close to this service for better performance and reduce the cost of use.
First of all, study the possibilities, and after testing it with a POC similar to this howto, including some aspects like performance and cost review, proceed to do the next steps (security, naming, automatization, data quality, failover, ...).
Recommend
About Joyk
Aggregate valuable and interesting links.
Joyk means Joy of geeK